![]() HT64
HT64
Uporabniški priročnik![]()
![]()

PREVIDNOSTNI IN VARNOSTNI UKREPI
Instrument je bil zasnovan v skladu z direktivo IEC/EN61010-1, ki se nanaša na elektronske merilne instrumente. Zaradi vaše varnosti in da preprečite poškodbe instrumenta, natančno upoštevajte postopke, opisane v tem priročniku, in preberite vse opombe, pred katerimi je simbol ![]() z največjo pozornostjo.
z največjo pozornostjo.
Pred in po izvajanju meritev natančno upoštevajte naslednja navodila:
- Ne izvajajte meritev v vlažnem okolju.
- Ne izvajajte meritev v primeru prisotnosti plina, eksplozivnih snovi ali vnetljivih snovi ali v prašnem okolju.
- Če se meritve ne izvajajo, se izogibajte kakršnemu koli stiku z merjenim vezjem.
- Izogibajte se kakršnemu koli stiku z izpostavljenimi kovinskimi deli, z neuporabljenimi merilnimi sondami, vezji itd.
- Ne izvajajte meritev, če v instrumentu odkrijete nepravilnosti, kot so deformacije, zlomi, puščanje snovi, odsotnost prikaza na zaslonu itd.
- Pri merjenju voltagvišja od 20 V, saj obstaja nevarnost električnega udara.
V tem priročniku in na instrumentu so uporabljeni naslednji simboli:
![]() Opozorilo: upoštevajte navodila v tem priročniku; nepravilna uporaba lahko poškoduje instrument ali njegove komponente.
Opozorilo: upoštevajte navodila v tem priročniku; nepravilna uporaba lahko poškoduje instrument ali njegove komponente.
![]() Števec z dvojno izolacijo
Števec z dvojno izolacijo
![]() AC voltage ali tok
AC voltage ali tok
![]() DC voltage ali tok
DC voltage ali tok
![]() Povezava z zemljo
Povezava z zemljo
1.1. PREDHODNA NAVODILA
- Ta instrument je bil zasnovan za uporabo v okoljih stopnje onesnaženosti 2.
- Uporablja se lahko za VOLTAGMeritve E in TOKA na inštalacijah s CAT IV 600V in CAT III 1000V.
- Priporočamo upoštevanje običajnih varnostnih pravil, določenih s postopki za izvajanje operacij na sistemih pod napetostjo, in uporabo predpisane osebne zaščitne opreme za zaščito uporabnika pred nevarnimi tokovi in instrumenta pred nepravilno uporabo.
- V primeru pomanjkanja indikacije prisotnosti voltage lahko predstavlja nevarnost za operaterja, vedno izvedite meritev kontinuitete, preden izvedete meritev na sistemu pod napetostjo, da potrdite pravilno povezavo in stanje vodnikov.
- Le kabli, ki so priloženi instrumentu, zagotavljajo skladnost z varnostnimi standardi. Biti morajo v dobrem stanju in jih po potrebi zamenjati z enakimi modeli.
- Ne preizkušajte tokokrogov, ki presegajo navedeno volumnotage meje.
- Ne izvajajte nobenega preskusa v okoljskih pogojih, ki presegajo meje, navedene v § 6.2.1.
- Preverite, ali je baterija pravilno vstavljena.
- Prepričajte se, da LCD zaslon in vrtljivo stikalo prikazujeta isto funkcijo.
1.2. MED UPORABO
Pozorno preberite naslednja priporočila in navodila:
![]() POZOR
POZOR
Neupoštevanje opozoril in/ali navodil lahko poškoduje instrument in/ali njegove komponente ali predstavlja vir nevarnosti za upravljavca.
- Preden aktivirate vrtljivo stikalo, odklopite testne kable iz tokokroga, ki ga merite.
- Ko je instrument priključen na tokokrog, ki ga merite, se ne dotikajte neuporabljenih priključkov.
- Ne merite upora v primeru zunanje voltages so prisotni; tudi če je inštrument zaščiten, prekomerna voltage lahko povzroči okvaro.
- Če med merjenjem ostane vrednost ali predznak merjene količine nespremenjen, preverite, ali je omogočena funkcija HOLD.
1.3. PO UPORABI
- When measurement is complete, set the rotary switch to OFF to switch off the instrument.
- Če instrumenta ne boste uporabljali dlje časa, odstranite baterije.
1.4. OPREDELITEV MERITVE (OVERVOLTAGE) KATEGORIJA
Standard »IEC/EN61010-1: Varnostne zahteve za električno opremo za merjenje, krmiljenje in laboratorijsko uporabo, 1. del: Splošne zahteve« določa kategorijo meritev, običajno imenovano prenapetosttage category, is. § 6.7.4: Measured circuits, reads: (OMISSIS)
Tokokrogi so razdeljeni v naslednje merilne kategorije:
- Merilna kategorija IV je za meritve, ki se izvajajo na izvoru nizke voltage namestitev. nprampso števci električne energije in meritve na primarnih pretokovnih zaščitnih napravah in regulacijskih enotah valovanja.
- Kategorija merjenja III je za meritve, ki se izvajajo na inštalacijah znotraj zgradb. nprampso meritve na razdelilnih ploščah, odklopnikih, ožičenju, vključno s kabli, zbiralkami, razvodnimi omaricami, stikali, vtičnicami v fiksni inštalaciji ter opremi za industrijsko uporabo in nekateri drugi opremi, npr.ample, stacionarni motorji s stalnim priključkom na fiksno inštalacijo.
- Merilna kategorija II je za meritve, ki se izvajajo na tokokrogih, ki so neposredno priključeni na nizkovoltage namestitev. nprampso meritve na gospodinjskih aparatih, prenosnih orodjih in podobni opremi.
- Merilna kategorija I je za meritve, ki se izvajajo na tokokrogih, ki niso neposredno priključeni na OMREŽJE. nprampso meritve na tokokrogih, ki ne izhajajo iz OMREŽJA, in posebej zaščitenih (notranjih) tokokrogih, ki izhajajo iz OMREŽJA. V slednjem primeru so prehodne napetosti spremenljive; iz tega razloga standard zahteva, da je zmožnost vzdržljivosti opreme ob prehodnih pojavih seznanjena z uporabnikom.
SPLOŠNI OPIS
Instrument izvaja naslednje meritve:
- DC/AC/AC+DC TRMS Voltage
- DC/AC voltage z nizko impedanco (LoZ)
- DC/AC/AC+DC TRMS Current
- DC/AC/AC+DC TRMS Current with transducer clamps
- AC, AC+DC TRMS current
- Zaslon 4-20mA%.
- Preizkus odpornosti in kontinuitete
- Test diod
- Zmogljivost
- Pogostost
- Delovni cikel
- Temperatura s sondo tipa K
- Data Logger function and display of graphs of measured data
Vsako od teh funkcij lahko izberete z ustreznim stikalom. Instrument je opremljen tudi s funkcijskimi tipkami (glejte § 4.2), analognim črtnim grafikonom in LCD TFT barvnim zaslonom z visokim kontrastom. Instrument je opremljen tudi s funkcijo Auto Power OFF, ki samodejno izklopi instrument po določenem (programabilnem) času mirovanja.
2.1. MERITVE POVPREČNIH VREDNOSTI IN TRMS VREDNOSTI
Merilne instrumente izmeničnih veličin delimo v dve veliki družini:
- Merilniki AVERAGE-VALUE: instrumenti, ki merijo vrednost edinega vala pri osnovni frekvenci (50 ali 60 Hz).
- TRMS (True Root Mean Square) Merilniki VALUE: instrumenti, ki merijo TRMS vrednost preskušane količine.
Obe družini instrumentov s popolnoma sinusoidnim valovanjem zagotavljata enake rezultate.
Pri popačenih valovih se namesto tega odčitki razlikujejo. Merilniki povprečne vrednosti zagotavljajo RMS vrednost edinega osnovnega vala; Namesto tega merilniki TRSM zagotavljajo RMS vrednost celotnega vala, vključno s harmoniki (znotraj pasovne širine instrumentov). Zato so z merjenjem iste količine z instrumenti iz obeh družin dobljene vrednosti enake le, če je val popolnoma sinusoiden. V primeru popačenja morajo merilniki TRMS zagotavljati višje vrednosti od vrednosti, ki jih odčitajo merilniki povprečnih vrednosti.
2.2. DEFINICIJA PRAVE SREDNJE KVADRATNE VREDNOSTI IN KREST FAKTORJA
Srednja kvadratna vrednost toka je definirana takole: »V času, ki je enak periodi, izmenični tok s korensko kvadratno vrednostjo jakosti 1 A, ki kroži po uporu, razprši enako energijo, ki v istem času bi se razpršil z enosmernim tokom z jakostjo 1A”. Rezultat te definicije je številski izraz:
![]() Srednja kvadratna vrednost je označena s kratico RMS.
Srednja kvadratna vrednost je označena s kratico RMS.
Crest Factor je opredeljen kot razmerje med najvišjo vrednostjo signala in njegovim
RMS vrednost: CF![]() Ta vrednost se spreminja z valovno obliko signala, pri povsem sinusoidnem valu je
Ta vrednost se spreminja z valovno obliko signala, pri povsem sinusoidnem valu je ![]() V primeru popačenja ima Crest Factor višje vrednosti, ko se popačenje valov povečuje.
V primeru popačenja ima Crest Factor višje vrednosti, ko se popačenje valov povečuje.
PRIPRAVA NA UPORABO
3.1. ZAČETNI PREGLEDI
Pred pošiljanjem je bil instrument preverjen z električnega in mehanskega vidika view. Izvedeni so bili vsi možni varnostni ukrepi, da je instrument dobavljen nepoškodovan. Vendar pa priporočamo, da instrument na splošno preverite, da odkrijete morebitne poškodbe med transportom. V primeru odkritja nepravilnosti nemudoma kontaktirajte špediterja. Priporočamo tudi, da preverite, ali embalaža vsebuje vse komponente, navedene v § 6.3.1. V primeru neskladja se obrnite na trgovca. V primeru, da je treba instrument vrniti, upoštevajte navodila v § 7.
3.2. NAPAJANJE INSTRUMENTA
The instrument is powered by 1×7.4V rechargeable Li-ION battery included in the package. When the battery is flat, the symbol “![]() ” appears on the display. For battery recharge, please refer to § 6.1.
” appears on the display. For battery recharge, please refer to § 6.1.
3.3. SHRANJEVANJE
Da bi zagotovili natančno merjenje, po dolgem času shranjevanja počakajte, da se instrument vrne v normalno stanje (glejte § 7.1.3).
NOMENKLATURA
4.1. OPIS INSTRUMENTA

NAPIS:
- LCD zaslon
- Funkcijska tipka F2
- Funkcijska tipka F3
- Funkcijska tipka F1
- Funkcijska tipka F4
- Tipka RANGE
- HOLD/REL key
- Vrtljivo izbirno stikalo
- Vhodna sponka 10A
- Vhodni terminal

- Input terminal mAuA
- Vhodna sponka COM
4.2. OPIS FUNKCIJSKIH TIPK
4.2.1. HOLD/REL key
Pressing the HOLD/REL key freezes the value of the measured quantity on the display. After pressing this key, the message “Hold” appears on the display. Press the HOLD/REL key again to exit the function. To save the vale on the display, see § 4.3.3. Press and hold the HOLD/REL key for a long time in order to activate/deactivate relative measurement. The instrument zeroes the display and saves the displayed value as a reference value which subsequent measurements will be referred to (see § 4.3.4). The symbol “A” appears on the display. This function is not active in position![]() . Press and hold the HOLD/REL key again to exit the function.
. Press and hold the HOLD/REL key again to exit the function.
4.2.2. Tipka RANGE
Press the RANGE key to activate the manual mode and to disable the Autorange function. The message “Manual” appears on the upper left part of the display instead of “AUTO”. In manual mode, press the RANGE key to change measuring range: the relevant decimal point will change its position. The RANGE key is not active in positions![]() Hz%,
Hz%, ![]() . In Autorange mode, the instrument selects the most appropriate ratio for carrying out measurement. If a reading is higher than the maximum measurable value, the indication “O.L” appears on the display. Press and hold the RANGE key for more than 1 second to exit the manual mode and restore the Autorange mode.
. In Autorange mode, the instrument selects the most appropriate ratio for carrying out measurement. If a reading is higher than the maximum measurable value, the indication “O.L” appears on the display. Press and hold the RANGE key for more than 1 second to exit the manual mode and restore the Autorange mode.
4.2.3. Function keys F1, F2, F3, F4
Use keys F1, F2, F3 and F4 to manage the instrument’s internal functions (see § 4.3).
4.2.4. Funkcija LoZ
Ta način omogoča izvajanje AC/DC voltage meritev z nizko vhodno impedanco, da se izognete napačnim odčitkom zaradi napačne voltage v kapacitivno sklopljeni.
![]() POZOR
POZOR
Če instrument vstavite med fazni in ozemljitveni vodnik, se lahko zaščitne naprave RCD med preskusom sprožijo. Za fazo PE voltage measurement after a RCD device preliminarily connect the test leads between phase and neutral cables at least for 5s, then perform the phase-PE measurement to avoid unexpected trips-out
4.2.5. LEAD message at display
From instrument switch off (OFF), in the ![]() positions a short sound is emitted and a “LEAD” message is shown for a while to indicate an advise of using test leads for the current measurements.
positions a short sound is emitted and a “LEAD” message is shown for a while to indicate an advise of using test leads for the current measurements.
4.3. DESCRIPTION OF INTERNAL FUNCTIONS
4.3.1. Description of the display
 NAPIS:
- Prikaz samodejnega/ročnega načina
- Prikaz sistemskega časa
- Indication of battery charge level and activation/deactivation of key tone (not associated with continuity test)
- Navedba merske enote
- Prikaz merilnega rezultata
- Analogni črtni grafikon
- Indications associated with function keys F1, F2, F3, F4
4.3.2. Glasnost AC+DCtage in Merjenje toka
Instrument je sposoben izmeriti morebitno prisotnost prekrivajočih se izmenjujočih se komponent na generičnem voltage ali trenutna enosmerna valovna oblika. To je lahko uporabno pri merjenju tipičnih impulzivnih signalov nelinearnih bremen (npr. varilni stroji, električne pečice itd.).
- Izberite položaj
 .
. - Press the F2 key selecting the “
 “ ” ali “ ” načini (glej sliko 3)
 - Follow the instructions shown in § 5.1 or § 5.9
 4.3.3. HOLD function and saving

- Press the HOLD/REL key again to freeze the result. The message “Hold” appears onthe display.
- Press the F3 key to save the data in the instrument’s memory.
- Enter the General menu to display the saved result (see § 4.3.7)
4.3.4 Relativne meritve

- Press and hold the HOLD/REL key to enter relative measurement (see Fig. 5 – right side). The message “REL” and symbol “
 ” se prikažejo na zaslonu.
 - Press the F4 key to enter the General menu, save the measured result and display it (see § 4.3.7).
4.3.5. Shranjevanje vrednosti MIN/MAX/AVERAGE in PEAK 
- Press the F4 key to enter the measuring mode of MAX, MIN and Average values of the quantity to be measured (see Fig. 6 – central part). The message “MAX MIN” appears on the display.
- The values are automatically updated by the instrument, which emits a short beep whenever the actually displayed values are exceeded (higher for MAX value, lower for MIN value).
- Press the F2 key to stop detecting the values and the F1 key to start measuring again.
- Press the F3 key to save the measured result (see Fig. 6 – right side) and display it (see § 4.3.7).

- Press the F4 key to enter the measuring mode of Peak values of the quantity to be measured (see Fig. 7 – right side). The message “PEAK” appears on the display and the values are updated in the same way as for the MAX/MIN function.
- Press the F2 key to stop detecting the values and the F1 key to start measuring again.
- Press the F3 key to save the result and display it (see § 4.3.7).
4.3.6. Ustvarjanje in shranjevanje grafov meritev

- Press the F1 key to enter the section for creating a graph of the quantity to be measured (see Fig. 8 – left side).
- Press the F2 (Fast) or F3 (Slow) key to set the sampling interval the instrument will use as a reference when creating the graph. You can choose among the following values: 0.2s, 0.5s, 1.0s, 2.0s, 5.0s, 10s
- Press the F1 key to start creating the graph. The measuring range (automatically inserted by the instrument) and the real-time value are displayed by the instrument (see Fig. 8 – central part).
- Press the F4 key to end the graph.
- Press the F1 key to save the graph in the instrument’s memory or the F4 key to start a new graph (see Fig. 8 – right side).
4.3.7. Instrument general menu
- With a measurement on the display (see Fig. 9 – left side), press function key F3 to enter the instrument’s general menu. The screen (see Fig. 9 – right side) is shown on the display.
 Shranjevanje meritev
 - Press the F1 (ENTER) key to save the measurement.
Recording data (Logger) - Use the F2 or F3 key to select symbol “Record” and press the F1 key (see Fig. 10 – left side).

- Use the F2 or F3 key to select:
➢ Setting of recording duration, from 1min to 23h:59min
➢ Setting of sampling interval from 1s to 59min:59s - Press the F1 key to enable the editing functions and the F2 (+) and F3 (>>) keys to carry out the desired settings.
- Press the F1 (OK) key to confirm the settings or the F4 (CANCEL) key to go back to editing (see Fig. 10 – right side).
- Press the key F4 (CLOSE) to go back to the main screen
- Select the option “Start Recording” and press the F1 key. The following screen appears on the display

- The instrument shows the remaining time and the number of samples taken in real time, and the message “Stopped” at the end of recording (see Fig. 11 – left side). Press the F4 (STOP) key to stop recording at any time.
- Press the F2 key to save recorded data in the internal memory and view it again on the display
- Press the F3 (TREND) key to display the trend of recording (see Fig. 11 – central part).
- Press the F4 (>>) key to move the cursor on the graph and the F2 (+) key to activate the Zoom function of the graph, increasing resolution (symbol “Xy” where y=max zoom dimension appears at the top of the display on the right side) (see Fig. 11 – right side). You can zoom X1 for at least 15 measuring points, X2 for at least 30 measuring points, X3 for at least 60 measuring points and so on for maximum 6 zooming operations.
- Press the F4 (BACK) key to go back to the previous screen. Deleting the instrument’s memory
- Use the F2 or F3 key to select symbol “Delete” and press the F1 key (see Fig. 12 – left side).
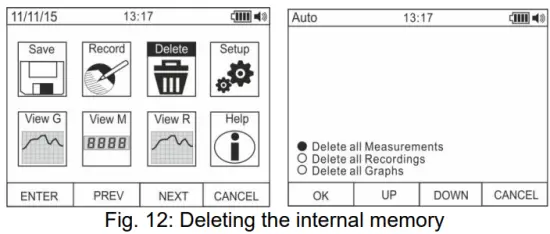
- Use the F2 or F3 key to select the options:
➢ Delete all Measurements → all snapshots (measurements) are deleted
➢ Delete all Recordings → all recordings are deleted
➢ Delete all Graphs → all graphs are deleted. - Press the F1 (OK) key to carry out the selected operation (a confirmation message is shown by the instrument). General settings of the instrument
- Use the F2 or F3 key to select symbol “Setup” and press the F1 key (see Fig. 13 – left side).

- Use the F2 or F3 key to select the options:
➢ Reset → restores the instrument’s default conditions.
➢ Format → allows activating the key tone, setting the format of date/time and of the displayed numbers (decimal comma or point).
➢ General → allows setting the system’s date/time, defining the Auto Power OFF interval, the background colour and the display’s font colour and type, and choosing the system’s language.
➢ Meter Info → provides information on the internal Firmware version and on the memory’s available space. - Press the F1 (ENTER) key to carry out the selected operation or the F4 (CANCEL) key to go back to the measuring screen. General settings of the instrument – Reset

- Press the F1 (OK) key to activate the Reset.
- The Reset operation do not deletes the instrument’s internal memory
General settings of the instrument – Format
- Use the F2 or F3 key to select the options:➢ Key tone → allows activating/deactivating the tone of the function keys.
➢ Numeric Format → allows defining the format of the numbers shown on the display among the options: 0.000 (decimal point) and 0,000 (comma)
➢ Date Format → allows defining the format of the system date between the options: MM/DD/YY and DD/MM/YY
➢ Time Format → allows defining the format of the system time between the options: - OURS and 24 HOURS
- Use the F1 (EDIT) key and the F2 and F3 keys for settings or the F4 key to go back to the previous screen. General settings of the instrument – Display

- Use the F2 or F3 key to select the options:
➢ Set Date → allows setting the system’s date as defined in the Format menu.
➢ Set Time → allows setting the system’s time as defined in the Format menu.
➢ Auto Power OFF → allows defining the instrument’s auto power off interval when idling in the range: 5min 60min with resolution 1min. Set value 00 to disable the function. Press the F3 key to switch on the instrument again after it has automatically switched off.
➢ Foreground → allows defining the display’s background colour and the colour of the font.
➢ Select Font → allows defining the type of font or the display among the available options (0, 1, 2).
➢ Language → allows selecting the system’s language among the options: Italian, English, Spanish, German and French
General settings of the instrument – Instrument Info
- The instrument shows the following information:
➢ Firmware version → internal Firmware version
➢ Free memory → percentagvrednosti preostalega prostega prostora v pomnilniku za shranjevanje posnetkov (SAVE), posnetkov (REC) in grafov (GRAPH). - Press the F4 key to go back to the previous screen Recalling graphs to the display

- Use the F2 or F3 key to select symbol “View G” and press the F1 key (see Fig. 18 – left side).
- Use the F2 (PREV) or F3 (NEXT) keys to select the desired graph among the ones saved in the instrument’s memory and press key F1 (ENTER) to open the graph (see Fig. 18 – central part).
- Use the F2 (<<) or F3 (>>) keys to move the cursor within the graph in the two directions, observing the corresponding value at the bottom of the display (see Fig. 18 – right side).
- Press the F1 (DELETE) key to delete the selected graph or the F4 (BACK) key to go back to the previous screen. Recalling measured data (snapshots) on the display

- Use the F2 or F3 key to select symbol “View M” and press the F1 key (see Fig. 19 – left side).
- Use the F2 (PREV) or F3 (NEXT) key to select and view the desired measure among the ones saved in the instrument’s memory (see Fig. 19 – right side). The measure reference appears at the bottom of the display on the right side.
- Press the F1 (DELETE) key to delete the selected measure or the F4 (CLOSE) key to go back to main screen Recalling recordings to the display

- Use the F2 or F3 key to select symbol “View R” and press the F1 key (see Fig. 20 – left side).
- Use the F2 (PREV) or F3 (NEXT) key to select the desired recording among the ones saved in the instrument’s memory (see Fig. 20 – central part). The recording reference appears at the bottom of the display.
- Press the F1 (TREND) key to display the trend of recording.
- Press the F3 (>>) key to move the cursor on the graph and observe the corresponding value at the bottom of the display.
- Press the F2 (+) key to activate (if available) the zooming function of the graph.
- Press the F1 (DELETE) key to delete the selected recording or the F4 (BACK) key to go back to the previous screen.
Spletna pomoč na zaslonu
- Use the F2 or F3 key to select symbol “Help” and press the F1 key (see Fig. 21).
- Use the F2 (UP) or F3 (DOWN) to browse the pages of the context on-line help.
- Press the F4 (CLOSE) key to go back to the main screen
NAVODILA ZA UPORABO
5.1. Glasnost enosmernega, izmeničnega in enosmernega tokaTAGE MERITEV
![]() POZOR
POZOR
Največji vhod DC voltage je 1000V. Ne merite voltagpresega omejitve, navedene v tem priročniku. Preseganje voltagOmejitve lahko povzročijo električni udar uporabnika in poškodbo instrumenta.

- Izberite položaje V Hz% or mV
- Rdeči kabel vstavite v vhodni terminal in črni kabel v vhodni terminal COM.
- Postavite rdeči in črni vodnik na mesta s pozitivnim in negativnim potencialom vezja, ki ga želite meriti (glejte sliko 22). Na zaslonu se prikaže vrednost voltage.
- Če se na zaslonu prikaže sporočilo "OL", izberite višji obseg.
- Ko se na zaslonu instrumenta pojavi simbol “-”, to pomeni, da je voltage ima nasprotno smer glede na povezavo na sliki 22.
- To use the HOLD, RANGE and REL function, see § 4.2.
- For AC+DC measurement, see § 4.3.2 and to use the internal functions, see § 4.3.
5.2. AC VOLTAGE MERITEV
![]() POZOR
POZOR
Največja vhodna AC voltage je 1000V. Ne merite voltagpresega omejitve, navedene v tem priročniku. Preseganje voltagOmejitve lahko povzročijo električni udar uporabnika in poškodbo instrumenta.

- Izberite položaje V Hz% or mV
- In position mV, press the F2 (MODE) key to view symbol “~” on the display.
- Rdeči kabel vstavite v vhodni terminal
 in črni kabel v vhodni terminal COM.
 - Rdeči vodnik oziroma črni vodnik namestite na točke tokokroga, ki ga želite meriti (glejte sliko 23). Na zaslonu se prikaže vrednost voltage.
- Če se na zaslonu prikaže sporočilo "OL", izberite višji obseg.
- Press the F2 (MODE) key to select measurements “Hz” or “%” in order to display the values of frequency and duty cycle of input voltage. Press the F1(TRIG) key to select the positive or negative half-wave of the function “%”The bargraph is not active in these functions.
- To use the HOLD, RANGE and REL function, see § 4.2.
- To use the internal functions, see § 4.3
5.3. AC/DC VOLTAGE MERITEV Z NIZKO IMPEDANCO (LOZ)
![]() POZOR
POZOR
Največja vhodna AC/DC voltage je 600V. Ne merite voltagpresega omejitve, navedene v tem priročniku. Preseganje voltagOmejitve lahko povzročijo električni udar uporabnika in poškodbo instrumenta.

- Izberite položaj LoZV
 . The “LoZ” and “DC” symbols are shown
 - Press the MODE (F2) key to select possibly the “AC” measurement
- Rdeči kabel vstavite v vhodni terminal in črni kabel v vhodni terminal COM
- Postavite rdeči in črni vodnik na želena mesta vezja, ki ga želite meriti (glejte sliko 24) ali na mesta s pozitivnim in negativnim potencialom vezja, ki ga želite meriti (glejte sliko 22). Na zaslonu se prikaže vrednost voltage.
- Sporočilo “OL” označuje, da je vrednost DC voltage presega največjo merljivo vrednost.
- Ko se na zaslonu instrumenta pojavi simbol “-”, to pomeni, da je voltage ima nasprotno smer glede na povezavo na sliki 22
- To use the HOLD, RANGE and REL function, see § 4.2
- To use the internal functions, see § 4.3
5.4. MERITEV FREKVENCE IN DELOVNEGA CIKLA
![]() POZOR
POZOR
Največja vhodna AC voltage je 1000V. Ne merite voltagpresega omejitve, navedene v tem priročniku. Preseganje voltagOmejitve lahko povzročijo električni udar uporabnika in poškodbo instrumenta.

1. Izberite položaj Hz%.
2. Press the F2 (MODE) key to select measurements “Hz” or “%” in order to display the values of frequency and duty cycle of input voltage.
3. Insert the red cable into input terminal![]() in črni kabel v vhodni terminal COM.
in črni kabel v vhodni terminal COM.
4. Position the red lead and the black lead respectively in the spots of the circuit to be measured (see Fig. 25). The value of frequency (Hz) or of duty cycle (%) is shown on the display. The bargraph is not active in these functions.
5. Za uporabo funkcij HOLD in REL glejte § 4.2.
6. Za uporabo notranjih funkcij glejte § 4.3
5.5. MERITEV UPORNOSTI IN PRESKUS KONTINUITETA
![]() POZOR
POZOR
Pred poskusom kakršnega koli merjenja upora prekinite napajanje iz tokokroga, ki ga želite meriti, in se prepričajte, da so vsi kondenzatorji izpraznjeni, če so prisotni.

- Izberite položaj

- Rdeči kabel vstavite v vhodni terminal in črni kabel v vhodni terminal COM.
- Postavite preskusne kable na želena mesta vezja, ki ga želite meriti (glejte sliko 26). Na zaslonu je prikazana vrednost upora.
- Če se na zaslonu prikaže sporočilo "OL", izberite višji obseg.
- Press the F2 (MODO) key to select measurement )))” relevant to the continuity test, and position the test leads in the desired spots of the circuit to be measured.
- The value of resistance (which is only indicative) is displayed in 2 and the instrument sounds if the value of resistance is <50Ω
- To use the HOLD, RANGE and REL function, see § 4.2.
- To use the internal functions, see § 4.3.
5.6. TEST DIODE
![]() POZOR
POZOR
Pred poskusom kakršnega koli merjenja upora prekinite napajanje iz tokokroga, ki ga želite meriti, in se prepričajte, da so vsi kondenzatorji izpraznjeni, če so prisotni.

- Izberite položaj
- Press the F2 (MODE) key to select “+” measurement.
- Rdeči kabel vstavite v vhodni terminal in črni kabel v vhodni terminal COM.
- Postavite kable na konce diode, ki jo želite testirati (glejte sliko 27), pri čemer upoštevajte prikazano polarnost. Vrednost neposredno polariziranega praga voltage se prikaže na zaslonu.
- If threshold value is equal to OmV, the P-N junction of the diode is short-circuited.
- Če se na zaslonu prikaže sporočilo "OL", so sponke diode obrnjene glede na indikacijo na sliki 27 ali pa je PN spoj diode poškodovan.
- To use the HOLD and REL function, see § 4.2.
- To use the internal functions, see § 4.3.
5.7. MERITEV KAPACIVNOSTI
![]() POZOR
POZOR
Preden izvedete meritve kapacitivnosti na vezjih ali kondenzatorjih, prekinite napajanje vezja, ki ga testirate, in pustite, da se vsa kapacitivnost v njem izprazni. Pri priključitvi multimetra in kapacitivnosti, ki jo želite izmeriti, upoštevajte pravilno polarnost (če je potrebno).

- Izberite položaj
- Press the F2 (MODE) key until the symbol “nF” is displayed.
- Rdeči kabel vstavite v vhodni terminal in črni kabel v vhodni terminal COM.
- Press the REL/A key before carrying out measurements.
- Position the leads at the ends of the capacitor to be tested, respecting, if necessary, the positive (red cable) and negative (black cable) polarity (see Fig. 28). The display shows the value. Depending on the capacitance, the instrument can take about 20s before displaying the correct final value. The bargraph is not active in this function.
- Sporočilo “OL” označuje, da vrednost kapacitivnosti presega največjo merljivo vrednost.
- To use the HOLD and REL function, see § 4.2.
- To use the internal functions, see § 4.3.
5.8. MERITEV TEMPERATURE S SONDO TIPA K
![]() POZOR
POZOR
Pred poskusom kakršnega koli merjenja temperature prekinite napajanje iz tokokroga, ki ga želite meriti, in se prepričajte, da so vsi kondenzatorji izpraznjeni, če so prisotni.

- Izberite položaj

- Press the F2 (MODE) key until the symbol “°C” or “F” is displayed.
- Priložen adapter vstavite v vhodne priključke (polarnost +) in COM (polarnost -) (glejte sliko 29)
- Connect the provided K-type wire probe or the optional K-type thermocouple (see § 7.2.2) to the instrument by means of the adapter, respecting the positive and negative polarity on it. The display shows the value of temperature. The bargraph is not active in this function.
- Sporočilo “OL” označuje, da vrednost temperature presega najvišjo merljivo vrednost.
- To use the HOLD and REL function, see § 4.2.
- To use the internal functions, see § 4.3.
5.9. DC, AC+DC CURRENT MEASUREMENT AND E 4-20MA% READING
![]() POZOR
POZOR
Maximum input DC current is 10A (input 10A) or 600mA (input mAuA). Do not measure currents exceeding the limits given in this manual. Exceeding voltagOmejitve lahko povzročijo električni udar uporabnika in poškodbo instrumenta.

- Prekinite napajanje iz tokokroga, ki ga želite meriti.
- Select position µA, mA or 10A 20mA for 4-20mA
 reading. to measure DC current or the same position 4-
 - Insert the red cable into input terminal 10A or into input terminal mAµA and the black cable into input terminal COM.
- Povežite rdeči vodnik in črni kabel zaporedno na vezje, katerega tok želite izmeriti, pri čemer upoštevajte polarnost in smer toka (glejte sliko 30).
- Napajajte vezje, ki ga želite meriti.
- Na zaslonu se prikaže vrednost enosmernega toka (glej sliko 30 – leva stran).
- The value of reading 4-20mA% (0mA = -25%, 4mA = 0%, 20mA = 100% and 24mA = 125%) (see Fig. 30 right side) appears on the display. The bargraph is not active in this function.
- Če se na zaslonu prikaže sporočilo "OL", je bila dosežena največja merljiva vrednost.
- Ko se na zaslonu instrumenta pojavi simbol “-”, to pomeni, da ima tok nasprotno smer glede na povezavo na sliki 30.
- To use the HOLD, RANGE and REL functions, see § 4.2.
- For AC+DC measurement, see § 4.3.2 and to use the internal functions, see § 4.3
5.10. MERITEV IZMENIČNEGA TOKA
![]() POZOR
POZOR
Maximum input AC current is 10A (input 10A) or 600mA (input mAuA). Do not measure currents exceeding the limits given in this manual. Exceeding voltagOmejitve lahko povzročijo električni udar uporabnika in poškodbo instrumenta.

- Prekinite napajanje iz tokokroga, ki ga želite meriti.
- Select positions μΑ, mA or 10A
- Press the F2 (MODE) key to select “AC” measurement.
- Insert the red cable into input terminal 10A or into input terminal mAµA and the black cable into input terminal COM.
- Connect the red lead and the black lead in series to the circuit whose current you want to measure (see Fig. 31).
- Napajajte vezje, ki ga želite meriti. Na zaslonu je prikazana vrednost toka.
- Če se na zaslonu prikaže sporočilo "OL", je bila dosežena največja merljiva vrednost.
- To use the HOLD, RANGE and REL functions, see § 4.2.
- To use the internal functions, see § 4.3
5.11. MERJENJE ENOSMERNEGA, IZMENIČNEGA, IZMENIČNEGA + ENOSMERNEGA TOKA S PRETVORNIKOM CLAMPS
![]() POZOR
POZOR
- Največja meritev toka pri tej funkciji je 3000 A AC ali 1000 A DC. Ne merite tokov, ki presegajo meje, navedene v tem priročniku
- Instrument izvaja meritev z uporabo obeh upogljivih pretvornikov klamp (dodatna oprema F3000U) in drugi standardni klamp pretvorniki družine HT. Za pretvornik clampPri izhodnem konektorju HT je za izvedbo povezave potreben opcijski adapter NOCANBA.

- Izberite položaj

- Press F2(MODE) key to select “AC”, “DC” or “AC+DC” measurement
- Pritisnite tipko RANGE, da na instrumentu izberete enako območje, ki je nastavljeno na pretvorniku klamp among the options: 1000mA, 10A, 30A, 40A (only for HT4006) 100A, 300A, 400A (only for HT4006), 1000A, 3000A. The selected range appear in the top left part of the display
- Rdeči kabel vstavite v vhodni terminal and the black cable into input terminal COM. For other standard transducers (see §) with HT connector use the NOCANBA optional accessory. For information about the use of transducer clamps glejte ustrezni uporabniški priročnik
- Vstavite kabel v čeljust (glejte sliko 32). Na zaslonu se prikaže vrednost toka
- Če se na zaslonu prikaže sporočilo "OL", je bila dosežena največja merljiva vrednost
- Za uporabo funkcij HOLD, RANGE in REL glejte § 4.2
- To use the internal functions, see § 4.3
VZDRŽEVANJE
![]() POZOR
POZOR
- Vzdrževalna dela naj izvajajo samo strokovnjaki in usposobljeni tehniki. Pred izvajanjem vzdrževalnih del odklopite vse kable iz vhodnih sponk.
- Instrumenta ne uporabljajte v okoljih z visoko vlažnostjo ali visokimi temperaturami. Ne izpostavljajte neposredni sončni svetlobi.
- Po uporabi vedno izklopite instrument. Če instrumenta ne boste uporabljali dlje časa, odstranite baterijo, da preprečite puščanje tekočine, ki bi lahko poškodovalo notranje tokokroge instrumenta.
6.1. RECHARGING THE INTERNAL BATTERY
Ko se na LCD-prikazovalniku prikaže simbol " ![]() ”, it is necessary to recharge the internal battery.
”, it is necessary to recharge the internal battery.

- Postavite vrtljivo stikalo na OFF in odstranite kable iz vhodnih sponk.
- Insert the adaptor of the battery charger power supply into the instrument, into the four input terminals (see Fig. 33).
- Insert the connector of the power supply into the adapter and connect the power supply to the electric mains.
- A blinking symbol of a green battery appears on the display. The recharging process is complete when the symbol is steady.
- Disconnect the battery charger from the instrument when the operation is complete.
 POZOR
POZOR
Če se postopek polnjenja ne začne, preverite celovitost zaščitne varovalke F800mA/1000V (glejte § 7.1.2) in jo po potrebi zamenjajte (glejte § 6.2).
6.2. ZAMENJAVA NOTRANJIH VAROVALK

- Postavite vrtljivo stikalo na OFF in odstranite kable iz vhodnih sponk.
- Turn the fastening screw of the battery compartment cover from position
 and remove it (see Fig. 34)
 na položaj
 - Odstranite poškodovano varovalko in vstavite novo varovalko istega tipa (glejte § 7.1.2).
- Restore the battery compartment cover into place and turn the fastening screw from position na položaj .
6.3. ČIŠČENJE INSTRUMENTA
Za čiščenje instrumenta uporabite mehko in suho krpo. Nikoli ne uporabljajte mokrih krp, topil, vode itd.
6.4. KONEC ŽIVLJENJA
![]() OPOZORILO: simbol na instrumentu označuje, da je treba napravo in njene dodatke zbirati ločeno in jih pravilno odstraniti.
OPOZORILO: simbol na instrumentu označuje, da je treba napravo in njene dodatke zbirati ločeno in jih pravilno odstraniti.
TEHNIČNE SPECIFIKACIJE
7.1. TEHNIČNE ZNAČILNOSTI
Accuracy calculated as [%reading + (num. digits*resolution)] at 18°C 28°C <75%HR
DC Voltage
| Razpon | Resolucija | Natančnost | Vhodna impedanca | Zaščita pred preobremenitvijo |
| 600.0mV | 0.1mV | ±(0.1% branja + 5 števki) | > 10 MW | 1000 VDC/ACrms |
| 6.000 V | 0.001 V | |||
| 60.00 V | 0.01 V | |||
| 600.0 V | 0.1 V | ±(0.2% branja + 5 števki) | ||
| 1000 V | 1V |
AC TRMS Voltage
| Razpon | Resolucija | Natančnost (*) | Zaščita pred preobremenitvijo | |
| (50Hz¸60Hz) | (61Hz¸1kHz) | |||
| 600.0mV | 0.1mV | ±(0.9% branja + 5 števki) | ±(3.0% branje + 5dgt) | 1000 VDC/ACrms |
| 6.000 V | 0.001 V | |||
| 60.00 V | 0.01 V | |||
| 600.0 V | 0.1 V | |||
| 1000 V | 1V | |||
(*) Accuracy specified from 10% to 100% of the measuring range, Input impedance: > 9M ;
Accuracy PEAK function: ±(10%rdg + 30dgt), PEAK response time: 1ms
For not sinusoidal waveforms the accuracy is: (10.0%reading + 10dgt)
AC+ DC TRMS Voltage
| Razpon | Resolucija | Accuracy (*) (50Hz¸1kHz) | Vhodna impedanca | Zaščita pred preobremenitvijo |
| 6.000 V | 0.001 V | ±(3.0% branje + 20dgt) | > 10 MW | 1000 VDC/ACrms |
| 60.00 V | 0.01 V | |||
| 600.0 V | 0.1 V | |||
| 1000 V | 1V |
(*) Natančnost je določena od 10 % do 100 % merilnega območja
For not sinusoidal waveforms the accuracy is: (10.0%reading + 10dgt)
DC/AC TRMS Voltage z nizko impedanco (LoZ)
| Razpon | Resolucija | Accuracy (*) (50Hz¸1kHz) | Vhodna impedanca | Zaščita pred preobremenitvijo |
| 6.000 V | 0.001 V | ±(3.0% branje+40dgt) | cca 3 kW | 600 VDC/ACrms |
| 60.00 V | 0.01 V | |||
| 600.0 V | 0.1 V | |||
| 600 V | 1V |
(*) Natančnost je določena od 10 % do 100 % merilnega območja
For not sinusoidal waveforms the accuracy is: (10.0%reading + 10dgt)
enosmerni tok
| Razpon | Resolucija | Natančnost | Zaščita proti previsoka cena |
| 600.0mA | 0.1mA | ±(0.9% branja + 5 števki) | Hitra varovalka 800mA/1000V |
| 6000mA | 1mA | ||
| 60.00mA | 0.01mA | ||
| 600.0mA | 0.1mA | ±(0.9% branja + 8 števki) | |
| 10.00A | 0.01A | ±(1.5% branja + 8 števki) | Hitra varovalka 10A/1000V |
AC TRMS tok
| Razpon | Resolucija | Natančnost (*) (50Hz¸1 kHz) | Zaščita proti previsoka cena |
| 600.0mA | 0.1mA | ±(1.2% branja + 5 števki) | Hitra varovalka 800mA/1000V |
| 6000mA | 1mA | ||
| 60.00mA | 0.01mA | ||
| 600.0mA | 0.1mA | ||
| 10.00A | 0.01A | ±(1.5% branja + 5 števki) | Hitra varovalka 10A/1000V |
(*) Accuracy specified from 5% to 100% of the measuring range; For not sinusoidal waveforms accuracy is: +(10.0%reading + 10dgt)
Accuracy PEAK function: ±(10%rdg+30dgt) , AC+DC TRMS Current: accuracy (50Hz+1kHz): +(3.0%reading + 20dgt)
DC tok s pretvornikom clamp
| Razpon | Izhodno razmerje | Resolucija | Natančnost (*) | Zaščita proti previsoka cena |
| 1000mA | 1V/1A | 1mA | ±(1.5 %rdg+ 6dgt) | 1000 VDC/ACrms |
| 10A | 100mV / 1A | 0.01A | ||
| 30A | ||||
| 40 A (**) | 10mV / 1A | ±(1.5%rdg.+26dgt) (***) | ||
| 100A |
0.1A |
±(1.5 %rdg+ 6dgt) | ||
| 300A | ||||
| 400 A (**) | 1mV / 1A | ±(1.5%rdg.+26dgt) (***) | ||
| 1000A | 1mV / 1A | 1A | ±(1.5%rdg+6dgt) | |
| 3000A |
(*) Natančnost se nanaša samo na instrument brez pretvornika; (**) Z merilnikom HT4006amp ; (***) Instrument za natančnost + clamp
AC TRMS tok s pretvornikom klamp
| Razpon | Izhodno razmerje | Resolucija | Accuracy (*) (50Hz¸1kHz) | Zaščita pred preobremenitvijo |
| 1000mA | 1V/1A | 1mA | ±(2.5 %rdg + 10dgt) | 1000 VDC/ACrms |
| 10A | 100mV / 1A | 0.01A | ||
| 30A | ||||
| 40 A (**) | 10mV / 1A | ±(3.5%rdg.+30dgt) (***) | ||
| 100A | 0.1A | ±(2.5 %rdg + 10dgt) | ||
| 300A | ||||
| 400 A (**) | 1mV / 1A | ±(3.5%rdg+30dgt) (***) | ||
| 1000A | 1A | ±(2.5 %rdg + 10dgt) | ||
| 3000A |
(*) Accuracy referred to only instrument without transducer ; Accuracy specified from 5% to 100% of the measuring range;
(**) With HT4006 transducer clamp ; (***) Instrument za natančnost + clamp
For not sinusoidal waveforms accuracy is: ![]() (10.0 % odčitka + 10 digitov)
(10.0 % odčitka + 10 digitov)
Accuracy PEAK function: ±(10%rdg+30dgt) , AC+DC TRMS Current: accuracy (50Hz![]() 1kHz):
1kHz): ![]() (3.0 % odčitka + 20 digitov)
(3.0 % odčitka + 20 digitov)
4-20mA% reading
| Razpon | Resolucija | Natančnost | Dopisovanje |
| -25%¸125% | 0.1 % | ±50 dgt | 0mA=-25%, 4mA=0%, 20mA=100%, 24mA=125% |
Test diod
| funkcija | Testni tok | Največja glasnosttage z odprtim krogom |
|
|
<1.5mA | 3.2 VDC |
Frekvenca (elektronska vezja)
| Razpon | Resolucija | Natančnost | Zaščita proti previsoka cena |
| 40.00 Hz ¸ 10 kHz | 0.01 Hz ¸ 0.001 kHz | ±(0.5% branja) | 1000 VDC/ACrms |
Občutljivost: 2 Vrms
Frekvenca (elektronska vezja)
| Razpon | Resolucija | Natančnost | Zaščita pred preobremenitvijo |
| 6.000Hz | 0.001Hz | ±(0.09 %rdg+5 števk) | 1000 VDC/ACrms |
| 60.00Hz | 0.01Hz | ||
| 600.0Hz | 0.1Hz | ||
| 6.000 kHz | 0.001 kHz | ||
| 60.00 kHz | 0.01 kHz | ||
| 600.0 kHz | 0.1 kHz | ||
| 1.000MHz | 0.001MHz | ||
| 10.00MHz | 0.01MHz |
Sensitivity: >2Vrms (@ 20% +80% duty cycle) and f<100kHz; >5Vrms (@ 20% + 80% duty cycle) and f>100kHz
Preizkus odpornosti in kontinuitete
| Razpon | Resolucija | Natančnost | Brenčalo | Zaščita pred preobremenitvijo |
| 600.0 W | 0.1 W | ±(0.8% branje + 10dgt) | <50 W | 1000 VDC/ACrms |
| 6.000 kW | 0.001 kW | ±(0.8% branja + 5 števki) | ||
| 60.00 kW | 0.01 kW | |||
| 600.0 kW | 0.1 kW | |||
| 6.000MW | 0.001MW | |||
| 60.00MW | 0.01MW | ±(2.5% branje + 10dgt) |
Delovni cikel
| Razpon | Resolucija | Natančnost |
| 0.1 % ¸ 99.9 % | 0.1 % | ±(1.2% branja + 2 števki) |
Pulse frequency range: 40Hz + 10kHz, Pulse amplitude: ±5V (100+s + 100ms)
Zmogljivost
| Razpon | Resolucija | Natančnost | Zaščita proti previsoka cena |
| 60.00nF | 0.01nF | ±(1.5% branje + 20dgt) | 1000 VDC/ACrms |
| 600.0nF | 0.1nF | ±(1.2% branja + 8 števki) | |
| 6.000 mF | 0.001 mF | ±(1.5% branja + 8 števki) | |
| 60.00 mF | 0.01 mF | ±(1.2% branja + 8 števki) | |
| 600.0 mF | 0.1 mF | ±(1.5% branja + 8 števki) | |
| 6000 mF | 1 mF | ±(2.5% branje + 20dgt) |
Temperatura s sondo tipa K
| Razpon | Resolucija | Natančnost (*) | Zaščita pred preobremenitvijo |
| -40.0 °C ÷ 600.0 °C | 0.1°C | ±(1.5% odčitek + 3°C) | 1000 VDC/ACrms |
| 600°C ÷ 1350°C | 1°C | ||
| -40.0 °F ÷ 600.0 °F | 0.1°F | ±(1.5%rdg+ 5.4°F) | |
| 600 °F ÷ 2462 °F | 1°F |
(*) Natančnost instrumenta brez sonde; Določena natančnost pri stabilni temperaturi okolja pri ±1 °C
Pri dolgotrajnih meritvah se odčitek poveča za 2 °C.
7.1.1. Referenčni standardi
Varnost: IEC/EN61010-1
EMC: IEC/EN 61326-1
Izolacija: dvojna izolacija
Stopnja onesnaženosti: 2
Overvoltage kategorija: CAT IV 600V, CAT III 1000V
7.1.2. Splošne značilnosti
Mehanske lastnosti
Velikost (D x Š x V): 175 x 85 x 55 mm (7 x 3 x 2 in)
Teža (vključene baterije): 400 g (14 unč)
Mehanska zaščita: IP40
Napajanje
Vrsta baterije: 1 × 7.4 V polnilna Li-ION baterija, 1300 mAh
Battery charger power supply: 100/240VAC, 50/60Hz, 10VDC, 1A
Indikacija nizke baterije: simbol "![]() ”Na zaslonu
”Na zaslonu
Življenjska doba baterije: pribl. 15 ur
Auto Power OFF: after 5 60min minutes’ idling (may be disabled)
Fuses: F10A/1000V, 10 x 38mm (input 10A)
F800mA/1000V, 6 x 32mm (input mAuA)
Zaslon
Pretvorba: TRMS
Characteristics: colour TFT, 6000 dots with bargraph
Sampling frequency: 3 times/s
Spomin MEASURES → max 2000, GRAPHS → max 50 RECORDINGS → 128 of max 20000 points
7.1.3. Okoljski pogoji za uporabo
Referenčna temperatura: 18°C ![]() 28°C (64°F
28°C (64°F ![]() 82 ° F)
82 ° F)
Operating temperature: 5°C ÷ 40°C (41°F ![]() 104 ° F)
104 ° F)
Dovoljena relativna vlažnost: <80 % RH
Storage temperature: -20°C ÷ 60°C (-4°F ![]() 140 ° F)
140 ° F)
Vlažnost skladiščenja: <80 % RH
Največja delovna višina: 2000 m (6562 ft)
Ta instrument izpolnjuje zahteve Low Voltage Direktiva 2014/35/EU (LVD) in Direktiva EMC 2014/30/EU
Ta instrument izpolnjuje zahteve evropskih direktiv 2011/65/EU (RoHS) in 2012/19/EU (WEEE)
7.2. DODATKI
7.2.1. Priloženi dodatki
- Par merilnih kablov s konicami 2/4 mm
- Adapter + žična sonda tipa K
- Li-ION rechargeable battery Code BAT64
- Battery charger power supply multiplug + interface Code A64
- Carrying bag and user manual
7.2.2. Neobvezna dodatna oprema
- Sonda tipa K za temperaturo zraka in plina Šifra TK107
- Sonda tipa K za temperaturo poltrdne snovi Šifra TK108
- Sonda tipa K za temperaturo tekoče snovi Šifra TK109
- Sonda tipa K za površinsko temperaturo Šifra TK110
- Sonda tipa K za površinsko temperaturo s konico 90° Šifra TK111
- Fleksibilni pretvornik klamp AC 30/300/3000A Koda. F3000U
- Standardni pretvornik klamp DC/AC 40-400A/1V Cod. HT4006
- Standardni pretvornik klamp AC 1-100-1000A/1V Koda. HT96U
- Standardni pretvornik klamp AC 10-100-1000A/1V Koda. HT97U
- Standardni pretvornik klamp DC 1000A/1V Koda. HT98U
- Adapter for standard transducer clamp with HT connector Cod. NOCANBA
POMOČ
8.1. GARANCIJSKI POGOJI
This instrument is warranted against any material or manufacturing defect, in compliance with the general sales conditions. During the warranty period, defective parts may be replaced. However, the manufacturer reserves the right to repair or replace the product. Should the instrument be returned to the After-sales Service or to a Dealer, transport will be at the Customer’s charge. However, shipment will be agreed in advance. A report will always be enclosed to a shipment, stating the reasons for the product’s return. Only use original packaging for shipment. Any damage due to the use of non-original packaging material will be charged to the Customer. The manufacturer declines any esponsibility for injury to people or damage to property.
Garancija ne velja v naslednjih primerih:
- Popravilo in/ali zamenjava dodatne opreme in baterije (garancija ni zajeta).
- Popravila, ki so lahko potrebna zaradi nepravilne uporabe instrumenta ali zaradi njegove uporabe skupaj z nezdružljivimi napravami.
- Popravila, ki so lahko potrebna zaradi neustrezne embalaže.
- Popravila, ki so lahko potrebna zaradi posegov, ki jih izvajajo nepooblaščene osebe.
- Spremembe instrumenta brez izrecnega dovoljenja proizvajalca.
- Uporaba ni predvidena v specifikacijah instrumenta ali v navodilih za uporabo.
Vsebine tega priročnika ni dovoljeno reproducirati v nobeni obliki brez dovoljenja proizvajalca.
Naši izdelki so patentirani in naše blagovne znamke so registrirane. Proizvajalec si pridržuje pravico do sprememb specifikacij in cen, če je to posledica izboljšav tehnologije.
8.2. POMOČ
Če instrument ne deluje pravilno, preden se obrnete na poprodajno službo, preverite stanje baterije in kablov ter jih po potrebi zamenjajte. Če instrument še vedno ne deluje pravilno, preverite, ali izdelek deluje v skladu z navodili v tem priročniku. Če se instrument vrne poprodajni službi ali trgovcu, bo prevoz plačana stranka. Vendar bo pošiljka dogovorjena vnaprej. Pošiljki bo vedno priloženo poročilo, v katerem so navedeni razlogi za vračilo izdelka. Za pošiljanje uporabljajte samo originalno embalažo; morebitna škoda zaradi uporabe neoriginalnega embalažnega materiala bremeni naročnika.
HT ITALIA SRL
Via della Boaria, 40
48018 – Faenza (RA) – Italija
T + 39 0546 621002
F +39 0546 621144
M info@ht-instrumnents.com
www.ht-instruments.it
HT INSTRUMENTS SL
C/ Legalitat, 89
08024 Barcelona – Španija
T +34 93 408 17 77
Ž +34 93 408 36 30
M info@htinstruments.es
www.ht-instruments.com/es-es/
HT INSTRUMENTS GmbH
Am Waldfriedhof 1b
D-41352 Korschenbroich – Nemčija
T +49 (0) 2161 564 581
Ž +49 (0) 2161 564 583
M info@htinstruments.de
www.ht-instruments.de
KJE SMO
 https://l.ead.me/bcsxjF
© Copyright HT ITALIA 2024
Izdaja 3.01 – 04/12/2024
Dokumenti / Viri
 |
HT Instruments HT64 digitalni multimeter TRMS/AC+DC z barvnim LCD zaslonom [pdfUporabniški priročnik HT64, HT64 TRMS AC DC digitalni multimeter z barvnim LCD zaslonom, HT64, TRMS AC DC digitalni multimeter z barvnim LCD zaslonom, digitalni multimeter z barvnim LCD zaslonom, multimeter z barvnim LCD zaslonom, barvni LCD zaslon, LCD zaslon, zaslon |