1. Izdelek je končanview
The GIGABYTE B760M DS3H WIFI6E GEN5 is an M-ATX motherboard designed to support 14th and 13th Generation Intel Core Processors. It features an LGA 1700 socket and is built with a focus on performance and connectivity for modern computing needs.
Ključne značilnosti:
- Intelovo podnožje LGA 1700: Podpira procesorje Intel Core 14. in 13. generacije.
- Združljivost z DDR5: Features Dual Channel DDR5 memory support across 4 DIMM slots.
- Robustna zasnova napajanja: Equipped with a Hybrid 8+2+1 Phases Digital VRM Solution for stable power delivery.
- Povezljivost naslednje generacije: Includes PCIe 5.0, M.2 slots, and USB 3.2 Gen 2x2 Type-C ports.
- Visokohitrostno omrežje: Integrated Intel Wi-Fi 6E and 2.5GbE LAN for fast and reliable network connections.
- Uporabniku prijazne funkcije: Incorporates Smart Fan 6 for advanced cooling control and Q-Flash Plus for BIOS updates without CPU, memory, or GPU installation.

Slika 1.1: Od zgoraj navzdol view of the GIGABYTE B760M DS3H WIFI6E GEN5 motherboard, showing the LGA 1700 socket, DDR5 DIMM slots, PCIe slots, and M.2 slots.
2. Nastavitev in namestitev
This section provides general guidelines for installing your GIGABYTE B760M DS3H WIFI6E GEN5 motherboard. Always refer to the detailed instructions provided with your CPU, cooler, and other components for specific installation steps.
2.1 Vrstni red namestitve komponent
- Namestitev procesorja: Carefully open the LGA 1700 socket lever, align the CPU with the triangular mark on the socket, place the CPU gently, and close the lever to secure it.
- Namestitev hladilnika procesorja: Izbrani hladilnik procesorja namestite v skladu z navodili proizvajalca. Poskrbite za pravilno uporabo termalne paste.
- Namestitev pomnilnika (RAM): Insert DDR5 memory modules into the DIMM slots. For dual-channel operation, refer to the motherboard manual for recommended slot configurations (typically slots A2 and B2 first). Press firmly until the clips on both ends lock the module in place.
- Namestitev M.2 SSD: Locate the M.2 slots on the motherboard. Insert the M.2 SSD at an angle and secure it with the provided screw or EZ-Latch mechanism.
- Namestitev grafične kartice (GPU): Insert your graphics card into the primary PCIe 5.0 x16 slot. Ensure it is fully seated and secured by the PCIe EZ-Latch.
- Priključek za napajanje: Priključite 24-pinski priključek za napajanje ATX in 8-pinski priključek za napajanje procesorja iz napajalnika na matično ploščo.
- Naprave SATA: Connect SATA data cables to your storage drives (HDDs/SSDs) and the SATA 6Gb/s ports on the motherboard.
- Priključki na sprednji plošči: Connect the case's front panel headers (power button, reset button, USB ports, audio jacks) to the corresponding pins on the motherboard. Refer to the motherboard's silkscreen labels for correct orientation.
- Namestitev antene: For Wi-Fi functionality, screw the included Wi-Fi antennas onto the rear I/O panel's antenna connectors (WiFi EZ-Plug).

Figure 2.1: Motherboard layout diagram highlighting key connectors such as USB ports, Wi-Fi antenna connectors, HDMI, DisplayPort, LAN, and audio jacks.
3. Navodila za uporabo
3.1 Initial Boot-Up and BIOS/UEFI Access
- Po sestavljanju sistema priključite monitor, tipkovnico in miško.
- Vklopite sistem. Med zagonom večkrat pritisnite DEL tipko za vstop v orodje za nastavitev BIOS/UEFI.
- In the BIOS/UEFI, you can configure boot order, enable/disable features, adjust fan speeds (Smart Fan 6), and monitor system status.
3.2 Namestitev gonilnika
- After installing your operating system, install the necessary drivers for the motherboard components.
- Drivers can be found on the official GIGABYTE website for your specific motherboard model. Key drivers include chipset, LAN, Wi-Fi, audio, and USB drivers.
3.3 BIOS Update with Q-Flash Plus
- The Q-Flash Plus feature allows you to update the BIOS without installing the CPU, memory, or graphics card.
- Prenesite najnovejši BIOS file od GIGABYTE-a website and rename it to GIGABYTE.bin.
- Kopirajte preimenovani BIOS file to a USB flash drive (FAT32 format).
- Vstavite USB-ključek v predvidena vrata Q-Flash Plus USB na zadnji vhodno/izhodni plošči.
- With the power supply connected and turned on (but the system off), press the Q-Flash Plus button. The LED will flash, indicating the update process. Wait until the LED stops flashing.
4. Vzdrževanje
Redno vzdrževanje pomaga zagotoviti dolgo življenjsko dobo in optimalno delovanje vaše matične plošče in sistema.
- Odstranjevanje prahu: Periodically clean dust from inside your computer case, especially from heatsinks, fans, and motherboard surfaces, using compressed air. Ensure the system is powered off and unplugged before cleaning.
- Posodobitve BIOS-a: Keep your BIOS updated to the latest version to benefit from performance improvements, bug fixes, and support for new hardware. Use the Q-Flash Plus feature or the BIOS utility.
- Posodobitve gonilnikov: Redno preverjajte GIGABYTE website for updated drivers for your motherboard's components.
- Fizični pregled: Occasionally inspect all cable connections (power, SATA, front panel) to ensure they are secure.
5. Odpravljanje težav
Ta razdelek obravnava pogoste težave, na katere lahko naletite.
5.1 Pogoste težave in rešitve
- Ni napajanja / Sistem se ne vklopi:
- Ensure the power supply is connected to the motherboard (24-pin ATX and 8-pin CPU) and the wall outlet.
- Check if the power supply switch is in the ON position.
- Verify that the front panel power button cable is correctly connected to the motherboard.
- No Display / No POST (Power-On Self-Test):
- Confirm that the monitor is connected to the graphics card (or integrated graphics if applicable) and powered on.
- Reseat the RAM modules firmly in their slots. Try booting with only one RAM module.
- Reseat the graphics card in its PCIe slot. Ensure any required PCIe power cables are connected to the GPU.
- Clear the CMOS by removing the CMOS battery for 5-10 minutes or using the Clear CMOS jumper (refer to the full manual for location).
- Operacijski sistem se ne zažene:
- Check the boot order in the BIOS/UEFI to ensure your primary storage drive is selected.
- Verify that the SATA data and power cables are securely connected to your storage drive.
- If using an M.2 SSD, ensure it is properly seated and detected in the BIOS.
- Težave z omrežno povezljivostjo:
- For wired LAN, ensure the Ethernet cable is securely connected and the LAN driver is installed.
- For Wi-Fi, ensure the antennas are properly attached to the WiFi EZ-Plug connectors and the Wi-Fi driver is installed.
- Preverite omrežne nastavitve v vašem operacijskem sistemu.
If issues persist, consult the comprehensive GIGABYTE user manual or contact technical support.
6. Tehnične specifikacije
| Funkcija | Podrobnost |
|---|---|
| Znamka | GIGABYTE |
| Ime modela | B760M DS3H WIFI6E GEN5 |
| CPU vtičnica | LGA 1700 |
| Združljivi procesorji | 14th, 13th Gen Intel Core Series Processors |
| Čipset | Čipset Intel B760 Express |
| Tehnologija pomnilnika RAM | DDR5 |
| Pomnilniške reže | 4 x DDR5 DIMM sockets (Dual Channel) |
| Največja hitrost pomnilnika | Do 5600 MHz (pretaktiranje) |
| PCIe reže | 1 x PCIe 5.0 x16 slot, 2 x PCIe 3.0 x1 slots |
| Priključki M.2 | 2 x M.2 connectors (PCIe 4.0 x4) |
| SATA vrata | 4 x priključka SATA 6Gb/s |
| Vrata USB (zadaj) | 1 x USB 3.2 Gen 2x2 Type-C, 1 x USB 3.2 Gen 2, 2 x USB 3.2 Gen 1, 4 x USB 2.0/1.1 |
| Mreženje | Intel Wi-Fi 6E, 2.5GbE LAN |
| Avdio | Realtek Audio CODEC (High Definition Audio) |
| Video izhodi | 1 x HDMI, 1 x DisplayPort (requires CPU with integrated graphics) |
| Faktor oblike | Micro ATX (M-ATX) |
| Dimenzije (DxŠxV) | 8.82 x 8.82 x 1 palcev |
| Teža predmeta | 2 funtov |
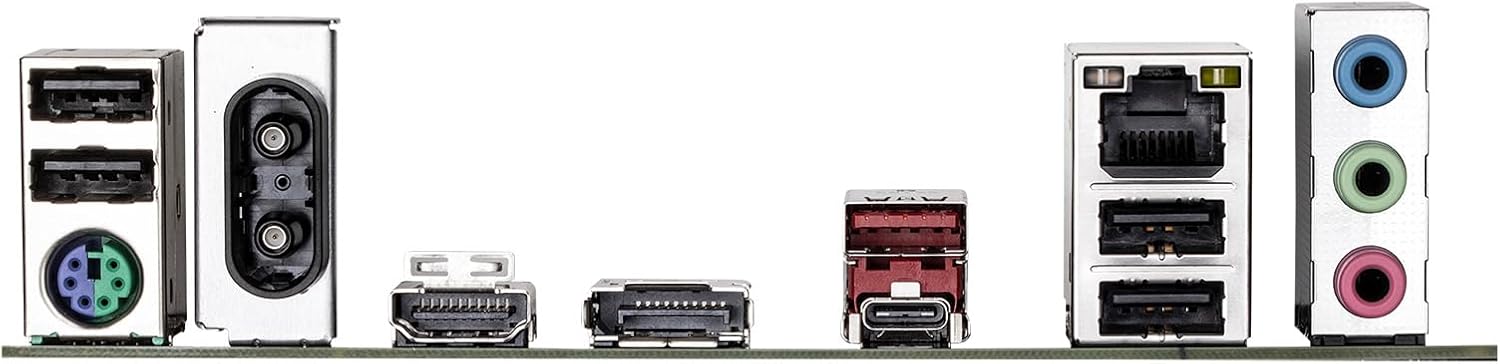
Figure 6.1: Rear I/O panel showing various ports including USB, LAN, Wi-Fi antenna connectors, HDMI, DisplayPort, and audio jacks.
7. Informacije o garanciji
GIGABYTE products are covered by a limited warranty. For detailed and up-to-date warranty terms, conditions, and registration procedures, please refer to the official GIGABYTE website or the warranty card included with your product. Warranty periods may vary by region and product type.
8. Tehnična podpora
For technical assistance, driver downloads, BIOS updates, FAQs, and further product information, please visit the official GIGABYTE support webspletno mesto:
Before contacting support, please have your motherboard model name (B760M DS3H WIFI6E GEN5) and serial number ready.


