1. Uvod
Hvala za nakupasing the Singer SN777αIII Computerized Sewing Machine. This machine is designed for ease of use and versatility, offering 100 stitch patterns, including alphanumeric characters, to support a wide range of sewing projects. Please read this manual thoroughly before operating your machine to ensure safe and efficient use.

Image: The Singer SN777αIII sewing machine is available in white, pink, and a white and pink combination, allowing users to choose a color that suits their preference or room decor.
2. Nastavitev
2.1 Razpakiranje in namestitev
- Previdno vzemite stroj in vso dodatno opremo iz embalaže.
- Napravo postavite na stabilno, ravno površino. Zagotovite dovolj prostora okoli naprave za udobno uporabo.
2.2 Napajalni priključek
- Prepričajte se, da je stikalo za vklop v položaju »IZKLOP«.
- Napajalni kabel priključite na napravo in nato v ustrezno električno vtičnico.
2.3 Navijanje vretenca
- Na zatič za navijanje položite tuljavo niti.
- Follow the winding path indicated on the machine.
- Na vreteno navijalca vretenca namestite prazno vreteno in ga potisnite v desno.
- Start winding by pressing the foot controller or start/stop button. Stop when the bobbin is full.
2.4 Vdevanje zgornje niti
- Dvignite ročico stiskalne noge.
- Follow the numbered threading path on the machine, ensuring the thread is correctly seated in all guides and the tension discs.
- Za lažje vdevanje niti skozi ušesce igle uporabite avtomatski vdevalec niti.
2.5 Setting the Lower Thread (Bobbin)
- Odprite pokrov vretenca.
- Vstavite navito vreteno v vreteno in pazite, da se nit odvija v pravilno smer.
- Guide the bobbin thread through the tension spring and out the bobbin case opening.
- Close the bobbin cover. The easy bobbin setting feature allows you to start sewing without pulling up the bobbin thread manually.
2.6 Pritrjevanje dodatkov
- Široka miza: Attach the wide table to the machine to expand your work area, especially useful for larger projects.
- Nožni upravljalnik: Connect the foot controller to the designated port on the machine for hands-free speed control.
3. Navodila za uporabo
3.1 Konec nadzorne ploščeview
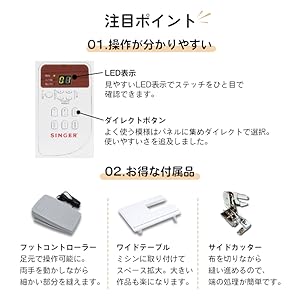
Image: The control panel features a clear LED display to show the selected stitch and direct buttons for frequently used patterns, simplifying operation.
- LED zaslon: Shows the selected stitch pattern number and other relevant settings.
- Direct Buttons: Allows quick selection of commonly used stitch patterns.
- Gumbi za izbiro šiva: Use these to navigate and select from the 100 available stitch patterns.
3.2 Selecting Stitch Patterns

Image: The machine offers 100 stitch patterns, including utility stitches, decorative stitches, buttonholes, satin stitches, cross stitches, patchwork quilt stitches, and alphanumeric characters (numbers and alphabets).
- Refer to the stitch chart on the machine or in the manual.
- Use the stitch selection buttons to choose the desired pattern. The selected pattern number will appear on the LED display.
- For alphanumeric stitches, select the corresponding pattern and then use the adjustment buttons to choose specific letters or numbers.
3.3 Osnovne šivalne operacije

Image: This illustration highlights key operational features such as hand-focused controls for start/stop, automatic buttonhole creation, the free arm for cylindrical sewing, stepless speed adjustment, drop feed for free-motion quilting, and the presser foot lifter button for smooth sewing over varying fabric thicknesses.
- Gumb Start/Stop: Press to start and stop sewing.
- Prilagoditev hitrosti: Use the slide control for stepless speed adjustment from low to high.
- Gumb za vzvratni šiv: Press and hold to sew in reverse for securing stitches.
- Gumb za dvig/spust igle: Iglo postavi navzgor ali navzdol.
- Presser Foot Lifter Button: Automatically keeps the presser foot horizontal, making it easy to start sewing thick fabrics.
3.4 Posebnosti
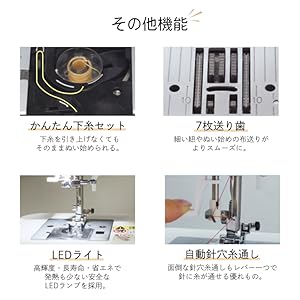
Image: This illustration details the easy bobbin setting for quick starts, the 7-point feed dog for smooth fabric feeding, the bright LED light for clear visibility, and the automatic needle threader for effortless threading.
- Samodejni vdevalec niti v iglo: A lever-operated system that threads the needle automatically.
- 7-točkovni podajalnik: Ensures smooth and consistent fabric feeding, especially for delicate or thick materials.
- LED lučka: Provides bright, long-lasting, and energy-efficient illumination of the sewing area.
- Prosta roka: Remove the accessory box to reveal the free arm, ideal for sewing cuffs, sleeves, and other cylindrical items.
- Fully Automatic Buttonhole: Simply set the button, and the machine automatically creates a perfectly sized buttonhole.
- Spuščanje podajanja: Lower the feed dogs for free-motion quilting or darning.
4. Vzdrževanje
4.1 Čiščenje
- Pred čiščenjem vedno izklopite in izključite napravo iz električnega omrežja.
- Regularly clean lint and dust from the bobbin case area and under the needle plate using the brush provided.
- Zunanjost naprave obrišite z mehko, suho krpo. Ne uporabljajte agresivnih kemikalij.
4.2 Zamenjava igle
- Izklopite stroj in ga odklopite.
- Odvijte iglo clamp privijte in odstranite staro iglo.
- Vstavite novo iglo z ravno stranjo obrnjeno nazaj in jo potisnite navzgor, kolikor gre.
- Zategnite iglo klamp varno privijte.
5. Odpravljanje težav
This section addresses common issues you might encounter. For problems not listed here, please consult the full instruction DVD or contact customer support.
| Težava | Možen vzrok | rešitev |
|---|---|---|
| Stroj se ne zažene | Power cord not connected; Power switch off; Foot controller not connected. | Check power connections; Turn on power switch; Ensure foot controller is plugged in. |
| Preskočeni šivi | Incorrect needle; Bent needle; Incorrect threading. | Use correct needle type for fabric; Replace bent needle; Re-thread machine carefully. |
| Niti se zlomi | Incorrect tension; Poor quality thread; Improper threading; Needle bent or dull. | Adjust tension; Use good quality thread; Re-thread machine; Replace needle. |
| Blago se ne podaja | Feed dogs lowered; Presser foot pressure too low. | Raise feed dogs; Adjust presser foot pressure. |
6. Specifikacije

Image: The Singer SN777αIII machine's dimensions are 404mm width x 188mm depth x 298mm height, with a weight of 5.8 kg.
- Model: SN777αIII
- Proizvajalec: Pevka
- Dimenzije (izdelek): 40.4 cm (širina) x 18.8 cm (globina) x 29.8 cm (višina)
- Teža (izdelek): 5.8 kg
- Material: Akrilonitril butadien stiren (ABS)
- Vzorci šivov: 100 types (including numbers and alphabets)
6.1 Priloženi dodatki

Image: A comprehensive diagram illustrating all standard accessories, including various presser feet, bobbins, screwdrivers, a seam ripper, needle set, seam guide, spool caps, auxiliary spool pin, spool pin felt, soft cover, power cord, instruction manual, and instruction DVD.
- Cik-cak stopalo
- Noga z zadrgo
- Tačka za gumbnico
- Gumijasta šivalna noga
- Overcasting Foot
- Tačka za slepi šiv
- Tačka za satenast vbod
- Bobbini
- Triangular Screwdriver
- Majhen izvijač
- Seam Ripper with Brush
- Set igel
- Vodič za šiv
- Spool Cap (Large)
- Spool Cap (Small)
- Pomožni zatič za tuljavo
- Spool Pin Filc
- Mehka vezava
- Napajalni kabel
- Navodila za uporabo
- DVD z navodili
- Nožni krmilnik
- Široka miza
- Stranski rezalnik
7. Garancija in podpora
For warranty information, please refer to the warranty card included with your product or contact your retailer. For technical support or service inquiries, please refer to the contact information provided in your purchase documentation or visit the official Singer webmesto.


