Uvod
Thank you for choosing the Epson EB-L210SF projector. This manual provides essential information for the safe and efficient use of your projector. Please read it thoroughly before operating the device and keep it for future reference.
The Epson EB-L210SF is a 3LCD Full-HD projector designed for clear and vibrant image projection. It features a laser light source for long-lasting performance.
Pomembne varnostne informacije
- Laserska varnost: Do not look directly into the projector lens when the laser light source is active. Avoid direct eye exposure to the laser beam.
- Prezračevanje: Ensure adequate ventilation around the projector. Do not block ventilation openings. Overheating can cause damage.
- vir energije: Uporabljajte samo napajalnik, ki je predpisan za ta projektor.
- Ravnanje: S projektorjem ravnajte previdno. Pazite, da vam ne pade ali da ga ne izpostavljate močnim udarcem.
- Čiščenje: Pred čiščenjem izključite napajalni kabel. Uporabite mehko, suho krpo. Ne uporabljajte tekočih ali aerosolnih čistil.
Nastavitev
1. Razpakiranje in namestitev
Carefully remove the projector and all accessories from the packaging. Place the projector on a stable, level surface. Ensure there is sufficient space around the projector for proper ventilation.

Slika 1: Sprednji in stranski view of the Epson EB-L210SF projector, showing the lens and ventilation grilles.
2. Priključitev napajanja
- Connect the supplied power cord to the projector's AC inlet.
- Drugi konec napajalnega kabla priključite v ozemljeno električno vtičnico.
3. Povezovanje vhodnih virov
The projector supports various input sources. Connect your device (computer, Blu-ray player, etc.) to the appropriate port on the projector's rear panel.

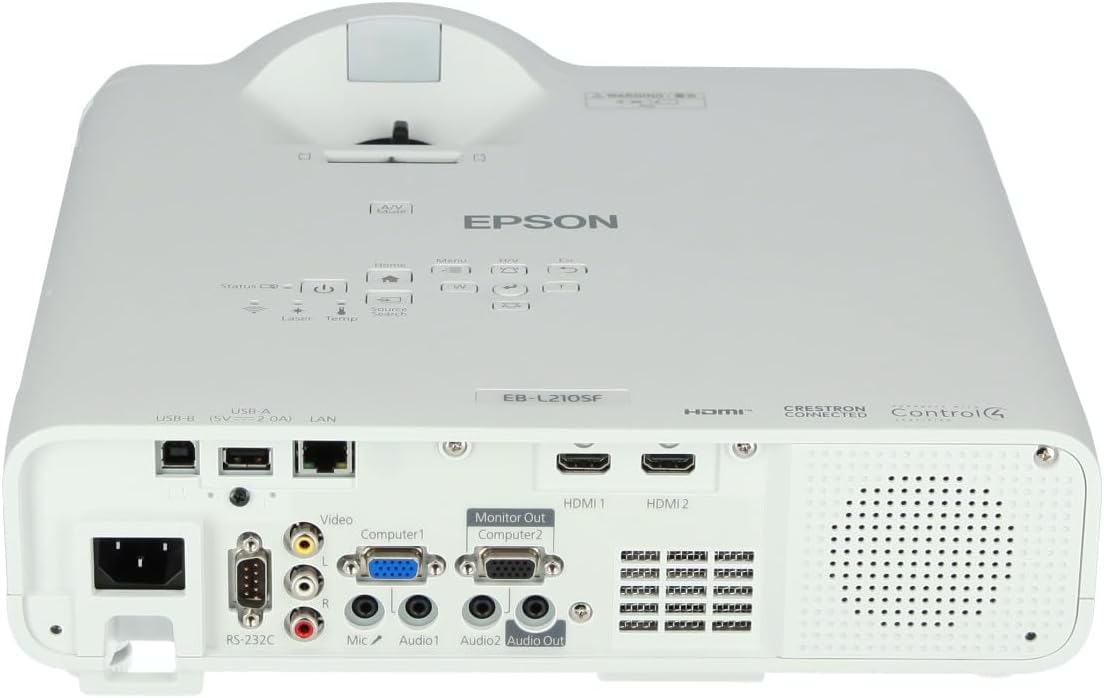
Figure 2: Rear panel of the projector, displaying various input and output ports including HDMI, Computer (VGA), Video, USB, and Audio connections.
- HDMI: Connect an HDMI cable from your device to one of the HDMI ports (HDMI 1 or HDMI 2).
- Računalnik (VGA): Connect a VGA cable from your computer to the Computer 1 or Computer 2 port. For audio, connect a separate audio cable to Audio 1 or Audio 2.
- Video: Connect composite video and audio cables to the Video and Audio (R/L) ports.
- USB: Use the USB-A port for connecting USB storage devices or the USB-B port for display over USB.
- LAN: Za upravljanje in spremljanje omrežja priključite ethernetni kabel.
4. Začetni vklop in prilagoditev slike
- Press the power button on the projector or remote control to turn on the device. The power indicator will illuminate.
- Prilagodite fokusni obroč around the lens until the image is sharp and clear.
- Uporabite zoom lever (if available) to adjust the image size.
- Če je slika trapezoidna, uporabite trapezni popravek feature (manual or automatic) to square the image. Refer to the Operating section for details on menu navigation.
Upravljanje projektorja
1. Nadzorna plošča je končanaview
The control panel on top of the projector allows access to various functions and settings.
Slika 3: Zgornji del view of the projector, highlighting the control panel with buttons for power, menu, source selection, and navigation.
- Gumb za vklop: Vklopi ali izklopi projektor.
- Iskanje virov: Preklaplja med razpoložljivimi vhodnimi viri.
- Gumb menija: Opens the on-screen display (OSD) menu.
- Navigation Buttons (Arrow keys): Uporablja se za navigacijo po možnostih menija.
- Gumb za vnos: Potrdi izbire v meniju.
- Esc Button: Exits the current menu or returns to the previous screen.
- Domov gumb: Accesses the home screen or quick settings.
- Izklop A/V: Temporarily mutes audio and blanks the screen.
2. Selecting an Input Source
Pritisnite Iskanje vira button on the control panel or remote control to cycle through the connected input sources (e.g., HDMI 1, HDMI 2, Computer 1, Video). The projector will automatically detect and display the active source.
3. Adjusting Image and Audio Settings
Pritisnite meni button to access the projector's on-screen display (OSD) menu. Use the navigation buttons to browse categories such as:
- Slika: Prilagodite svetlost, kontrast, barvo, odtenek, ostrino in barvno temperaturo.
- signal: Configure input signal settings, aspect ratio, and overscan.
- nastavitve: General projector settings like language, display options, and power management.
- Avdio: Adjust volume, mute, and audio input selection.
Izberite možnost in pritisnite Vnesite to modify its value. Press Esc za izhod iz menija.
Vzdrževanje
1. Čiščenje projektorja
- Zunanjost: Wipe the projector's exterior with a soft, dry, lint-free cloth. For stubborn dirt, dampen the cloth slightly with water, then wipe dry.
- Objektiv: Gently wipe the lens with a lens cleaning cloth or lens paper. Avoid using abrasive materials or excessive force.
- Zračni filter: Regularly check and clean the air filter to prevent dust buildup, which can affect performance and cause overheating. Refer to the projector's on-screen menu for filter maintenance reminders.
2. Laser Light Source
The Epson EB-L210SF uses a laser light source, which offers a long operational life and does not require lamp replacement. No user maintenance is typically required for the laser light source itself.
Odpravljanje težav
Če imate težave s projektorjem, si oglejte naslednje pogoste težave in rešitve:
| Težava | Možen vzrok/rešitev |
|---|---|
| Ni projicirane slike |
|
| Slika je zamegljena ali neizostrena |
|
| Slika je popačena (trapezoidna) |
|
| Brez zvoka |
|
| Projector is not wireless | The Epson EB-L210SF is not inherently a wireless projector. Wireless functionality typically requires an optional external wireless adapter, which is sold separately. Please consult Epson's official website or your retailer for compatible wireless adapters. |
| Overheating warning (Temp indicator) |
|
Specifikacije
| Funkcija | Podrobnost |
|---|---|
| Številka modela | V11HA75080 |
| Ločljivost zaslona | 1920 x 1080 (Full HD) |
| Tehnologija povezljivosti | HDMI, VGA, USB, LAN |
| Dimenzije izdelka | 11.81 x 11.81 x 11.81 palcev |
| Teža predmeta | 10.14 funtov |
| Vir svetlobe | Laser |
| Proizvajalec | Epson |
| Priporočene uporabe | Spremljanje |
| Posebna funkcija | Lahka |
| Potrebne baterije | 1 AAAA (for remote control, not included with projector unit) |
| Prvič na voljo | 14. november 2023 |
Garancija in podpora
Za podrobne informacije o garanciji glejte garancijski list, ki je priložen izdelku, ali obiščite uradno spletno stran Epsona. webGarancijski pogoji se lahko razlikujejo glede na regijo.
For technical support, product registration, or to download the latest drivers and software, please visit the official Epson support website or contact Epson customer service in your region. Contact information can typically be found on the Epson webmesto.


