1. Uvod
This manual provides detailed instructions for the safe and effective use of your Technaxx TX-219 4-in-1 Multifunction Device. This versatile unit combines a jump starter, an air compressor, a power bank, and an LED light, designed for automotive and portable power needs. Please read this manual thoroughly before operation and retain it for future reference.
2. Varnostna navodila
Vedno upoštevajte naslednje varnostne ukrepe, da preprečite poškodbe ali škodo na napravi ali vozilu:
- Pred uporabo preberite vsa navodila.
- Hraniti izven dosega otrok.
- Wear eye protection when operating the jump starter.
- Naprave ne izpostavljajte dežju ali vlagi.
- Do not operate if the device or cables are damaged.
- Med uporabo poskrbite za ustrezno prezračevanje.
- Priključite pomožni zaganjalnik klamps correctly: positive to positive, negative to negative. Avoid short-circuiting.
- Ne poskušajte zagnati zmrznjenega akumulatorja.
- Disconnect the jump starter from the vehicle battery within 30 seconds after the engine starts.
- Do not use the air compressor continuously for more than 10 minutes to prevent overheating. Allow it to cool down.
- Ko naprave ne uporabljate, jo hranite na hladnem in suhem mestu.
3. Vsebina paketa
Preverite, ali so v paketu prisotni vsi elementi:
- Technaxx Jump Starter TX-219 Unit
- Adapter Cable with Battery Clamps
- AC adapter
- Compressed Air Hose
- USB kabel
- Avto adapterski kabel
- Uporabniški priročnik

Slika 3.1: konecview of the Technaxx TX-219 package contents, showing the main unit, battery clamps, various charging cables, and the air hose.
4. Izdelek je končanview
Familiarize yourself with the components of your Technaxx TX-219 device.

Slika 4.1: Pod kotom view of the Technaxx TX-219 unit, showing the digital display, control buttons, USB ports, and LED light.
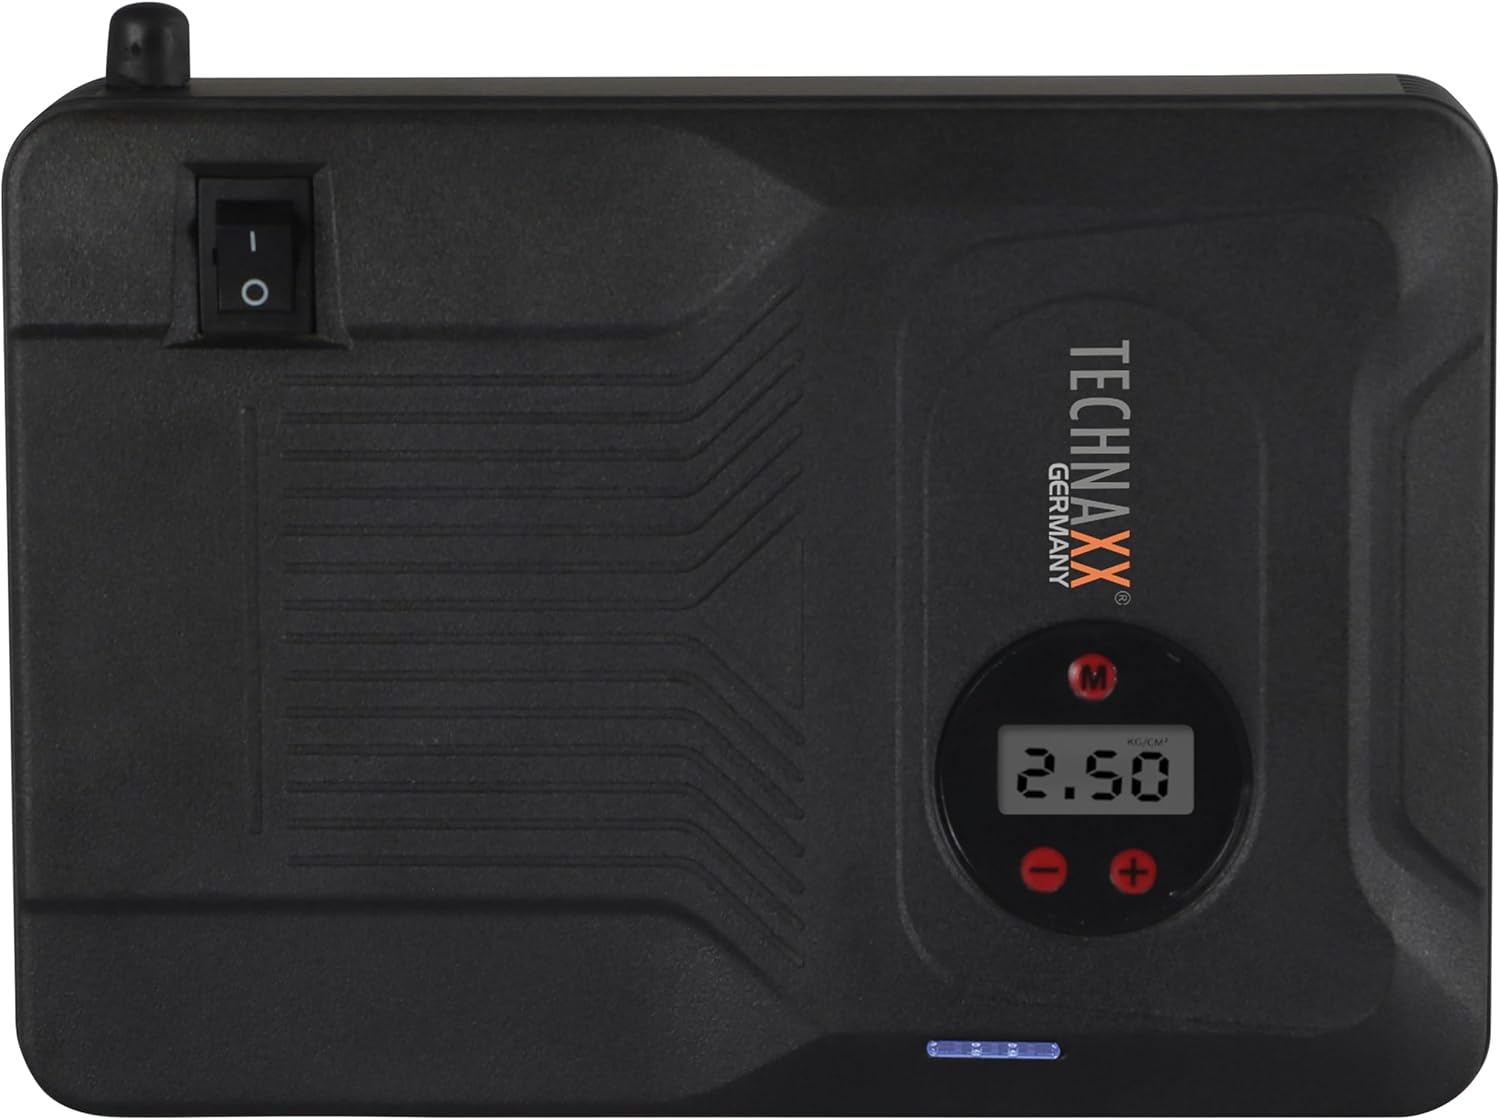
Slika 4.2: Vrh view of the device, highlighting the power switch and the digital display for pressure readings.

Slika 4.3: Spredaj view of the device, showing the digital display, pressure adjustment buttons, and the power indicator lights.
Ključne komponente:
- Digitalni zaslon: Shows air pressure for the compressor and battery status.
- Gumbi za upravljanje: For adjusting pressure settings and operating the device.
- USB-A Output Ports (5V/1A, 5V/2A): Za polnjenje zunanjih elektronskih naprav.
- 15V/0.4A Input Port: For charging the internal battery of the TX-219.
- Jump Start Output Port: Connects to the battery clamp kabel.
- LED lučka: Zagotavlja osvetlitev.
- Stikalo za vklop: Vklop/izklop naprave.
- Priključek zračne cevi: For the air compressor function.
5. Nastavitev in polnjenje naprave
Before first use, fully charge the Technaxx TX-219 unit. It is recommended to recharge the device every 3 months to maintain battery health.
- Connect the AC adapter to the 15V/0.4A input port on the TX-219.
- Napajalnik priključite v standardno stensko vtičnico.
- The battery indicator lights on the device will illuminate to show charging progress. All lights will be solid when fully charged.
- Alternatively, use the car adapter cable to charge the device from a vehicle's 12V accessory socket.

Slika 5.1: The Technaxx TX-219 unit being charged or used as a power bank to charge a smartphone.
6. Navodila za uporabo
6.1. Zagon vozila s pomočjo kablov
The TX-219 can jump start gasoline engines up to 4.0L and diesel engines up to 3.0L.
- Ensure the TX-219 is sufficiently charged (at least 75% battery indicated).
- Izklopite kontakt vozila in vso dodatno opremo.
- Priključite rdeči (+) clamp na pozitivni (+) pol akumulatorja vozila.
- Povežite črni (-) klamp na čist, nepobarvan kovinski del bloka motorja ali šasije vozila, stran od akumulatorja. Do not connect to the negative (-) battery terminal directly unless specified by vehicle manufacturer.
- Connect the adapter cable to the jump start output port on the TX-219.
- Zaženite motor vozila. Če se ne zažene takoj, počakajte 30 sekund, preden poskusite znova. Ne zaganjajte motorja več kot 3 sekunde na poskus.
- Once the engine starts, immediately disconnect the adapter cable from the TX-219.
- Nato odklopite črni (-) clamp, ki mu sledi rdeči (+) clamp iz akumulatorja vozila.

Slika 6.1: The Technaxx TX-219 connected to a vehicle battery using the provided clamps for jump starting.

Slika 6.2: A close-up of the jump starter connected to a car battery, illustrating the process of jump starting.
6.2. Uporaba zračnega kompresorja
The integrated air compressor can inflate tires up to 3.5 Bar (approximately 50 PSI) and features an automatic shut-off.
- Connect the compressed air hose to the air hose connection port on the TX-219.
- Attach the other end of the hose to the tire valve.
- Turn on the TX-219. The digital display will show the current tire pressure.
- Use the '+' and '-' buttons to set the desired pressure. The display supports Bar, KPA, kg/cm², and PSI units.
- Press the compressor start button to begin inflation.
- Kompresor se bo samodejno ustavil, ko bo dosežen prednastavljeni tlak.
- Disconnect the air hose from the tire valve and the TX-219.

Slika 6.3: The Technaxx TX-219 being used to inflate a car tire, demonstrating the air compressor function.

Slika 6.4: A user inflating a tire with the TX-219, showing the digital display and the air hose connection.
6.3. Uporaba kot power bank
The 14000 mAh battery can charge various USB-powered devices.
- Connect your device's USB charging cable to one of the USB-A output ports (5V/1A or 5V/2A) on the TX-219.
- The TX-219 will automatically begin charging your device.
- Spremljajte stanje polnjenja naprave. Ko je popolnoma napolnjena, jo izključite.

Slika 6.5: The Technaxx TX-219 connected to a smartphone via USB, illustrating its power bank functionality.

Slika 6.6: The TX-219 acting as a portable power bank, charging a mobile device.
6.4. Uporaba LED luči
The integrated LED light can be used for illumination in dark environments.
- Locate the LED light button on the device.
- Za vklop LED lučke enkrat pritisnite gumb.
- Press again to cycle through different light modes (e.g., steady, strobe, SOS, if available).
- Press and hold the button to turn off the LED light.

Slika 6.7: The TX-219's LED light providing illumination in a vehicle's engine compartment.
7. Specifikacije
| Funkcija | Specifikacija |
|---|---|
| Model | TX-219 |
| Vrsta baterije | Litijev železov fosfat |
| Kapaciteta baterije | 14000 mAh |
| Začetni tok | 350 A (Max. 600 A) |
| Jump Start Voltage | 12 volta |
| Združljivost motorjev (bencin) | Do 4.0 L |
| Združljivost motorja (dizel) | Do 3.0 L |
| Izhod USB-A 1 | 5 V, 2 A |
| Izhod USB-A 2 | 5 V, 1 A |
| Kompresor | 12 V / 100 W, Max 3.5 Bar (approx. 50 PSI) |
| Vhod za polnjenje | 15 V, 0.4 A (največ) |
| LED lučka | Več funkcij |
| Dimenzije (D x Š x V) | 19 x 13 x 5.5 cm |
| Teža | 1.16 kg |
| Certifikati | CE |
8. Vzdrževanje
- Čiščenje: Napravo obrišite z mehko, suho krpo. Ne uporabljajte agresivnih kemikalij ali abrazivnih čistil.
- Shranjevanje: Store the TX-219 in a cool, dry place, away from direct sunlight and extreme temperatures.
- Polnjenje: Recharge the unit every three months, even if not in use, to prolong battery life.
- Pregled kabla: Regularly inspect all cables and clampPreverite morebitne znake poškodb, obrabe ali korozije. Po potrebi zamenjajte.
9. Odpravljanje težav
| Težava | Možen vzrok | rešitev |
|---|---|---|
| Naprava se ne vklopi. | Baterija je prazna. | Charge the TX-219 fully. |
| Vozilo se ne zažene s pomočjo kablov. | Napačna klamp connection; TX-219 battery too low; vehicle battery severely damaged. | Zagotovite klamps are connected correctly (+ to +, - to chassis). Recharge TX-219. Consult a mechanic if vehicle battery is faulty. |
| Zračni kompresor se ne napihuje. | Hose not securely connected; desired pressure already reached; device battery low. | Check hose connections. Verify desired pressure setting. Recharge TX-219. |
| Polnjenje prek USB-ja ne deluje. | USB cable faulty; device not compatible; TX-219 battery low. | Try a different USB cable. Ensure your device is compatible. Recharge TX-219. |
| LED lučka ne deluje. | Battery depleted; light button not pressed correctly. | Recharge TX-219. Press the LED button firmly. |
10. Garancija in podpora
For warranty information and technical support, please refer to the warranty card included with your product or visit the official Technaxx webspletno mesto. Shranite račun kot dokazilo o nakupu.
Proizvajalec: Technaxx
Številka modela: 5031


