Uvod
Thank you for choosing the SUNVIVI 12-Cup Programmable Drip Coffee Maker. This manual provides essential information for the safe and efficient operation, maintenance, and troubleshooting of your new appliance. Please read all instructions carefully before use and retain this manual for future reference.
Pomembna varnostna navodila
Pri uporabi električnih naprav je treba vedno upoštevati osnovne varnostne ukrepe, da zmanjšate nevarnost požara, električnega udara in/ali poškodbe oseb, vključno z naslednjimi:
- Preberite vsa navodila.
- Ne dotikajte se vročih površin. Uporabite ročaje ali gumbe.
- To protect against fire, electric shock, and personal injury, do not immerse cord, plugs, or coffee maker in water or other liquid.
- Potreben je natančen nadzor, kadar katero koli napravo uporabljajo otroci ali v njeni bližini.
- Izvlecite vtič iz vtičnice, ko ga ne uporabljate in pred čiščenjem. Pustite, da se ohladi, preden namestite ali odstranite dele in preden očistite aparat.
- Ne uporabljajte nobene naprave s poškodovanim kablom ali vtičem ali po tem, ko naprava ne deluje pravilno ali je bila kakor koli poškodovana. Napravo vrnite najbližjemu pooblaščenemu servisu na pregled, popravilo ali nastavitev.
- Uporaba dodatkov, ki jih proizvajalec naprave ne priporoča, lahko povzroči požar, električni udar ali telesne poškodbe.
- Ne uporabljajte na prostem.
- Kabel ne sme viseti čez rob mize ali pulta ali se dotikati vročih površin.
- Ne postavljajte na ali blizu vročega plinskega ali električnega gorilnika ali v segreto pečico.
- Vedno najprej priključite vtič na napravo, nato pa priključite kabel v stensko vtičnico. Za izklop izklopite kateri koli gumb in nato izvlecite vtič iz stenske vtičnice.
- Naprave ne uporabljajte za namene, ki niso predvideni.
- Če med kuhanjem odstranite pokrov, lahko pride do opeklin.
- Vrč je zasnovan za uporabo s to napravo. Nikoli se ne sme uporabljati na vrhu strelišča.
- Vročega vrča ne postavljajte na mokro ali hladno površino.
- Ne uporabljajte počenega vrča ali vrča z ohlapnim ali oslabljenim ročajem.
- Ne očistite vrča s čistilnimi sredstvi, blazinicami iz jeklene volne ali drugimi abrazivnimi materiali.
Sestavine izdelka
Familiarize yourself with the parts of your SUNVIVI 12-Cup Coffee Maker:
- Vodni zbiralnik: Features a visualized water window with graduation lines for precise filling.
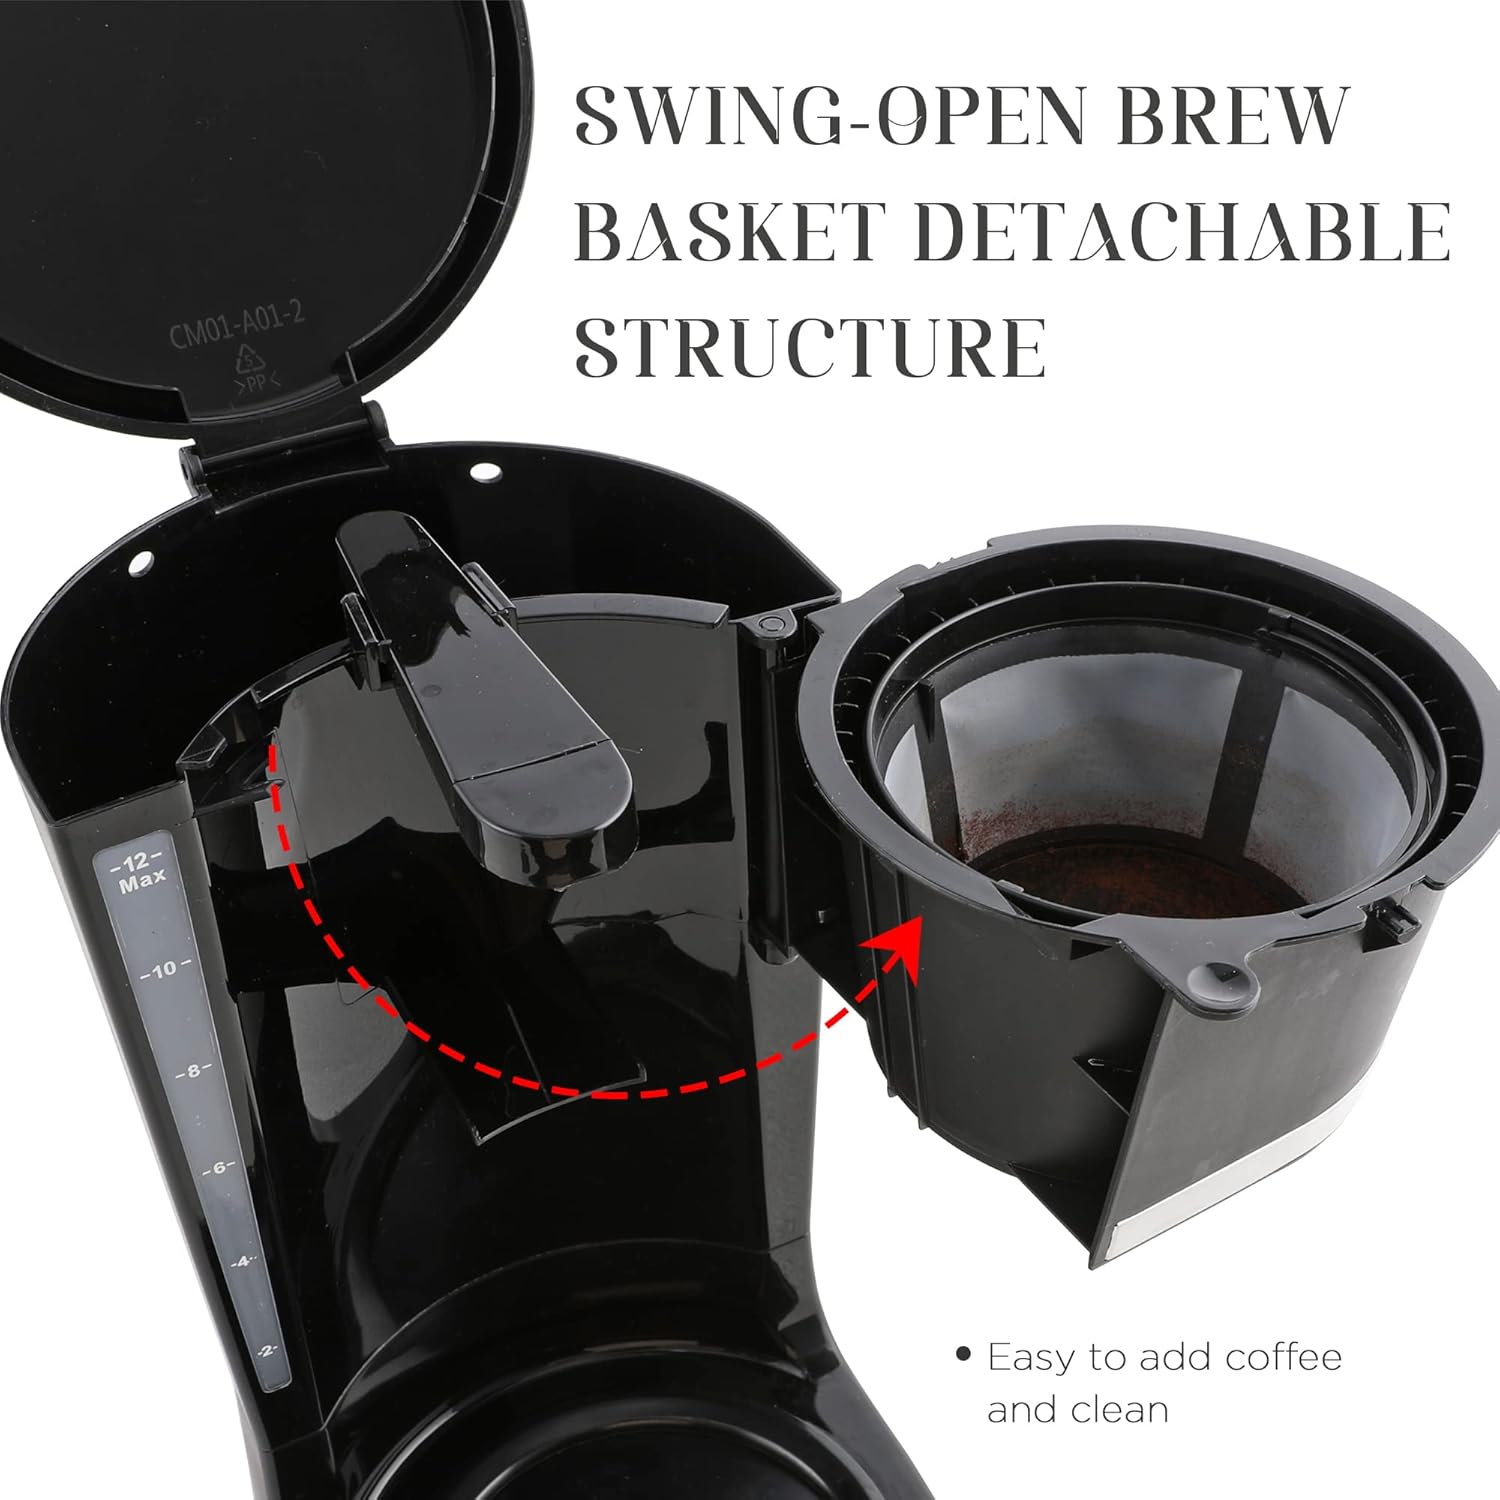
- Swing-Open Brew Basket: Rotatable and detachable for easy coffee ground loading and cleaning.
- Trajni filter: Filtrirna košara za večkratno uporabo odpravlja potrebo po papirnatih filtrih.
- Stekleni vrč: Prostornina 12 skodelic z merilnimi oznakami.
- Nadzorna plošča: Digital display with PROG, HOUR, MIN, and ON/OFF buttons for programming and operation.
- Grelna plošča: Keeps coffee warm for up to 2 hours.
- Auto Drip-Stop System: Preprečuje kapljanje, ko med kuhanjem odstranite vrč.
Slika: spredaj view of the SUNVIVI 12-Cup Coffee Maker, showing the glass carafe, control panel, and water level indicator.

Image: A hand pouring water into the coffee maker's water reservoir, highlighting the easy-view water window with 4 to 12 cup markings.
Nastavitev
- Razpakiraj: Iz kavnega aparata previdno odstranite vso embalažo in nalepke.
- Čisto: Wash the carafe, carafe lid, and permanent filter basket in warm, soapy water. Rinse thoroughly and dry. Wipe the exterior of the coffee maker with a soft, damp krpo.
- Cikel prve uporabe: Before brewing coffee for the first time, operate the coffee maker with only water to clean the internal components.
- Rezervoar za vodo napolnite do oznake 12 skodelic s svežo, hladno vodo.
- Place the empty permanent filter basket into the brew basket.
- Prazen vrč postavite na grelno ploščo.
- Press the ON/OFF button to start a brewing cycle.
- Ko je cikel končan, vodo zavrzite in vrč sperite.
Navodila za uporabo
Kuhanje kave
- Napolnite rezervoar za vodo: Open the top cover and pour fresh, cold water into the water reservoir. Use the visualized water window and carafe markings to fill to your desired number of cups (2-12).
- Dodajte kavno usedlino: Rotate the swing-open brew basket to the right and lift it up. Place the permanent filter (or a paper filter) into the basket. Add your desired amount of ground coffee. For best results, use approximately one tablespoon of ground coffee per cup.
- Close & Place Carafe: Swing the brew basket back into position and close the top cover. Place the empty glass carafe onto the warming plate.
- Začetek kuhanja: Pritisnite gumb VKLOP/IZKLOP. Kontrolna lučka se bo prižgala in kuhanje se bo začelo.
- Auto Pause & Serve: If you wish to pour a cup of coffee before the brewing cycle is complete, simply remove the carafe from the warming plate. The Auto Drip-Stop system will temporarily halt the coffee flow for up to 30 seconds. Return the carafe to the warming plate within 30 seconds to resume brewing and prevent overflow.

Image: A hand demonstrating the Auto Drip-Stop system by removing the carafe mid-brew without any coffee dripping.
- Funkcija ohranjanja toplote: After brewing is complete, the coffee maker will automatically switch to the "Keep Warm" function, maintaining the coffee temperature between 175°F and 185°F for 2 hours. The indicator light will remain on during this period.
- Samodejni izklop: For safety and energy saving, the coffee maker will automatically shut off after 2 hours of keeping warm.
Setting the Programmable Brew Time
You can program your coffee maker to start brewing automatically at a later time, up to 24 hours in advance.
- Nastavi trenutni čas: With the coffee maker plugged in, press the HOUR and MIN buttons to set the current time. Hold the buttons to advance quickly.
- Nastavitev časa programa: Press the PROG button. The display will show "PROG" and the time will flash. Use the HOUR and MIN buttons to set your desired brew start time.
- Aktiviraj program: After setting the desired time, press the PROG button again to confirm. The "PROG" indicator light will illuminate, indicating that the automatic brew function is set.
- Cancel Program: To cancel the programmed brew, simply press the ON/OFF button.

Image: The digital display and control buttons (PROG, HOUR, MIN, ON/OFF) of the coffee maker, illustrating the programmable feature.
Video: A demonstration of setting the programmable brew time on the SUNVIVI 12-Cup Coffee Maker.
Vzdrževanje in čiščenje
Redno čiščenje zagotavlja optimalno delovanje in podaljšuje življenjsko dobo vašega kavnega aparata.
- Dnevno čiščenje:
- Pred čiščenjem aparat za kavo vedno izključite iz električnega omrežja.
- Remove the permanent filter from the brew basket. Discard used coffee grounds.
- Wash the carafe, carafe lid, and permanent filter basket in warm, soapy water. These parts are top-rack dishwasher safe.
- Obrišite zunanjost aparata za kavo z mehko damp krpo. Ne uporabljajte abrazivnih čistil ali gob za ribanje.
- Podstavka kavnega aparata ne potapljajte v vodo ali katero koli drugo tekočino.
- Odstranjevanje vodnega kamna (odstranjevanje mineralnih usedlin):
- V vašem kavnem aparatu se lahko naberejo mineralne usedline (kalcij) in vplivajo na njegovo delovanje. Vodni kamen iz kavnega aparata odstranjujte vsake 2–3 mesece ali pogosteje, če imate trdo vodo.
- Fill the water reservoir with a mixture of 1 part white vinegar and 2 parts cold water.
- Place the empty permanent filter basket into the brew basket and the empty carafe on the warming plate.
- Press the ON/OFF button to start a brewing cycle.
- After about 5 minutes, press the ON/OFF button to turn off the coffee maker and let the vinegar solution soak for 30 minutes.
- Press the ON/OFF button again to complete the brewing cycle.
- Discard the vinegar solution and run 2-3 cycles with fresh, cold water to rinse thoroughly.

Image: The swing-open brew basket and removable permanent filter, designed for easy access and cleaning.
Video: A demonstration of the swing-open brew basket and how to remove the permanent filter for cleaning.
Odpravljanje težav
If your coffee maker is not functioning as expected, please consult the table below for common issues and solutions.
| Težava | Možen vzrok | rešitev |
|---|---|---|
| Kava se ne skuha. |
|
|
| Kava je prešibka ali premočna. |
|
|
| Kava se preliva iz filtrirne košarice. |
|
|
| Water leaks from the bottom of the unit. |
|
|
Specifikacije
| Funkcija | Podrobnost |
|---|---|
| Znamka | SUNVIVI |
| Ime modela | Aparat za kavo s 12 skodelicami |
| barva | Črna |
| Zmogljivost | 12 skodelici |
| Dimenzije izdelka | 12"D x 11"Š x 6"V |
| Teža predmeta | 4.69 funtov |
| Vir napajanja | AC |
| Posebne lastnosti | Auto Drip-Stop system, Automatic Pause & Serve, Keep Warm, Programmable, Swing-open Brew Basket |
| Vključene komponente | Trajni filter |

Image: Diagram showing the dimensions (height, width, depth) of the SUNVIVI 12-Cup Coffee Maker.
Garancija in podpora
For warranty information or customer support, please refer to the contact details provided with your product packaging or visit the official SUNVIVI website. Please have your model number (12 Cup Coffee Maker) and purchase date available when contacting support.


