1. Uvod
Thank you for choosing the OSD Black 300W Subwoofer Amplifier, Model BK-SAM300. This amplifier is designed to provide powerful and precise low-frequency amplification for passive subwoofers, enhancing your home theater or audio system experience. With its robust Class AB output stage and versatile connectivity options, the BK-SAM300 delivers deep, impactful bass for movies, music, and games.
This manual provides detailed instructions for the proper installation, operation, and maintenance of your subwoofer amplifier. Please read it thoroughly before use and retain it for future reference.
2. Varnostne informacije
OPOZORILO: Da zmanjšate nevarnost požara ali električnega udara, te naprave ne izpostavljajte dežju ali vlagi.
- Pred uporabo naprave preberite vsa navodila amplifier.
- Ta priročnik shranite za poznejšo uporabo.
- Heed all warnings on the amplifier and in this manual.
- Sledite vsem navodilom.
- Te naprave ne uporabljajte v bližini vode.
- Čistite samo s suho krpo.
- Ne blokirajte prezračevalnih odprtin. Namestite v skladu z navodili proizvajalca.
- Ne nameščajte v bližini virov toplote, kot so radiatorji, grelniki, peči ali druge naprave (vključno z amplifiers), ki proizvajajo toploto.
- Ne izničite varnostnega namena polariziranega ali ozemljenega vtiča. Polarizirani vtič ima dve rezili, od katerih je ena širša od druge. Ozemljeni vtič ima dve rezili in tretji ozemljitveni vtič. Široko rezilo ali tretji zatič sta na voljo za vašo varnost. Če priloženi vtič ne ustreza vaši vtičnici, se obrnite na električarja za zamenjavo zastarele vtičnice.
- Zaščitite napajalni kabel, da se po njem ne pohodi ali stisne, zlasti pri vtičih, vtičnicah in na mestu, kjer izstopa iz naprave.
- Uporabljajte samo priključke/dodatke, ki jih je določil proizvajalec.
- Izklopite napravo med nevihtami ali ko je dlje časa ne uporabljate.
- Za vse servise se obrnite na usposobljeno servisno osebje. Servis je potreben, če je bil aparat kakor koli poškodovan, na primer poškodovan je napajalni kabel ali vtič, je bila polita tekočina ali so v aparat padli predmeti, je bil aparat izpostavljen dežju ali vlagi, ne deluje normalno , ali je bil opuščen.
3. Vsebina paketa
Označite polje za naslednje elemente:
- OSD Black 300W Subwoofer Amplifier (BK-SAM300)
- Napajalni kabel
- Uporabniški priročnik (ta dokument)
4. Izdelek je končanview
4.1 Kontrole sprednje plošče
The front panel of the BK-SAM300 features essential controls for power and audio adjustments.

Slika 4.1: spredaj in zadaj View of the BK-SAM300 Amplifier. This image displays both the front panel with its controls and the rear panel with all input/output connections.
- Gumb za vklop: Preklopi ampvklop ali izklop napajanja življenjske naprave.
- Phase Control (0° - 180°): Adjusts the phase of the subwoofer output relative to the main speakers. This helps to ensure that the subwoofer's sound waves align correctly with those of the main speakers, preventing cancellation or reinforcement issues at the crossover frequency.
- FREQ (Crossover Frequency) Control: Sets the upper frequency limit for the subwoofer. Frequencies above this setting will be filtered out. Adjustable from approximately 40Hz to 120Hz.
- GAIN (Volume) Control: Adjusts the overall output level of the subwoofer amplifier. Use this to balance the subwoofer's volume with the rest of your audio system.
4.2 Povezave in kontrole na zadnji plošči
The rear panel houses all the input and output connections, along with additional settings for advanced configuration.
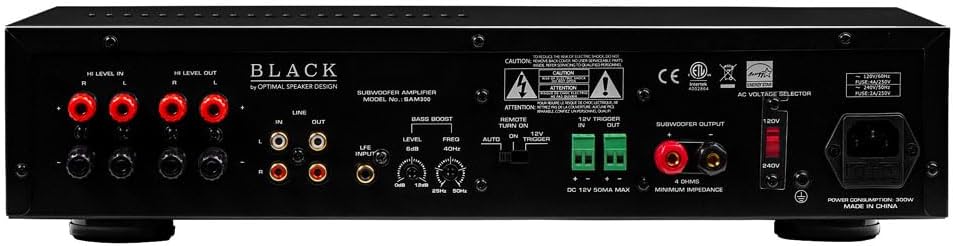
Figure 4.2: Rear Panel of the BK-SAM300 Amplifier. This image provides a detailed view of all input and output terminals, including Hi Level, Line, LFE, Bass Boost, 12V Trigger, and Subwoofer Output.
- HI LEVEL IN (Speaker Level Input): Connects directly to the speaker outputs of your receiver or amplifier. Use this if your receiver does not have a dedicated subwoofer output or LFE output.
- HI LEVEL OUT (Speaker Level Output): Passes the full-range audio signal from the HI LEVEL IN to your main speakers.
- LINE IN (RCA Input): Standard RCA stereo inputs for connecting to the pre-out or line-out of your receiver or audio source.
- LINE OUT (RCA Output): Passes the audio signal from the LINE IN to another amplifier ali avdio naprava.
- LFE INPUT (RCA Input): Dedicated input for connecting to the LFE (Low-Frequency Effects) output of an AV receiver. This bypasses the amplifier's internal crossover, relying on the receiver's bass management.
- BASS BOOST (Level & Freq):
- Level (0dB to 12dB): Adjusts the intensity of the bass boost.
- Freq (25Hz to 50Hz): Selects the center frequency at which the bass boost is applied.

Figure 4.3: Detail of Bass Boost Controls. This image highlights the Level and Freq knobs for fine-tuning the bass boost.
- REMOTE TURN ON (Manual, Auto, 12V Trigger): Izbere amplifier's power-on mode.
- Ročno: Amplifier is turned on/off manually via the front panel power button.
- Samodejno: Amplifier automatically turns on when an audio signal is detected and enters standby mode when no signal is present for a period.
- 12V sprožilni vhod/izhod: Omogoča amplifier to be turned on/off by a 12V DC trigger signal from a compatible receiver or control system.
- SUBWOOFER OUTPUT (Binding Posts): Connects to your passive subwoofer using speaker wire. Ensure correct polarity (+ to + and - to -). The amplifier je stabilen do impedance 4 ohmov.

Figure 4.4: Detail of Subwoofer Output and 12V Trigger. This image shows the binding posts for subwoofer connection and the 12V trigger terminals.
- AC VOLTAGE SELECTOR (120V/240V): Izbere ustrezen vhodni voltage za vašo regijo. Ensure this is set correctly before plugging in the amplifier.
- AC napajalni vhod: Priključi priložen napajalni kabel.
5. Nastavitev
5.1 Namestitev
Postavite amplifier in a location that allows for adequate ventilation. Avoid enclosed spaces or stacking other components directly on top of the amplifier. Keep it away from direct sunlight, heat sources, and moisture. Ensure it is placed on a stable, level surface.
5.2 Priključitev Amplifier
Choose one of the following connection methods based on your audio system's capabilities:
Method A: Using LFE Input (Recommended for AV Receivers with Subwoofer Output)
- Connect an RCA cable from the LFE or Subwoofer Pre-Out jack on your AV receiver to the LFE INPUT jack on the BK-SAM300.
- Connect your passive subwoofer to the IZHOD SUBWOOFERJA binding posts on the BK-SAM300 using appropriate gauge speaker wire. Ensure correct polarity (+ to + and - to -).
- Proceed to Section 5.3 for power connection.
Method B: Using Line Level Inputs (for Stereo Receivers or Pre-Outs)
- Connect RCA cables from the Pre-Out or Line-Out jacks of your receiver/pre-ampdvigalo za LINE IN (Left and Right) jacks on the BK-SAM300.
- Connect your passive subwoofer to the IZHOD SUBWOOFERJA binding posts on the BK-SAM300 using appropriate gauge speaker wire. Ensure correct polarity (+ to + and - to -).
- Proceed to Section 5.3 for power connection.
Method C: Using High Level Inputs (for Receivers without Dedicated Subwoofer/Pre-Outs)
- Connect speaker wires from the main speaker outputs of your receiver/ampdvigalo za VISOKA STOPNJA IN (Left and Right) binding posts on the BK-SAM300. Ensure correct polarity.
- (Optional) If you wish to pass the signal through to your main speakers, connect speaker wires from the HI. STOPNJA VEN binding posts on the BK-SAM300 to your main speakers.
- Connect your passive subwoofer to the IZHOD SUBWOOFERJA binding posts on the BK-SAM300 using appropriate gauge speaker wire. Ensure correct polarity (+ to + and - to -).
- Proceed to Section 5.3 for power connection.
5.3 Napajalni priključek
- Before connecting the power cord, ensure the AC VOLTAGE IZBORNIK stikalo na zadnji plošči nastavljeno na pravilno glasnosttage for your region (120V or 240V). Incorrect setting can damage the unit.
- Priloženi napajalni kabel priključite na Vhod za izmenični tok on the rear panel of the amplifier.
- Drugi konec napajalnega kabla priključite v ustrezno stensko vtičnico.
6. Navodila za uporabo
6.1 Vklop/izklop
The BK-SAM300 offers three power-on modes:
- Ročni način: Nastavite DALJINSKI VKLOP switch to "Manual". Press the front panel Gumb za vklop obrniti ampvklop ali izklop dvižnika.
- Samodejni način: Nastavite DALJINSKI VKLOP switch to "Auto". The amplifier will automatically turn on when an audio signal is detected at the inputs and will enter standby mode after approximately 15-20 minutes of no audio signal.
- 12V Trigger Mode: Connect a 12V DC trigger cable from your source component (e.g., AV receiver) to the 12V TRIGGER IN terminal. Set the DALJINSKI VKLOP switch to "12V Trigger". The amplifier will power on/off with the source component.
6.2 Prilagajanje kontrol
Optimal sound quality depends on proper adjustment of the amplifier's controls to match your subwoofer and listening environment.
- GAIN (Volume): Start with the GAIN control at its minimum setting. Play some audio with significant bass content. Slowly increase the GAIN until the subwoofer's output blends seamlessly with your main speakers. Avoid setting the gain too high, as this can lead to distortion.
- FREQ (Crossover Frequency):
- Če uporabljate LFE INPUT, this control is bypassed. Set your AV receiver's subwoofer crossover frequency.
- Če uporabljate LINE IN or VISOKA STOPNJA IN, adjust the FREQ control to blend the subwoofer's output with your main speakers. A good starting point is typically 80Hz-100Hz, but this may vary depending on the size and frequency response of your main speakers. Smaller main speakers usually require a higher crossover frequency.
- PHASE (0° - 180°): The phase control helps to ensure that the subwoofer's sound waves are in sync with your main speakers.
- Play music with a consistent bass line.
- While listening from your primary listening position, slowly adjust the PHASE control from 0° to 180°.
- Stop at the position where the bass sounds the loudest and most impactful. If the bass sounds weak or hollow, try adjusting the phase.
- BASS BOOST: Use the BASS BOOST controls (Level and Freq) to fine-tune the low-frequency response.
- frekvenca: Select the specific low frequency (25Hz to 50Hz) you wish to boost.
- stopnja: Adjust the amount of boost (0dB to 12dB) at the selected frequency. Use sparingly to avoid muddy or boomy bass.
7. Vzdrževanje
- Čiščenje: Odklopite amplifier from power before cleaning. Use a soft, dry cloth to wipe down the exterior. Do not use liquid cleaners or aerosol sprays.
- Prezračevanje: Ensure that the ventilation openings are not blocked by dust or debris. Periodically check and clean if necessary to maintain proper airflow.
- Shranjevanje: Če shranjujete amplifier for an extended period, disconnect it from power and store it in a cool, dry place, away from direct sunlight and extreme temperatures.
8. Odpravljanje težav
| Težava | Možen vzrok | rešitev |
|---|---|---|
| Ni moči / Amplifier se ne vklopi. |
|
|
| Ni zvoka iz globokotonca. |
|
|
| Distorted or muddy bass. |
|
|
| Brenčanje ali brenčanje. |
|
|
9. Specifikacije
| Funkcija | Podrobnost |
|---|---|
| Model | BK-SAM300 |
| Izhodna moč | 300 vatov (RMS) |
| Stabilnost impedance | 4-ohm Stable |
| Amprazred lifier | Razred AB |
| Frekvenčni odziv | 20Hz - 160Hz |
| Frekvenca križanja | Adjustable 40Hz - 120Hz |
| Fazni nadzor | 0° - 180° Variable |
| Ojačanje nizkih tonov | 25Hz - 50Hz, up to 12dB |
| Vložki | Low-level (RCA), High-level (Speaker), LFE (RCA), 12V Trigger |
| Izhodi | Subwoofer Output (Binding Posts), High-level Pass-through, 12V Trigger |
| Načini napajanja | Manual, Auto-Sensing, 12V Trigger |
| Poraba energije v stanju pripravljenosti | Manj kot 1 vat |
| Dimenzije (Š x V x G) | 17.25 x 3.75 x 13.88 palcev (43.8 x 9.5 x 35.2 cm) |
| Teža | 20 funtov (9.07 kg) |
| Material ohišja | Heavy-duty steel with brushed aluminum faceplate |
| voltage | Switchable 120V/240V |
10. Garancija in podpora
OSD Audio products are designed and manufactured to the highest quality standards. For specific warranty information regarding your BK-SAM300 Subwoofer Amplifier, please refer to the warranty card included with your product or visit the official OSD Audio webGarancijski pogoji običajno krijejo napake v materialu in izdelavi pri normalni uporabi.
For technical support, troubleshooting assistance, or service inquiries, please contact OSD Audio customer support through their official website or the contact information provided with your purchase. Please have your model number (BK-SAM300) and purchase date ready when contacting support.
Spletni viri: For the latest information, FAQs, and additional support, please visit the OSD zvok webmesto.


