1. Uvod
This manual provides detailed instructions for the safe installation, operation, and maintenance of the BESTTEN 20 Amp Decorator Receptacle Outlet. This product is designed for residential and commercial applications, offering a reliable and durable electrical connection point. Please read this manual thoroughly before installation and retain it for future reference.

Image 1.1: BESTTEN 20 Amp Decorator Receptacle Outlet with included wallplate.
2. Varnostne informacije
WARNING: RISK OF ELECTRIC SHOCK OR FIRE. IMPROPER INSTALLATION CAN RESULT IN SERIOUS INJURY OR DEATH.
- Installation should be performed by a qualified electrician or a knowledgeable individual familiar with electrical wiring.
- Always turn off power at the circuit breaker or fuse box before installing or servicing the outlet.
- Use only 12 AWG solid copper wire for connections to this 20 Amp posoda.
- Prepričajte se, da so vse žične povezave varne in pravilno izolirane.
- Do not exceed the specified electrical ratings (20A/125V/2500W).
- Ta naprava je samo za uporabo v zaprtih prostorih.
3. Vsebina paketa
Vsak paket vsebuje naslednje elemente:
- NAJBOLJŠI 20 Amp Decorator Receptacle Outlet(s)
- Decorator Wallplate(s)
- Montažni vijaki
4. Specifikacije
| Funkcija | Specifikacija |
|---|---|
| Številka modela | USP1-20-B-10PK |
| Električna ocena | 20A/125V/2500W |
| Material | Polikarbonatna termoplastika |
| barva | Bela |
| Vrsta ožičenja | Side Wiring Only |
| Žični merilnik | 12 AWG Solid Copper Wire |
| Certifikati | Na seznamu UL/cUL |
| Product Dimensions (Outlet) | 4.06" H x 1.29" W x 0.98" D (10.3cm H x 3.28cm W x 2.51cm D) |
| Product Dimensions (Wallplate) | 4.5" L x 2.75" W (11.4cm L x 6.98cm W) |

Image 4.1: Detailed dimensions of the receptacle and wallplate.
5. Navodila za namestitev
Follow these steps carefully to install your BESTTEN 20 Amp Decorator Receptacle Outlet:
- Izklopite napajanje: Locate the circuit breaker or fuse that controls the outlet you are replacing or installing. Turn off the power completely. Verify power is off using a voltage tester.
- Remove Old Outlet (if applicable): Unscrew and carefully pull the old outlet from the wall box. Disconnect the wires, noting which wire was connected to which terminal (hot, neutral, ground).
- Pripravite žice: Strip approximately 0.5 inches (1.27 cm) of insulation from the ends of the electrical wires (hot, neutral, ground). Ensure the wire ends are straight.
- Povežite žice:
- Povežite black (hot) wire to the brass-colored screw terminals.
- Povežite bela (nevtralna) wire to the silver-colored screw terminals.
- Povežite zelena ali gola bakra (mleta) žico na zeleni vijačni priključek.
This receptacle supports side wiring only. Insert the straight wire end into the clamp under the screw terminal and tighten the screw securely. Only 12 AWG solid copper wire is permitted for this 20 Amp posoda.
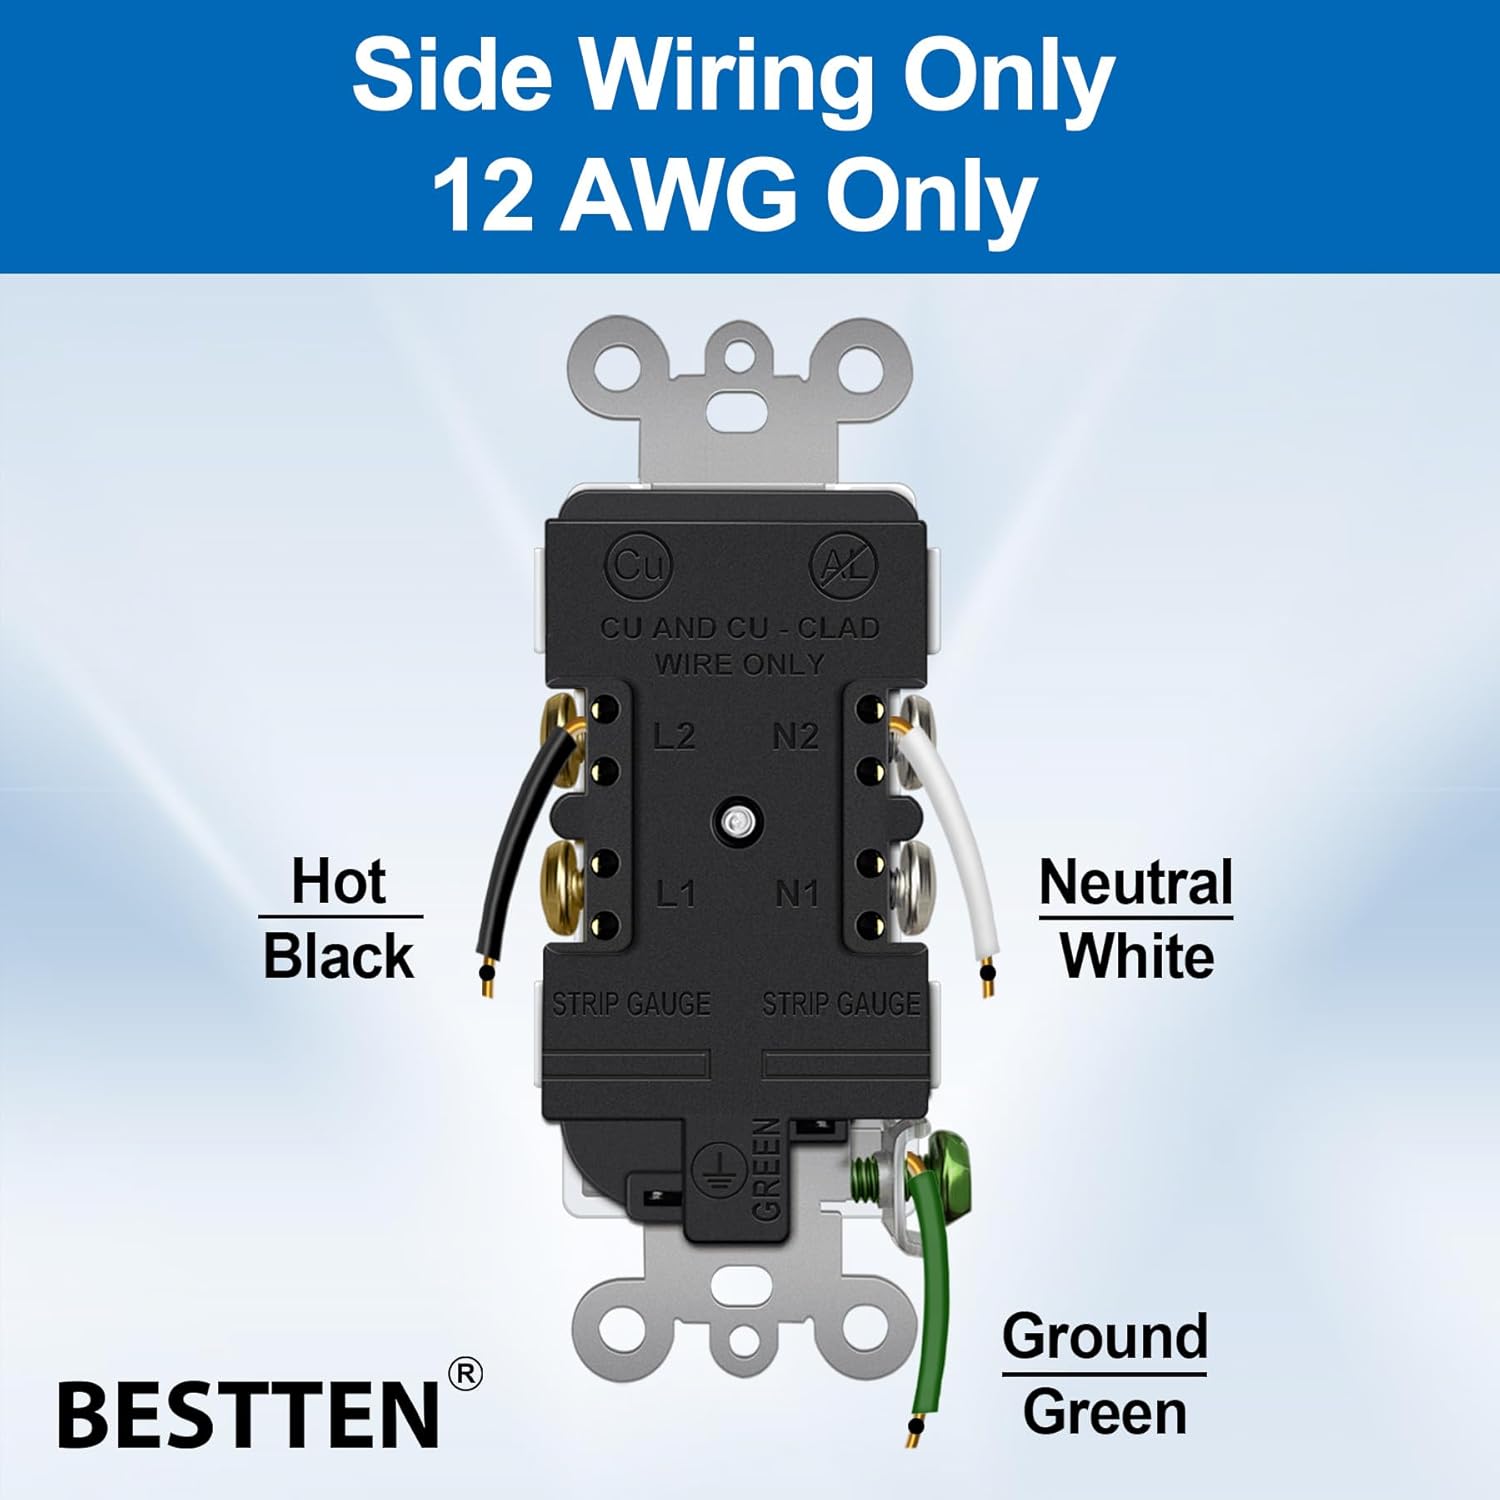
Image 5.1: Wiring diagram illustrating side wiring connections for hot (black), neutral (white), and ground (green) wires.
- Break-Off Tabs (Optional for Split Receptacles): If you require a split receptacle (two separate circuits for the top and bottom outlets), use pliers to break off the small metal tab connecting the two brass-colored (hot) terminals. Similarly, you can break off the tab connecting the two silver-colored (neutral) terminals if needed for specific wiring configurations.

Image 5.2: Illustration of breaking off the metal tab for split circuit functionality.
- Mount the Outlet: Carefully push the wired outlet back into the wall box. Use the provided mounting screws to secure the outlet to the wall box. The break-off plaster ears can be used for flush alignment.
- Namestitev stenske plošče: Attach the decorator wallplate over the installed outlet using the provided screws.
- Obnovi moč: Turn the power back on at the circuit breaker or fuse box. Test the outlet with a known working device.
6. Delovanje
The BESTTEN 20 Amp Decorator Receptacle Outlet functions as a standard electrical outlet. Once properly installed and powered, it provides two points for connecting electrical devices. Insert appliance plugs firmly into the receptacles. Ensure that the total current draw of all connected devices does not exceed the outlet's rating of 20 Amps.

Image 6.1: The receptacle outlet seamlessly integrated into a kitchen environment.
7. Vzdrževanje
The BESTTEN 20 Amp Decorator Receptacle Outlet requires minimal maintenance. To ensure optimal performance and safety:
- Regularly inspect the outlet and wallplate for any signs of damage, cracks, or discoloration.
- Clean the surface with a soft, dry cloth. Avoid using abrasive cleaners or solvents.
- If the outlet feels warm to the touch, or if there are any unusual sounds or smells, immediately disconnect power at the circuit breaker and consult a qualified electrician.

Image 7.1: The durable polycarbonate construction ensures long-lasting performance.
8. Odpravljanje težav
| Težava | Možen vzrok | rešitev |
|---|---|---|
| Outlet is not providing power. |
|
|
| Outlet feels warm. |
|
|
| Plug is difficult to insert. | New outlet, tight contacts. | This is normal for new outlets to ensure a secure connection. It should ease with repeated use. |
9. Garancija in podpora
BESTTEN products are manufactured with quality and durability in mind. For warranty information or technical support, please visit the official BESTTEN webspletno mesto ali se obrnite neposredno na njihovo službo za stranke. Za uveljavljanje garancije shranite račun.
Proizvajalec: NAJBOLJŠE
Webspletno mesto: Uradna trgovina BESTTEN na Amazonu


