1. Pomembna varnostna navodila
To reduce the risk of fire, electric shock, or injury, always follow these basic safety precautions when using your Arctic-Pro Portable Digital Ice Maker Machine:
- Pred uporabo preberite vsa navodila.
- Ne dotikajte se vročih površin. Uporabite ročaje ali gumbe.
- To protect against electrical hazards, do not immerse cord, plug, or any part of the appliance in water or other liquids.
- Potreben je natančen nadzor, kadar katero koli napravo uporabljajo otroci ali v njeni bližini.
- Izvlecite vtič iz vtičnice, ko ga ne uporabljate in pred čiščenjem. Pustite, da se ohladi, preden namestite ali odstranite dele in preden očistite aparat.
- Ne uporabljajte naprave s poškodovanim kablom ali vtičem oziroma po okvari naprave ali njeni kakršni koli poškodbi. Za pregled, popravilo ali nastavitev se obrnite na službo za stranke.
- Uporaba nastavkov, ki jih proizvajalec naprave ne priporoča, lahko povzroči nevarnost.
- Ne uporabljajte na prostem.
- Kabel ne sme viseti čez rob mize ali pulta ali se dotikati vročih površin.
- Ne postavljajte na ali blizu vročega plinskega ali električnega gorilnika ali v segreto pečico.
- Vedno najprej priključite vtič na napravo, nato pa priključite kabel v stensko vtičnico. Za izklop izklopite kateri koli gumb in nato izvlecite vtič iz stenske vtičnice.
- Naprave ne uporabljajte za druge namene, razen za predvideno uporabo v gospodinjstvu.
- Ta naprava je samo za uporabo v gospodinjstvu.
- V tej napravi ne uporabljajte jedkih kemikalij ali hlapov.
- This ice maker must be grounded.
- Ne prebadajte cevi hladilnega sredstva.
2. Izdelek je končanview
The Arctic-Pro Portable Digital Ice Maker Machine is designed to produce ice quickly and efficiently. It features a compact design suitable for various settings.
2.1 Komponente
- Enota za ledomat
- Odstranljiva košara za led
- Ledena zajemalka
- Power Cord (3-prong plug)
2.2 Lastnosti
- Digitalni zaslon: An easy-to-read LCD control panel for selecting ice size, setting timers, and controlling cleaning functions.
- jasno View Window Lid: Omogoča opazovanje procesa izdelave ledu.
- Fill Sensor: Detects water level to ensure proper operation.
- Inteligentni senzorji: Prevents the ice basket from overfilling.
- Dve velikosti ledenih kock: Choose between small (0.75 x 0.75 inches) and large (1 x 0.75 inches) ice cubes.
- Proizvodnja hitrega ledu: Produces first batch of ice in 6-8 minutes.
- Dnevna zmogljivost: Capable of producing up to 26 pounds of ice per day.
- Enhanced Cooling System: Features a fan for efficient heat dissipation.

Figure 1: Key features and components of the ice maker.
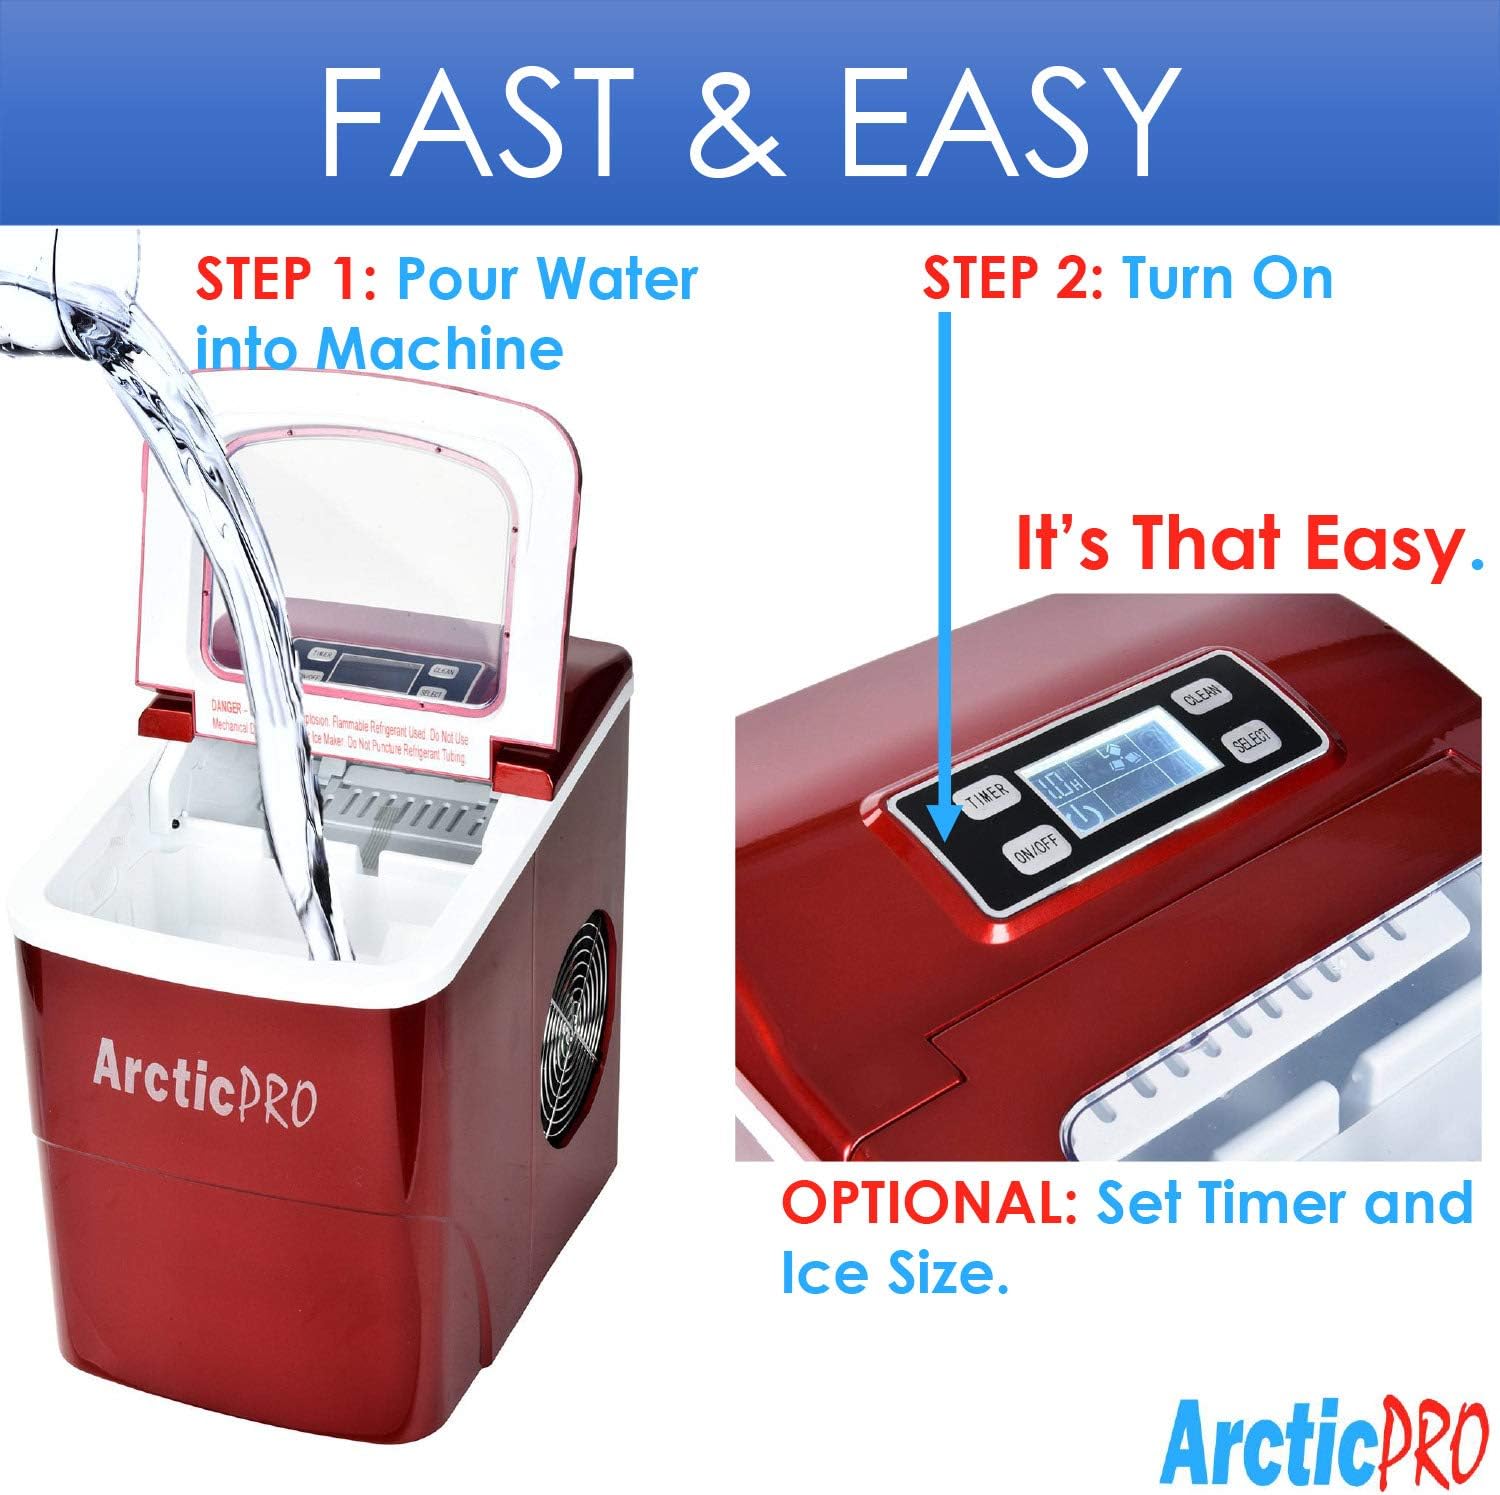
Figure 2: Ice production capabilities.
3. Navodila za nastavitev
3.1 Razpakiranje
- Odstranite ves embalažni material iz enote.
- Inspect the ice maker for any damage. If damaged, do not operate and contact customer service.
- Remove the ice basket and ice scoop from inside the unit.
3.2 Začetno čiščenje
Before first use, clean the interior of the ice maker:
- Wash the ice basket and ice scoop with warm water and mild detergent. Rinse thoroughly.
- Očistite notranjost ledomata z mehko krpo dampened with warm water and a small amount of vinegar or mild detergent. Rinse with clean water and drain.
- Pred ponovnim sestavljanjem se prepričajte, da so vsi deli suhi.
3.3 Namestitev
- Place the ice maker on a stable, level surface away from direct sunlight and heat sources.
- Ensure there is adequate ventilation around the unit, especially at the back and sides where the cooling fan is located.
- Pustite vsaj 4 palcev prostora okoli enote za pravilno kroženje zraka.
3.4 Napajalni priključek
- Plug the 3-prong power cord into a grounded electrical outlet (115V, 60Hz).
- Allow the unit to rest for at least one hour before adding water and operating, especially if it was tilted during transport.
4. Navodila za uporabo
Operating your Arctic-Pro ice maker is a simple two-step process:

Figure 3: Simple operating steps.
4.1 Dodajanje vode
- Odprite pokrov ledomata.
- Pour potable water into the water reservoir. Do not exceed the 'MAX FILL LINE' indicated inside the reservoir.
- Zaprite pokrov.

Video 1: Demonstrates adding water to the ice maker. Note: This video is a customer-generated preview and may not represent official instructions.
4.2 Začetek proizvodnje ledu
- Pritisnite VKLOP/IZKLOP button on the digital control panel to turn on the unit.
- Uporabite IZBERI button to choose your desired ice cube size: Small (S) or Large (L). The selected size will be indicated on the digital screen.
- The ice maker will begin its cycle. The first batch of ice cubes will typically be ready in 6-8 minutes.
4.3 Indikatorji
- ICE FULL: An indicator light or message on the digital screen will illuminate when the ice basket is full. The unit will automatically pause ice production. Remove ice from the basket to resume production.
- DODAJ VODO: An indicator light or message will illuminate when the water reservoir is low. Add water to the reservoir to resume ice production.
4.4 Timer Function (Optional)
The digital screen allows you to set a timer for operation. Refer to the specific instructions in your product packaging for detailed timer setup.
5. Vzdrževanje in čiščenje
Redno čiščenje in vzdrževanje zagotavljata optimalno delovanje in dolgo življenjsko dobo vašega ledomata.
5.1 Dnevno čiščenje
- After each use, unplug the unit.
- Remove the ice basket and empty any remaining ice.
- Preostalo vodo iz rezervoarja izpustite s pomočjo izpustnega čepa, ki se nahaja na dnu enote.
- Wipe the interior with a soft cloth.
5.2 Tedensko čiščenje
- Perform the daily cleaning steps.
- Prepare a solution of warm water and a small amount of white vinegar or a food-grade ice maker cleaner.
- Pour the solution into the water reservoir and allow it to sit for 10-15 minutes.
- Raztopino popolnoma odcedite.
- Rinse the reservoir thoroughly with clean water multiple times to remove any residue.
- Zunanjost obrišite z mehko damp krpo.
5.3 Shranjevanje
If storing the ice maker for an extended period:
- Ensure the unit is thoroughly cleaned and completely dry.
- Leave the lid slightly ajar to prevent mold and mildew growth.
- Hraniti na hladnem in suhem mestu.
6. Odpravljanje težav
Review Preden se obrnete na službo za stranke, si oglejte naslednje pogoste težave in rešitve.
| Težava | Možen vzrok | rešitev |
|---|---|---|
| Ledomat se ne vklopi | Brez napajanja | Check if the power cord is securely plugged into a grounded outlet. Test the outlet with another appliance. |
| Brez proizvodnje ledu | Lack of water in reservoir | Add water to the reservoir up to the MAX FILL LINE. |
| Previsoka temperatura okolice | Ensure the ice maker is in a cool environment and not exposed to direct sunlight or heat sources. | |
| Air circulation blocked | Ensure adequate space around the unit for ventilation. Clean any dust from the fan vents. | |
| Ice cubes are too small or cloudy | Temperatura vode je previsoka | Use colder water when filling the reservoir. |
| Kopičenje mineralov | Perform a thorough cleaning and descaling as per maintenance instructions. Use filtered water. | |
| Indikator "ICE FULL" sveti, vendar košara ni polna | Ice blocking sensor | Rearrange ice in the basket or remove some ice to clear the sensor path. |
| Nenavaden hrup med delovanjem | Sliši se običajni zvok delovanja | Some gurgling or fan noise is normal. If the noise is excessive or unusual, contact customer service. |
7. Specifikacije
| Funkcija | Specifikacija |
|---|---|
| Ime modela | Prenosni stroj za pripravo ledu |
| Številka modela | 21738 |
| Mere (D x Š x V) | 11.5 cm x 8.75 cm x 12.5 cm |
| Dnevna zmogljivost proizvodnje ledu | Do 26 funtov |
| First Ice Production Time | 6-8 minut |
| Velikosti ledenih kock | Small (0.75"x0.75"), Large (1"x0.75") |
| Wattage | 100 vatov |
| voltage | 115 volta |
| Nivo hrupa | 45 decibelov |
| Material | Plastika |
| Vključene komponente | Ice Maker, Ice Basket, Small Ice Scoop |

Slika 4: Dimenzije izdelka.
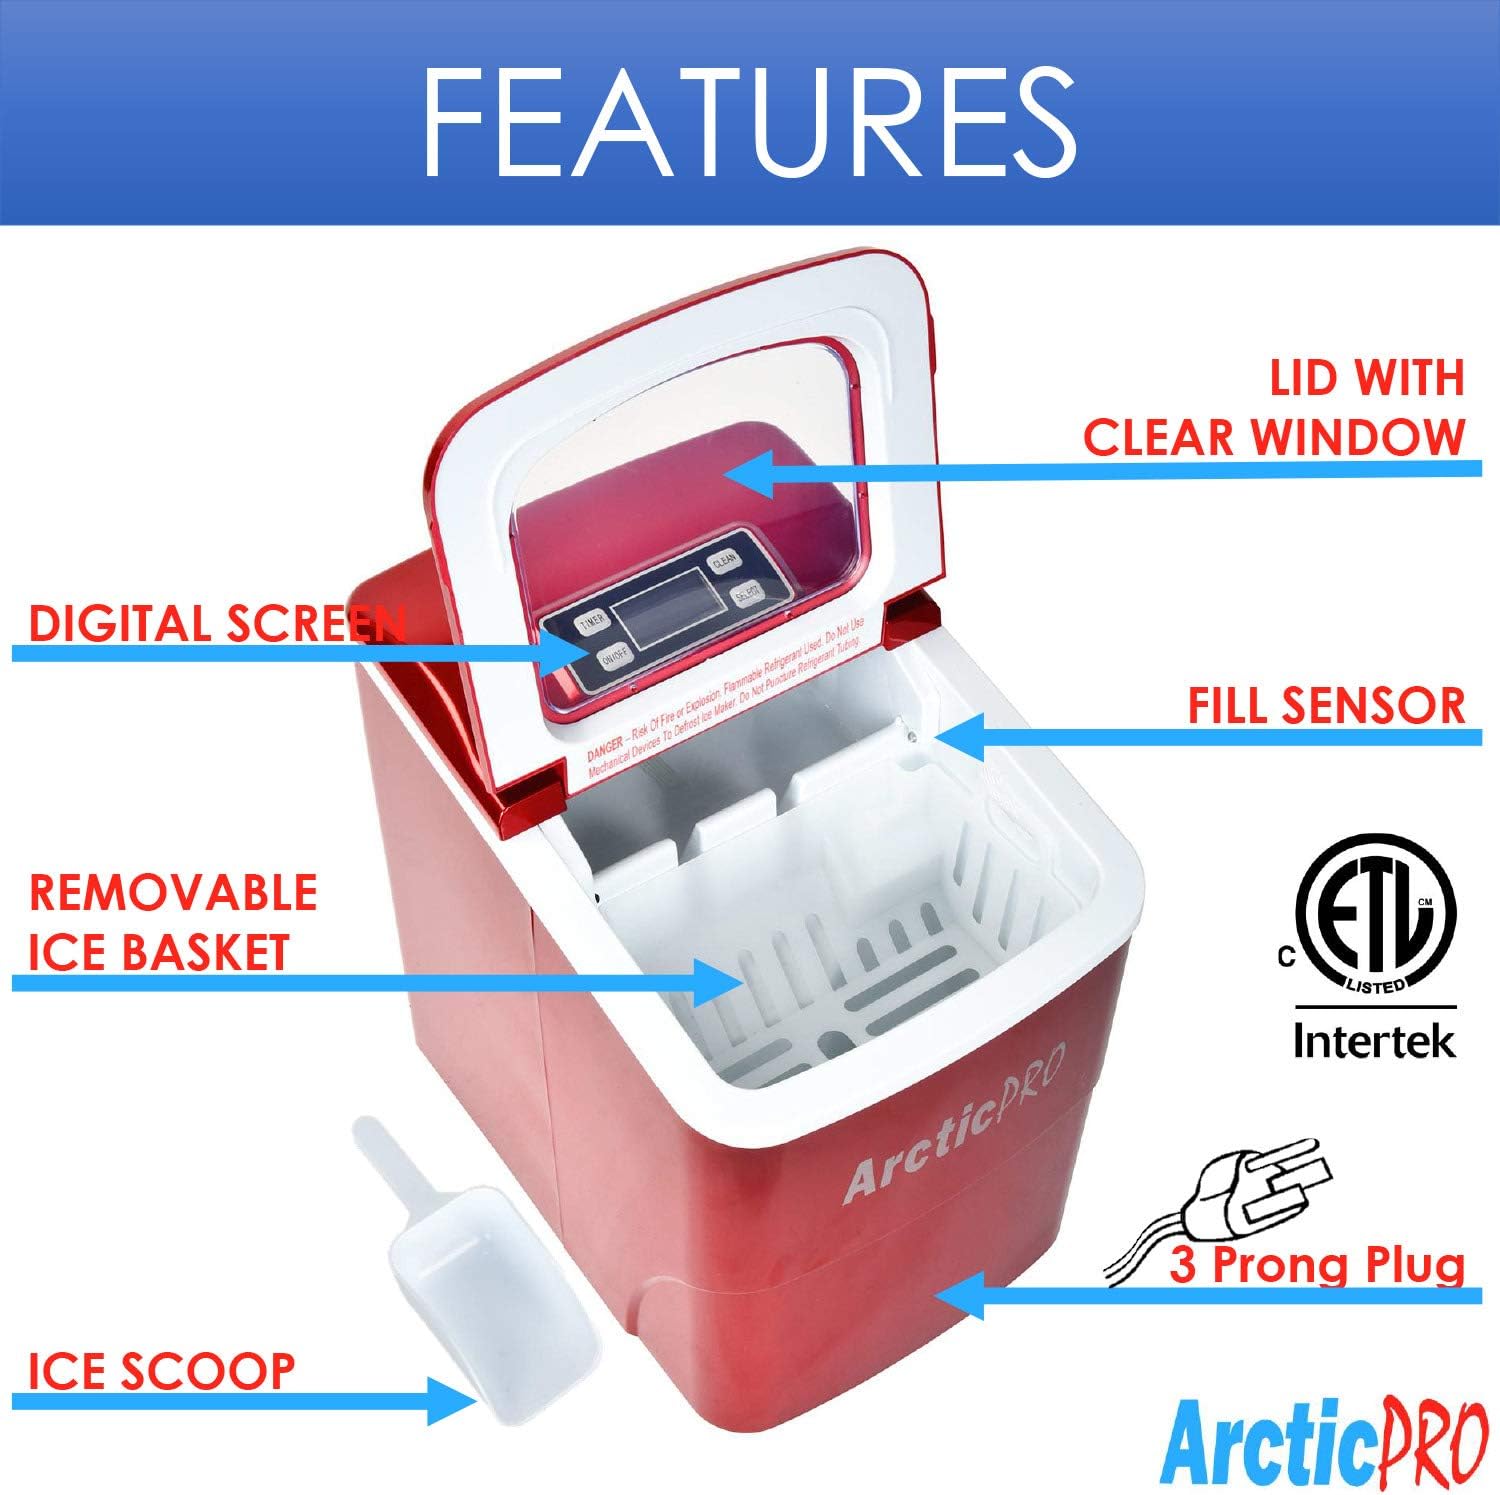
Figure 5: Ice cube size comparison.
8. Garancija in podpora strankam
Arctic-Pro products are manufactured to high-quality standards. For warranty information, product registration, or technical assistance, please refer to the warranty card included with your purchase or visit the official Arctic-Pro webmesto.
If you encounter any issues not covered in this manual, please contact Arctic-Pro customer support for further assistance.


