1. Uvod
This manual provides comprehensive instructions for the installation, operation, and maintenance of the Supermicro X10SLM+-LN4F motherboard. Designed for server applications, this motherboard features an LGA1150 socket, Intel C224 PCH, DDR3 memory support, and multiple Gigabit Ethernet ports. Please read this manual thoroughly before proceeding with installation to ensure proper setup and optimal performance.
2. Izdelek je končanview
The Supermicro X10SLM+-LN4F is a microATX server motherboard built for reliability and performance. Key features include:
- LGA1150 Socket for Intel Xeon E3-1200 v3/v4 and 4th Gen Core i3 processors.
- Intel C224 PCH chipset.
- Four DDR3 DIMM slots supporting up to 64GB ECC/non-ECC UDIMM.
- Multiple SATA3 (6Gbps) ports.
- Integrated quad Gigabit Ethernet ports.
- USB 3.0 and USB 2.0 support.
- VGA output for integrated graphics.
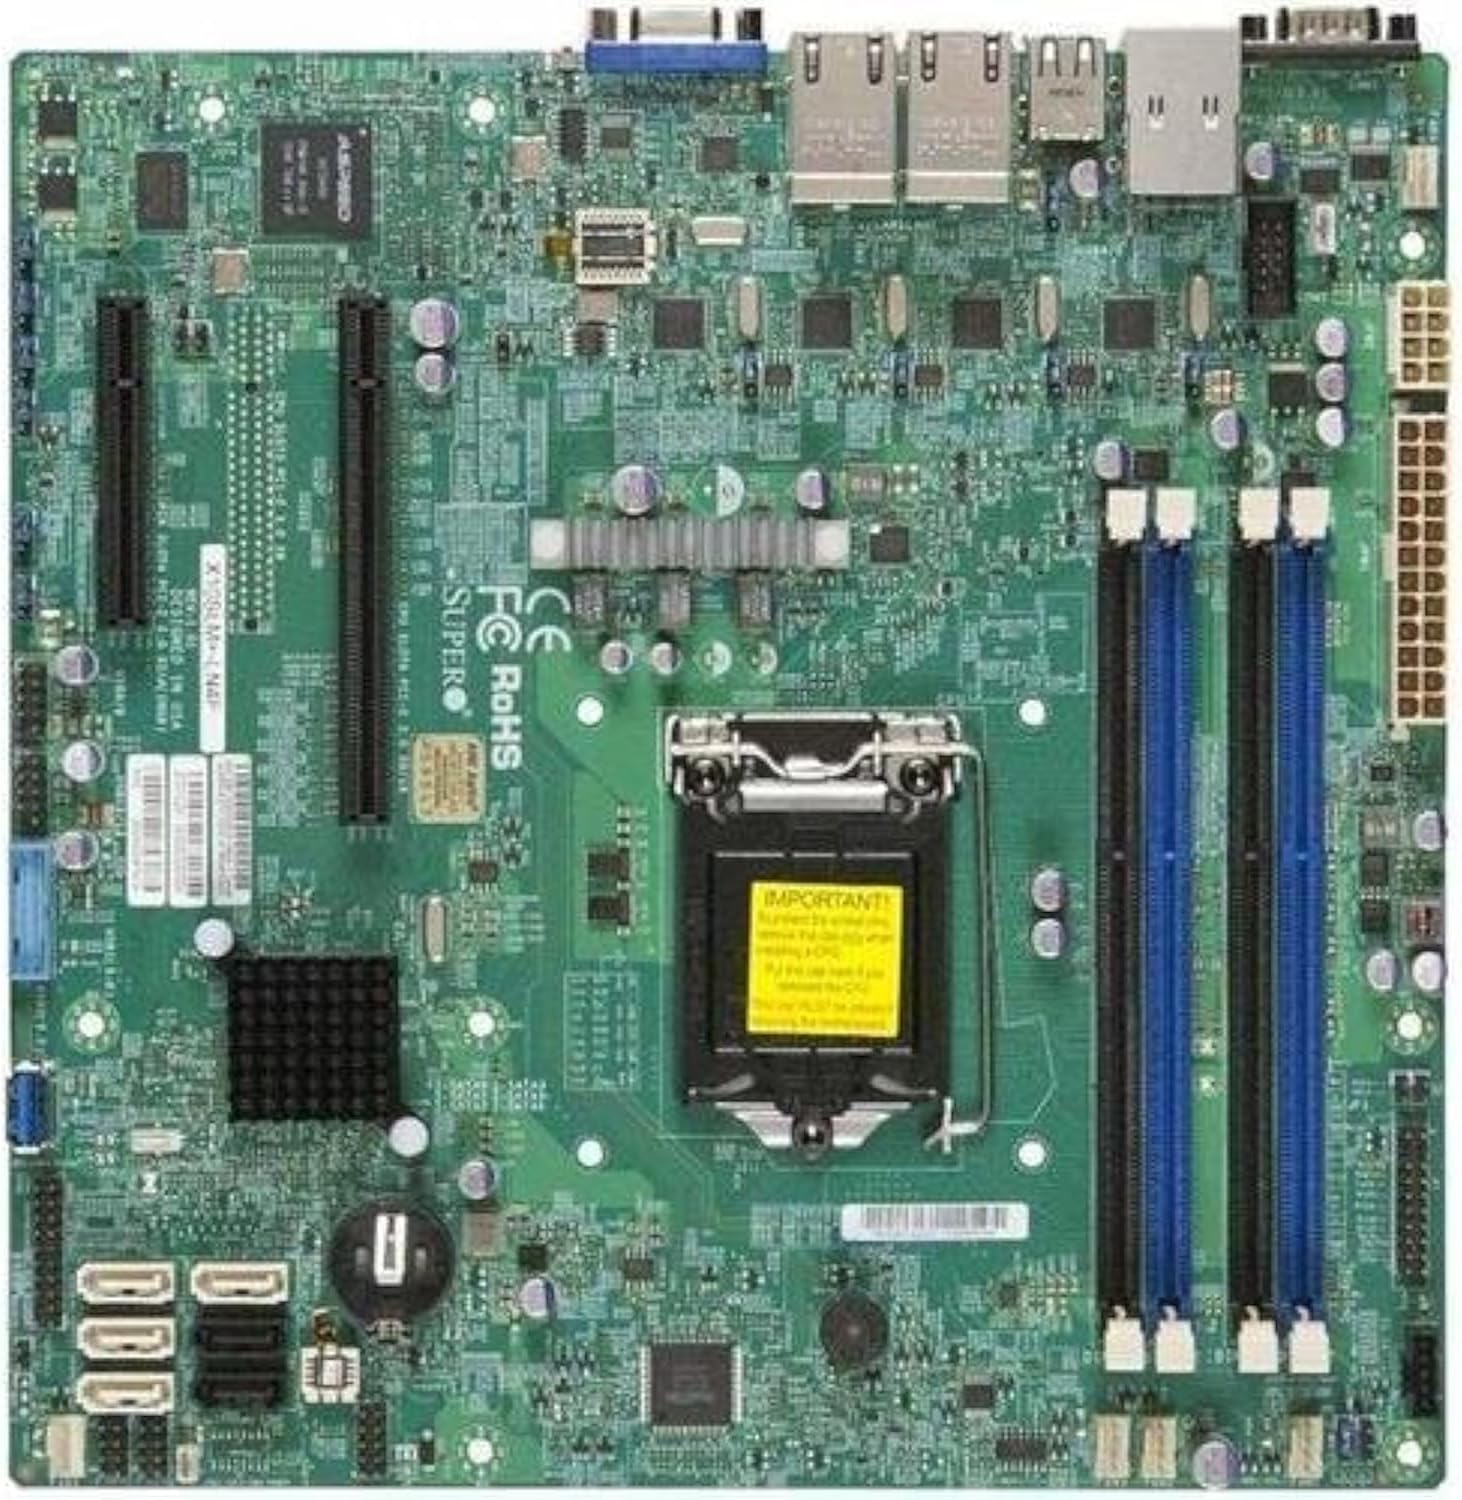
Slika 2.1: Od zgoraj navzdol view of the Supermicro X10SLM+-LN4F motherboard, showing the CPU socket, DIMM slots, PCIe slots, and various connectors.

Slika 2.2: Pod kotom view of the motherboard, highlighting the layout of components and expansion slots.
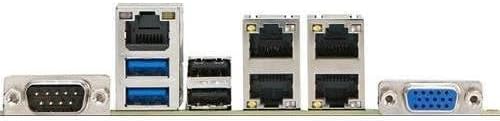
Slika 2.3: Rear I/O panel of the Supermicro X10SLM+-LN4F motherboard, featuring multiple LAN ports, USB ports, and serial ports.
3. Nastavitev in namestitev
Pred začetkom namestitve se prepričajte, da je sistem izklopljen in odklopljen iz vira napajanja. Nosite antistatično zapestnico, da preprečite poškodbe komponent zaradi elektrostatične razelektritve (ESD).
3.1. Namestitev procesorja
- Na matični plošči poiščite vtičnico LGA1150 za procesor.
- Nežno potisnite ročico za nalaganje navzdol in jo povlecite na stran, da odprete okvir za zadrževanje podnožja procesorja.
- Carefully align the triangular mark on the CPU with the corresponding mark on the socket.
- Place the CPU into the socket without forcing it.
- Close the retention frame and secure it with the load lever.
- Na integrirani razpršilnik toplote (IHS) procesorja nanesite tanko, enakomerno plast termalne paste.
- Namestite hladilnik procesorja v skladu z navodili proizvajalca.
3.2. Namestitev pomnilnika (RAM)
- Locate the four DDR3 DIMM slots. For optimal performance, refer to the motherboard's specific memory population guidelines, typically starting with slots closest to the CPU or specific colored slots for dual-channel configurations.
- Odprite zadrževalne sponke na obeh koncih reže za DIMM.
- Poravnajte zarezo na pomnilniškem modulu DDR3 s ključem v reži DIMM.
- Pomnilniški modul trdno vstavite v režo, dokler se zadrževalne sponke ne zaskočijo.
- Ensure both clips are fully closed and the module is seated correctly.
3.3. Namestitev naprave za shranjevanje
Connect SATA storage devices (HDDs/SSDs) to the SATA ports on the motherboard using SATA data cables. Connect the power cables from your power supply unit (PSU) to the storage devices.
3.4. Namestitev razširitvene kartice
This motherboard features PCI Express (PCIe) slots. To install an expansion card:
- Remove the corresponding slot cover from your chassis.
- Poravnajte razširitveno kartico z režo PCIe.
- Press down firmly until the card is fully seated in the slot.
- Kartico pritrdite z vijakom ali sponko za pritrditev na ohišje.
3.5. Napajalne povezave
- 24-pinski ATX napajalni priključek: Connect the main 24-pin power cable from your PSU to the ATX power connector on the motherboard.
- 8-pin EPS/CPU Power Connector: Connect the 8-pin (or 4+4 pin) CPU power cable from your PSU to the EPS connector near the CPU socket.
3.6. Priključki V/I na sprednji plošči in zadnji strani
- Priključki na sprednji plošči: Connect the power switch, reset switch, power LED, and HDD activity LED cables from your chassis to the corresponding pins on the motherboard's front panel header. Refer to the motherboard's silkscreen labels for correct orientation.
- USB glave: Connect front panel USB ports to the onboard USB headers.
- Audio Headers: Connect front panel audio jacks to the onboard audio header.
- Zadnja V/I plošča: Connect peripherals such as keyboard, mouse, monitor (via VGA), and network cables (to the Gigabit Ethernet ports) to the rear I/O panel.
4. Navodila za uporabo
4.1. Initial Power On and BIOS/UEFI Setup
- After all components are installed and connected, connect the power cord to the PSU and turn on the power switch on the PSU.
- Press the power button on your chassis.
- Med samodejnim preizkusom ob vklopu (POST) večkrat pritisnite DEL or F2 key (or as indicated on screen) to enter the BIOS/UEFI setup utility.
- In the BIOS/UEFI, configure essential settings such as date and time, boot order, and enable/disable specific features as required for your operating system and hardware.
- Shranite spremembe in zapustite BIOS/UEFI. Sistem se bo znova zagnal.
4.2. Namestitev operacijskega sistema
To install an operating system (e.g., Windows, Linux, VMware ESXi):
- Insert the operating system installation media (USB drive or DVD) into the system.
- Boot from the installation media (you may need to adjust the boot order in BIOS/UEFI).
- Follow the on-screen prompts to install the operating system on your chosen storage device.
- After installation, install all necessary drivers for the motherboard components (chipset, LAN, VGA, etc.) from the Supermicro webspletnega mesta ali priloženega diska z gonilniki.
5. Vzdrževanje
Redno vzdrževanje pomaga zagotoviti dolgo življenjsko dobo in stabilno delovanje vaše matične plošče in sistema.
5.1. Čiščenje
- Občasno očistite prah z matične plošče in sistemskih komponent s stisnjenim zrakom. Pred čiščenjem se prepričajte, da je sistem izklopljen in izklopljen iz električnega omrežja.
- Izogibajte se uporabi tekočih čistil neposredno na komponentah.
- Ensure proper airflow within the chassis by keeping fan vents clear.
5.2. Firmware and Driver Updates
- Preverite Supermicro website periodically for updated BIOS/UEFI firmware and drivers for your motherboard model.
- Follow the provided instructions carefully when updating firmware to avoid system instability.
5.3. Okoljski vidiki
- Matično ploščo uporabljajte v priporočenih temperaturnih in vlažnih območjih, da preprečite poškodbe.
- Ensure adequate ventilation in the server chassis.
6. Odpravljanje težav
V tem razdelku so rešitve za pogoste težave, na katere lahko naletite.
6.1. Ni napajanja / Ni POST-a (samodejni preizkus ob vklopu)
- Verify that the power supply unit (PSU) is connected correctly to the motherboard (24-pin ATX and 8-pin EPS connectors).
- Ensure the PSU is switched on and receiving power from the wall outlet.
- Preverite, ali je kabel stikala za vklop na sprednji plošči pravilno priključen na priključek matične plošče.
- Reseat the CPU, RAM modules, and any expansion cards.
- Try booting with only essential components (CPU, one RAM stick, CPU cooler) to isolate the issue.
- Listen for beep codes from the system speaker, which can indicate specific hardware failures. Refer to the Supermicro website for beep code interpretations.
6.2. Težave s prikazom
- Ensure the monitor is properly connected to the motherboard's VGA port.
- Preverite, ali je monitor vklopljen in nastavljen na pravilen vhodni vir.
- If using a discrete graphics card, ensure it is properly seated and connected to power (if required).
6.3. Operacijski sistem se ne zažene
- Check the boot order in the BIOS/UEFI to ensure the correct storage device is prioritized.
- Verify that the operating system is installed correctly on the storage device.
- Ensure SATA data and power cables are securely connected to the storage device and motherboard.
7. Specifikacije
Below are the technical specifications for the Supermicro X10SLM+-LN4F motherboard:
| Funkcija | Podrobnost |
|---|---|
| Znamka | Supermikro |
| Ime modela | X10SLM+-LN4F-B |
| CPU vtičnica | LGA1150 |
| Vrsta čipseta | Intel C224 |
| Tehnologija pomnilnika RAM | DDR3 SDRAM |
| Hitrost pomnilnika | 1600 MHz |
| Zmogljivost pomnilnika | Do 64 GB |
| Število vrat USB 2.0 | 2 (zadnji V/I) |
| Vmesnik grafične kartice | Integrated, PCI |
| Združljive naprave | Strežnik |
| Platforma | Windows 10 |
| Teža predmeta | 5.8 funtov |
| Dimenzije izdelka (DxŠxV) | 10 x 10 x 2 palcev |
| Prvič na voljo | 4. junij 2013 |
Note: Specifications are subject to change without notice. For the most current information, please refer to the official Supermicro product page.
8. Garancija in podpora
For detailed warranty information, please refer to the warranty card included with your product or visit the official Supermicro website. Technical support is available through Supermicro's customer service channels, including their support portal, email, and phone. Please have your product model number (X10SLM+-LN4F) and serial number ready when contacting support.
For the latest drivers, BIOS updates, and additional documentation, please visit: www.supermicro.com


