1. Uvod
Thank you for choosing the Technoline WS 6750 Weather Station. This device provides comprehensive weather information and timekeeping features for your home. Please read this manual carefully to ensure proper setup and operation.

Image 1.1: Technoline WS 6750 Main Unit. This image shows the front of the weather station, featuring a clear digital display with various weather data.
Ključne značilnosti:
- DCF-77 Radio-Controlled Clock with optional manual setting.
- 12/24 urni prikaz časa.
- Time zone setting (± 12 hours).
- Date and weekday display in 7 languages.
- Prikaz notranje in zunanje temperature.
- Indoor and outdoor humidity display.
- Temperature and humidity trend indicators.
- MIN/MAX memory for temperature and humidity.
- Comfort indicator.
- Frost alarm.
- Barometric pressure display with 12-hour history.
- Ikone vremenske napovedi.
- Sunrise and sunset display.
- Moon phase, moonrise, and moonset display.
- Two alarm settings with snooze function.
- Blue backlight.
- Battery charge indicator for main unit and sensors.
- Supports up to 3 outdoor sensors (one included).
- Table-standing design.
2. Nastavitev
2.1. Namestitev baterije
The Technoline WS 6750 requires batteries for operation. Ensure you have the correct battery types as specified below.
Glavna enota:
- Odprite pokrov predalčka za baterije na zadnji strani glavne enote.
- Insert the required AA Mignon LR06 batteries, observing the correct polarity (+/-).
- Zaprite pokrov prostora za baterije.
Zunanji senzor:

Image 2.1: Technoline Outdoor Sensor. This image displays the compact outdoor sensor unit.
- Odprite pokrov predalčka za baterije na zadnji strani zunanjega senzorja.
- Insert the required AAA Micro LR03 batteries, observing the correct polarity (+/-).
- Zaprite pokrov prostora za baterije.
- Pomembno: For optimal performance and battery life, use alkaline batteries.
2.2. Začetni vklop in seznanjanje senzorjev
After installing batteries in both the main unit and the outdoor sensor, the main unit will automatically begin searching for the radio-controlled time signal and the outdoor sensor signal.
- Place the outdoor sensor near the main unit during initial setup to facilitate pairing.
- The main unit's display will show a flashing radio tower icon (for DCF signal) and a flashing RF symbol (for sensor signal).
- Once the signals are received, the time will set automatically, and outdoor temperature/humidity will appear on the display. This process may take several minutes.
- If the outdoor sensor does not connect, press the "CHANNEL" button on the main unit to manually search for the sensor. Ensure the sensor is within range and its batteries are correctly installed.
2.3. Placement of Outdoor Sensor
For accurate outdoor readings, proper placement of the sensor is crucial.
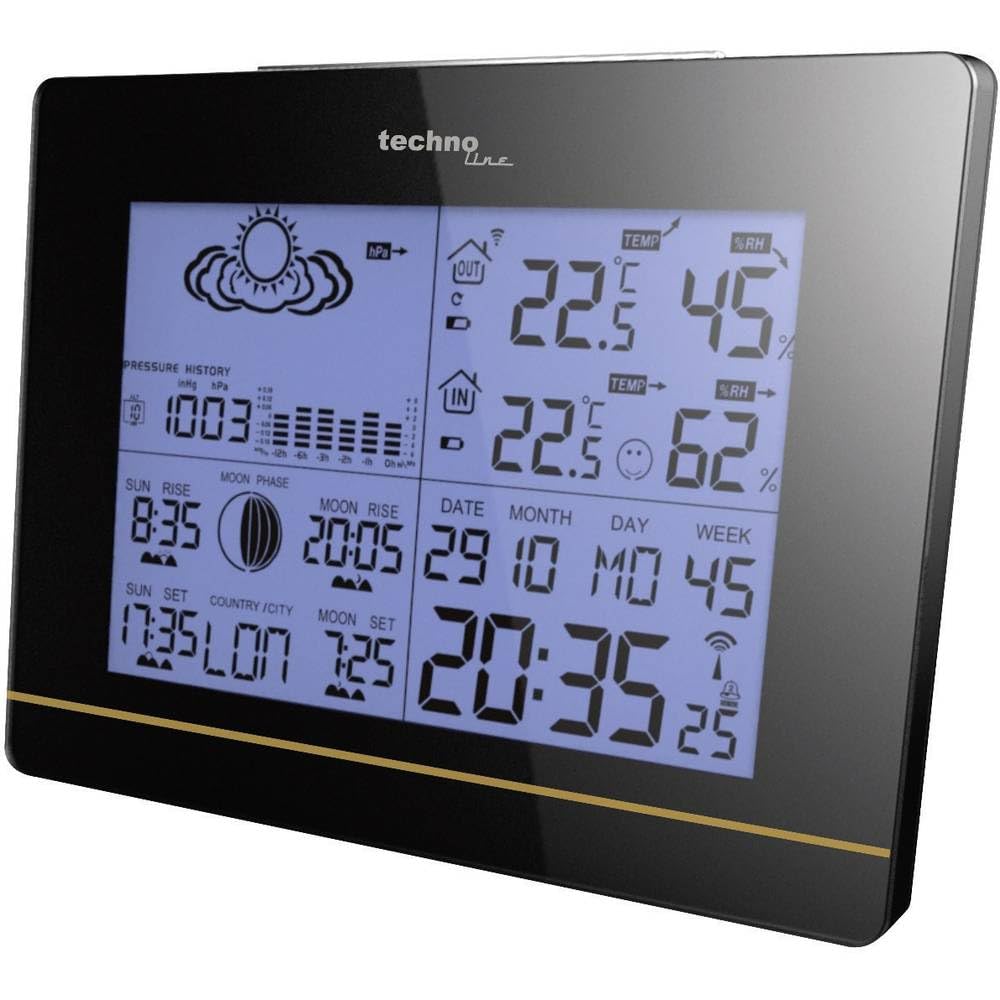
Image 2.2: Outdoor Sensor Placement. The image shows the outdoor sensor mounted on a brick wall, indicating a suitable location away from direct sunlight and rain.
- Choose a shaded location, away from direct sunlight, to prevent inaccurate temperature readings.
- Protect the sensor from direct rain and snow. While the sensor is designed for outdoor use, prolonged exposure to harsh weather can affect its lifespan and accuracy. Consider placing it under an eave or in a protective enclosure.
- Ensure the sensor is within the effective transmission range of the main unit (typically up to 30 meters in open air, less with obstacles).
- Avoid placing the sensor near large metal objects or electrical appliances that could interfere with the radio signal.
2.4. Time Zone and Manual Time Setting
If you are in a region where the DCF-77 signal is not available or if you need to adjust for a different time zone, you can manually set the time and time zone offset.
- Press and hold the "MODE" button to enter time setting mode.
- Use the "UP" or "DOWN" buttons to adjust the flashing value (e.g., time zone offset, hour, minute).
- Press "MODE" again to confirm the setting and move to the next parameter.
- The time zone offset can be set from -12 to +12 hours.
- To manually disable the DCF-77 reception, refer to the detailed instructions in the full manual (not provided here).
3. Delovanje
3.1. Prikaz čezview
The main unit's display provides a wealth of information at a glance. Key areas include:
- Čas in datum: Current time (12/24h format), date, and weekday.
- Notranji podatki: Kazalnik temperature, vlažnosti in udobja.
- Zunanji podatki: Temperature and humidity from the connected sensor(s).
- Vremenska napoved: Icons indicating predicted weather conditions (sunny, cloudy, rainy, etc.).
- Barometrični tlak: Current pressure and 12-hour history graph.
- Astronomski podatki: Sunrise/sunset times, moon phase, moonrise/moonset times.
- Alarmi: Alarm indicators when set.
- Indikatorji baterije: Low battery warnings for main unit and sensors.
3.2. Funkcije gumbov
The Technoline WS 6750 features several buttons for navigation and setting adjustments:
- NAVODILA: Enters setting modes (time, alarm, date) and confirms selections.
- GOR (▲): Increases values during settings, cycles through display modes.
- DOL (▼): Decreases values during settings, cycles through display modes.
- ZGODOVINA: Displays 12-hour barometric pressure history.
- KANAL: Switches between outdoor sensors (if multiple are connected) or initiates sensor search.
- SNOOZE/LUČ: Activates backlight, snoozes alarm.
- PONASTAVITI: Ponastavi enoto na tovarniške nastavitve (običajno majhen gumb, ki zahteva pritisk na žebljiček).
3.3. Nastavitev alarmov
The weather station has two independent alarms.
- Press the "MODE" button repeatedly until "AL1" or "AL2" appears on the display.
- Press and hold "MODE" to enter alarm setting mode. The hour will flash.
- Use "UP" or "DOWN" to set the desired hour. Press "MODE" to confirm.
- Set the minutes similarly. Press "MODE" to confirm and exit.
- To activate/deactivate an alarm, press "UP" or "DOWN" when "AL1" or "AL2" is displayed. An alarm icon will appear/disappear.
- When an alarm sounds, press "SNOOZE/LIGHT" to activate the snooze function (typically 5 minutes). To stop the alarm, press any other button.
3.4. MIN/MAX Temperature and Humidity
The unit records the minimum and maximum indoor/outdoor temperature and humidity values.
- Press the "UP" button repeatedly to cycle through current, maximum (MAX), and minimum (MIN) readings for temperature and humidity.
- To clear the recorded MIN/MAX values, press and hold the "UP" button while MIN or MAX values are displayed.
4. Vzdrževanje
4.1. Zamenjava baterije
When the battery charge indicator appears on the display for either the main unit or a sensor, it's time to replace the batteries.
- Replace all batteries in the respective unit (main unit or sensor) at the same time with new, high-quality alkaline batteries.
- Med namestitvijo pazite na pravilno polarnost.
- After replacing batteries in the outdoor sensor, the main unit may need to re-establish connection. Press the "CHANNEL" button if the outdoor readings do not reappear automatically.
- Stare baterije zavrzite odgovorno v skladu z lokalnimi predpisi.
4.2. Čiščenje
- Glavno enoto in senzor obrišite z mehko krpoamp krpo.
- Ne uporabljajte abrazivnih čistil ali topil, saj lahko poškodujejo zaslon aliasing.
- Ensure no water enters the battery compartments or other openings.
4.3. Outdoor Sensor Protection
The outdoor sensor is not fully waterproof. To prolong its life and ensure accurate readings, it is recommended to protect it from direct exposure to heavy rain, snow, and extreme temperatures.
- Mount the sensor under an eave, porch, or in a weather-resistant enclosure.
- Ensure adequate ventilation around the sensor for accurate temperature and humidity measurement.
5. Odpravljanje težav
| Težava | Možen vzrok | rešitev |
|---|---|---|
| Na glavni enoti ni prikaza. | Baterije so prazne ali nepravilno vstavljene. | Zamenjajte baterije in pazite na pravilno polarnost. |
| Zunanja temperatura/vlažnost se ne prikazuje ali utripa. | Senzor izven dosega, prazna baterija senzorja ali motnje. |
|
| Prikazan je napačen čas. | DCF-77 signal not received or incorrect time zone setting. |
|
| Display difficult to read. | Viewing angle issue. | Prilagodite viewing angle of the main unit. The display is optimized for viewing slightly from above or below. |
| Inaccurate outdoor readings. | Senzor je izpostavljen neposredni sončni svetlobi, dežju ali virom toplote. | Relocate the outdoor sensor to a shaded, protected area with good air circulation. |
If problems persist, try performing a full reset of the unit by pressing the "RESET" button (usually located in a small hole on the back, requiring a thin object like a paperclip).
6. Specifikacije
| Model: | WS 6750 |
| Znamka: | Tehnolinija |
| Dimenzije (glavna enota): | 17.1 x 5 x 12.3 cm (D x Š x V) |
| Teža (glavna enota): | 335 gramov |
| Napajanje (glavna enota): | AA Mignon LR06 batteries (not included) |
| Moč (zunanji senzor): | AAA Micro LR03 batteries (not included) |
| Material: | Plastika |
| Povezljivost: | Radio Frequency (for sensor communication) |
| Posebne lastnosti: | Alarm, Clock, Backlight |
7. Garancija in podpora
Information regarding the product warranty is not available in the provided data. For detailed warranty terms, technical support, or to purchase additional sensors, please refer to the official Technoline webali se obrnite na svojega prodajalca.
Always keep your purchase receipt as proof of purchase for any warranty claims.