1. Uvod
The Brother LS2125 is a versatile sewing machine designed for various sewing projects, from basic mending to creating garments and quilts. It features 25 built-in stitch functions, including straight, zigzag, decorative, heirloom, and quilt stitches. This machine is equipped with an automatic 4-step buttonholer and a free arm for sewing cuffs and sleeves, making it suitable for both beginners and experienced sewers.
2. Izdelek je končanview
The Brother LS2125 sewing machine offers a range of features to assist with your sewing tasks. Key components include the stitch selector, tension dial, and a convenient work light.
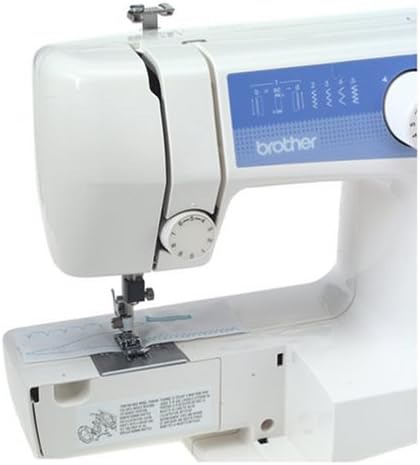
Slika 2.1: Spredaj view of the Brother LS2125 sewing machine, showing the stitch selection dial and tension control.
Included with your sewing machine is a set of essential accessories to get you started and maintain your machine.
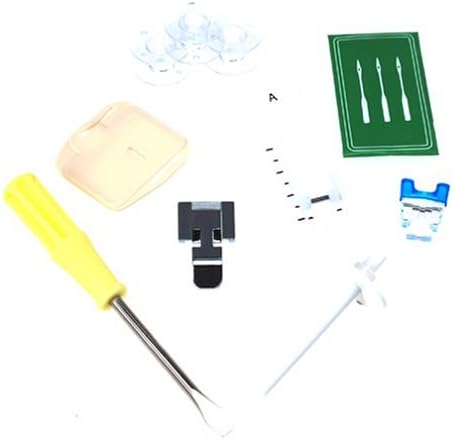
Slika 2.2: Included accessories such as bobbins, needles, screwdriver, and various presser feet.
Ključne značilnosti:
- 25 Built-in Stitch Functions: Includes straight, zig-zag, satin, elastic, and blind hem stitches.
- Automatic 4-Step Buttonholer: Poenostavi postopek ustvarjanja gumbnic.
- Auto-Set Stitch Length and Width: For simplified operation.
- Easy Threading and Quick-Set Bobbin Winding: Designed for user convenience.
- Snap-on Presser Feet: Allows for quick and easy changing of feet.
- Zmogljivost proste roke: Converts from flat surface to free arm for sewing cuffs, sleeves, and pant legs.
- Integrated Work Light: Illuminates the sewing area for better visibility.
- Shranjevanje dodatne opreme: Built-in compartment for keeping tools and accessories organized.
3. Nastavitev
3.1 Razpakiranje in namestitev
- Previdno vzemite stroj iz embalaže.
- Stroj postavite na stabilno, ravno površino.
- Ensure the power cord is accessible for connection to a suitable power outlet.
3.2 Napajalni priključek
- Connect the power cord to the machine and then to a wall outlet.
- Turn on the power switch, usually located on the side or back of the machine. The work light should illuminate.
3.3 Navijanje vretenca
- Na zatič za navijanje položite tuljavo niti.
- Sledite poti napeljave za navijanje vretenca, ki je običajno označena na diagramih na stroju.
- Na vreteno navijalca vretenca namestite prazno vreteno.
- Push the spindle to the right to engage the bobbin winding mechanism.
- Gently press the foot controller or engage the start/stop button to wind the thread onto the bobbin.
- Once full, cut the thread and remove the bobbin.
3.4 Vdevanje zgornje niti
- Dvignite ročico stiskalne noge.
- Na zatič za navijanje položite tuljavo niti.
- Follow the numbered threading guides on the machine, ensuring the thread passes through all tension discs and guides.
- Iglo napeljite od spredaj nazaj.
3.5 Vstavljanje vretenca
- Odprite pokrov vretenca.
- Vstavite navito vreteno v vreteno in pazite, da se nit odvija v pravilni smeri (običajno v nasprotni smeri urinega kazalca).
- Pull the bobbin thread through the tension spring and guide.
- Zaprite pokrov vretenca.
- Spustite iglo, da poberete nit vretenca, nato pa obe niti povlecite pod tačko in nazaj.
4. Navodila za uporabo
4.1 Izbira vzorca šiva
- Turn the pattern selection dial to choose one of the 25 available stitch patterns.
- The machine automatically sets the optimal stitch length and width for most patterns.
4.2 Nastavitev napetosti niti
- The upper thread tension dial allows for fine-tuning the stitch balance.
- Adjust the dial as needed to achieve even stitches on both sides of the fabric. A balanced stitch shows threads meeting in the middle of the fabric layers.
4.3 Osnovno šivanje
- Postavite blago pod tačko.
- Spustite ročico stiskalne noge.
- Za začetek šivanja nežno pritisnite nožni regulator.
- To sew in reverse, press and hold the reverse lever/button.
4.4 Izdelovanje gumbnic
- Pritrdite nogo za gumbnico.
- Select the 4-step buttonhole pattern on the dial.
- Follow the machine's markings for each of the four steps to create a perfectly sized buttonhole.
- Use the buttonhole adjusting screw for fine adjustments if necessary.
4.5 Uporaba proste roke
- To use the free arm, slide off the accessory storage compartment.
- This exposes the narrow free arm, ideal for sewing cylindrical items like cuffs, sleeves, and pant hems.
4.6 Menjava šivalnih tačk
- Ensure the needle is in the highest position and the power is off.
- Press the release button on the back of the presser foot holder to detach the current foot.
- Align the new snap-on presser foot with the holder and lower the presser foot lever until it snaps into place.
5. Vzdrževanje
5.1 Čiščenje stroja
- Pred čiščenjem stroj vedno izključite iz električnega omrežja.
- Z mehko krtačo odstranite vlakna in prah z območja vretenca in transportnih zob.
- Obrišite zunanjost z mehko, suho krpo. Izogibajte se uporabi močnih kemikalij.
5.2 Menjava igle
- Izklopite stroj in dvignite iglo v najvišji položaj.
- Odvijte iglo clamp privijte in odstranite staro iglo.
- Vstavite novo iglo z ravno stranjo obrnjeno proti zadnji strani stroja in jo potisnite navzgor, kolikor gre.
- Zategnite iglo klamp varno privijte.
- Replace needles regularly (every 8-10 hours of sewing) or when they become dull or bent to prevent skipped stitches and fabric damage.
5.3 Shranjevanje dodatkov
- Utilize the extension table with its integrated accessory storage to keep your bobbins, needles, and presser feet organized and readily available.
6. Odpravljanje težav
This section addresses common issues you might encounter during operation. For more complex problems, refer to the full instruction manual or contact customer support.
| Težava | Možen vzrok | rešitev |
|---|---|---|
| Preskočeni šivi | Incorrectly threaded needle, bent or dull needle, wrong needle type for fabric. | Re-thread the machine, replace the needle, ensure the correct needle is used. |
| Pretrganje niti (zgornji del) | Incorrect upper tension, improperly threaded, burr on needle plate, poor quality thread. | Adjust tension, re-thread, check for burrs, use good quality thread. |
| Pretrganje niti (vretenca) | Incorrectly wound bobbin, bobbin inserted incorrectly, lint in bobbin case. | Ponovno navijte vreteno, pravilno vstavite vreteno in očistite vreteno. |
| Neenakomerni šivi / zankanje | Incorrect thread tension (upper or bobbin), improper threading. | Adjust tension dials, re-thread both upper and bobbin threads. |
| Stroj se ne zažene | Power cord not connected, power switch off, foot controller not connected. | Preverite napajalne priključke, prepričajte se, da je stikalo vklopljeno, in preverite priključek nožnega regulatorja. |
7. Specifikacije
Below are the technical specifications for the Brother LS2125 sewing machine.

Slika 7.1: Dimensions of the Brother LS2125 sewing machine.
| Funkcija | Podrobnost |
|---|---|
| Številka modela | LS2125 |
| Dimenzije izdelka | 17.5 x 14.2 x 7.5 palcev (44.45 x 36.07 x 19.05 cm) |
| Teža predmeta | 15.45 funtov (7.01 kg) |
| Znamka | brat |
| barva | Bela |
| Material | Plastika |
| Vir napajanja | Električni na kabel |
| UPC | 012502609773, 012502625360 |
| Proizvajalec | Brother International Corporation |
| Prvič na voljo | 2. maj 2006 |
8. Garancija in podpora
8.1 Omejena garancija
The Brother LS2125 sewing machine is covered by a 25-letna omejena garancija. This warranty typically covers manufacturing defects and specific components. Please refer to the warranty card included with your product for full terms and conditions, including coverage details and limitations.
8.2 Podpora strankam
For technical assistance, troubleshooting beyond this manual, or warranty claims, please contact Brother customer support. You can typically find contact information on the official Brother webspletnem mestu ali v dokumentaciji, ki je priložena vaši napravi.
- Spletni viri: Obiščite uradno podporo Brother website for FAQs, digital manuals, and driver downloads.
- Telefonska podpora: Contact Brother customer service during business hours for direct assistance.
- Pooblaščeni servisni centri: For repairs, locate an authorized Brother service center in your area.


