Nintendo 64 System Pikachu Version Blue/Yellow Instruction Manual
Model: Nintendo 64 System Pikachu Version
1. Uvod
This manual provides essential information for the proper setup, operation, and maintenance of your Nintendo 64 System Pikachu Version Blue/Yellow console. Please read these instructions carefully before using your system to ensure optimal performance and longevity.
2. Vsebina paketa
Preverite, ali vaš paket vsebuje naslednje elemente:
- Nintendo 64 System Pikachu Version Console (Blue/Yellow)
- Nintendo 64 Controller (matching color)
- AC Adapter (Power Supply)
- Stereo A/V Cable
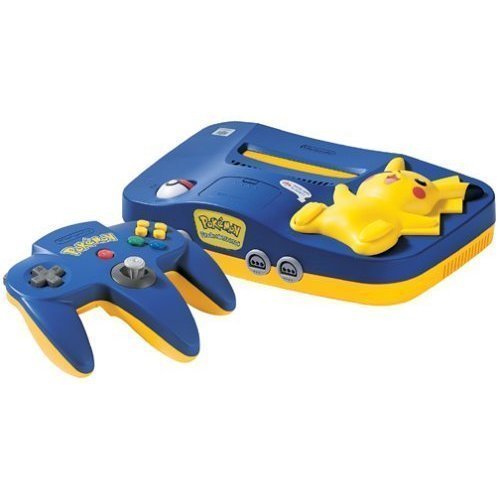
This image displays the Nintendo 64 System Pikachu Version in its distinctive blue and yellow casing. The console features a raised-relief Pikachu figure on top, with the Poké Ball power switch located on its foot. The console's unique design includes light-up cheeks for Pikachu when powered on.
3. Nastavitev
3.1 Priključitev na televizor
- Ensure your television is turned off.
- Connect the yellow plug of the Stereo A/V Cable to the video input (usually yellow) on your television.
- Connect the white plug to the left audio input (white) and the red plug to the right audio input (red) on your television.
- Connect the multi-out connector of the Stereo A/V Cable to the 'MULTI OUT' port on the back of the Nintendo 64 console.
3.2 Priključitev napajanja
- Insert the small end of the AC Adapter into the 'DC 12V' input on the back of the Nintendo 64 console.
- Plug the other end of the AC Adapter into a standard electrical outlet.
3.3 Inserting a Game Pak
- Prepričajte se, da je konzola izklopljena.
- Insert a Nintendo 64 Game Pak into the slot on top of the console, with the label facing forward. Press firmly until it clicks into place.
3.4 Priključitev krmilnikov
- Plug the controller cable into one of the controller ports on the front of the console. Up to four controllers can be connected.
4. Navodila za uporabo
4.1 Vklop/izklop
- To turn the system ON, rotate the Pokຐ Ball switch on Pikachu's foot to the 'ON' position. Pikachu's cheeks will light up.
- To turn the system IZKLOP, rotate the Pokຐ Ball switch on Pikachu's foot to the 'OFF' position.
4.2 Resetting the Console
- To reset the console during gameplay, press Pikachu's foot (the Pokຐ Ball switch) firmly. This will restart the game.
4.3 Igranje iger
- After powering on, select the correct video input channel on your television.
- The game will typically start automatically. Follow on-screen instructions for gameplay.
5. Vzdrževanje
5.1 Čiščenje konzole
- Always power off and unplug the console before cleaning.
- Wipe the exterior of the console with a soft, dry cloth. For stubborn dirt, slightly dampkrpo navlažite z vodo in jo nato takoj obrišite do suhega.
- Ne uporabljajte abrazivnih čistil, topil ali kemičnih razpršil.
5.2 Cleaning Game Paks
- If a game pak is not functioning correctly, gently clean the gold connector pins on the bottom of the pak with a cotton swab lightly dampz izopropilnim alkoholom. Preden ga ponovno vstavite, pustite, da se popolnoma posuši.
5.3 Shranjevanje
- Konzolo in igralne pakete shranjujte na hladnem in suhem mestu, stran od neposredne sončne svetlobe, ekstremnih temperatur in prekomernega prahu.
- Keep the console away from strong magnetic fields.
6. Odpravljanje težav
6.1 Brez napajanja
- Ensure the AC Adapter is securely plugged into both the console and a working electrical outlet.
- Check if the Pokຐ Ball power switch is in the 'ON' position.
6.2 No Video or Audio
- Verify that the Stereo A/V Cable is correctly connected to both the console and the television.
- Ensure your television is set to the correct video input channel (e.g., AV1, Video 1).
- Check that the game pak is fully inserted into the console.
6.3 Game Not Loading or Freezing
- Remove the game pak and reinsert it firmly.
- Clean the game pak's connector pins as described in the Maintenance section.
- Press Pikachu's foot to reset the console.
7. Specifikacije
| ASIN | B00005249D |
| Datum izdaje | 29. september 1996 |
| Dimenzije izdelka | 12 x 9 x 6 palcev |
| Teža predmeta | 4 funta |
| Proizvajalec | Nintendo of America |
8. Garancija in podpora
For warranty information and technical support, please refer to the documentation included with your purchase or visit the official Nintendo support webspletnega mesta. Shranite dokazilo o nakupu za morebitne garancijske zahtevke.