
1. Uvod
This manual provides detailed instructions for the installation, operation, and maintenance of your STUDIOFINIX Bluetooth 5.4 4-Zone 8-Channel Audio Amplifier Receiver. This amplifier is designed to deliver high-fidelity audio across multiple rooms, offering independent zone control, various input options, and a professional karaoke function. Please read this manual thoroughly before use to ensure proper setup and optimal performance.
2. Varnostna navodila
- vir energije: Uporabljajte samo priloženi napajalnik. Prepričajte se, da je glasnosttage ustreza zahtevam, navedenim na napravi.
- Prezračevanje: Do not block any ventilation openings. Install in a location with adequate airflow to prevent overheating.
- Voda in vlaga: Naprave ne izpostavljajte dežju, vlagi ali kapljajočim/brizgajočim tekočinam. Hranite stran od vodnih virov.
- Toplota: Ne postavljajte v bližino virov toplote, kot so radiatorji, grelniki, peči ali druge naprave, ki proizvajajo toploto.
- Čiščenje: Unplug the unit from the power outlet before cleaning. Use a dry, soft cloth only.
- Servisiranje: Tega izdelka ne poskušajte servisirati sami. Vsa servisna dela prepustite usposobljenemu servisnemu osebju.
- Impedanca zvočnika: Ensure connected speakers have an impedance of 4-8 ohms. Connecting speakers with lower impedance may damage the amplifier.
3. Vsebina paketa
Preverite, ali so v vašem paketu priloženi vsi spodaj navedeni elementi:
- STUDIOFINIX Ampojačevalec x 1
- Napajalnik x 1
- Black Terminal Connectors x 4
- Navodila za uporabo x 1

Figure 3.1: Package Contents. The image displays the amplifier unit, its power adapter, four black terminal connectors, and the user manual.
4. Izdelek je končanview
4.1 Predstavitev sprednje plošče
The front panel provides access to primary controls and input ports for convenient operation.

Figure 4.1: Front Panel Layout. Key controls include the Volume/Power ON/OFF knob, MIC VOL knob, MIC input, AUX input, USB port, TF Card slot, and Bass/Treble adjustment knobs.
- VOLUME/PWR ON/OFF: Nadzira glavno glasnost in vklopi/izklopi enoto.
- MIC GOL: Prilagodi glasnost priključenega mikrofona.
- MIC vhod: 3.5 mm priključek za priklop mikrofona.
- AUX vhod: 3.5mm jack for auxiliary audio devices.
- Vrata USB: Za predvajanje zvoka files pogona USB.
- Reža za TF kartice: Za predvajanje zvoka files from a TF (MicroSD) card.
- NIZKI/VISOKI: Adjusts the low and high frequency response of the audio output.
4.2 Predstavitev zgornje plošče
The top panel features controls for mode selection, playback, and echo effects for karaoke.

Figure 4.2: Top Panel Layout. This view highlights the MODE button, playback controls (Fast Retreat/Previous Song, Play/Pause, Fast Forward/Next Song), and the ECHO button for microphone effects.
- NAVODILA: Switches between input sources (Bluetooth, Optical, AUX, LINE IN, USB, TF Card).
- Nadzor predvajanja: Buttons for previous track, play/pause, and next track when using USB/TF card or Bluetooth.
- ODMEV: Activates and adjusts the echo effect for the microphone input.
- Zone Control Buttons (1, 2, 3, 4): Independently turn on or off each of the four audio zones.
4.3 Back Panel Introduction
The back panel contains the main speaker outputs and additional wired input options.

Figure 4.3: Back Panel Layout. This image shows the DC IN port, speaker output terminals for Zones 1-4 (supporting 8 speakers), Optical input, and stereo RCA Line In (R/L) inputs.
- DC IN: Power input port for the provided power adapter.
- Speaker Outputs (ZONE 1-4): Connect up to 8 speakers (2 per zone) with 4-8 ohm impedance. Red terminals are positive (+), black terminals are negative (-).
- OPTIČNI vhod: Digital audio input for connecting devices like TVs or game consoles.
- VHOD (D/L): Stereo RCA inputs for connecting analog audio sources.
5. Nastavitev
5.1 Priključitev zvočnikov
The amplifier supports up to 8 speakers, divided into 4 independent zones. Ensure your speakers have an impedance of 4-8 ohms.
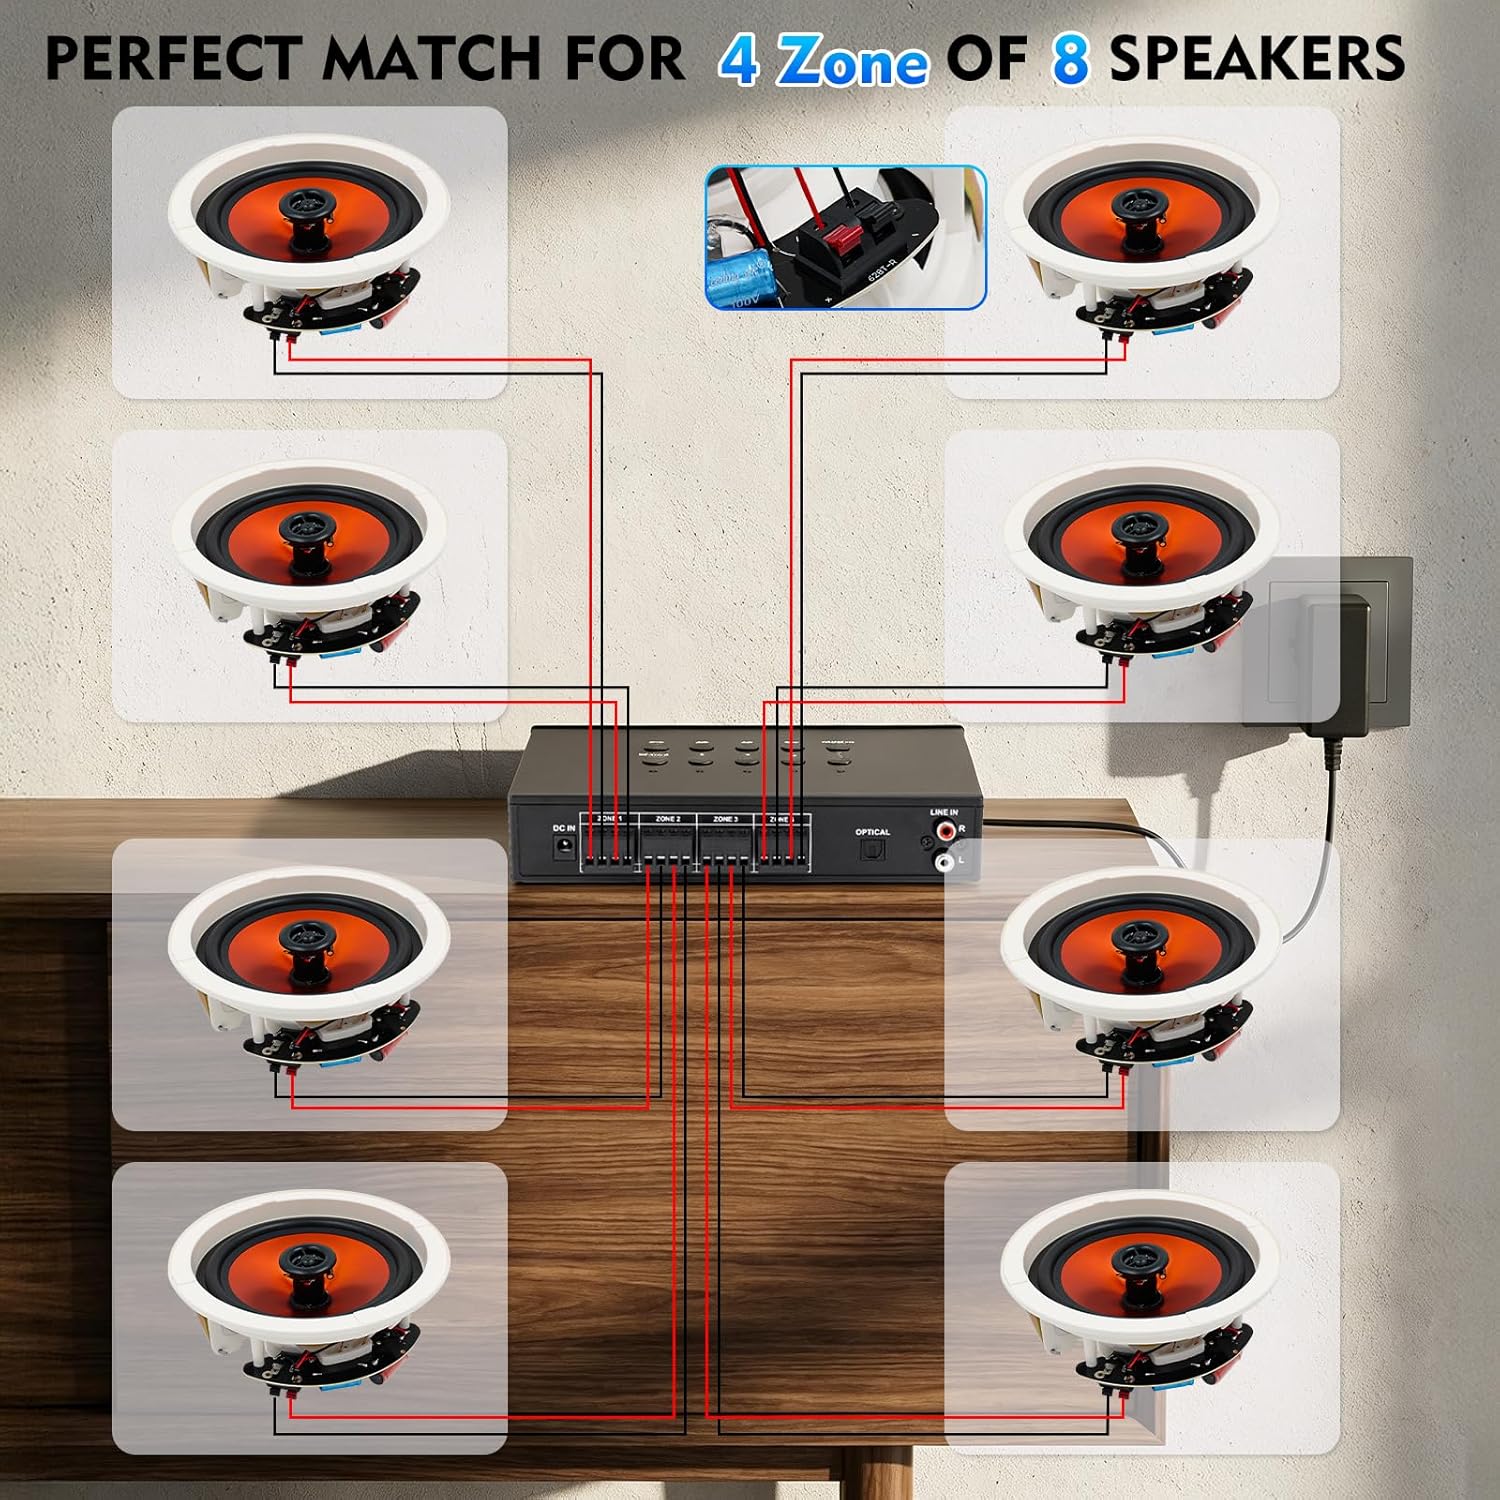
Figure 5.1: Speaker Wiring Diagram. This illustration demonstrates connecting two speakers per zone, with red wires to positive (+) terminals and black wires to negative (-) terminals on the amplifier's back panel.
- Prepoznajte pozitivni (+) in negativni (-) priključek na zvočnikih.
- Connect the positive (+) wire from each speaker to the corresponding red (+) terminal on the amplifier for the desired zone.
- Connect the negative (-) wire from each speaker to the corresponding black (-) terminal on the amplifier for the desired zone.
- Repeat for all speakers across the 4 zones. Ensure all connections are secure.
5.2 Napajalni priključek
After connecting all speakers and audio sources, connect the power adapter.
- Insert the DC plug of the power adapter into the 'DC IN' port on the back of the amplifier.
- Priključite napajalnik v ustrezno stensko vtičnico.
6. Navodila za uporabo
6.1 Vklop/izklop in nadzor glasnosti
- Za vklop amplifier, rotate the VOLUME/PWR ON/OFF vrtite gumb v smeri urinega kazalca, dokler se zaslon ne prižge.
- Za izklop zavrtite gumb v nasprotni smeri urinega kazalca, dokler ne klikne.
- Adjust the master volume by rotating the VOLUME/PWR ON/OFF gumb.
6.2 Izbira vhodnega vira
Pritisnite NAČIN button on the top panel to cycle through available input sources: Bluetooth, Optical, AUX, LINE IN, USB, and TF Card.
6.3 Bluetooth seznanjanje
Če želite povezati napravo Bluetooth:

Figure 6.1: Bluetooth Connectivity. The image shows a smartphone successfully paired with the amplifier, indicating stable Bluetooth 5.4 connection for wireless audio streaming.
- Izberite način Bluetooth z uporabo NAČIN gumb. Na zaslonu se bo prikazal napis »BT« ali podoben indikator.
- Na pametnem telefonu, tabličnem računalniku ali drugi napravi, ki podpira Bluetooth, omogočite Bluetooth in poiščite razpoložljive naprave.
- Select "STUDIOFINIX" or a similar name from the list to pair.
- Ko sta seznanjena, lahko brezžično pretakate zvok na amplifier.
6.4 Wired Input Operation
The amplifier supports various wired audio sources:

Figure 6.2: Multiple External Audio Sources. This graphic illustrates the diverse input options available, including Microphone, Bluetooth, USB, AUX, and TF Card, allowing connection of various external devices.
- Optični vhod: Connect a digital audio cable from your source (e.g., TV, game console) to the OPTICAL port on the back panel. Select Optical mode using the NAČIN gumb.
- AUX vhod: Connect a 3.5mm audio cable from your device to the AUX port on the front panel. Select AUX mode.
- LINIJA V: Connect RCA cables from your analog audio source (e.g., CD player) to the LINE IN (R/L) ports on the back panel. Select LINE IN mode.
- USB/TF kartica: Insert a USB drive or TF card into the respective slot on the front panel. The amplifier will automatically switch to USB or TF mode and begin playback. Use the playback controls on the top panel to manage tracks.
6.5 Funkcija karaok
Enjoy karaoke with the built-in microphone input and echo effect.

Figure 6.3: Karaoke Ready. This image depicts individuals enjoying a karaoke session, highlighting the amplifier's capability to connect a microphone for vocal performances.
- Priključite mikrofon v Vhod za MIC na sprednji plošči.
- Prilagodite glasnost mikrofona z MIC VOL gumb.
- Pritisnite ODMEV button on the top panel to activate and adjust the echo effect for your vocals.
6.6 Neodvisen nadzor con
The amplifier allows you to independently control the power for each of the four speaker zones.

Figure 6.4: 4-Zone Independent Control. This visual demonstrates how the amplifier can manage audio in four separate areas, allowing users to turn zones on or off as needed for multi-room audio customization.
- Uporabite namensko ZONE 1, ZONE 2, ZONE 3, ZONE 4 buttons on the top panel to toggle each zone on or off.
- Note that while zones can be independently turned on/off, the overall volume, bass, and treble settings apply to all active zones simultaneously.
6.7 Nastavitev nizkih in visokih tonov
Adjust the audio's tonal characteristics using the BASS in TREPLE knobs on the front panel to suit your preference.
7. Vzdrževanje
- Čiščenje: Disconnect the power before cleaning. Use a soft, dry cloth to wipe the exterior of the unit. Do not use liquid cleaners or aerosol sprays.
- Shranjevanje: If storing the unit for an extended period, disconnect it from power and store in a cool, dry place away from direct sunlight.
- Prezračevanje: Regularly check that ventilation openings are clear of dust and debris.
8. Odpravljanje težav
| Težava | Možen vzrok | rešitev |
|---|---|---|
| Brez moči | Power adapter not connected; Power outlet not working; Unit is off. | Ensure power adapter is securely connected and plugged into a live outlet. Turn the VOLUME/PWR ON/OFF knob clockwise. |
| Iz zvočnikov ni zvoka | Incorrect input source selected; Speaker wires loose or incorrectly connected; Volume too low; Specific zone turned off. | Press MODE to select the correct input. Check speaker wire connections (positive/negative). Increase master volume. Ensure the relevant zone button is ON. |
| Bluetooth se ne povezuje | Not in Bluetooth mode; Device too far; Device already connected to another amplifier. | Select Bluetooth mode. Move device closer to the ampprekinite povezavo z drugimi napravami Bluetooth in poskusite znova seznaniti napravo. |
| Mikrofon ne deluje | Microphone not plugged in; MIC VOL too low. | Ensure microphone is securely plugged into the MIC input. Increase the MIC VOL knob. |
| USB/TF kartica ne predvaja | Napačen način; Nezdružljivo file format; Poškodovan medij. | Select USB or TF mode. Ensure audio files are in a supported format (e.g., MP3). Try a different USB drive or TF card. |
9. Specifikacije
| Funkcija | Specifikacija |
|---|---|
| Znamka | STUDIOFINIX |
| Številka modela | ST-AMP-8PBT-BK-US |
| Število kanalov | 8 |
| Izhodna vattage | 480 W (skupaj) |
| Različica Bluetooth | 5.4 |
| Impedanca zvočnika | 4-8 ohmov |
| Možnosti vnosa | Optical, AUX, LINE IN, USB, TF Card, MIC, Bluetooth |
| Frekvenčni odziv | ±2dB@20-20kHz |
| Razmerje med signalom in hrupom | 85 dB |
| Dimenzije (D x Š x V) | 195mm x 40mm x 140mm (Approx.) |
10. Informacije o garanciji
This STUDIOFINIX amplifier prihaja z a 1-letna omejena garancija from the date of purchase. This warranty covers manufacturing defects in materials and workmanship under normal use. It does not cover damage caused by misuse, accident, unauthorized modification, or improper installation. Please retain your proof of purchase for warranty claims.
11. Podpora strankam
For technical assistance, warranty claims, or general inquiries, please contact STUDIOFINIX customer support through the retailer's platform or visit the official STUDIOFINIX webspletno mesto za kontaktne podatke.
Spletna podpora: www.studiofinix.com