
1. Izdelek je končanview
The GLEDOPTO ZigBee 3.0 LED Strip Light Controller Pro Max (Model GL-C-601P) is a versatile 5-in-1 smart controller designed for various LED strip types including RGBCCT, RGBW, RGB, CCT, and Dimmer. It integrates seamlessly with ZigBee 3.0 compatible smart home ecosystems, offering flexible control options via smartphone apps, voice commands, and optional RF remotes. This controller features broad voltage compatibility (5-24V) and enhanced safety with a removable 20A fuse and user-friendly WAGO quick-connect terminals.

Figure 1: GLEDOPTO ZigBee Pro Max 5-in-1 LED Controller (Model GL-C-601P) showing input, output terminals, and fuse.
2. Ključne značilnosti
- ZigBee 3.0 Universal Hub Controller: Ensures seamless integration with major smart home ecosystems like Amazon Alexa and Google Assistant via a ZigBee hub.
- Funkcionalnost 5 v 1: Podpira konfiguracije LED trakov RGBCCT, RGBW, RGB, CCT in Dimmer.
- Broad Voltage Združljivost: Operates with 5-24V LED strips, suitable for most PWM-dimmable types.
- Izboljšana varnost: Includes a removable 20A pluggable fuse for overcurrent protection and electrical safety.
- Vsestranski nadzor: Supports control via ZigBee hub (smartphone app, voice commands) and optional GLEDOPTO 2.4G RF remote (not included).
- User-Friendly Wiring: Features upgraded WAGO quick-connect terminals for tool-free and secure wiring.
- Multiple Power Input Options: Offers V+V-, DC5.5×2.1mm, and Type-C (5V, 3A Max, USB wall adapter, not PC USB) for flexible installation.
- Advanced Lighting Modes: Provides precise control over 16 million colors and color temperatures from 2200K-6500K, including a unique color and color temperature mix mode.
- Funkcija pomnilnika ob izklopu: Retains the last lighting state after power interruption.
- Adjustable PWM Frequency: Allows adaptation to different power supplies and reduction of noise.

Slika 2: Podrobno view of the controller highlighting the 20A pluggable fuse, heat dissipation design, and WAGO terminals.
3. Nastavitev in namestitev
3.1 Wiring the LED Controller
Before wiring, ensure the power supply is disconnected. The controller supports various LED strip types. Identify your LED strip type (RGBCCT, RGBW, RGB, CCT, or Dimmer) and connect it to the corresponding output terminals using the WAGO quick-connect system. Insert the stripped wire ends into the appropriate terminals until secure. The input terminals accept 5-24V DC power.
Slika 3: Nprample wiring diagram for an RGBCCT LED strip. Connect the V+ from the power supply to the controller's V+ input, and the corresponding color channels (R, G, B, C, T) to the output terminals.
3.2 Power Input Options
The controller offers three power input methods:
- V+V- Terminals: For direct connection to a DC power supply (5-24V).
- DC5.5×2.1mm Jack: For standard DC power adapters (5-24V).
- Vrata tipa C: For 5V, 3A Max power input using a USB wall adapter (not compatible with PC USB ports).
3.3 Connecting to a ZigBee Hub
To integrate the controller into your smart home system, you need a compatible ZigBee 3.0 hub (e.g., Philips Hue, SmartThings, Amazon Echo with built-in ZigBee hub). Follow your ZigBee hub's instructions to add a new device. Typically, you will put the hub into pairing mode, then power on the GLEDOPTO controller. The controller's indicator light will flash to confirm pairing status. Once paired, the device will appear in your hub's app.
4. Navodila za uporabo
4.1 Nadzor aplikacij
Once connected to your ZigBee hub, you can control the LED strip via the hub's smartphone application. This allows for:
- Barvna prilagoditev: Izbirajte med 16 milijoni barv.
- Nadzor svetlosti: Prilagodite intenzivnost svetlobe od 1 % do 100 %.
- Prilagoditev barvne temperature: Change white light from warm (2200K) to cool (6500K).
- Nastavitev scene: Ustvarite in aktivirajte prilagojene svetlobne scene.

Figure 4: App interface demonstrating color, brightness, and color temperature adjustments for the LED strip.
4.2 Glasovni nadzor
For voice control, ensure your ZigBee hub is linked to a voice assistant like Amazon Alexa or Google Assistant. You can then use voice commands to control your LED strip. Exampvključujejo:
- "Alexa, prižgi luč v dnevni sobi."
- "Hey Google, set the light to purple."
- "Alexa, increase brightness to 70%."
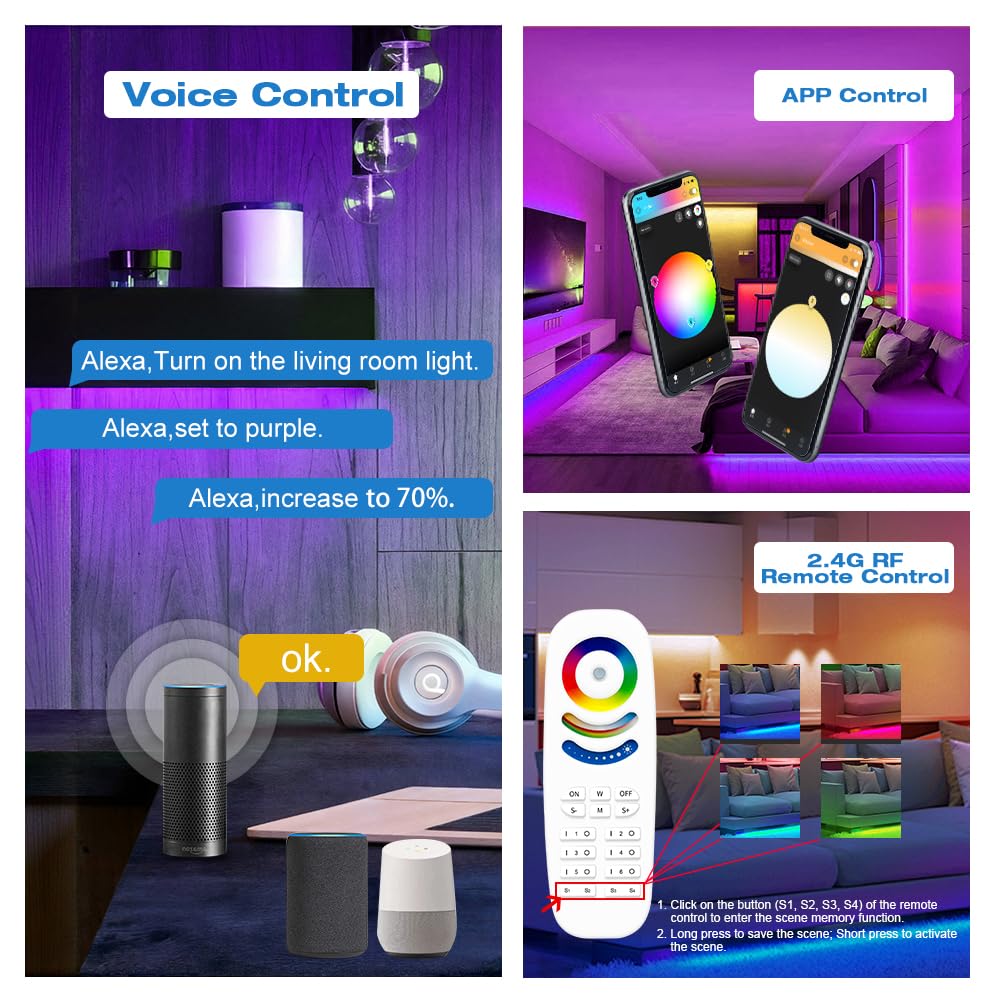
Figure 5: Voice control setup with smart speakers for hands-free operation.
4.3 Daljinski upravljalnik RF (izbirno)
The controller supports an optional GLEDOPTO 2.4G RF remote (not included). This remote allows for direct control of color, brightness, color temperature, and dynamic modes without requiring a ZigBee hub. Refer to the remote's specific instructions for pairing and operation.
4.4 5-in-1 Mode Switching
The controller automatically detects the connected LED strip type. You can manually switch between the five modes (RGBCCT, RGBW, RGB, CCT, Dimmer) by short-pressing the 'Opt' button on the controller. The indicator light will change color to reflect the current mode.

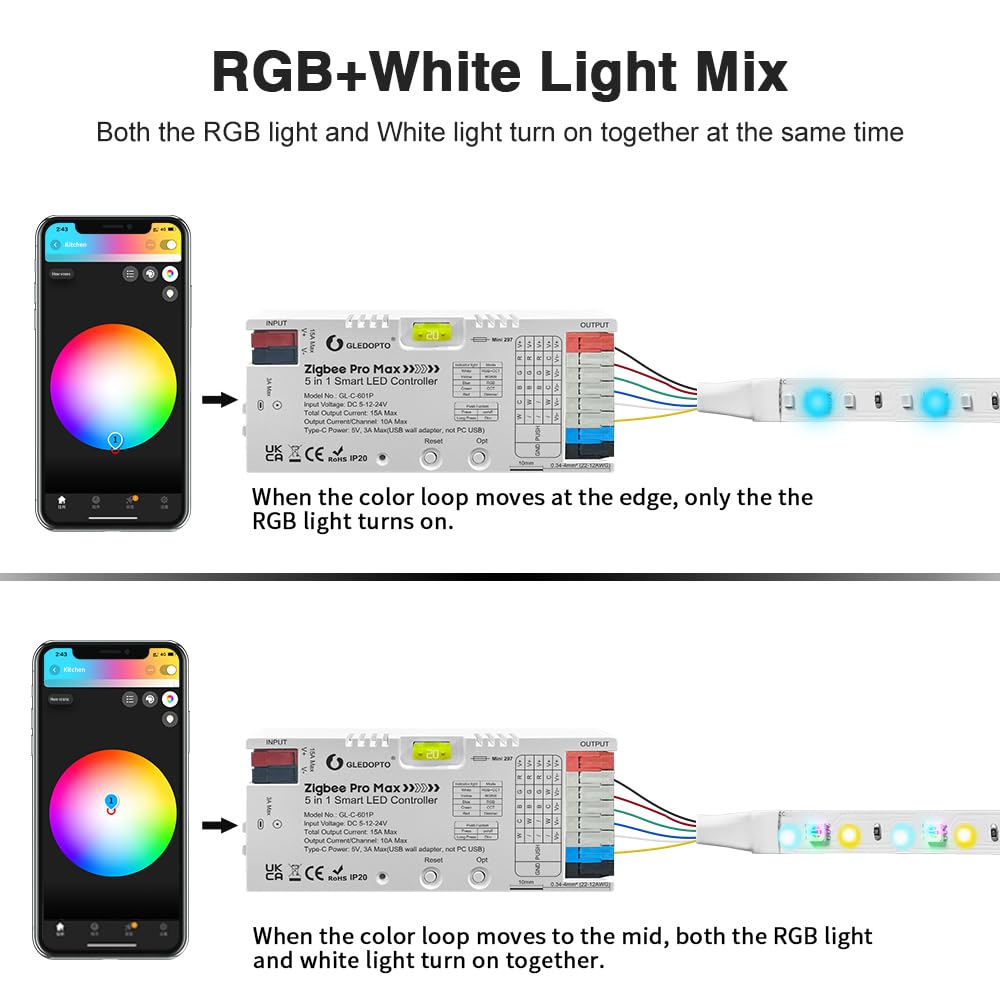
Figure 6: Explanation of the RGB+White Light Mix mode, showing how RGB and white light can be combined or used separately.
4.5 Funkcija pomnilnika ob izklopu
The controller features a power-off memory function. By default, it remembers the last state (on/off and settings) before a power failure. You can switch this behavior to 'lights up by default when powered on' by long-pressing the 'Opt' button for more than 5 seconds. The indicator light will flash 3 times to confirm the change.

Figure 7: Illustration of the two power-off memory options: remembering the last state or defaulting to on.
4.6 Nastavitve frekvence
The controller allows adjustment of the PWM frequency to adapt to different power supplies and reduce potential noise. Short-press the 'Reset' button to cycle through frequency options (1000Hz, 2000Hz, 4000Hz, 8000Hz, 600Hz, 800Hz). Each press changes the frequency, indicated by the number of flashes of the indicator light.

Figure 8: Frequency setting options and corresponding indicator light flashes.
4.7 Videoposnetek izdelka
Video 1: Official GLEDOPTO ZigBee Pro Max 5-in-1 LED Controller demonstration, showcasing its features and control methods.
5. Vzdrževanje
5.1 Splošna nega
Keep the controller in a dry environment, away from direct sunlight and extreme temperatures. Clean the exterior with a soft, dry cloth. Do not use harsh chemicals or abrasive cleaners.
5.2 Zamenjava varovalke
The controller is equipped with a removable 20A pluggable fuse for protection. If the controller stops functioning due to an overcurrent event, the fuse may need replacement. Disconnect all power before attempting to replace the fuse. Carefully remove the old fuse and insert a new 20A fuse of the same type. Ensure the replacement fuse is correctly seated.
6. Odpravljanje težav
- Krmilnik se ne odziva: Check power connections. Ensure the power supply voltage is within the 5-24V range. Verify the fuse is intact.
- Unable to pair with ZigBee hub: Ensure the hub is in pairing mode. Try resetting the controller by pressing the 'Reset' button for 5 seconds until the indicator light flashes rapidly. Move the controller closer to the hub.
- LED trak ne sveti: Check all wiring connections to the LED strip and power supply. Ensure the LED strip type matches the controller's selected mode.
- Incorrect colors or brightness: Calibrate settings via the app. Ensure the correct LED strip type is selected in the app or via the controller's mode button.
- Flickering or noise: Adjust the PWM frequency using the 'Reset' button (refer to section 4.6). Ensure the power supply is stable and sufficient for the connected LED strip.
7. Specifikacije
| Atribut | Vrednost |
|---|---|
| Številka modela | GL-C-601P |
| Znamka | GLEDOPTO |
| Protokol povezljivosti | ZigBee 3.0 |
| Vhodna voltage | DC 5-24V |
| Maks. Izhodni tok | 15 A maks |
| Izhodni tok/kanal | 10 A maks |
| Max Wattage | 360 vatov |
| Varovalka | 20A Pluggable Fuse |
| Nadzorna metoda | App Control, Voice Control, RF Remote (optional) |
| Združljive naprave | Amazon Alexa, Google Assistant, Zigbee Hub, Gledopto 2.4G RF Remote |
| Vrsta priključka | Quick-connect (WAGO style) |
| Dimenzije | 5.04 x 2.09 x 1.06 palcev |
| Teža predmeta | 2.56 unč |
| Material | Plastika |
8. Garancija in podpora
GLEDOPTO products are designed for reliability and performance. For warranty information, please refer to the documentation included with your purchase or visit the official GLEDOPTO website. For technical support, troubleshooting assistance, or to inquire about replacement parts, please contact GLEDOPTO customer service through their official channels.