Vetroo M06
Navodila za uporabo ohišja za igralni računalnik Vetroo M06 Micro-ATX/Mini-ITX
Model: M06
Uvod
This manual provides detailed instructions for the installation, operation, and maintenance of your Vetroo M06 Micro-ATX/Mini-ITX Gaming PC Case. Please read this manual thoroughly before beginning assembly to ensure proper setup and optimal performance.

Image: The Vetroo M06 Micro-ATX/Mini-ITX Gaming PC Case in black, showcasing its mesh front panel and side window, viewed iz kota.
Ključne značilnosti
- Kompaktna zasnova: Micro-ATX / Mini-ITX form factor with a high-airflow mesh front panel, designed for space-efficient builds.
- Optimizirano hlajenje: Supports up to five 120mm fans and a 240mm top-mounted liquid radiator for efficient thermal management.
- GPU Compatibility: Primerno za grafične kartice dolžine do 355 mm.
- Flexible PSU Mounting: Features an adjustable power supply installation area with a maximum length of 160mm.
- Sodobna povezljivost: Front panel includes USB Type-C and USB 3.0 ports for convenient peripheral access.
Vsebina paketa
Preden nadaljujete z namestitvijo, preverite, ali so prisotne vse komponente:
- Vetroo M06 PC Case
- Škatla s priborom (vijaki, distančniki, kabelske vezice)
- SFX PSU Bracket (1x)
- Uporabniški priročnik (ta dokument)
Specifikacije
| Funkcija | Podrobnost |
|---|---|
| Ime modela | M06 |
| Vrsta ohišja | Mini-stolp |
| Združljivost matične plošče | Micro ATX, Mini ITX |
| Mere izdelka (D x Š x V) | 395 mm x 200 mm x 332 mm (15.55" x 7.87" x 13.07") |
| Teža predmeta | 13.37 funtov (6.06 kg) |
| Material | Acrylonitrile Butadiene Styrene (ABS), SPCC (0.8mm metal plate) |
| Največja dolžina GPU | 355 mm |
| Največja višina hladilnika procesorja | 165 mm |
| Največja dolžina PSU | 160mm (Adjustable mounting) |
| Podpora oboževalcev | Do 5 x 120 mm ventilatorjev |
| Podpora za radiatorje | 1 x 240mm (Top) |
| Sprednja V / I vrata | 1 x USB Type-C, 1 x USB 3.0, HD Audio, Power Button, Reset Button |

Image: Diagram illustrating the compact dimensions of the Vetroo M06 PC case, measuring 15.5 inches in depth, 7.8 inches in width, and 13.0 inches in height.

Image: A detailed diagram outlining the compatibility specifications for the Vetroo M06 PC case, including maximum CPU cooler height (165mm), GPU length (355mm), PSU length (160mm), and supported motherboard form factors (M-ATX/ITX).
Nastavitev in namestitev
Before starting, ensure you have a clean, static-free workspace. Refer to your component manuals for specific installation details.
1. Namestitev matične plošče
- Remove the side panel(s) of the case.
- Install the necessary motherboard standoffs into the case tray according to your motherboard's form factor (Micro-ATX or Mini-ITX).
- Matično ploščo previdno namestite na distančnike in poravnajte luknje za vijake.
- Pritrdite matično ploščo z vijaki.
2. Namestitev grafične kartice
- Remove the appropriate PCIe slot covers from the rear of the case.
- Insert your graphics card into the primary PCIe slot on your motherboard.
- Grafično kartico pritrdite na ohišje z vijaki.
- Connect any required PCIe power cables from your power supply to the GPU.
3. Namestitev PSU
- Determine the desired mounting position for your power supply. The Vetroo M06 supports adjustable PSU mounting.
- If using an SFX power supply, attach the included SFX bracket to the PSU.
- Slide the power supply into its designated bay and secure it with screws from the rear of the case.
- Route the necessary power cables to your components.

Slika: Notranji view of the Vetroo M06 PC case highlighting the three adjustable mounting positions for ATX/SFX power supplies, along with an illustration of the included SFX bracket.
4. Storage Installation (HDD/SSD)
- Locate the designated mounting points for 3.5" HDDs and 2.5" SSDs.
- Secure your storage drives using the provided screws.
- Connect SATA data and power cables to each drive.
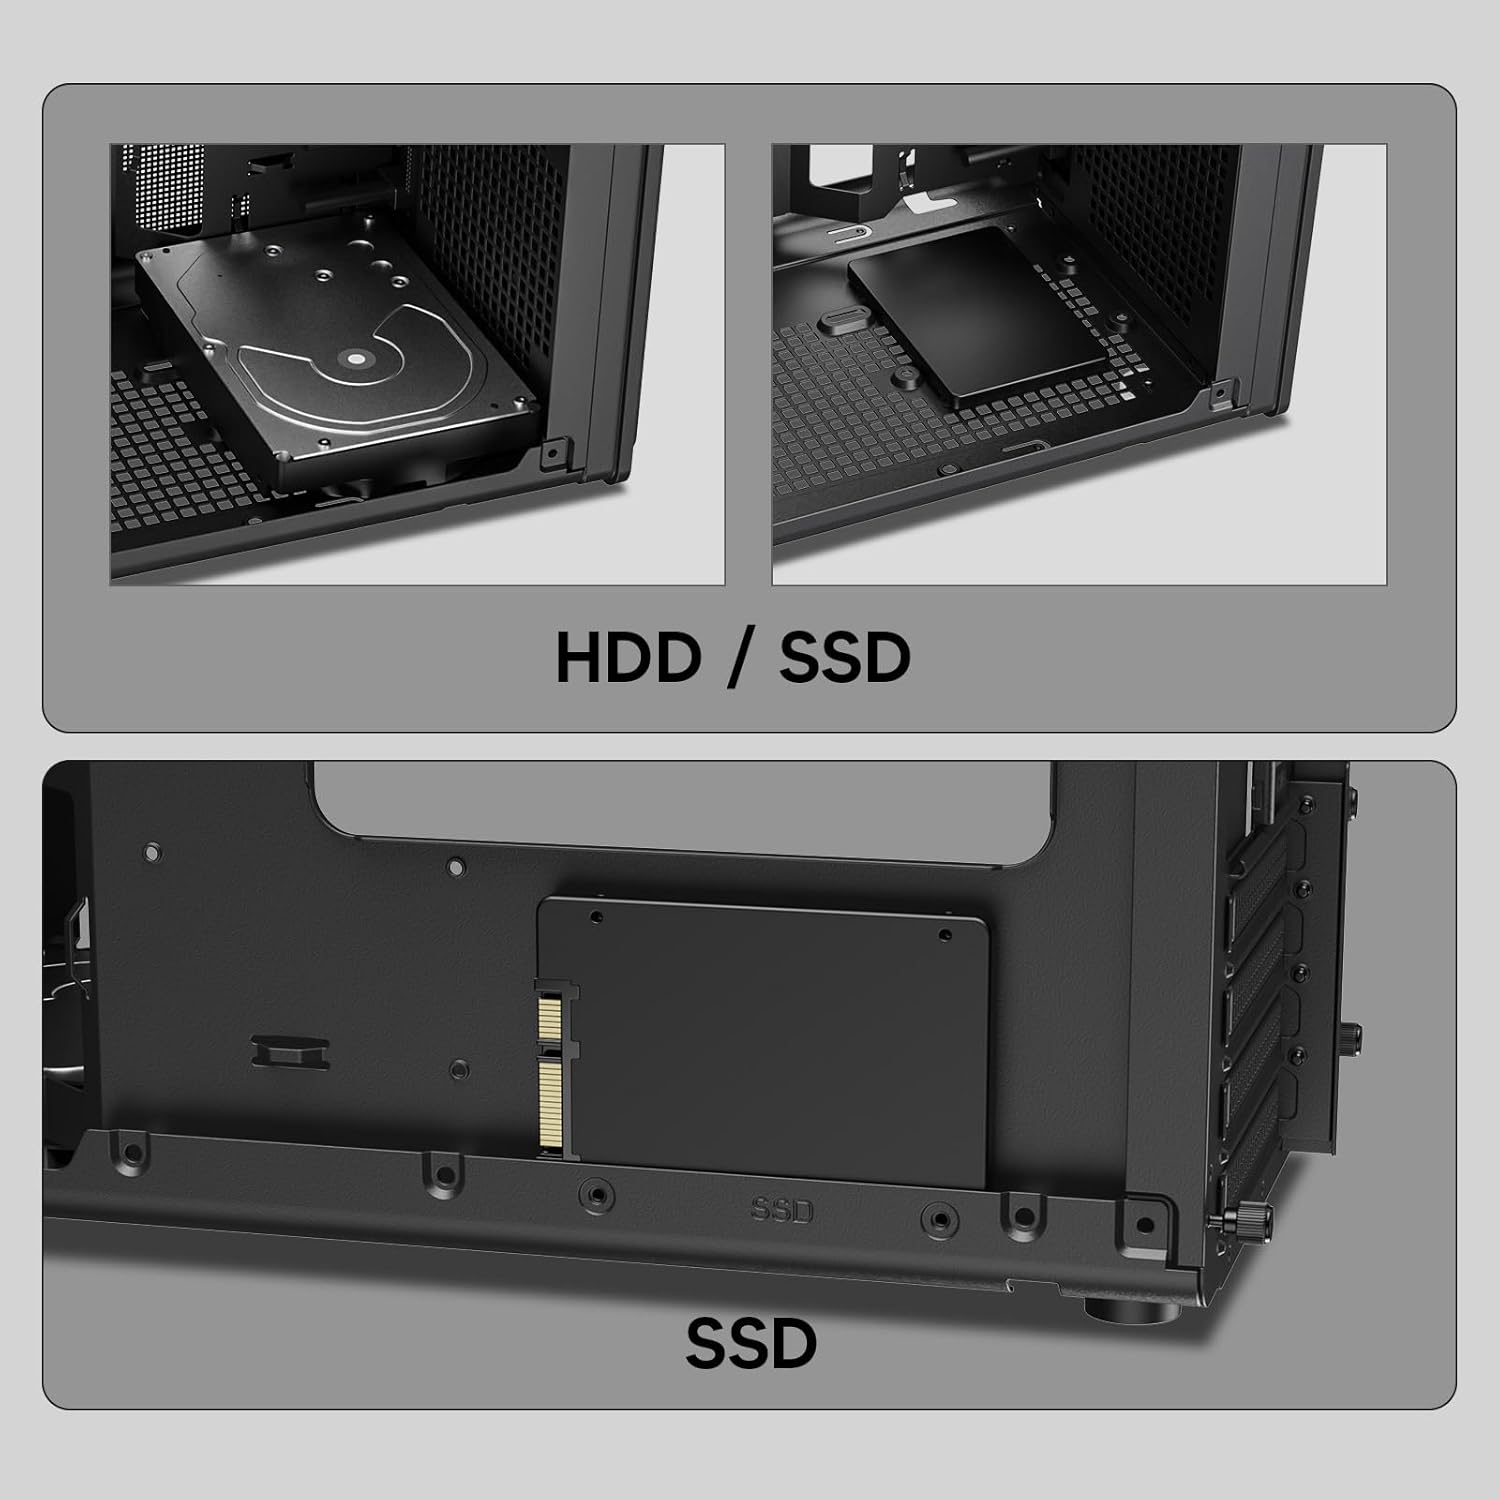
Slika: Bližnji posnetek views of the Vetroo M06 PC case interior, demonstrating the mounting options for both 3.5-inch Hard Disk Drives (HDDs) and 2.5-inch Solid State Drives (SSDs).
5. Cooling System Installation (Fans/Radiator)
- Identify the fan mounting locations (up to five 120mm fans).
- Mount fans using appropriate screws, ensuring correct airflow direction.
- For liquid cooling, install a 240mm radiator at the top mounting position, securing it with screws.
- Connect fan and pump cables to your motherboard or fan controller.
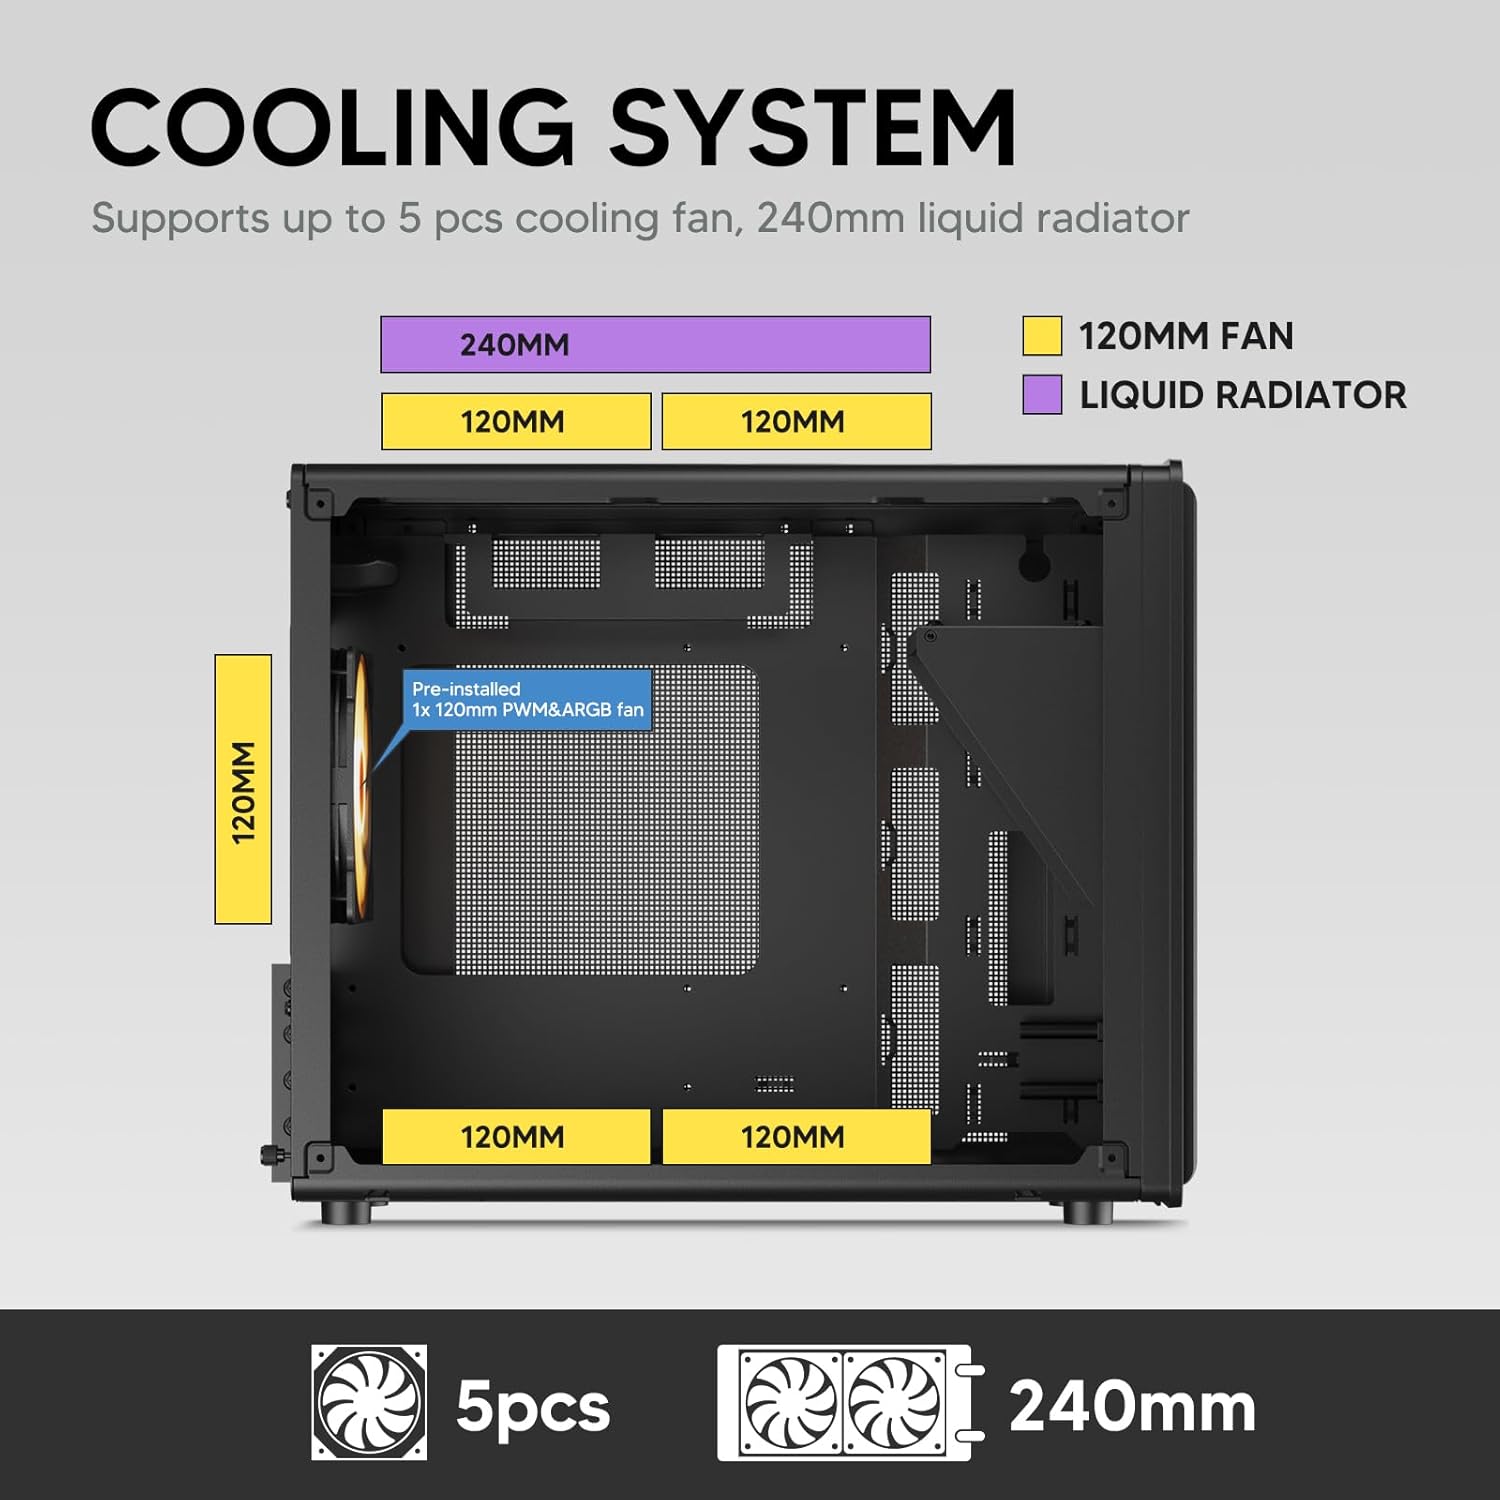
Image: A diagram illustrating the cooling system layout within the Vetroo M06 PC case, detailing the positions for up to five 120mm fans and a 240mm liquid radiator at the top.
6. Povezave V/I plošče
- Connect the front panel cables (Power, Reset, USB 3.0, USB Type-C, HD Audio) to the corresponding headers on your motherboard. Refer to your motherboard manual for header locations.

Image: A close-up of the Vetroo M06 PC case's front I/O panel, clearly labeling the Power button, Reset button, USB 3.0 port, HD Audio jack, and USB Type-C port.
Navodila za uporabo
Once all components are installed and cables are connected, replace the side panels. Connect your peripherals (monitor, keyboard, mouse) and power cable to the PSU. Press the power button on the front panel to start your system.
Upravljanje pretoka zraka
The Vetroo M06 case features an excellent airflow design with mesh panels to facilitate optimal cooling. Ensure fans are installed to create a balanced airflow, typically with intake fans at the front/bottom and exhaust fans at the rear/top.

Image: An exploded diagram of the Vetroo M06 PC case, illustrating the intended airflow patterns with blue arrows indicating cool air intake and red arrows showing warm air exhaust through its mesh panels.
Vzdrževanje
Redno vzdrževanje pomaga podaljšati življenjsko dobo komponent vašega računalnika in zagotavlja optimalno delovanje.
- Čiščenje prahu: Občasno očistite filtre za prah in notranje komponente s stisnjenim zrakom. Pred čiščenjem se prepričajte, da je sistem izklopljen in izklopljen iz električnega omrežja.
- Upravljanje kablov: Verify that internal cables are neatly routed and do not obstruct airflow.
- Preverjanje komponent: Ensure all screws are tight and components are securely seated.

Image: A close-up shot of the Vetroo M06 PC case, featuring a digital caliper measuring the thickness of the metal plate, which is specified as 0.8mm, highlighting the case's robust construction.
Odpravljanje težav
Če naletite na težave, si oglejte naslednje pogoste korake za odpravljanje težav:
- Sistem se ne vklopi:
- Check all power connections, including the PSU to wall outlet, PSU to motherboard (24-pin and CPU 8-pin), and front panel power switch cable to motherboard.
- Prepričajte se, da je stikalo napajalnika v položaju »VKLOP«.
- Brez izhoda za prikaz:
- Verify that your monitor is connected to the graphics card (not the motherboard's integrated graphics ports, unless you are using integrated graphics).
- Ponovno namestite grafično kartico in module RAM-a.
- Težave s pregrevanjem:
- Za optimalen pretok zraka se prepričajte, da se vsi ventilatorji ohišja vrtijo in so pravilno usmerjeni.
- Check CPU cooler installation and thermal paste application.
- Clean any dust buildup from fans and filters.
- Vrata USB ne delujejo:
- Verify that the front panel USB 3.0 and USB Type-C cables are correctly connected to the motherboard headers.
Garancija in podpora
Vetroo products are designed for quality and reliability. For warranty information and technical support, please visit the official Vetroo webspletno mesto ali se obrnite na njihovo službo za stranke. Shranite dokazilo o nakupu za uveljavljanje garancije.
Vetroo Official Webspletno mesto: Vetroo Store on Amazon
For further assistance, please refer to the contact information provided with your product packaging or on the official Vetroo support channels.