
1. Uvod
Hvala za nakupasing the Netzu T338B 3-in-1 Digital Alarm Clock. This device is designed to provide clear time, date, and indoor temperature displays, along with an alarm function. Its compact design and adjustable features make it suitable for various indoor environments such as bedrooms, living rooms, and offices. Please read this manual carefully to ensure proper setup and operation.

Image 1.1: The Netzu T338B Digital Alarm Clock, showing its main display with time, temperature, and date.
2. Varnostne informacije
- Naprave ne izpostavljajte ekstremnim temperaturam, neposredni sončni svetlobi ali visoki vlažnosti.
- Izogibajte se padcem ali izpostavljanju naprave močnim udarcem.
- Uporabljajte samo priloženi napajalnik ali združljivega z ustrezno glasnostjotage.
- Hraniti izven dosega otrok.
- Naprave ne poskušajte razstavljati ali popravljati sami. Če potrebujete servis, se obrnite na podporo strankam.
- Baterije zavrzite v skladu z lokalnimi predpisi.
3. Vsebina paketa
Prosimo, preverite paket za naslednje artikle:
- Netzu T338B Digital Alarm Clock
- AC Power Cable (USB cable and wall adapter)
- Uporabniški priročnik
4. Značilnosti izdelka
- 3-v-1 zaslon: Shows time, date, and indoor temperature simultaneously.
- Nastavljiva svetlost: 4 levels of display brightness plus an OFF option.
- Nastavljiva glasnost: 3 alarm volume levels.
- Funkcija dremeža: Provides a 9-minute snooze duration.
- Format časa: Supports 12-hour and 24-hour time display.
- Enota za temperaturo: Displays temperature in Celsius (°C) or Fahrenheit (°F).
- vir energije: Corded electric (AC power) with battery backup for settings (2x AAA batteries, not included).
- Kompaktna zasnova: Dimensions of 5.94"L x 1.3''W x 2.17"H, suitable for various spaces.
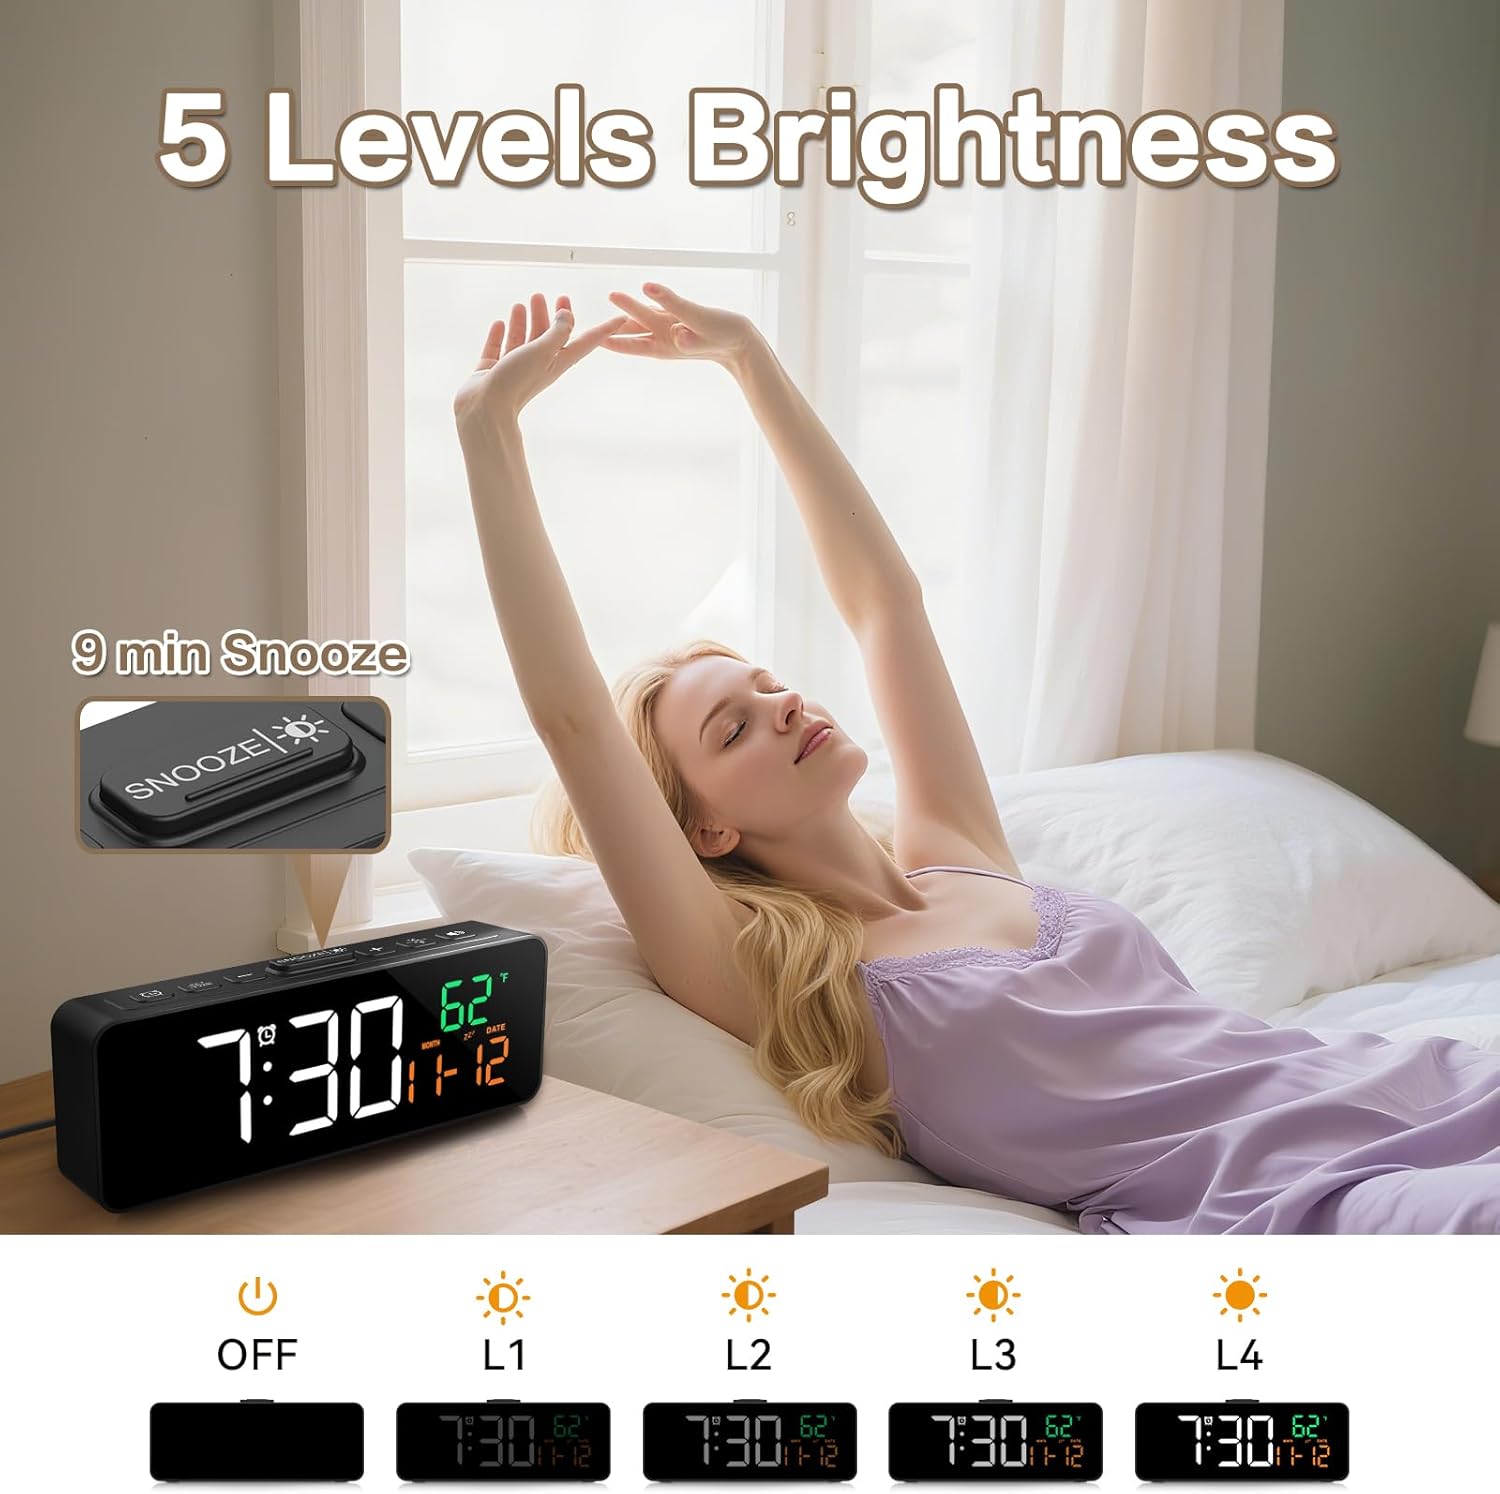
Image 4.1: The compact dimensions of the Netzu T338B Digital Alarm Clock, measuring 5.9 inches in length, 1.3 inches in width, and 2.17 inches in height.
5. Nastavitev
5.1 Napajalni priključek
- Connect the provided AC power cable to the DC 5V input port on the back of the clock.
- Plug the other end of the power cable into a standard wall outlet. The display will light up.
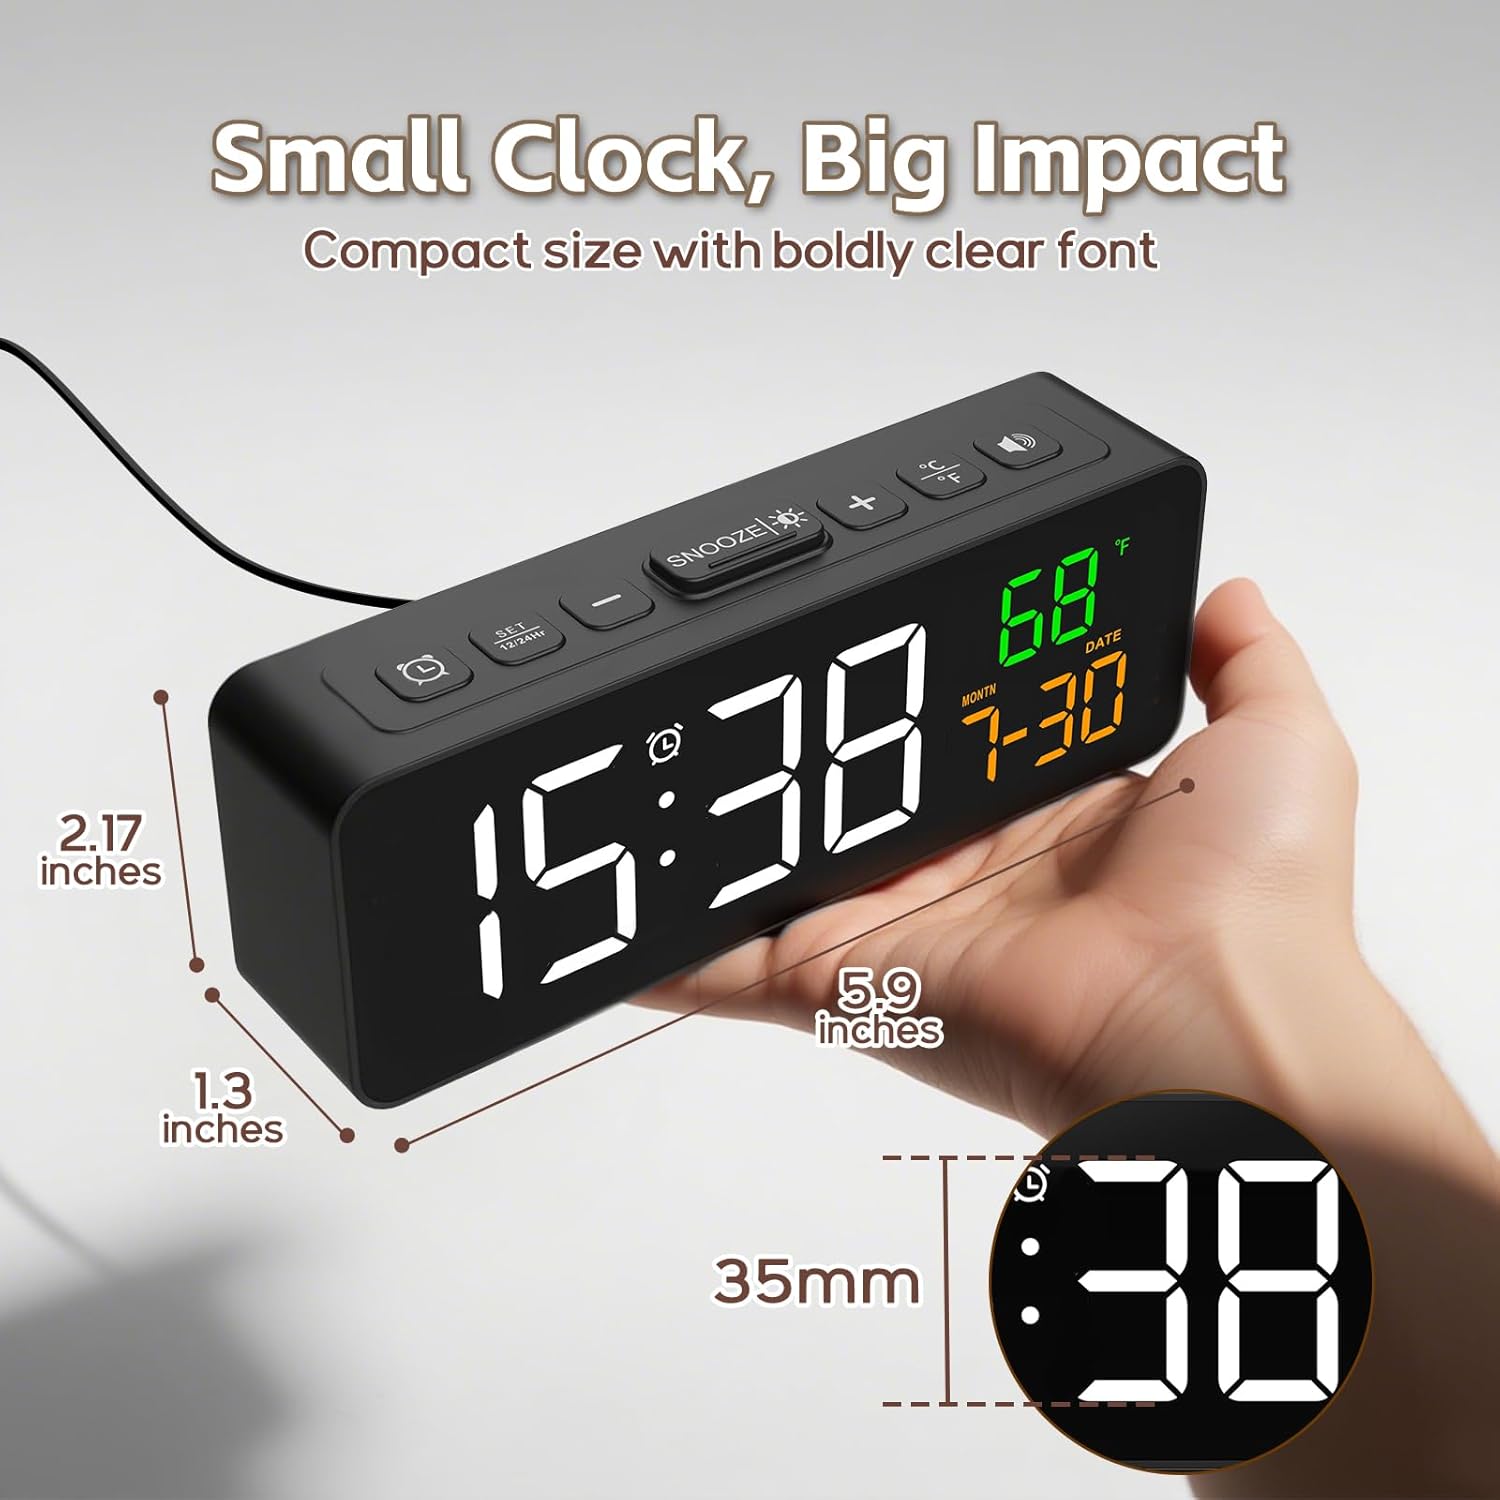
Image 5.1: The Netzu T338B Digital Alarm Clock connected to a power outlet via its plug-in cable.
5.2 Namestitev baterije (rezervne)
For backup purposes, in case of a power outage, install 2 AAA batteries (not included) into the battery compartment on the back of the clock. These batteries will preserve your time and alarm settings but will not power the display or sound the alarm during a power interruption.
- Odprite pokrov predalčka za baterije na zadnji strani ure.
- Vstavite 2 bateriji AAA in pazite na pravilno polarnost (+ in -).
- Trdno zaprite pokrov prostora za baterije.
6. Navodila za uporabo
6.1 Nastavitev časa in datuma
The clock displays time, month, and date. You can switch between 12-hour and 24-hour formats.

Image 6.1: The clock displaying time in both 12-hour (PM) and 24-hour formats.
- Pritisnite in držite ČAS NAST button (usually marked with a clock icon) on the back or top of the clock until the hour digits flash.
- Uporabite + or - gumbi za nastavitev ure.
- Pritisnite ČAS NAST again to move to minute adjustment. Use + or - za prilagoditev minut.
- Nadaljujte s pritiskom ČAS NAST za preklapljanje med nastavitvami leta, meseca in datuma ter prilagajanje vsake od njih z + or -.
- Pritisnite ČAS NAST še zadnjič ali počakajte nekaj sekund, da se nastavitve shranijo in zaprejo.
- To switch between 12/24-hour format, briefly press the ČAS NAST button when the time is displayed (not in setting mode).
6.2 Setting Temperature Unit
The clock can display temperature in Celsius or Fahrenheit.

Image 6.2: The clock displaying indoor temperature and the current month and date.
- Na kratko pritisnite ° C / ° F button (usually on the top or back) to toggle between Celsius and Fahrenheit.
6.3 Nastavitev alarma
- Pritisnite in držite ALARM NASTAVLJEN button (usually marked with an alarm clock icon) until the alarm hour digits flash.
- Uporabite + or - gumbe za nastavitev ure budilke.
- Pritisnite ALARM NASTAVLJEN again to move to minute adjustment. Use + or - to adjust alarm minutes.
- Pritisnite ALARM NASTAVLJEN one last time or wait a few seconds to save the alarm time.
- Za vklop ali izklop alarma na kratko pritisnite VKLOP / IZKLOP ALARMA button (often the same as ALARM SET or a dedicated button). An alarm icon will appear on the display when activated.
6.4 Prilagoditev svetlosti
The display has 4 brightness levels and an OFF mode.

Image 6.3: Visual representation of the clock's five brightness settings: OFF, L1 (lowest), L2, L3, and L4 (highest).
- Na kratko pritisnite SVETLOst button (often the SNOOZE button or a dedicated sun icon) to cycle through the brightness levels: L4 > L3 > L2 > L1 > OFF > L4.
6.5 Prilagajanje glasnosti alarma
There are 3 adjustable alarm volume levels.

Image 6.4: The clock displaying an alarm time with an illustration of three distinct volume levels (L01, L02, L03) for the alarm sound.
- While the alarm is sounding, or during alarm setup, press the GLASNOST gumb (pogosto + or - button when in alarm mode) to cycle through the 3 volume levels.
6.6 Uporaba funkcije dremeža
- Ko se oglasi alarm, pritisnite tipko DREMEŽ button (usually a large button on top) to temporarily silence the alarm for 9 minutes.
- Alarm se ponovno oglasi po 9 minutah.
- To turn off the alarm completely, press any other button on the clock (e.g., ALARM SET, TIME SET).
7. Vzdrževanje
- Površino ure očistite z mehko, suho krpo. Ne uporabljajte abrazivnih čistil ali topil.
- Ensure the ventilation openings (if any) are free from dust and debris.
- If storing the clock for an extended period, remove the AAA backup batteries to prevent leakage.
8. Odpravljanje težav
| Težava | Možen vzrok | rešitev |
|---|---|---|
| Zaslon je prazen. | Ni priključka za napajanje. | Ensure the AC power cable is securely plugged into the clock and a working wall outlet. |
| Alarm does not sound during power outage. | Backup batteries only save settings, not power the alarm. | This is normal operation. The clock requires AC power for the display and alarm function. |
| Ura/datum ni pravilen. | Incorrectly set or power interruption without backup batteries. | Re-set the time and date following Section 6.1. Install fresh AAA batteries for backup. |
| Zaslon je pretemno/presvetlo osvetljen. | Potrebno je prilagoditi raven svetlosti. | Press the BRIGHTNESS button to cycle through levels (Section 6.4). |
| Glasnost alarma je prenizka/visoka. | Volume level needs adjustment. | Adjust the alarm volume during alarm setup or when it's sounding (Section 6.5). |
9. Specifikacije
- Znamka: Netzu
- Številka modela: T338B
- Vrsta zaslona: Digitalno
- vir energije: Električni napajalnik (AC)
- Rezervno napajanje: 2 x AAA Batteries (not included, for settings only)
- Dimenzije izdelka: 5.94" D x 1.3" Š x 2.17" V
- Teža artikla: 7.4 unč
- Material: Plastika
- Posebne lastnosti: Adjustable Brightness, Adjustable Volume, Snooze, Temperature Display, Date Display
- Notranja/zunanja uporaba: Notranja
10. Garancija in podpora
Netzu products are designed for reliability and performance. For warranty information or technical support, please refer to the contact details provided on the product packaging or visit the official Netzu website. Please have your model number (T338B) and purchase information ready when contacting support.
