
FORGING MOUNT HY9462-B
FORGING MOUNT Long Reach TV Wall Mount Instruction Manual
Model: HY9462-B
1. Uvod
This manual provides detailed instructions for the safe and proper installation, operation, and maintenance of your FORGING MOUNT Long Reach TV Wall Bracket Mount. Please read this manual thoroughly before installation and retain it for future reference.
The FORGING MOUNT TV wall mount is designed for large flat or curved screen televisions, offering full motion capabilities including tilt, swivel, and extension for optimal viewing angles. It features a robust construction and an integrated power strip for convenience.

Slika 1.1: Konecview of the FORGING MOUNT Long Reach TV Wall Mount and included accessories.
2. Pomembne varnostne informacije
WARNING: Failure to read and follow these instructions may result in serious personal injury, property damage, or voiding of your warranty.
- Prepričajte se, da lahko površina za montažo varno podpira skupno težo nosilca in televizorja.
- NE install on drywall alone. This mount requires installation into wood studs, solid concrete, or brick walls.
- Za natančno lociranje lesenih stebrov vedno uporabite iskalnik stebrov.
- Verify the VESA pattern and weight of your TV are within the specified limits of this mount.
- Uporabljajte samo strojno opremo, ki jo je priskrbel ali določil proizvajalec.
- Če ste glede katerega koli dela postopka namestitve negotovi, se posvetujte s kvalificiranim monterjem.
- Med namestitvijo hranite otroke in hišne ljubljenčke proč.
3. Vsebina paketa
Carefully unpack the box and ensure all parts are present and undamaged. If any parts are missing or defective, contact customer support immediately.
3.1 Mount Components
- Sestav stenske plošče z zgibnimi rokami
- TV Bracket Rails (2x)
- Integrated Power Strip with Power Cord
3.2 Paket strojne opreme
The hardware pack includes various screws, washers, and spacers to accommodate different TV models and wall types. A drilling template and a bubble level are also included.
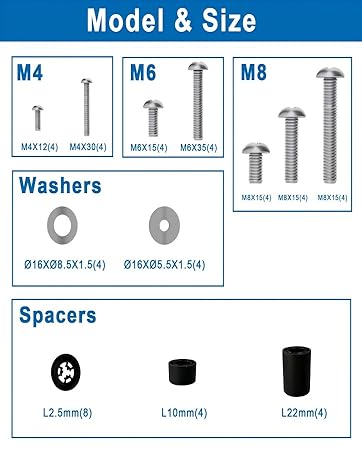
Image 3.1: Included mounting hardware (screws, washers, spacers).
Refer to the included hardware guide for specific screw sizes (M4, M6, M8) and their applications.
4. Preverjanje združljivosti
Before proceeding with installation, ensure your television and wall type are compatible with this mount.
4.1 TV Size and Weight
- Velikost zaslona: Fits most 50 to 100 inch flat or curved TVs.
- Zmogljivost teže: Podpira televizorje do 90 kg (198 lbs).
4.2 VESA Pattern
This mount supports VESA patterns from 200x100mm to 800x600mm. Measure the horizontal and vertical distance between the mounting holes on the back of your TV to determine its VESA pattern.
4.3 Wall Types
The mount is designed for installation on:
- 16-inch Wood Studs
- Solid Concrete Walls
- Brick Walls
IMPORTANT: DO NOT mount this product on drywall alone. Drywall cannot support the weight of the mount and a large television.

Image 4.1: Visual guide for TV size, VESA compatibility, and suitable wall types.

Image 4.2: Detailed compatibility check for TV size, VESA, and wall types.
5. Vodič za namestitev
Follow these steps carefully for a secure installation. It is recommended to have at least two people for installation, especially when lifting the TV.
5.1 Potrebno orodje (ni vključeno)
- Iskalnik stebrov (za namestitev lesenih stebrov)
- Drill with appropriate drill bits (wood or masonry)
- Phillips izvijač za glavo
- Ključ za vtičnice
- Svinčnik
- Merilni trak
5.2 Pritrditev nosilcev televizorja na televizor
- Televizor položite z zaslonom navzdol na mehko, čisto površino, da preprečite praske.
- Identify the correct diameter and length of screws (M4, M6, or M8) that fit your TV's mounting holes. Use washers and spacers as needed to ensure the screws do not bottom out and the brackets sit flush.
- Attach the two vertical TV bracket rails to the back of your TV using the selected screws, washers, and spacers. Ensure the brackets are centered and securely tightened.
5.3 Montaža stenske plošče
Za namestitev lesenih nosilcev:
- Use a stud finder to locate the edges and center of two adjacent wood studs. Mark the center of the studs at the desired height for your TV.
- Place the drilling template against the wall, aligning it with your marked stud centers and desired TV height. Use the included bubble level to ensure it is perfectly horizontal.
- Mark the pilot hole locations through the template.
- Drill pilot holes into the wood studs at the marked locations.
- Attach the wall plate assembly to the wall using the lag bolts and washers provided. Tighten securely, but do not overtighten.
Za montažo betonskih/opečnih sten:
- Mark the desired height and horizontal position for the wall plate. Use the included bubble level to ensure it is perfectly horizontal.
- Place the drilling template against the wall and mark the pilot hole locations.
- Drill pilot holes into the concrete or brick wall using a masonry drill bit.
- Insert the concrete anchors into the drilled holes, ensuring they are flush with the wall surface.
- Attach the wall plate assembly to the wall using the lag bolts and washers provided, screwing them into the anchors. Tighten securely.
5.4 Obešanje televizorja
- With assistance, carefully lift the TV and hook the TV bracket rails onto the wall plate.
- Prepričajte se, da je televizor varno pritrjen na stensko ploščo.
- Engage the safety locking screws or mechanisms on the TV brackets to prevent accidental dislodgement.
5.5 Integrated Power Strip Installation
The integrated power strip can be mounted in one of four positions on the wall plate for convenient access. Choose the position that best suits your setup.

Image 5.1: Four possible mounting locations for the integrated power strip.
Secure the power strip using the provided small screws. Plug the power strip's cord into a wall outlet. You can then connect your TV, game console, or other devices to the 2 AC outlets and 2 USB ports.
6. Upravljanje nosilca
Your FORGING MOUNT provides flexible viewing options. Adjustments should be made smoothly and carefully.
6.1 Izteg in umik
Gently pull or push the TV to extend it up to 42.6 inches from the wall or retract it back to a low-profile 2.8 palcev.
6.2 Nastavitev vrtenja
The mount allows for a 180-degree swivel, enabling you to direct the TV screen towards different viewing areas in the room.

Image 6.1: Demonstrating the mount's ability to swivel a 75-inch TV 90 degrees.
6.3 Nastavitev nagiba
Adjust the tilt angle from +5 degrees to -15 degrees to reduce glare or achieve a more comfortable viewing angle. This is typically a tool-free adjustment.
6.4-stopenjska nastavitev
After installation, you can fine-tune the TV's horizontal level by +/-3 degrees to ensure it is perfectly straight.
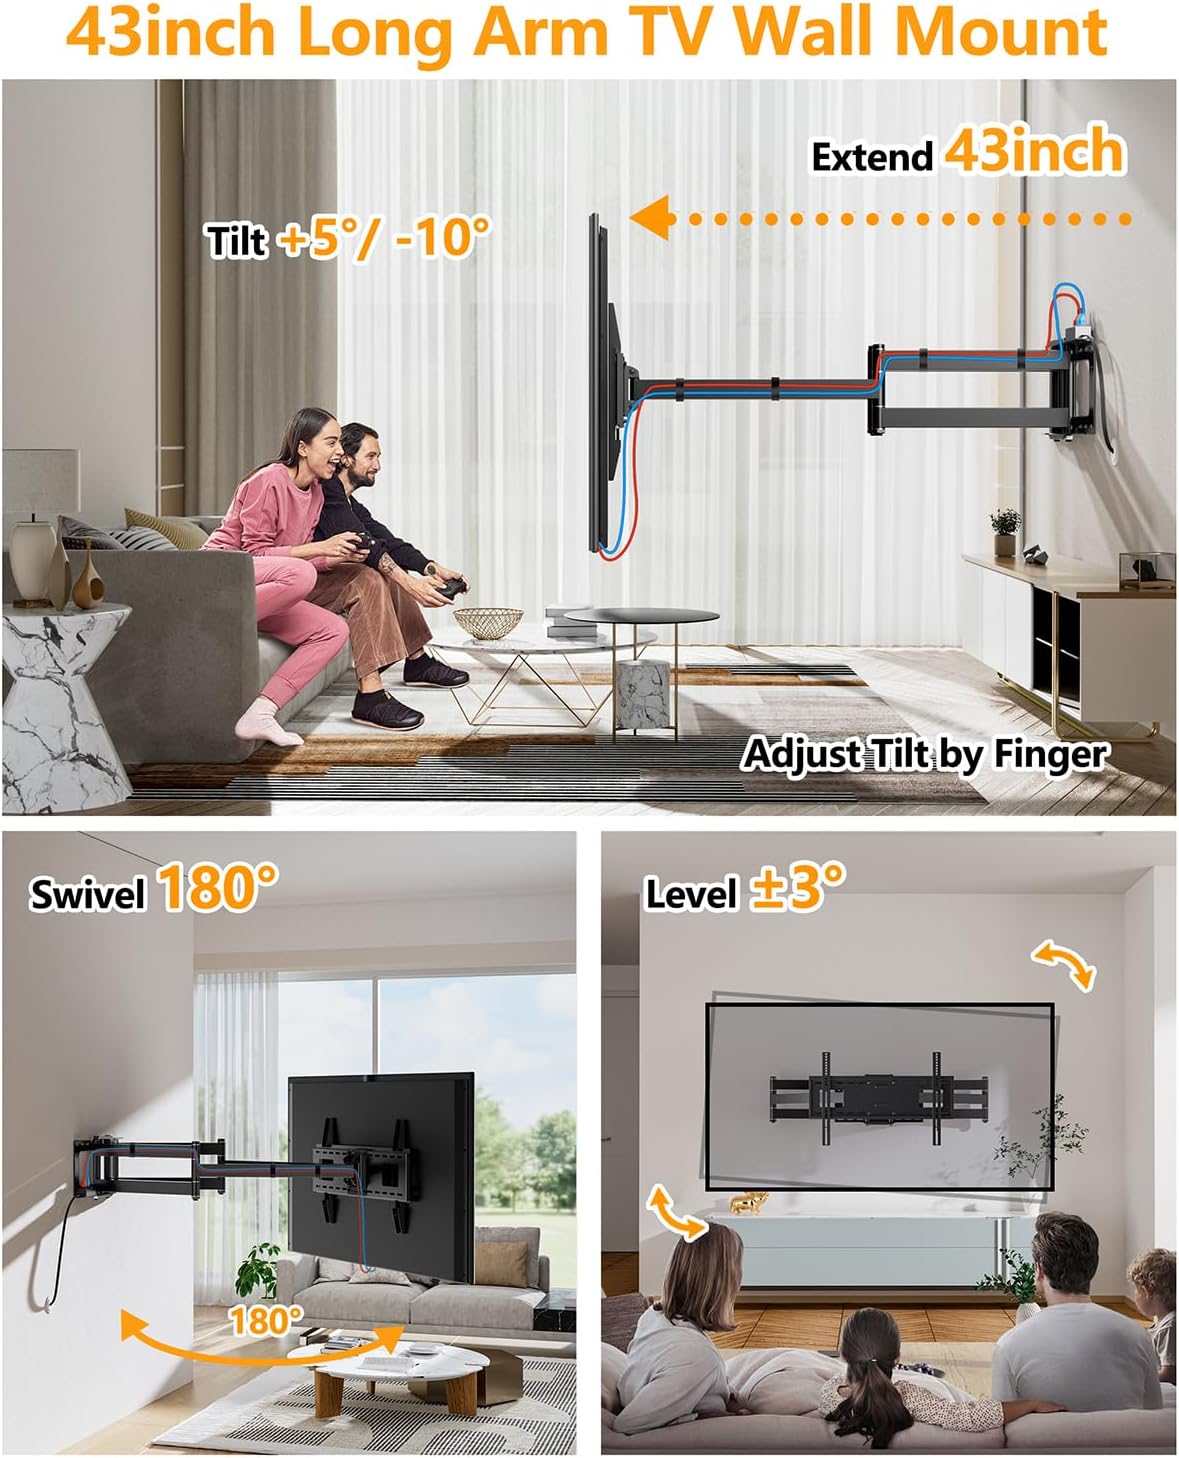
Image 6.2: Visual representation of the mount's tilt, swivel, and level adjustment features.
7. Vzdrževanje
- Občasno preverite vse vijake in povezave, da se prepričate, da so trdno priviti in varno pritrjeni.
- Nosilec očistite z mehko, suho krpo. Izogibajte se abrazivnim čistilom ali topilom.
- If the articulating arms become stiff, a small amount of silicone-based lubricant can be applied to the pivot points. Avoid petroleum-based lubricants.
8. Odpravljanje težav
| Težava | Možen vzrok | rešitev |
|---|---|---|
| Televizor po namestitvi ni poravnan. | Initial leveling was not precise. | Use the +/-3 degree level adjustment feature to fine-tune the TV's position. |
| Mount feels stiff when extending/swiveling. | Joints may require lubrication or are new. | Apply a small amount of silicone-based lubricant to the pivot points. Movement should become smoother with use. |
| Power strip not working. | Not plugged into wall outlet, or circuit breaker tripped. | Ensure the power strip's cord is securely plugged into a functioning wall outlet. Check your home's circuit breaker. |
| Mount appears unstable. | Improper installation or loose fasteners. | Immediately remove the TV. Re-check all wall mounting bolts and TV bracket screws for tightness. Ensure installation was on a suitable wall type (wood stud, concrete, brick) and not drywall alone. If issues persist, consult a professional. |
9. Specifikacije
| Funkcija | Podrobnost |
|---|---|
| Številka modela | HY9462-B |
| Združljive velikosti televizorjev | 50 - 100 palcev |
| Zmogljivost teže | 198 lbs (90 kg) |
| Združljivost VESA | 200x100 mm do 800x600 mm |
| Vrsta namestitve | Stenski nosilec |
| Vrsta gibanja | Articulating, Tilt, Swivel |
| Kot nagiba | +5° / -15° |
| Zasučni kot | 180° |
| Prilagoditev ravni | +/-3° |
| Podaljšek od stene | 2.8 palca (zloženo) do 42.6 palca (izvlečeno) |
| Material | Legirano jeklo |
| barva | Črna |
| Integrated Power Strip | 2 AC Outlets, 2 USB Ports, 6.68 ft Power Cord |
| Teža predmeta | 31.4 funtov |
| Dimenzije paketa | 44 x 11 x 4 palcev |
10. Informacije o garanciji
FORGING MOUNT products are manufactured with quality and durability in mind. This product comes with a limited warranty against defects in materials and workmanship under normal use. Please refer to the warranty card included in your package or visit the official FORGING MOUNT webza podrobne garancijske pogoje.
Za vse garancijske zahtevke je potrebno potrdilo o nakupu.
11. Podpora strankam
If you have any questions regarding the installation, operation, or parts of your FORGING MOUNT TV wall mount, please do not hesitate to contact our professional product support team.
- Webspletno mesto: Visit the FORGING MOUNT Store on Amazon
- E-pošta: Refer to your product packaging or warranty card for direct contact information.
Please have your model number (HY9462-B) and purchase date ready when contacting support.
Ask a question about this manual
Ask about setup, troubleshooting, compatibility, parts, safety, or missing instructions. Manuals+ will review the question and use this page’s manual context to help answer it.