
1. Uvod
Hvala za nakupasing the KOSUMOSU BL-330OR-2 Digital LED Alarm Clock. This manual provides essential information for the proper setup, operation, and maintenance of your device. Please read it thoroughly before use and retain it for future reference.
This digital clock features a clear 6.7-inch LED display, offering time, date, day of the week, and temperature readings. It includes dual alarm functions with snooze, and both automatic and manual brightness adjustment to suit various environments.

Slika 1.1: Spredaj view of the KOSUMOSU BL-330OR-2 Digital LED Alarm Clock.
2. Nastavitev
2.1 Vsebina paketa
- KOSUMOSU BL-330OR-2 Digital LED Alarm Clock
- Napajalni kabel USB (1.5 metra)
- Uporabniški priročnik
Opomba: A 5V/1A AC adapter is required for operation and is not included in the package. Please use a compatible USB power adapter.
2.2 Napajalni priključek
- Connect the provided USB cable to the USB port on the back of the alarm clock.
- Plug the other end of the USB cable into a 5V/1A AC adapter (not included) or a powered USB port.
- Zaslon se bo zasvetil, kar pomeni, da je ura vklopljena.
The clock includes a button battery (CR2025) for time memory during power outages. This battery does not power the display or alarm functions; it only retains settings.
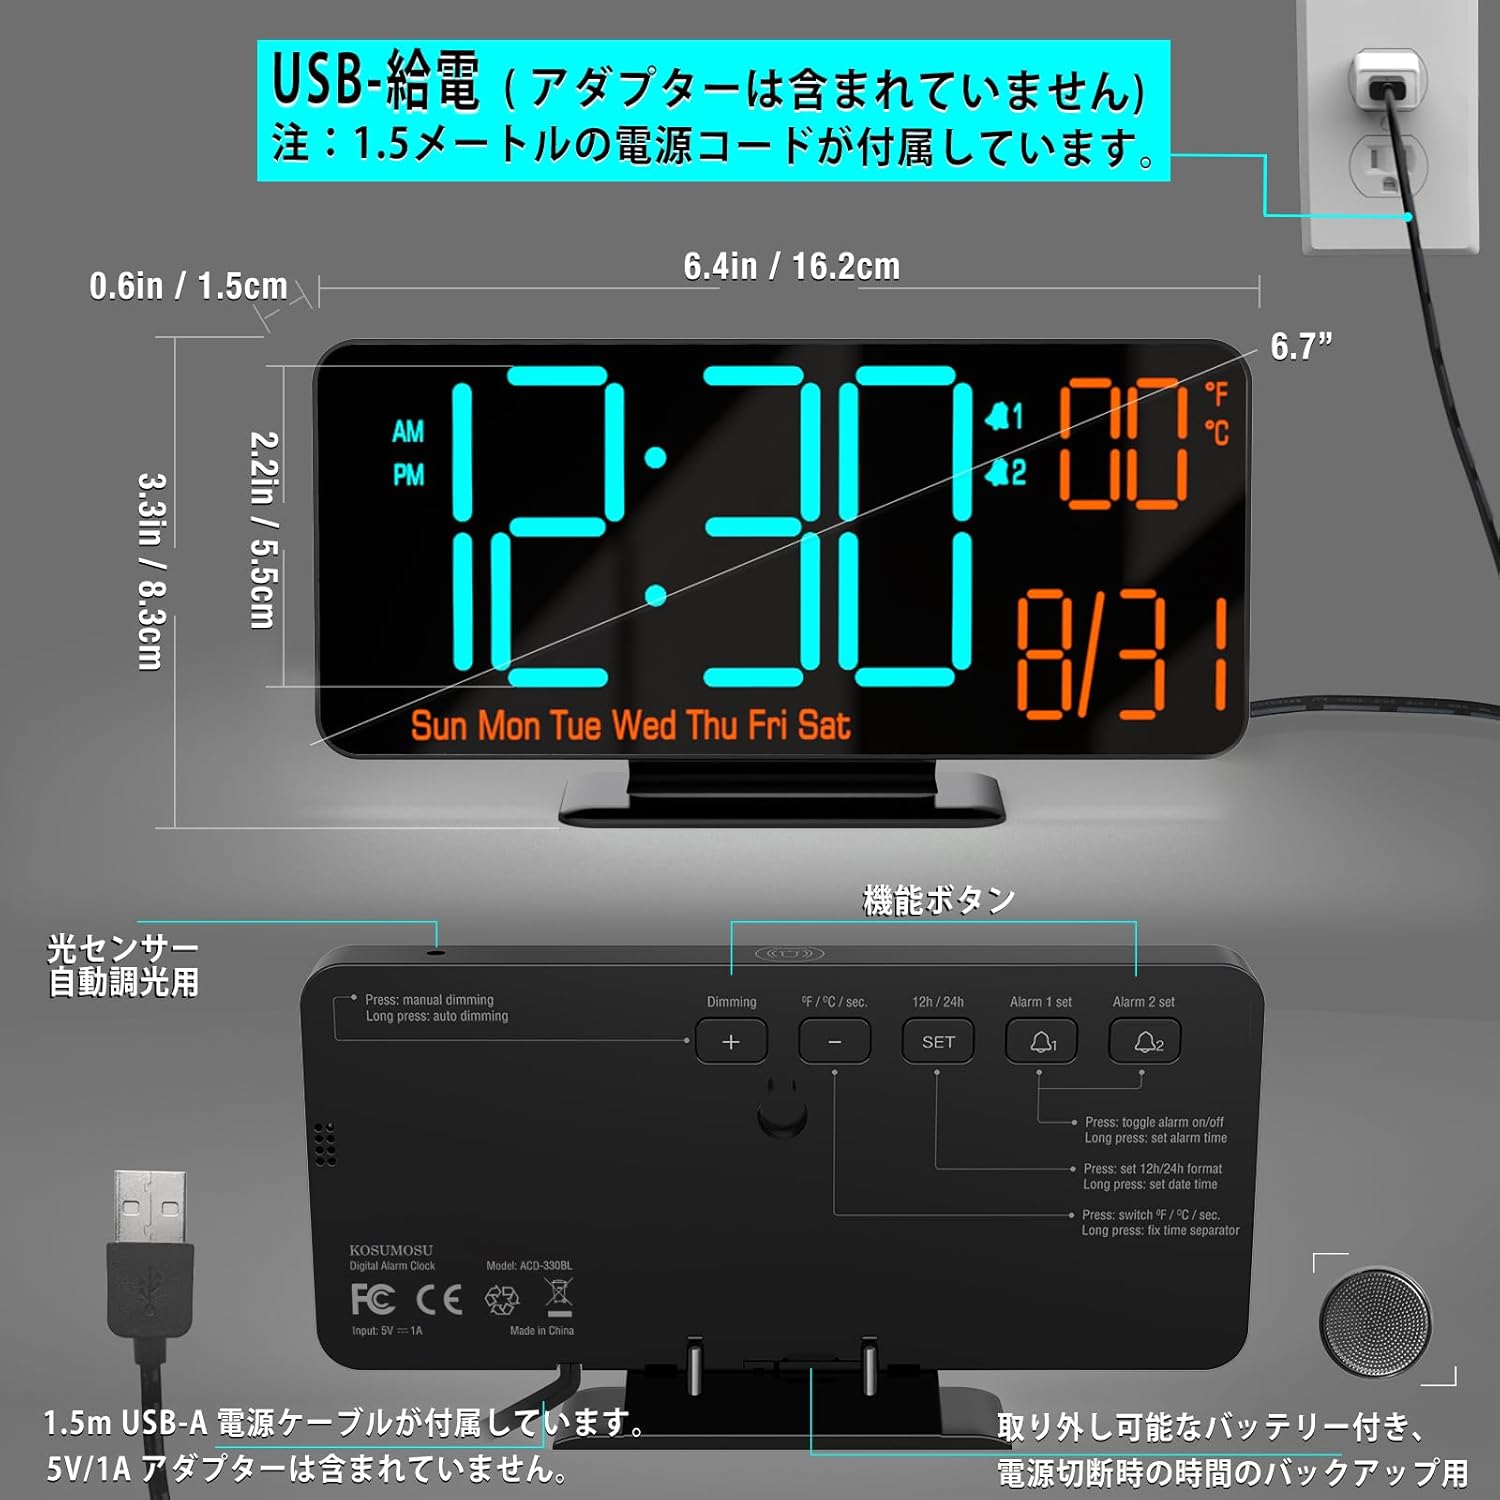
Image 2.1: Dimensions and USB power connection diagram.
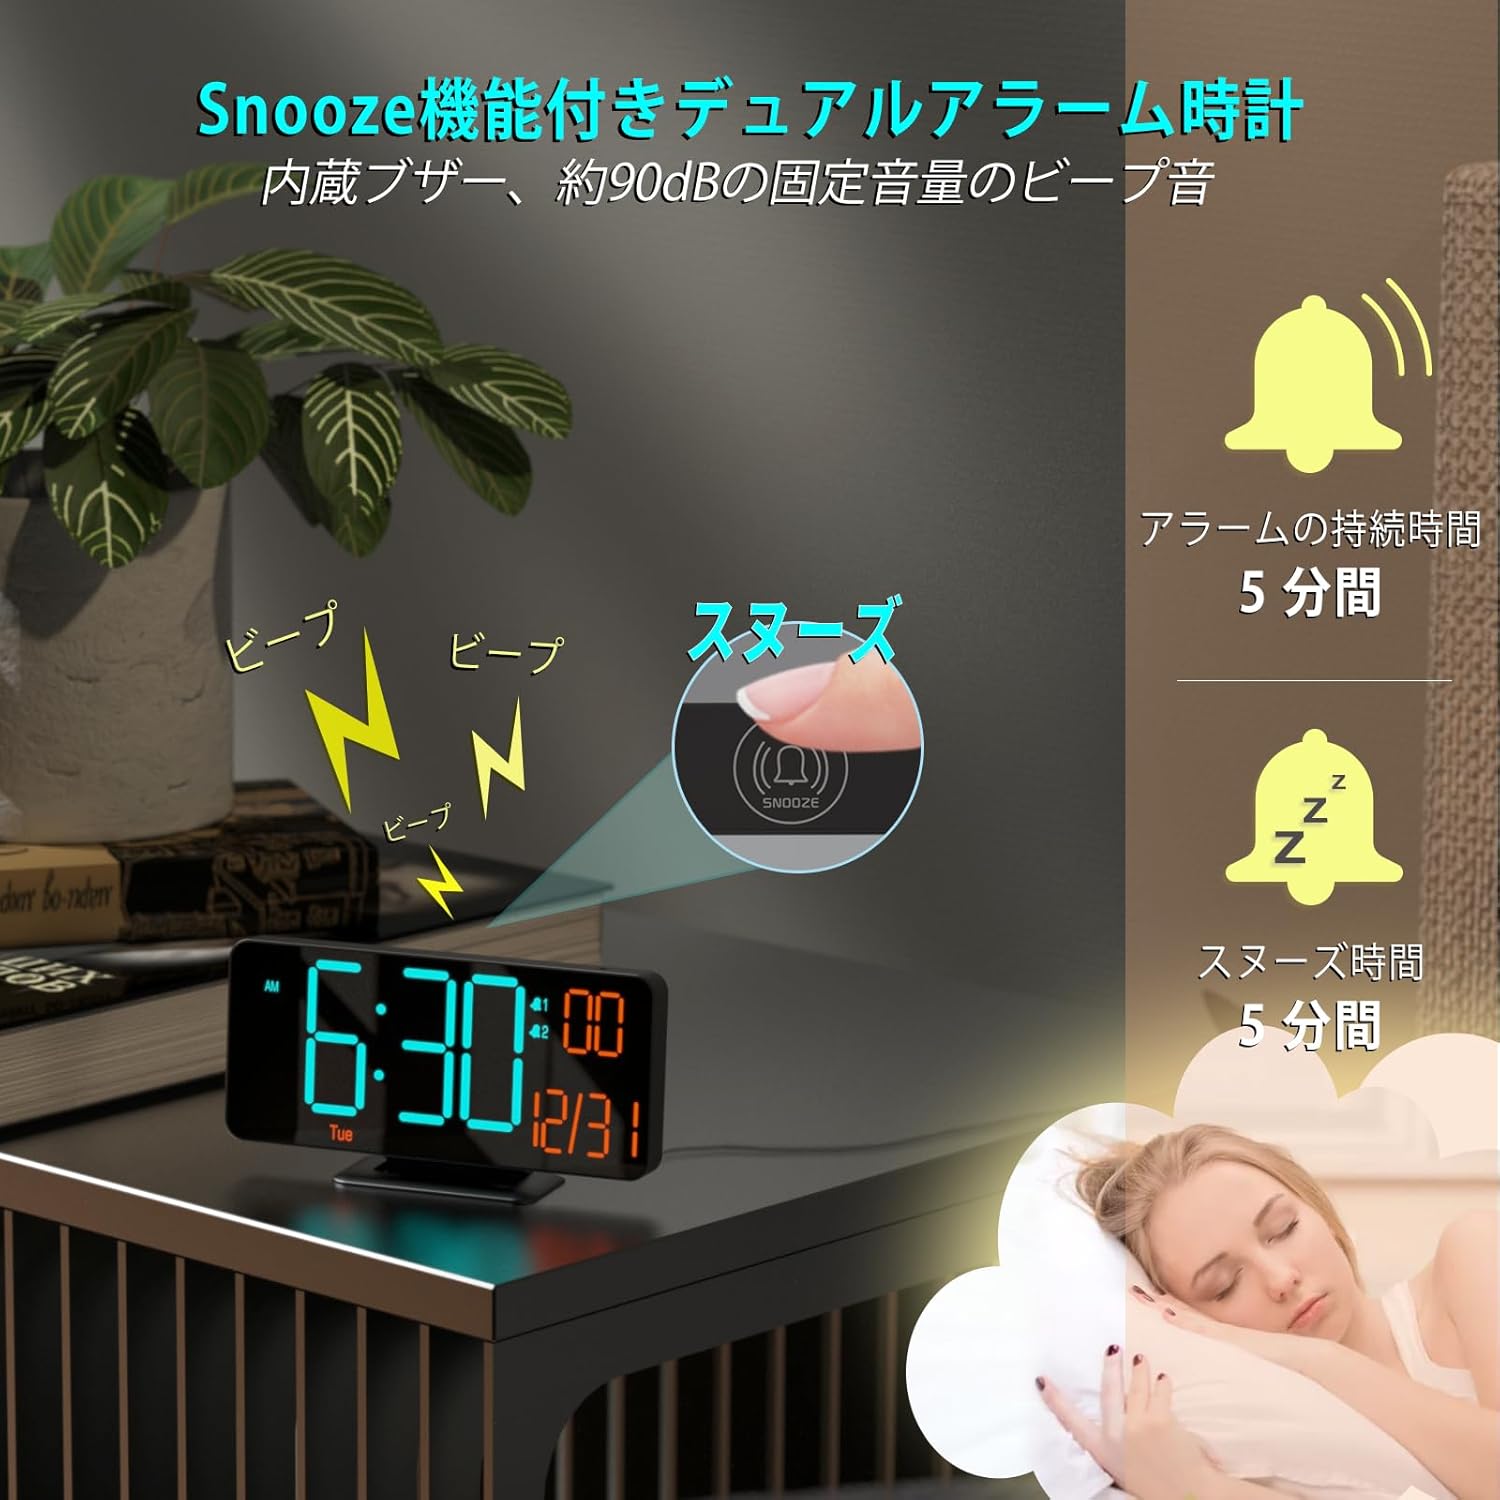
Image 2.2: Rear panel with function buttons and USB port.
2.3 Začetne nastavitve (čas, datum, enota temperature)
Refer to the buttons on the back of the clock (SET, +, -, ALARM 1 SET, ALARM 2 SET).
- Nastavi čas: Pritisnite in držite NASTAVI za vstop v način nastavitve časa. Uporabite + in - gumba za nastavitev ure, nato pa pritisnite NASTAVI za potrditev in premik na minute. Ponovite za minute.
- 12/24-urni format: While in time setting mode, press the 12H/24H za preklapljanje med 12-urnim (z indikatorjem AM/PM) in 24-urnim formatom časa.
- Nastavi datum: Ko nastavite čas, pritisnite NASTAVI again to enter date setting mode. Adjust year, month, and day using + in -, pritiskanje NASTAVI to confirm each. The day of the week will update automatically.
- Enota za temperaturo: Pritisnite °F/°C button to switch between Celsius and Fahrenheit display for temperature.
3. Delovanje
3.1 Prilagoditev svetlosti
The clock offers both manual and automatic dimming features.
- Ročno zatemnitev: Pritisnite MOTENJE button to cycle through three brightness levels (Low, Medium, High) or turn the LED display off.
- Samodejno zatemnitev: The clock has a built-in light sensor. To activate automatic dimming, ensure manual dimming is not set to 'Off'. The clock will automatically adjust its brightness based on ambient light conditions.
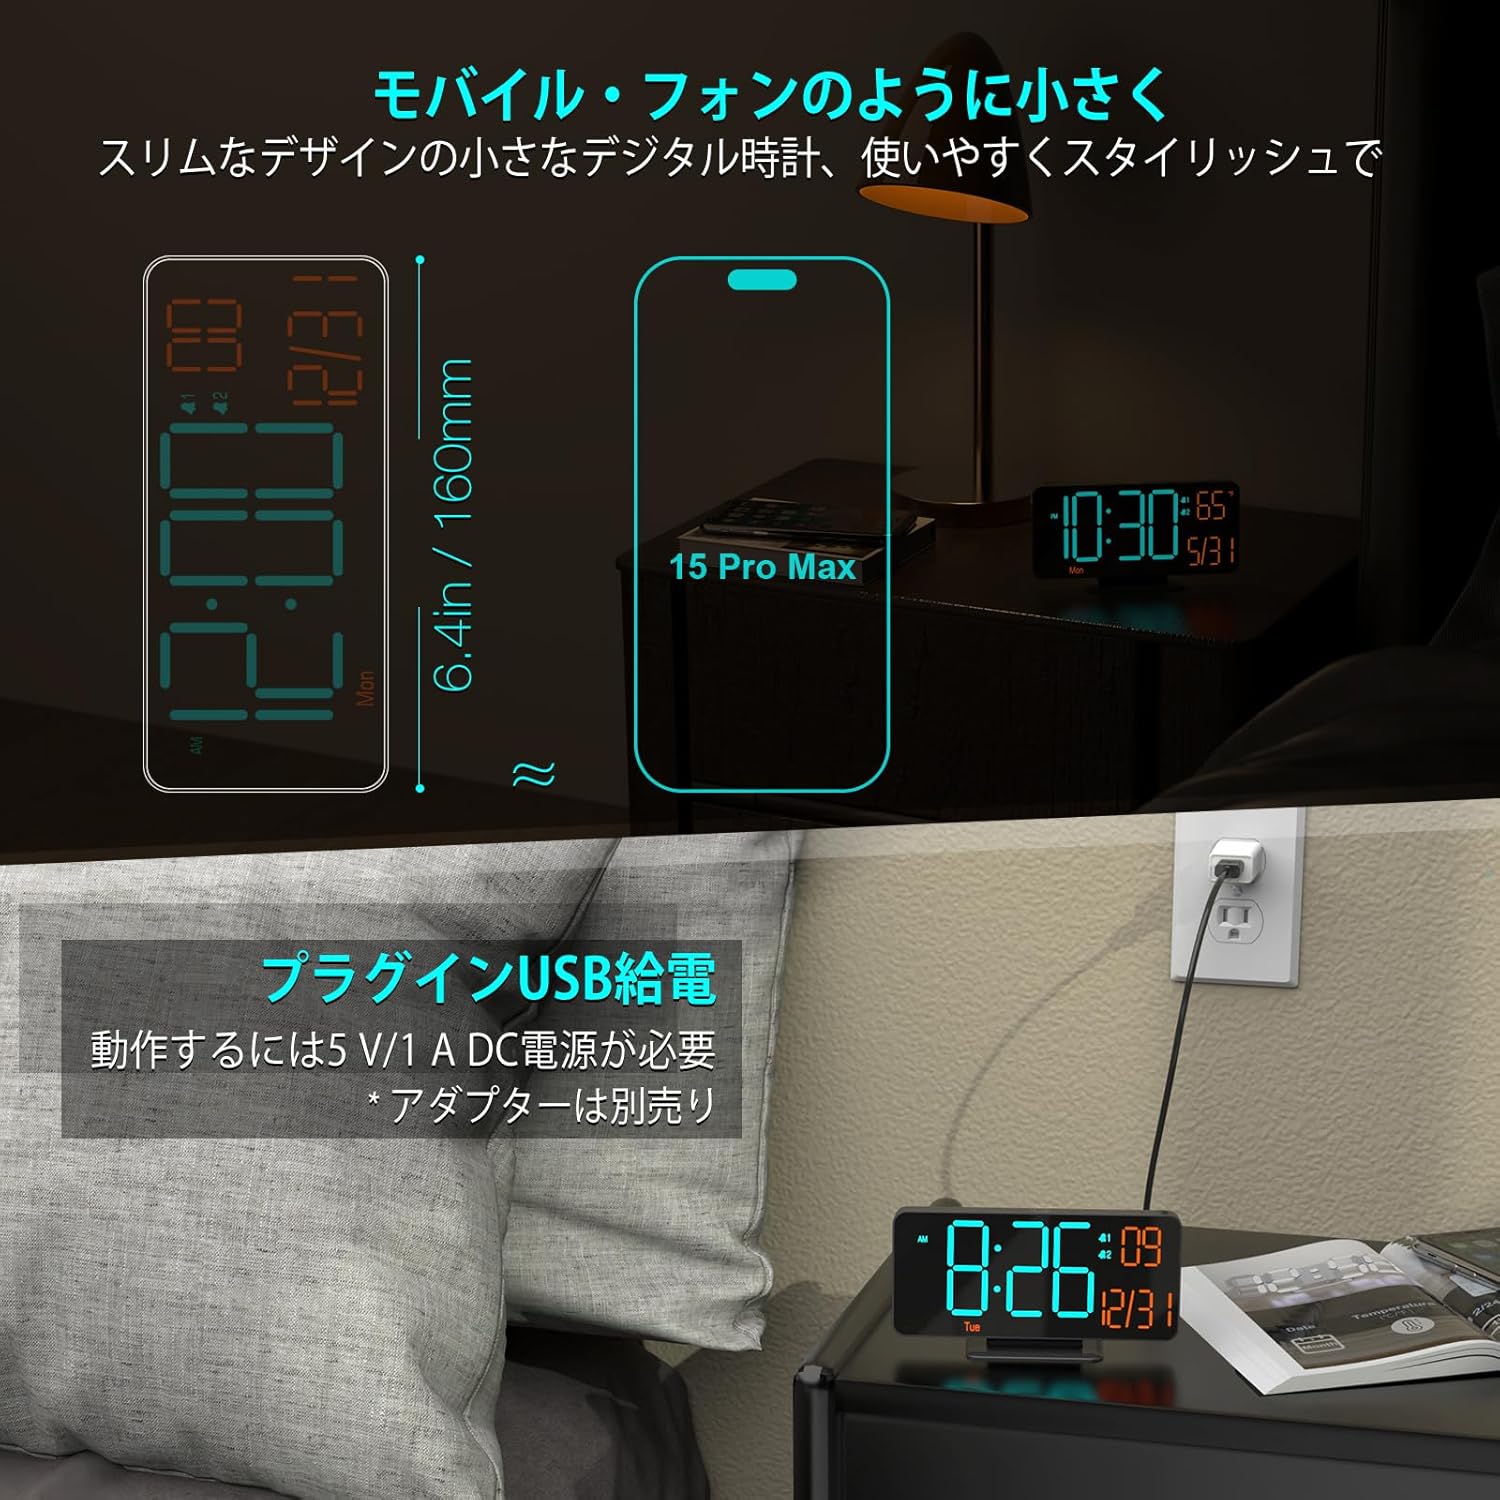
Image 3.1: Display brightness options (manual and automatic).
3.2 Alarm Settings (Dual Alarms)
Ura podpira dva neodvisna alarma (Alarm 1 in Alarm 2).
- Nastavite čas alarma: Pritisnite in držite ALARM 1 NAST or ALARM 2 NAST to enter alarm time setting mode. Use + in - to adjust the hour, then press the respective ALARM NASTAVLJEN button to confirm and move to minutes. Repeat for minutes.
- Enable/Disable Alarm: Na kratko pritisnite ALARM 1 NAST or ALARM 2 NAST za vklop ali izklop alarma. Ko je alarm aktiven, se na zaslonu prikaže ikona alarma.
- Alarm Cycle: The clock offers three alarm cycles: Weekdays, Weekends, and Everyday. While setting the alarm, press the ALARM NASTAVLJEN button repeatedly after setting minutes to cycle through these options.
3.3 Funkcija dremeža
Ko se oglasi alarm, pritisnite veliko DREMEŽ button on the top of the clock to activate the snooze function. The alarm will pause for 5 minutes and then sound again. To turn off the alarm completely, press any other button on the back of the clock.

Image 3.2: Snooze function activation.
3.4 Display Modes (Seconds/Temperature)
The clock can display seconds or temperature alongside the time and date. Press the SECONDS/TEMPERATURE button to switch between displaying seconds and temperature (°F/°C).

Image 3.3: Various display modes including seconds and temperature.
4. Vzdrževanje
4.1 Čiščenje
Za čiščenje ure nežno obrišite zaslon in casing with a soft, dry cloth. Do not use abrasive cleaners, solvents, or spray directly onto the device, as this may damage the surface or internal components.
4.2 Rezervna baterija
The internal CR2025 button battery maintains time settings during power interruptions. If the clock is unplugged for an extended period, this battery may eventually deplete. To replace it, carefully open the battery compartment on the back of the unit and insert a new CR2025 battery, ensuring correct polarity.
5. Odpravljanje težav
| Težava | Možen vzrok | rešitev |
|---|---|---|
| Zaslon je prazen | No power; LED display turned off manually. | Ensure USB cable is securely connected to a 5V/1A power source. Press the MOTENJE button to check if the display was manually turned off. |
| Alarm se ne oglasi | Alarm is not enabled; alarm volume is too low. | Pritisnite ALARM 1 NAST or ALARM 2 NAST to ensure the alarm icon is displayed. Check alarm settings for correct time and cycle. |
| Čas je netočen | Initial setting error; prolonged power outage. | Re-set the time following section 2.3. If frequent time drift occurs, ensure a stable power supply. |
| Temperature reading is incorrect | Sensor calibration needed. | The manual does not specify temperature calibration. Ensure the clock is not placed near heat sources or in direct sunlight. |
6. Specifikacije
- Znamka: KOSUMOSU
- Model: BL-330OR-2
- Vrsta zaslona: LED Digital
- Velikost zaslona: 6.7 palcev
- barva: Orange LED - Black
- Material: Plastika
- Dimenzije: 16.2 cm (širina) x 8.3 cm (višina)
- vir energije: Corded Electric (USB 5V/1A, AC adapter not included)
- Battery Type (Backup): Lithium Metal (CR2025, included)
- Teža: 170 gramov
- Lastnosti: LED Display, Alarm, Calendar Display, Temperature Display, Automatic Dimming
- Vrsta sobe: Pisarna, kuhinja, spalnica, dnevna soba, učilnica
7. Garancija in podpora
KOSUMOSU Technology provides a 2-letna garancija for this product. If you encounter any quality issues or problems with usage, please contact our customer service immediately. We are committed to providing a replacement product or guiding you through setup and usage procedures.
For customer support, please refer to the contact information provided with your purchase or visit the official KOSUMOSU webmesto.