
1. Uvod
Thank you for choosing the pamo Industrial Design LAS 1 Standard Garment Rack. This manual provides essential information for the safe and correct assembly, operation, and maintenance of your new garment rack. Please read these instructions carefully before assembly and retain them for future reference.

Figure 1.1: The pamo Industrial Design LAS 1 Standard Garment Rack, fully assembled and in use.
2. Varnostne informacije
- Pred začetkom sestavljanja se prepričajte, da so vse komponente prisotne in nepoškodovane. Ne uporabljajte, če kateri koli deli manjkajo ali so poškodovani.
- Assemble the garment rack on a soft, clean surface to prevent scratches.
- Do not exceed the maximum load capacity of 175 pounds (60 kg). Overloading can cause instability and damage.
- This product is designed for freestanding use. While stable, avoid climbing on or hanging from the rack.
- Med sestavljanjem majhne dele hranite izven dosega otrok, da preprečite nevarnost zadušitve.
- Občasno preverite vse povezave, da se prepričate, da so tesne.
3. Vsebina paketa
Preverite, ali so v paketu priložene vse naslednje komponente. Če kateri koli deli manjkajo, se obrnite na podporo strankam.

Figure 3.1: Illustration of typical components included in the package.
- Vertical Pipes (various lengths)
- Horizontal Pipes (various lengths)
- T-konektorji
- Komolčni priključki
- Floor Flanges / Feet
- Non-slip Felt Pads
- Hex Key (Allen wrench)
- Navodila za sestavljanje (ta priročnik)
4. Nastavitev in montaža
The pamo Industrial Design Garment Rack features an easy screw system for straightforward assembly. No drilling into walls or floors is required for the freestanding model.
4.1. Priprava
- Očistite prostoren prostor za montažo.
- Razporedite vse komponente in jih identificirajte s pomočjo seznama delov.
- Ensure the floor is protected, especially if assembling on delicate surfaces.
4.2. Montažni koraki
- Pritrdite noge: Screw the floor flanges/feet onto the bottom ends of the vertical pipes. Ensure they are tightened securely. Apply the non-slip felt pads to the bottom of the flanges.
- Connect Vertical and Horizontal Pipes: Begin by connecting the lower horizontal pipes to the vertical pipes using T-connectors. Hand-tighten initially.
- Build the Frame: Continue connecting vertical and horizontal pipes using T-connectors and elbow connectors as per the specific design of your LAS 1 Standard model. Refer to the detailed diagrams provided in the included paper instructions for your specific configuration.
- Varne povezave: Once the basic frame is assembled, use the provided hex key to firmly tighten all screw connections. Do not overtighten, but ensure all joints are snug to prevent wobbling.
- Končna uvrstitev: Carefully move the assembled garment rack to its desired location. The non-slip felt pads will protect your floor.

Figure 4.1: The easy screw system allows for straightforward assembly.
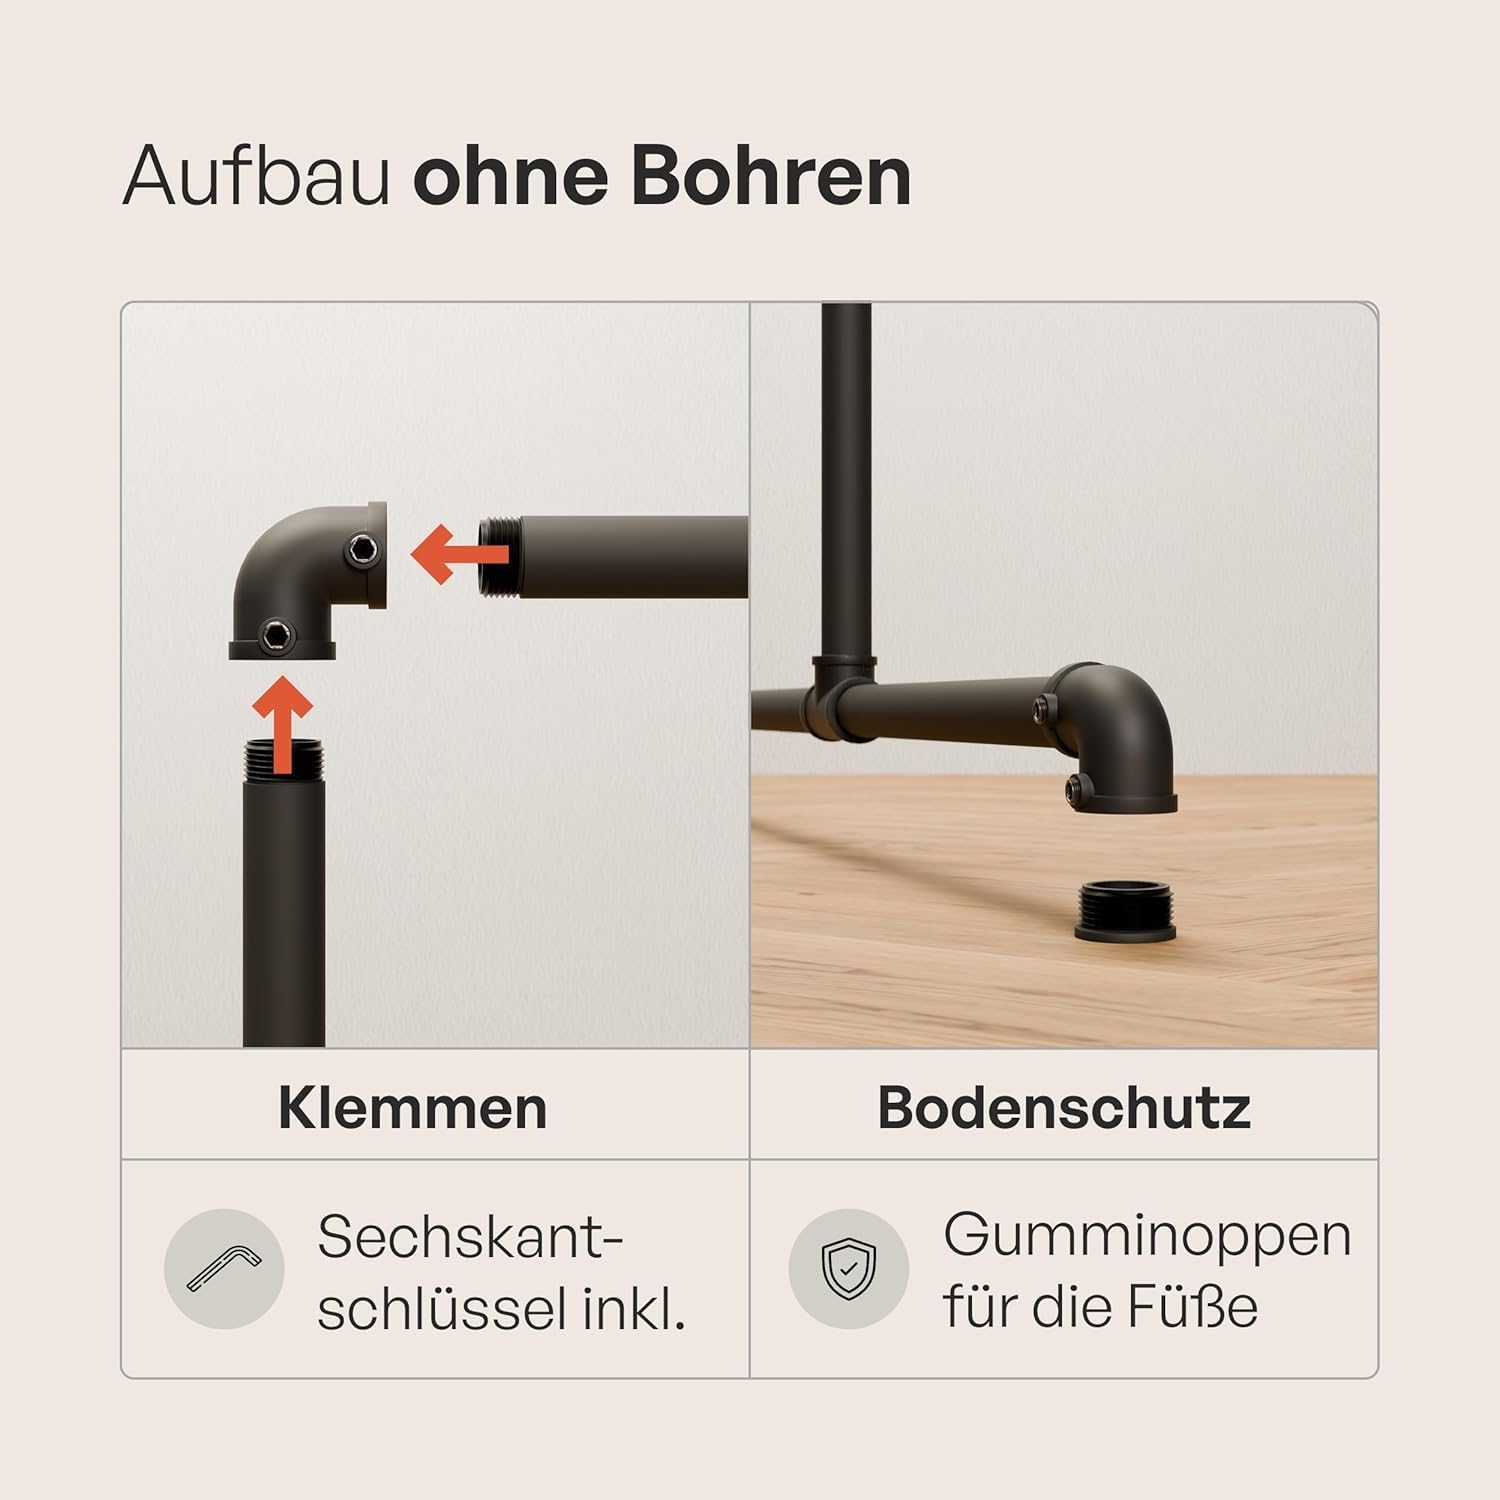
Figure 4.2: Detail of pipe clamping and floor protection with rubber feet.
5. Navodila za uporabo
The pamo Industrial Design Garment Rack is designed for organizing and storing clothing. Its robust construction allows for significant weight capacity.
- Obešanje oblačil: Use standard hangers to hang garments on the horizontal pipes. Distribute weight evenly to maintain stability.
- Zmogljivost teže: The rack has a maximum load capacity of 175 pounds (60 kg). Avoid concentrating heavy items in one area.
- Samostoječa uporaba: This model is designed to be freestanding. Ensure it is placed on a level surface. The non-slip felt pads provide stability and floor protection.
- Razširljiv sistem: The modular design allows for future expansion or reconfiguration. Additional components can be purchased separately to adapt the rack to changing needs.
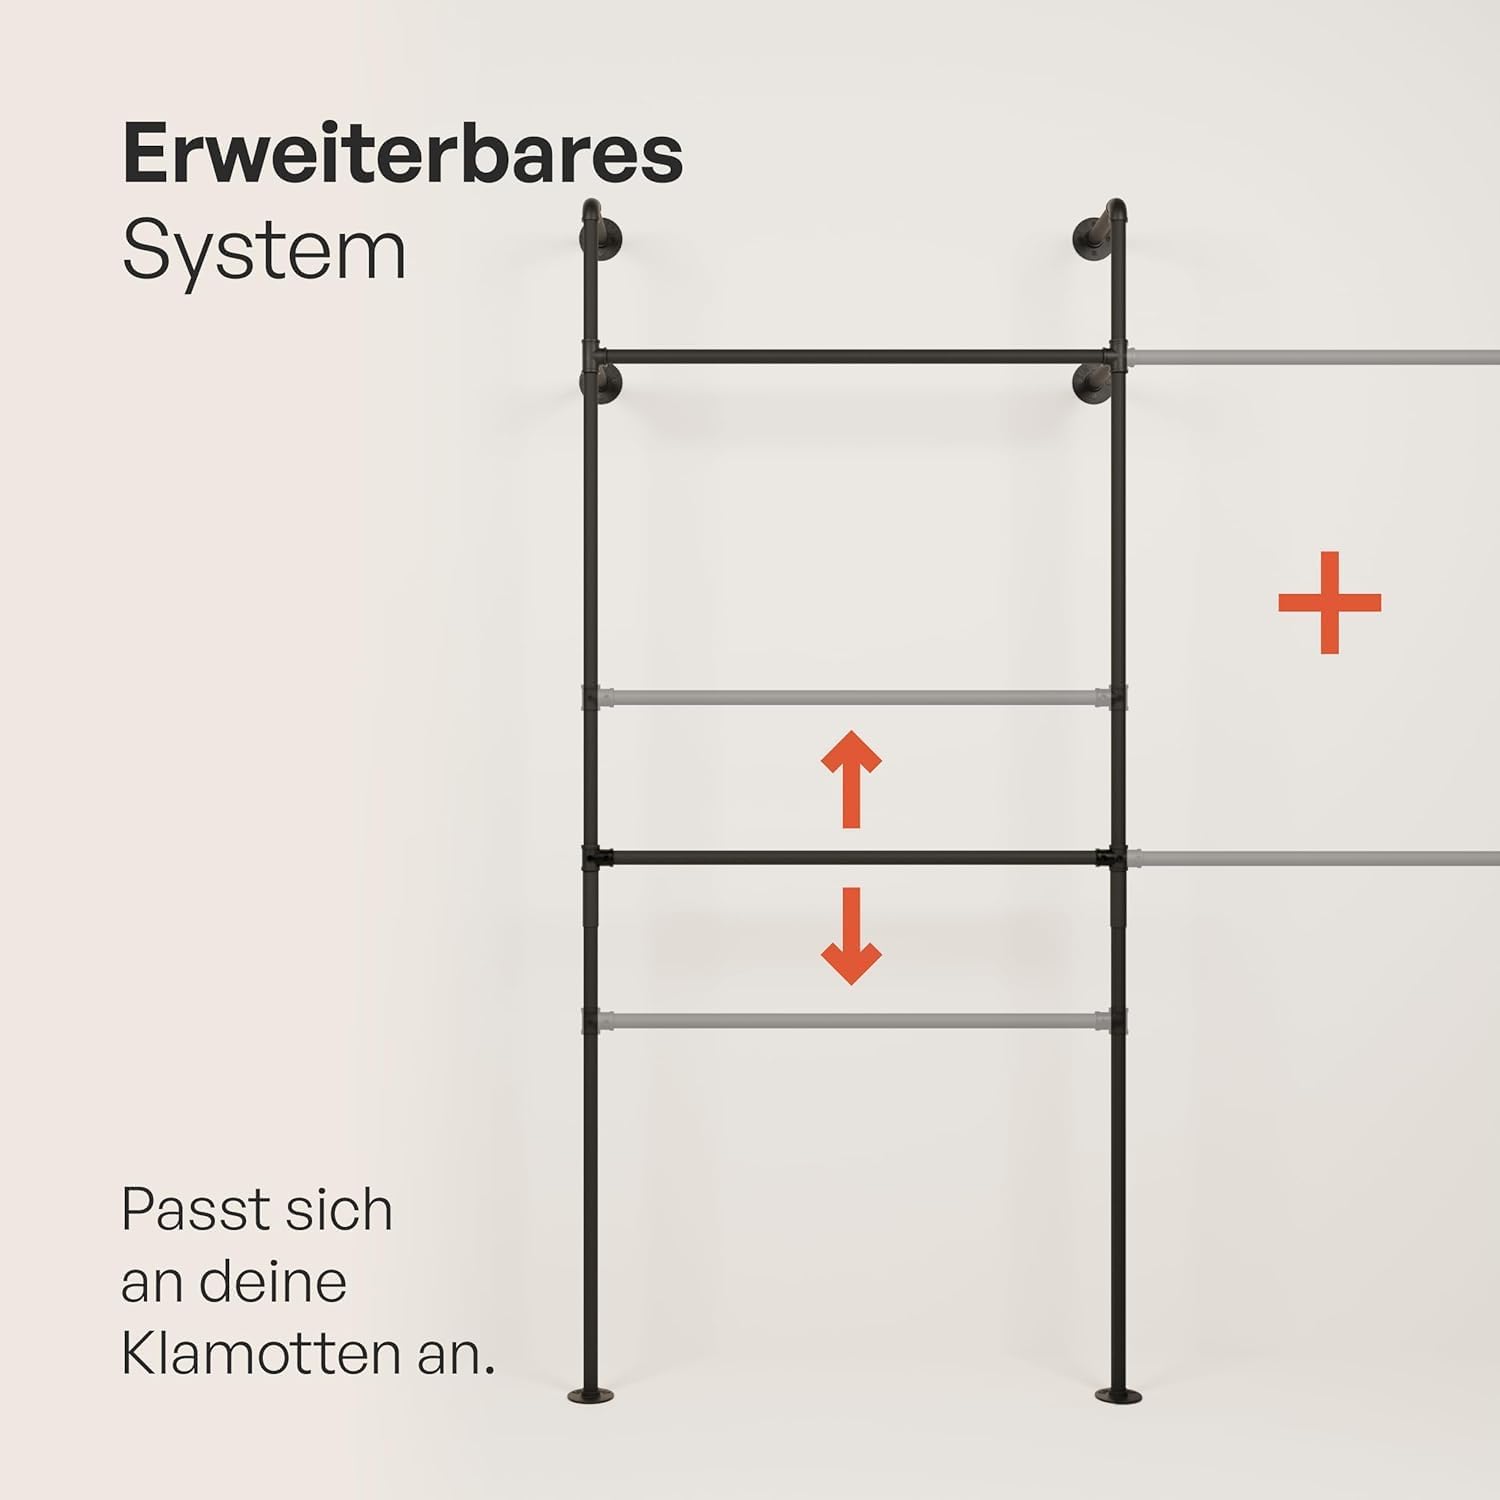
Figure 5.1: The modular system allows for expansion and customization.
6. Vzdrževanje
Proper care will ensure the longevity and appearance of your garment rack.
- Čiščenje: Kovinske površine obrišite z mehko krpoamp cloth. Avoid abrasive cleaners or harsh chemicals, as these can damage the powder-coated finish.
- Pregled: Periodically inspect all connections and joints for tightness. Re-tighten any loose screws using the hex key.
- Floor Pads: Check the non-slip felt pads for wear and tear. Replace them if they become damaged to continue protecting your floor.

Figure 6.1: The MatteGuard coating provides a durable, scratch-resistant surface.
7. Odpravljanje težav
If you encounter any issues with your garment rack, refer to the following common problems and solutions.
| Težava | Možen vzrok | rešitev |
|---|---|---|
| Rack is wobbly/unstable | Loose connections; uneven floor; overloaded | Tighten all screw connections. Ensure the rack is on a level surface. Redistribute weight or reduce load. |
| Pipes do not fit together | Incorrect orientation; debris in threads | Ensure pipes are aligned correctly. Check threads for any obstructions and clear if necessary. |
| Praske na tleh | Missing or worn felt pads | Ensure felt pads are properly attached to all feet. Replace worn pads if necessary. |
8. Specifikacije
| Znamka | pamo |
| Model | LAS 1 Standard (P-01-087) |
| barva | Črna |
| Material | Metal (Solid steel tubes, malleable cast iron fittings) |
| Vrsta zaključka | Powder Coated (MatteGuard) |
| Mere izdelka (V x Š x G) | Približno 194 cm x 99 cm x 60 cm (76.38" x 38.98" x 23.62") |
| Vrsta namestitve | Samostoječa |
| Nosilnost | 175 funta (60 kilograma) |
| Zahtevana montaža | ja |
| Posebne lastnosti | Easy to Install, Non-slip Felt Pads, Scratch-resistant |

Figure 8.1: Product dimensions for the LAS 1 Standard Garment Rack.
9. Garancija in podpora
For information regarding product warranty, please refer to the documentation provided with your purchase or visit the official pamo website. If you require assistance with assembly, have questions about product functionality, or need to report a missing/damaged part, please contact pamo customer support.
Kontaktni podatki: Please refer to the contact details provided on the product packaging or the official pamo webspletno mesto za najnovejše informacije o podpori.