
1. Izdelek je končanview
The JONSBO D32 STD Micro-ATX PC Case is a compact and highly compatible chassis designed for building high-performance desktop systems. It supports a wide range of hardware components, including back-connect motherboards, various cooling solutions, and long graphics cards, making it suitable for both gaming and business applications.
This manual provides detailed instructions for setting up, operating, maintaining, and troubleshooting your JONSBO D32 STD PC Case.

Figure 1: JONSBO D32 STD Micro-ATX PC Case, front view z notranjimi komponentami.
2. Ključne značilnosti
- Visoka združljivost: Supports MATX Back-Connect/BTF motherboards, 240mm AIO liquid coolers, 365mm GPUs, and ATX/SFX-L/SFX PSUs.
- Kompaktna zasnova: Optimized for desktop use with a small footprint, featuring a magnetic dust-proof net at the bottom.
- Flexible Cooling Options: Accommodates up to 6 cooling fans (Top: 2x120mm/140mm, Bottom: 3x120mm/2x140mm, Rear: 1x120mm) and CPU air coolers up to 164mm (Intel) or 163mm (AMD).
- Konfiguracija shranjevanja: Supports up to 3x 2.5" SSDs or 2x 2.5" SSDs + 1x 3.5" HDD.
- Sprednji V/I: Includes USB3.2 Gen1 Type-A (x1), USB3.2 Gen2 Type-C (x1), and a combined HP MIC 2-in-1 port.
3. Nastavitev in namestitev
3.1 Razpakiranje in pregled
Carefully remove the PC case from its packaging. Inspect the case for any signs of damage during transit. Ensure all accessories listed in the packing list are present. The case includes a plastic container with labeled bags for screws and zip ties for convenience.
3.2 Component Installation Guidelines
The D32 STD case is designed for efficient component installation. Follow these guidelines for optimal setup:
- Namestitev matične plošče: The case supports MINI-ITX and MICRO-ATX motherboards, including back-connect MICRO-ATX types. Ensure proper standoff alignment before securing the motherboard. For back-connect motherboards, the D32STD supports widths up to 207mm.
- Namestitev napajalne enote (PSU): The case supports ATX, SFX-L, and SFX PSUs. A front power structure improves internal space utilization. For ATX PSUs, the recommended length varies based on GPU installation: 150mm (GPU in 1st PCI-E slot) or 170mm (GPU in 2nd PCI-E slot). A 14cm ATX PSU is generally easier to manage. Note: Internal power adapter cable is incompatible with 16A plug power supply.
- Namestitev grafične kartice (GPU): The D32 STD supports graphics cards up to 365mm in length. The total clearance from the GPU backplane to the bottom is 94mm (1st PCI-E slot) or 73mm (2nd PCI-E slot). Adjust bottom fan installation based on GPU thickness and position.
- Namestitev hladilnega sistema:
- Tekočinsko hlajenje: The top of the case supports 240mm AIO integrated liquid coolers. It can also accommodate a 30mm thick radiator with 30mm fans.
- Zračno hlajenje: Compatible with high-performance dual tower air-cooled radiators with a height of up to 164mm (Intel CPU) or 163mm (AMD CPU).
- Konfiguracija ventilatorja:
- Top: 2 x 120mm or 2 x 140mm fans
- Bottom: 3 x 120mm or 2 x 140mm fans (forms a high flow intake channel)
- Zadaj: 1 x 120 mm ventilator
- Namestitev pogona za shranjevanje: The case offers flexible storage options. It supports up to three 2.5" SSDs or a combination of two 2.5" SSDs and one 3.5" HDD.
- Upravljanje kablov: Utilize the provided zip ties and the case's internal routing options to manage cables effectively. For back-connect motherboards, ensure sufficient space for stiffer power supply cables.

Figure 2: Motherboard tray with highlighted areas for back-connect motherboard support.

Figure 3: Power supply installation area and internal airflow design.

Figure 4: Graphics card length and clearance specifications.

Figure 5: Fan installation locations and sizes.

Figure 6: Storage drive installation options.
4. Upravljanje ohišja računalnika
Once all components are installed and secured, connect your peripherals and power cable. The front I/O panel provides convenient access to USB ports and audio jacks.
4.1 Front I/O Interface
- USB3.2 Gen1 Type-A: 1 port
- USB3.2 Gen2 Type-C: 1 port
- HP MIC 2 in 1 (Headphone & Microphone composite audio port): 1 port

Figure 7: Front I/O panel for easy connectivity.
4.2 Vklop
Press the power button located on the front panel to turn on your system. Ensure all cables are securely connected before powering on.
5. Vzdrževanje
Redno vzdrževanje pomaga zagotoviti optimalno delovanje in dolgo življenjsko dobo komponent vašega računalnika.
- Upravljanje prahu: The case features a magnetic dust-proof net at the bottom. Regularly remove and clean this filter to prevent dust buildup inside the case, which can hinder airflow and component cooling.
- Čiščenje zunanjosti: Uporabite mehko, damp cloth to clean the exterior surfaces of the case. Avoid abrasive cleaners or solvents.
- Notranje čiščenje: Periodically open the side panels and use compressed air to remove dust from internal components like fans, heatsinks, and circuit boards. Ensure the system is powered off and unplugged before performing internal cleaning.

Figure 8: Magnetic dust filter for easy cleaning.
6. Odpravljanje težav
Ta razdelek obravnava pogoste težave, na katere lahko naletite z ohišjem računalnika.
6.1 Sistem se ne vklopi
- Preverite napajalne povezave: Ensure the PSU is properly connected to the wall outlet and the motherboard. Verify the power button cable from the case is correctly connected to the motherboard's front panel header.
- Stikalo za napajanje: Confirm the power switch on the PSU itself is in the "ON" position.
- Sedenje komponent: Reseat the CPU, RAM, and GPU to ensure they are properly seated in their respective slots.
6.2 Težave s pregrevanjem
- Konfiguracija ventilatorja: Verify that all installed fans are spinning and configured for optimal airflow (e.g., intake at front/bottom, exhaust at top/rear).
- Nabiranje prahu: Očistite vse filtre za prah in notranje komponente, kot je opisano v poglavju Vzdrževanje.
- Termalna pasta: Ensure CPU cooler has adequate thermal paste application.
6.3 Vrata USB ne delujejo
- Glava sprednje plošče: Check that the USB cables from the front I/O panel are securely connected to the correct headers on your motherboard.
- Težave z gonilniki: Ensure your motherboard's chipset drivers are up to date.
7. Specifikacije
| Funkcija | Specifikacija |
|---|---|
| Model izdelka | D32 STD |
| Chassis Size (excluding protruding parts) | 384 mm (D) x 207 mm (Š) x 302 mm (V) |
| Chassis Size (including footrest) | 395 mm (D) x 207 mm (Š) x 314 mm (V) |
| Podpora za matično ploščo | MINI-ITX / MICRO-ATX / Back-connect MICRO-ATX |
| Razširitvene reže | 4 |
| Material ohišja | SPCC steel plate (Thickness: 0.7mm-0.8mm) |
| CPU Air Cooler Height Limit | 164mm MAX (Intel CPU) / 163mm MAX (AMD CPU) |
| CPU Water-cooled Radiator Support | Top 240 AIO |
| GPU Compatible Length | Do 365 mm |
| ATX PSU Length Limit | 150mm (GPU in 1st PCI-E slot) / 170mm (GPU in 2nd PCI-E slot) / 200mm (GPU length 288mm) |
| SFX PSU Support | SFX / SFX-L |
| Drive Bays | 3 x 2.5" SSD or 2 x 2.5" SSD + 1 x 3.5" HDD |
| Sprednji V/I | 1x USB3.2 Gen1 Type-A, 1x USB3.2 Gen2 Type-C, 1x HP MIC 2-in-1 |
| Podpora oboževalcev | Top: 2x120mm/2x140mm, Rear: 1x120mm, Bottom: 3x120mm/2x140mm |
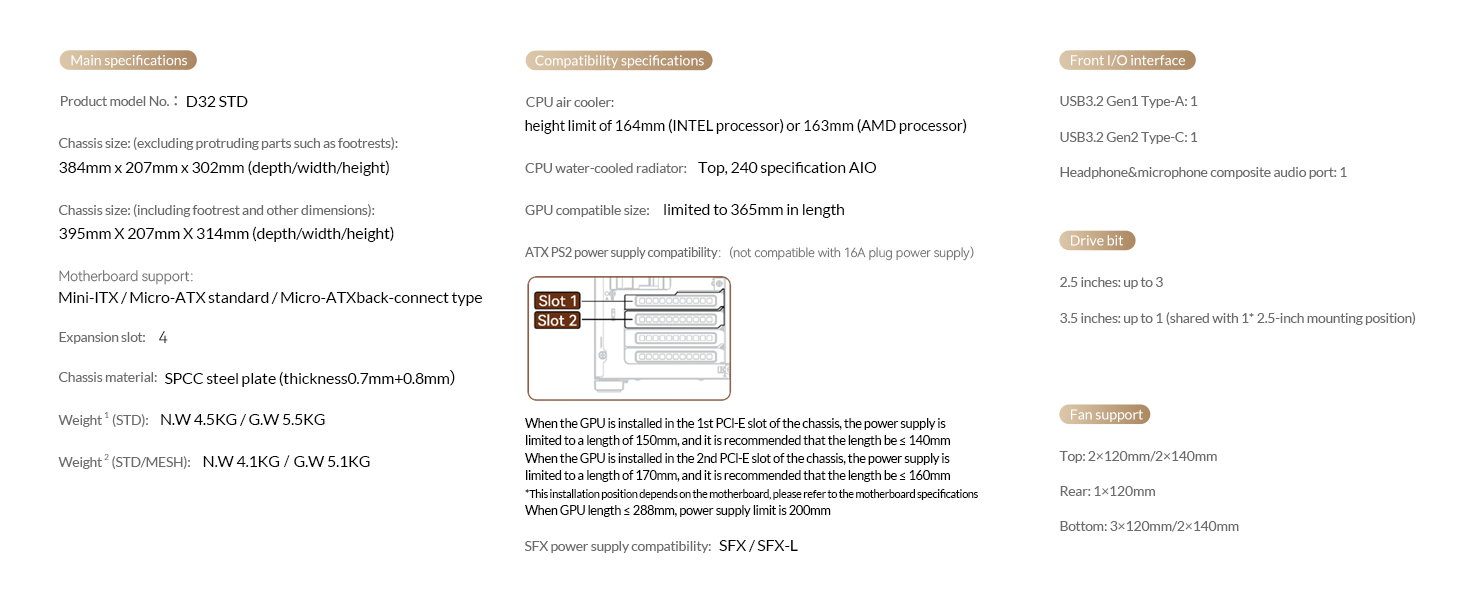
Slika 9: Celovite tehnične specifikacije.
8. Uradni videoposnetki izdelkov
JONSBO D32 STD Micro ATX PC Case Overview
Ta videoposnetek nudi celovit pregledview of the JONSBO D32 STD Micro ATX PC Case, highlighting its features, design, and compatibility. It showcases the case from various angles and demonstrates its compact size and internal layout.
9. Garancija in podpora
Za informacije o garanciji in tehnično podporo se obrnite na uradno spletno stran JONSBO. webspletno mesto ali se obrnite na njihovo službo za stranke. Račun shranite kot dokazilo o nakupu za uveljavljanje garancije.
Za dodatno podporo lahko obiščete Jonsbo Store on Amazon.