
1. Uvod
This manual provides detailed instructions for the setup, operation, and maintenance of your AMIR Projection Alarm Clock (Model WA146-AMUS). This digital alarm clock features a 7.9-inch LED display, a 180° rotatable projector, adjustable brightness, multiple alarm modes, and temperature display. Please read this manual thoroughly before use to ensure proper functionality and to maximize your product experience.

Slika 1.1: Spredaj view of the AMIR Projection Alarm Clock showing its 7.9-inch display and key features like time, alarm, 12/24H, snooze, projection, 4-level brightness, temperature, and night mode.
2. Vsebina paketa
Preverite, ali so v paketu prisotni vsi elementi:
- AMIR Projection Alarm Clock (WA146-AMUS)
- Polnilni kabel USB (1.5 metra)
- Uporabniški priročnik
3. Značilnosti izdelka
- 7.9-palčni LED zaslon: Large, clear digital display for easy viewing.
- 180° Rotatable Projector: Projects time onto walls or ceilings, adjustable for optimal viewing.
- Nastavljiva svetlost: Four levels of display brightness (Bright, Medium, Low, Off) to suit different environments.
- Več načinov alarma: Set alarms for Monday-Friday, Monday-Saturday, or Everyday.
- Funkcija dremeža: Customizable snooze interval from 1 to 60 minutes.
- Večnamenski zaslon: Shows time, date, and indoor temperature.
- 12/24-urni format: Preprosto preklapljajte med 12-urnim in 24-urnim formatom časa.
- Nočni način: Automatically dims the display between 18:00 and 6:00 (adjustable time range).
- Dvojno napajanje: Operates via USB cable (for constant display) or 3 AAA batteries (for memory function during power outages).
4. Krmilniki in zaslon
Familiarize yourself with the clock's buttons and display elements.

Slika 4.1: Zadaj view of the alarm clock, indicating the power port, battery compartment, projection lamp, and control buttons (SWAP, +, -, ALARM, MODE, PROJECT/SNOOZE).
- Zaslon: Shows time, date, temperature, and alarm status.
- Projekcija Lamp: Located on the side, projects time onto a surface.
- Napajalni priključek (DC 5V): For connecting the USB power cable.
- Predal za baterije: Holds 3 AAA batteries for backup power.
- SWAP Button: Used for various settings adjustments.
- Gumba '+' / '-': Adjust values during settings, or change display brightness.
- Gumb ALARM: Used to set and activate alarms.
- Gumb MODE: Cycles through display modes and enters setting modes.
- PROJECT/SNOOZE Button: Activates/deactivates projection, or triggers snooze during an alarm.
5. Nastavitev
5.1 Powering the Clock
Budilko je mogoče napajati na dva načina:
- USB Cable Power (Recommended): Connect the provided USB cable to the DC 5V power port on the back of the clock and plug the other end into a USB power adapter (not included) or a USB port. The LED screen will remain constantly on.
- Moč baterije: Insert 3 AAA batteries (not included) into the battery compartment. When powered by batteries, the display will turn off after a short period to conserve power. Press any button to activate the display. Batteries also provide a memory feature, retaining time settings during power outages when using USB power.
5.2 Začetna priprava
Before first use, ensure you remove the protective film from the display screen.
6. Navodila za uporabo
6.1 Setting the Time and 12/24 Hour Format
- Pritisnite in držite NAČIN button for 3 seconds. The 12/24H format will flash. Use the '+' or '-' buttons to select your preferred format.
- Pritisnite NAČIN again. The hour digits will flash. Use '+' or '-' za prilagoditev ure.
- Pritisnite NAČIN again. The minute digits will flash. Use '+' or '-' za prilagoditev minut.
- Pritisnite NAČIN ponovno za potrditev in izhod iz nastavitve časa.

Image 6.1: Visual guide for setting the time and selecting 12-hour or 24-hour format using the MODE, '+' and '-' buttons.
6.2 Nastavitev alarma
- Pritisnite in držite ALARM button for 3 seconds. The alarm hour digits will flash. Use '+' or '-' za nastavitev ure budilke.
- Pritisnite ALARM again. The alarm minute digits will flash. Use '+' or '-' za nastavitev minut alarma.
- Pritisnite ALARM again. The snooze time (default 5 minutes) will flash. Use '+' or '-' to set the snooze interval from 1 to 60 minutes.
- Pritisnite ALARM again. The alarm mode (1-5, 1-6, or 1-7) will flash. Use '+' or '-' za izbiro:
- 1-5: Od ponedeljka do petka
- 1-6: Od ponedeljka do sobote
- 1-7: Vsak dan
- Pritisnite ALARM again to confirm and exit alarm setting.

Image 6.2: Visual guide for setting the alarm time, snooze duration, and selecting one of the three alarm modes.
6.3 Activating/Deactivating Alarm
After setting the alarm, a small alarm icon will appear on the display, indicating the alarm is active. To deactivate the alarm, short press the ALARM gumb, dokler ikona alarma ne izgine.
6.4 Uporaba funkcije dremeža
Ko se oglasi alarm, pritisnite veliko PROJECT/SNOOZE button to activate snooze. The alarm will pause for the set snooze interval and then sound again. To turn off the alarm completely, press any other button.

Image 6.3: Illustration of the snooze function, showing a person pressing the large PROJECT/SNOOZE button for extra sleep time.
6.5 Prilagajanje svetlosti zaslona
Kratek pritisk na '+' or '-' buttons to cycle through the four display brightness levels: Bright, Medium, Low, and Off.

Image 6.4: Demonstrates the four adjustable brightness levels of the clock's display: Bright, Medium, Dim, and Off.
6.6 Using the Projection Feature
The clock can project the time onto a wall or ceiling. The projection distance ranges from 1.6ft to 16ft.
- Aktiviraj/Deaktiviraj projekcijo: Kratek pritisk na PROJECT/SNOOZE gumb za vklop ali izklop projekcije.
- Prilagodi kot projekcije: Manually rotate the projection lamp on the side of the clock to adjust the projection angle.
- 180° Flip Projection: Če je predvideni čas obrnjen na glavo, pritisnite in držite ZAMENJAVA button to flip the projection 180 degrees.
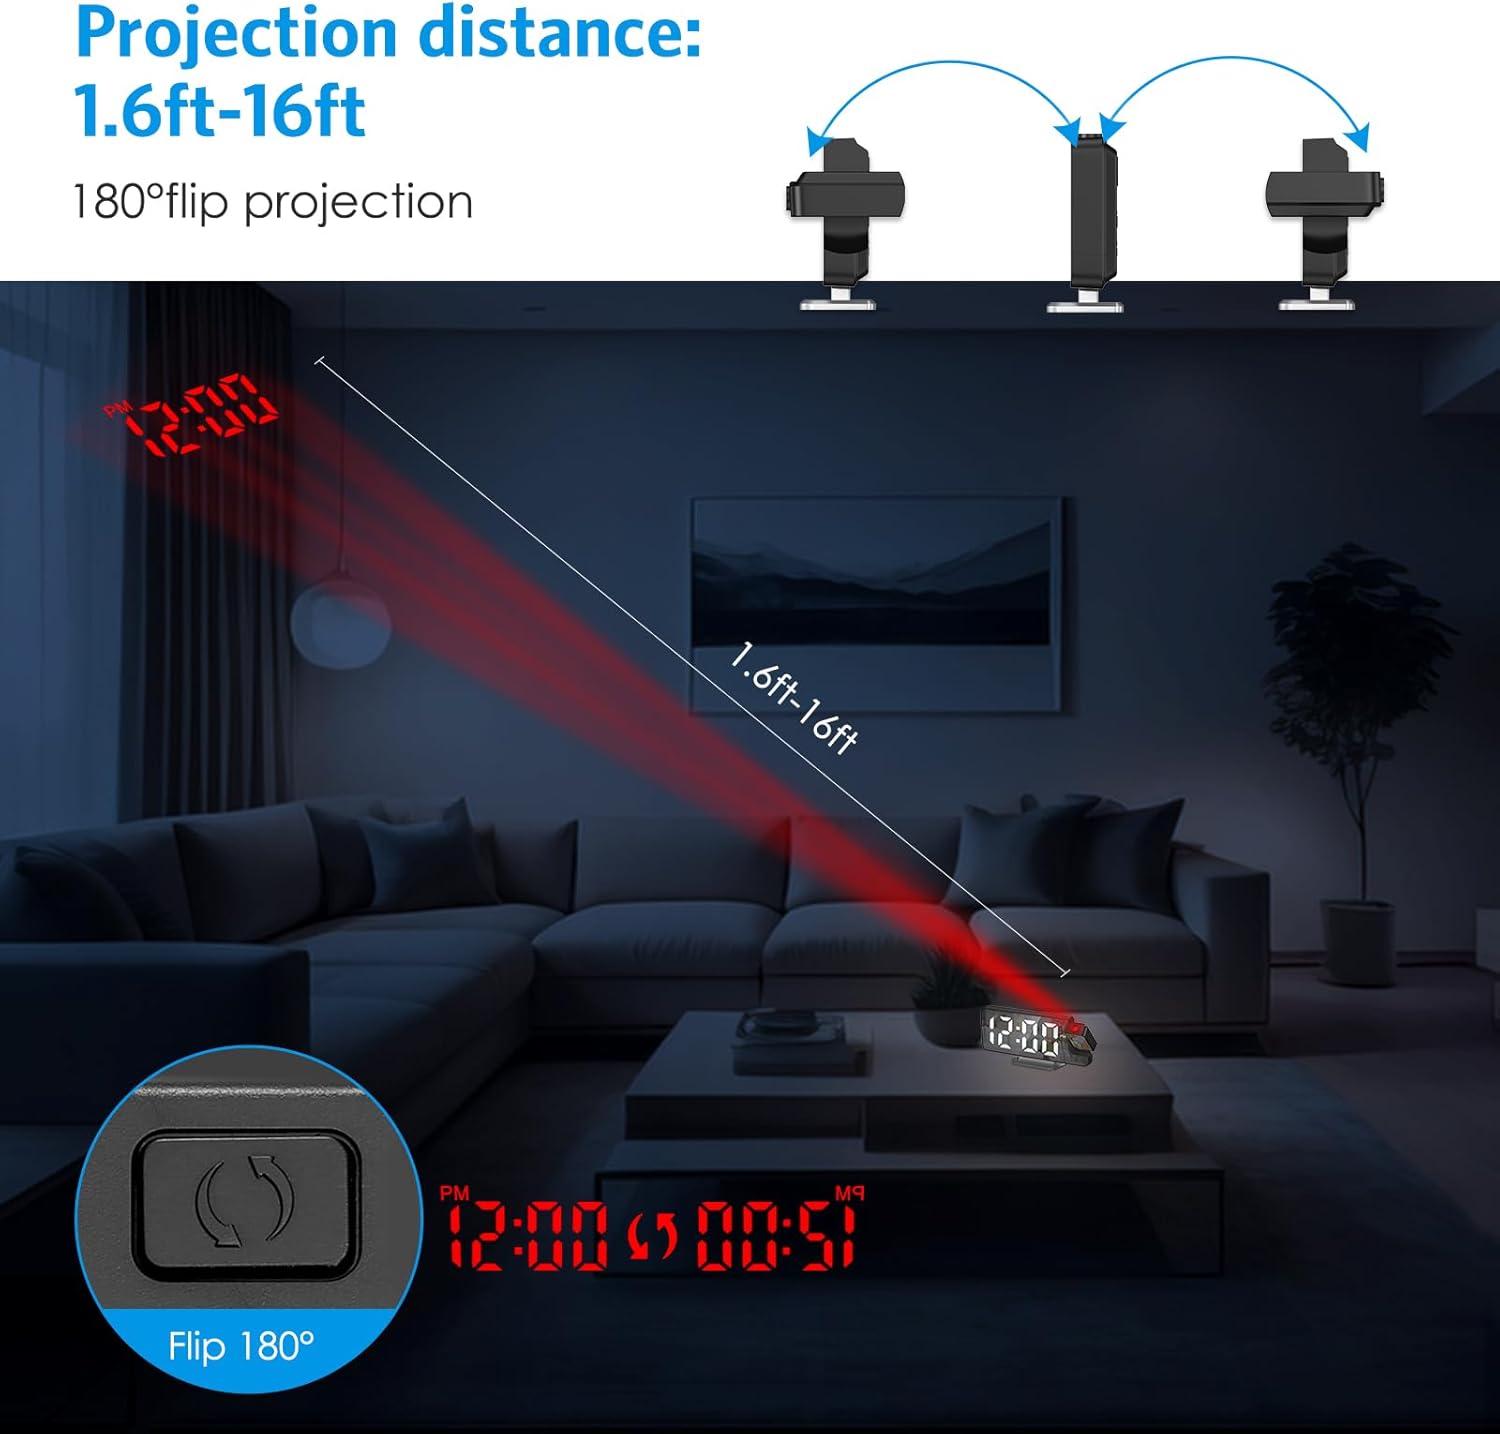
Image 6.5: Illustrates the projection distance range (1.6ft-16ft) and the 180° flip projection capability.
Video 6.1: This video demonstrates the AMIR Projection Alarm Clock's features, including 3 levels of brightness adjustment, time/date/temperature rotation on the main display, manual adjustment of projection angle, one-touch on/off projection, and 180-degree projection rotation.
6.7 Nočni način
Night mode automatically dims the display during a specified period to reduce light disturbance. The default night mode period is from 18:00 to 6:00.
- Activate/Deactivate Night Mode: Pritisnite NAČIN button repeatedly until 'ON' or 'OFF' appears next to the night mode icon. Use '+' or '-' preklopiti.
- Adjust Night Mode Time Range: When night mode is active, press and hold the NAČIN button until the start hour flashes. Use '+' or '-' za nastavitev. Pritisnite NAČIN to move to the start minute, then end hour, and end minute, adjusting each with '+' or '-'. Pritisnite NAČIN shraniti.

Image 6.6: The alarm clock operating in Night Mode, showing the display dimmed and time projected onto the wall.
7. Vzdrževanje
To ensure the longevity and optimal performance of your AMIR Projection Alarm Clock, follow these maintenance guidelines:
- Čiščenje: Use a soft, dry cloth to wipe the display and exterior surfaces. Avoid abrasive cleaners or solvents, which can damage the finish.
- Umestitev: Uro postavite na stabilno, ravno površino, stran od neposredne sončne svetlobe, ekstremnih temperatur in visoke vlažnosti.
- moč: If not using the clock for an extended period, remove the AAA batteries to prevent leakage.
8. Odpravljanje težav
Če imate težave z budilko, si oglejte naslednje pogoste težave in rešitve:
| Težava | Možen vzrok | rešitev |
|---|---|---|
| Display is off or intermittent (on battery power) | Battery saving mode activated. | Press any button to activate the display. For continuous display, use USB power. |
| Time changes randomly or is incorrect. | Power interruption or incorrect setting. | Ensure AAA batteries are installed for memory backup. Re-set the time following Section 6.1. Avoid placing near strong electromagnetic fields. |
| Projekcija je zamegljena ali nejasna. | Incorrect focus or distance. | Adjust the projection lamp's focus ring (if available) or move the clock closer/further from the projection surface. Ensure the surface is flat and clear. |
| Alarm se ne oglasi. | Alarm ni aktiviran ali pa je glasnost prenizka. | Verify the alarm icon is visible on the display. Check alarm settings (Section 6.2). Ensure alarm volume is not set to minimum (if adjustable). |
| Projection is upside down. | Potrebno je prilagoditi orientacijo projekcije. | Pritisnite in držite ZAMENJAVA button to flip the projection 180 degrees (Section 6.6). |
9. Specifikacije
| Funkcija | Podrobnost |
|---|---|
| Znamka | AMIR |
| Številka modela | WA146-AMUS |
| Vrsta zaslona | Digitalna LED |
| Velikost zaslona | 7.9 palcev |
| Dimenzije izdelka (Š x V) | 4.13"W x 1.25"H (Note: This seems to be a partial dimension, likely referring to height/depth. The main image shows 7.5in width.) |
| Vir napajanja | USB Cable Power (DC 5V) or 3 AAA Batteries |
| Vrsta materiala | Akrilonitril butadien stiren (ABS) |
| Posebne lastnosti | 2 Alarms + 3 Levels Volume, Adjustable Brightness, Large Display, Snooze, USB/Battery Powered, 180° Rotatable Projector, Temperature Display, Night Mode |
10. Garancija in podpora
The AMIR Projection Alarm Clock (WA146-AMUS) comes with a Lifetime Warranty, ensuring long-term reliability. For any questions, technical assistance, or support needs, please contact AMIR customer service. Refer to the product packaging or the official AMIR webspletno mesto za kontaktne podatke.