Vetroo AL800
Vetroo AL800 Mid Tower ATX PC Computer Case
Navodila za uporabo
Uvod
This manual provides detailed instructions for the assembly, operation, and maintenance of your Vetroo AL800 Mid Tower ATX PC Computer Case. Please read this manual thoroughly before beginning installation to ensure proper setup and optimal performance.

Figure 1: Vetroo AL800 Mid Tower ATX PC Computer Case (Black)
Varnostne informacije
- Pred nameščanjem ali odstranjevanjem kakršnih koli komponent vedno izključite napajalnik iz stenske vtičnice.
- Handle components with care to avoid damage from electrostatic discharge. Consider using an anti-static wrist strap.
- Ohišje in komponente hranite stran od tekočin in prekomerne vlage.
- Poskrbite za ustrezno prezračevanje, da preprečite pregrevanje.
- Ne poskušajte spreminjati ohišja ali njegovih komponent, saj lahko s tem razveljavite garancijo in predstavljate varnostna tveganja.
Vsebina paketa
Preverite, ali so v paketu prisotni vsi elementi:
- Vetroo AL800 Mid Tower ATX PC Computer Case
- Škatla s priborom (vijaki, distančniki, kabelske vezice)
- Pre-installed 1x 120mm PWM/ARGB Fan (rear)
- Uporabniški priročnik (ta dokument)
Ključne značilnosti
- ARGB LED Strip: Integrated LED lighting and ARGB case fans can be synchronized with compatible motherboards via a 5V 3-pin interface.
- Door Opening Design: Features a 4mm thick tempered glass side panel with a convenient door-opening mechanism for easy access to internal components.
- High Performance Airflow: A mesh front panel and strategically placed dust filters ensure optimal airflow and system cooling.
- Široka združljivost: Supports ATX, M-ATX, and ITX motherboards. Accommodates GPUs up to 340mm in length and CPU coolers up to 165mm in height.
- Podpora za tekoče hlajenje: Front panel supports up to a 360mm liquid cooling radiator.
- Podpora ventilatorjev: Podpira do 8 x 120 mm ventilatorje.
- Preprosto upravljanje kablov: Includes two soft silicone cord grommets for organized cable routing.
- Powerful I/O Panel: Features 1x USB 3.2 Type-C port, 2x USB 3.0 ports, and a combined microphone/headphone jack.
Nastavitev in namestitev
1 Splošna priprava
- Ohišje postavite na ravno, stabilno površino.
- Open the tempered glass side panel by gently pulling it open. It is hinged for easy access.
- Remove the tempered glass panel if necessary for easier installation by lifting it off its hinges once open.

Figure 2: Tempered Glass Door Opening Design
2. Namestitev matične plošče
- Namestite V/I zaščito (če je primerno) v zadnjo odprtino ohišja.
- Align your ATX, M-ATX, or ITX motherboard with the pre-installed standoffs.
- Secure the motherboard using the provided screws from the accessory box.
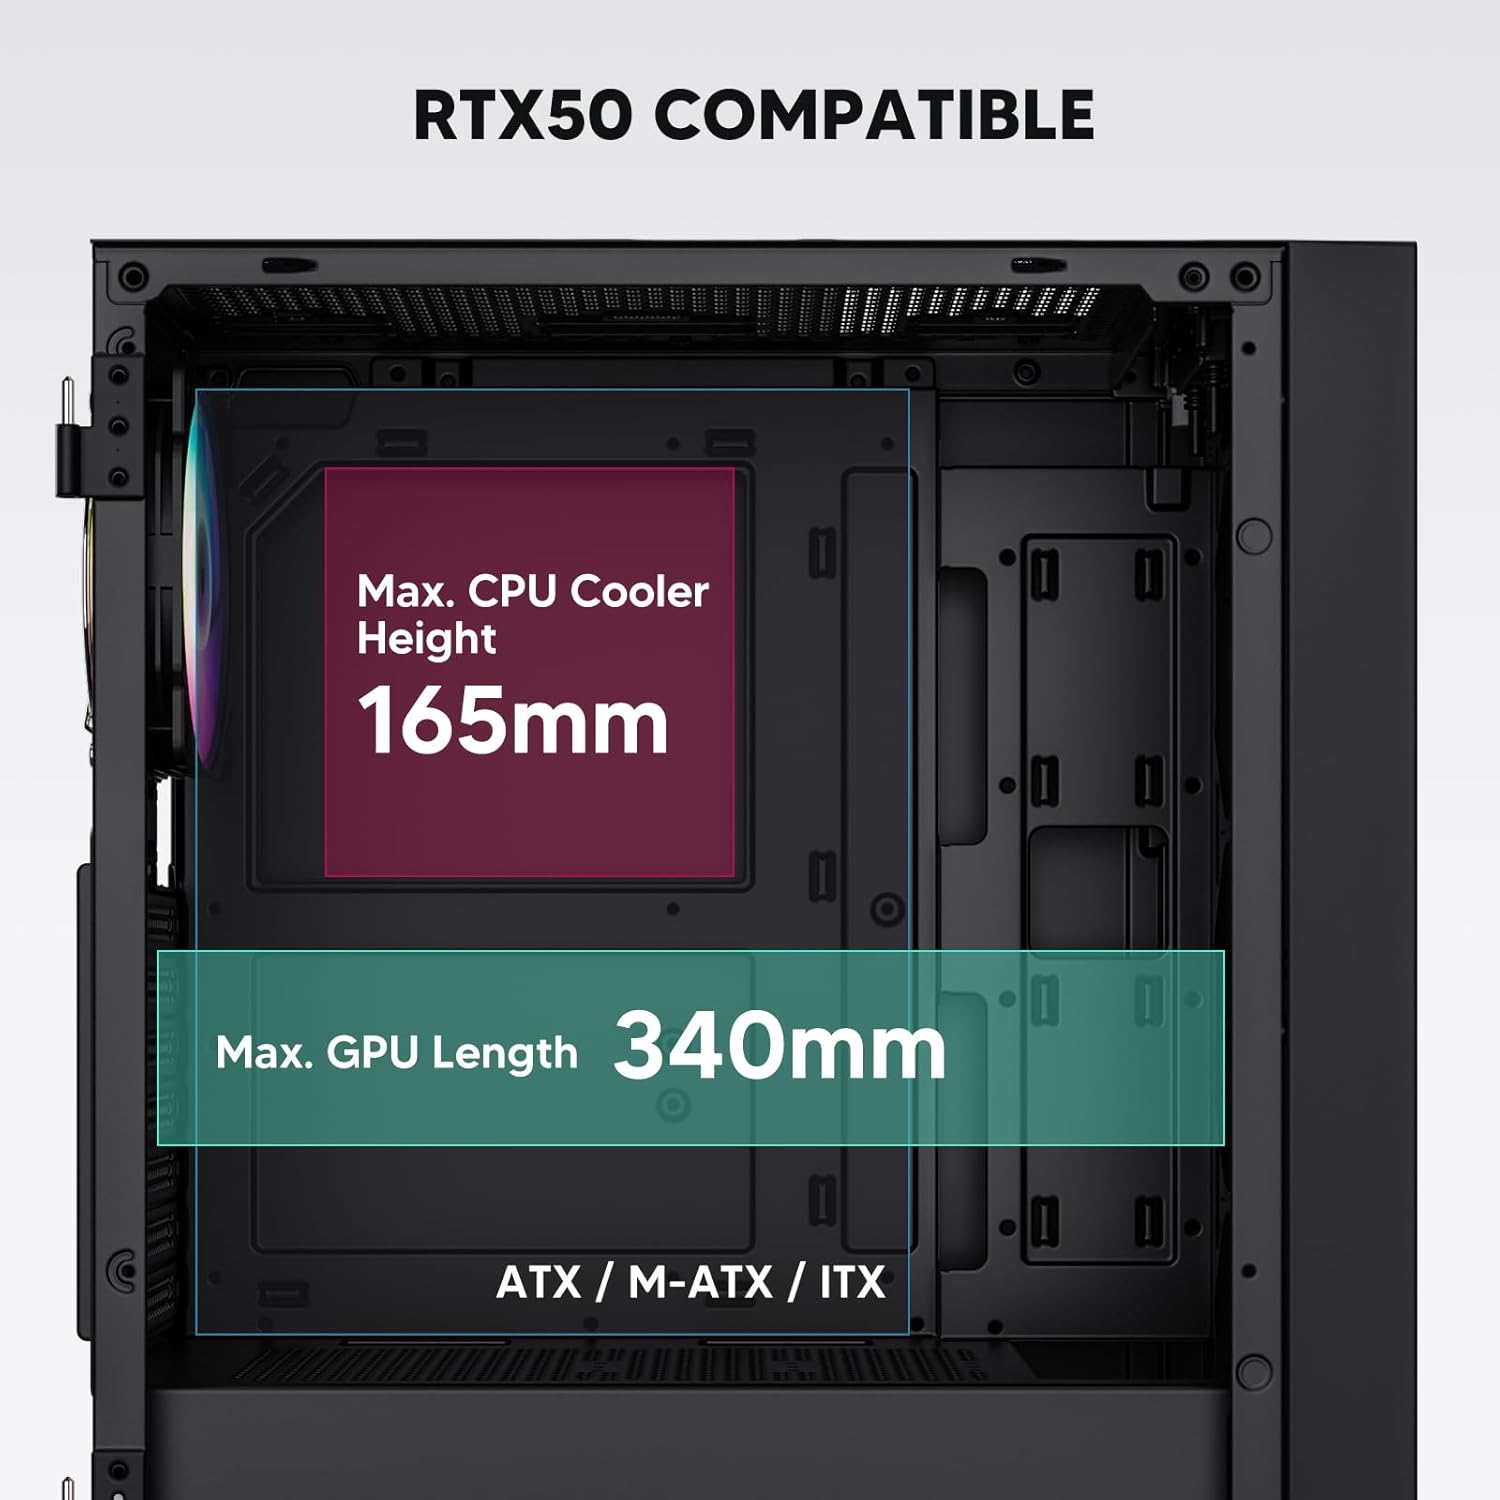
Figure 3: Motherboard and Component Clearance (Max CPU Cooler Height 165mm, Max GPU Length 340mm)
3. Storage Device Installation (HDD/SSD)
- Locate the dedicated mounting points for SSDs and HDDs.
- Install 2.5" SSDs onto the SSD trays or mounting brackets.
- Install 3.5" HDDs into the drive cage located at the bottom of the case.
- Vse pogone pritrdite z ustreznimi vijaki.

Figure 4: Internal Layout with Drive Bay Locations (SSD, HDD, Power Supply)
4. Namestitev napajalnika
- Mount your power supply unit (PSU) in the dedicated compartment at the bottom rear of the case.
- Ensure the PSU fan faces downwards (if the case has a bottom vent) or upwards, depending on your cooling preference.
- Secure the PSU with screws from the rear of the case. The case supports PSUs up to 200mm in length.
5. Namestitev razširitvene kartice (GPU)
- Odstranite potrebne pokrove rež PCI-E z zadnje strani ohišja.
- Insert your graphics card or other expansion cards into the motherboard's PCI-E slots.
- Secure the cards with screws. The case supports GPUs up to 340mm in length.
6. Cooling System Installation (Fans/Radiators)
- The case comes with one pre-installed 120mm PWM/ARGB fan at the rear.
- Additional fans (120mm or 140mm) can be installed at the front, top, and bottom.
- Liquid cooling radiators up to 360mm can be installed at the front, and up to 240mm at the top.
- Refer to the diagram for supported fan and radiator configurations.

Figure 5: Fan and Liquid Radiator Support Diagram
7. Priključki na sprednji plošči
- Connect the front panel cables (Power, Reset, USB 3.0, USB Type-C, HD Audio) to the corresponding headers on your motherboard.
- Consult your motherboard manual for the exact pin layout of these headers.
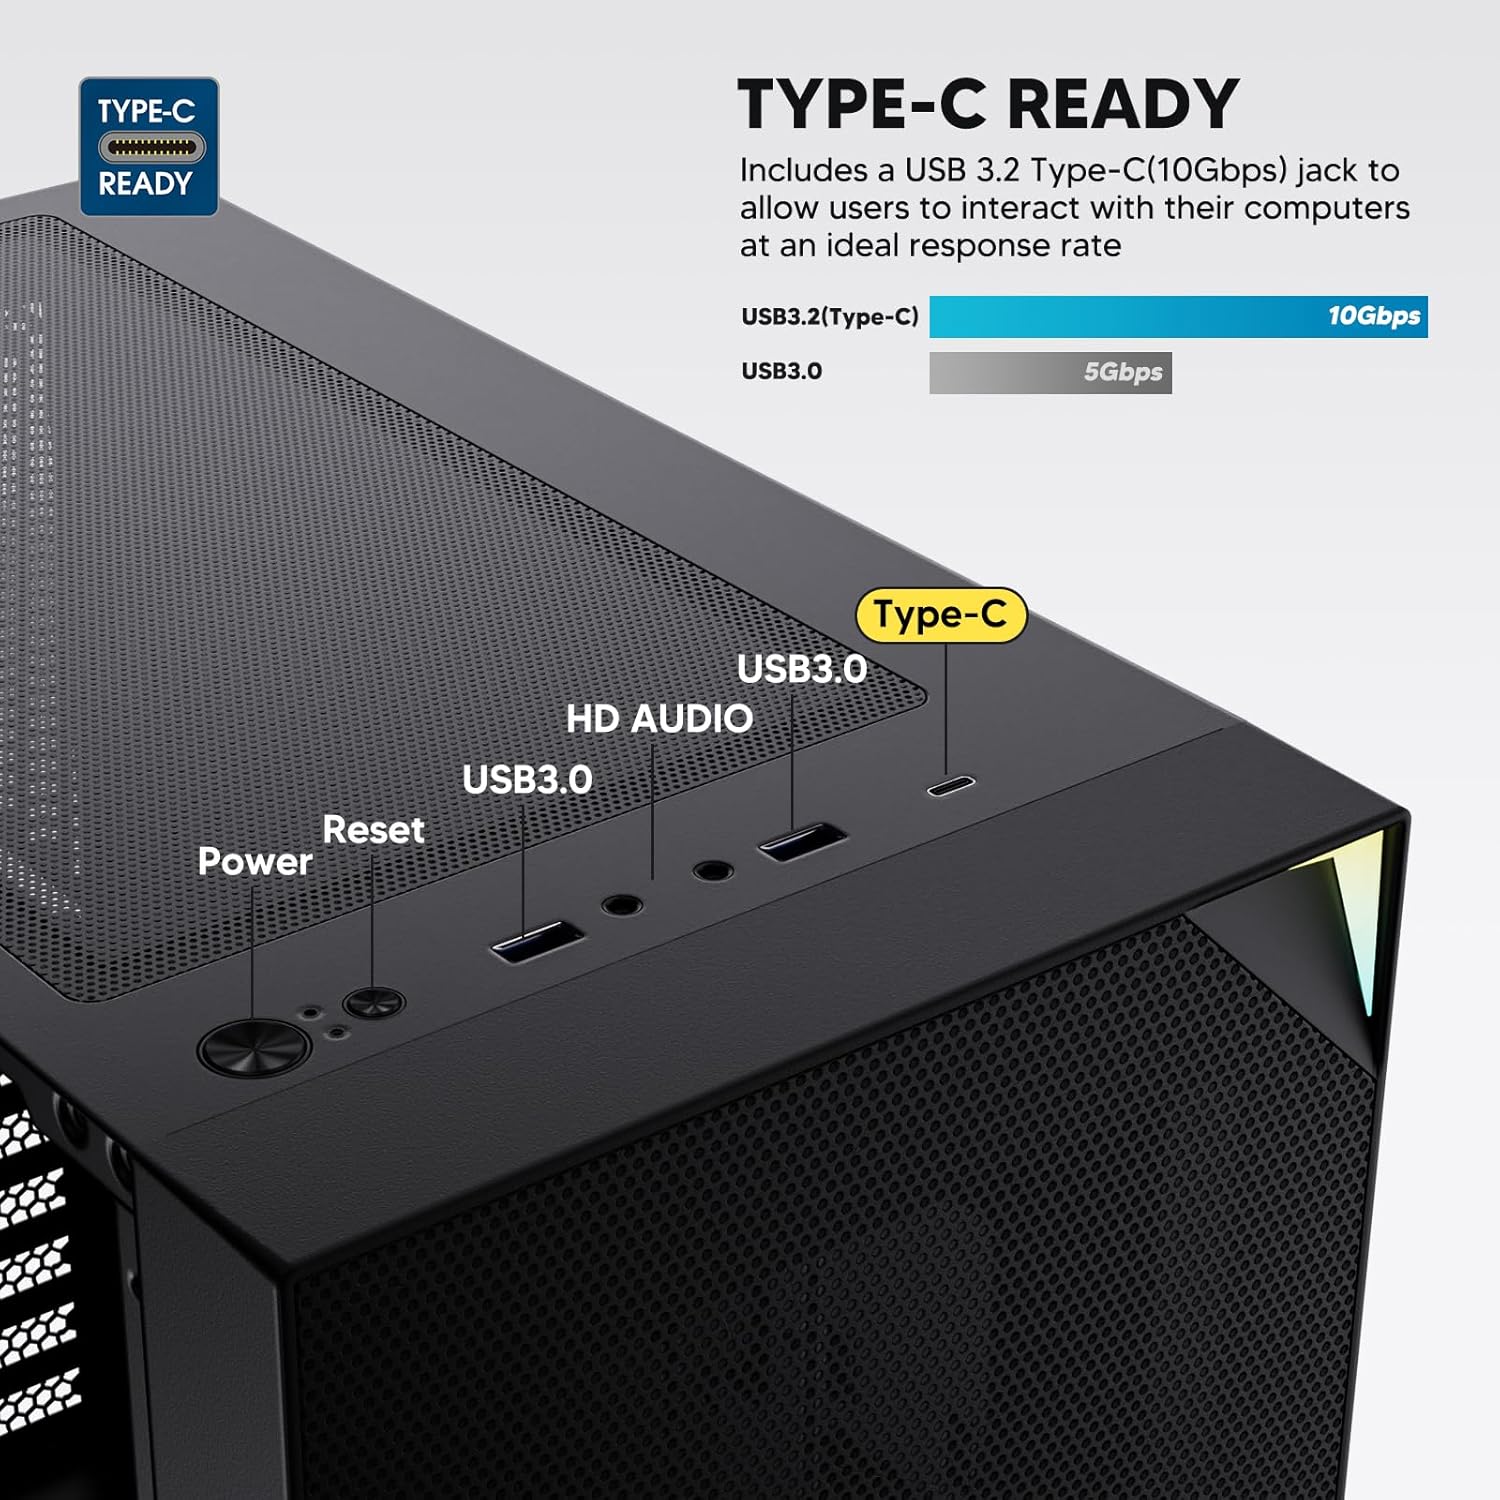
Figure 6: Top I/O Panel Connections
8. ARGB and PWM Connections
- The pre-installed fan and ARGB LED strip require connection to your motherboard.
- Connect the 4-pin PWM connector from the fan to a compatible fan header on your motherboard for speed control.
- Connect the 3-pin ARGB connector from the fan and LED strip to a 5V 3-pin ARGB header on your motherboard for lighting synchronization. Ne priključujte na 12V RGB konektor, saj boste s tem poškodovali LED diode.
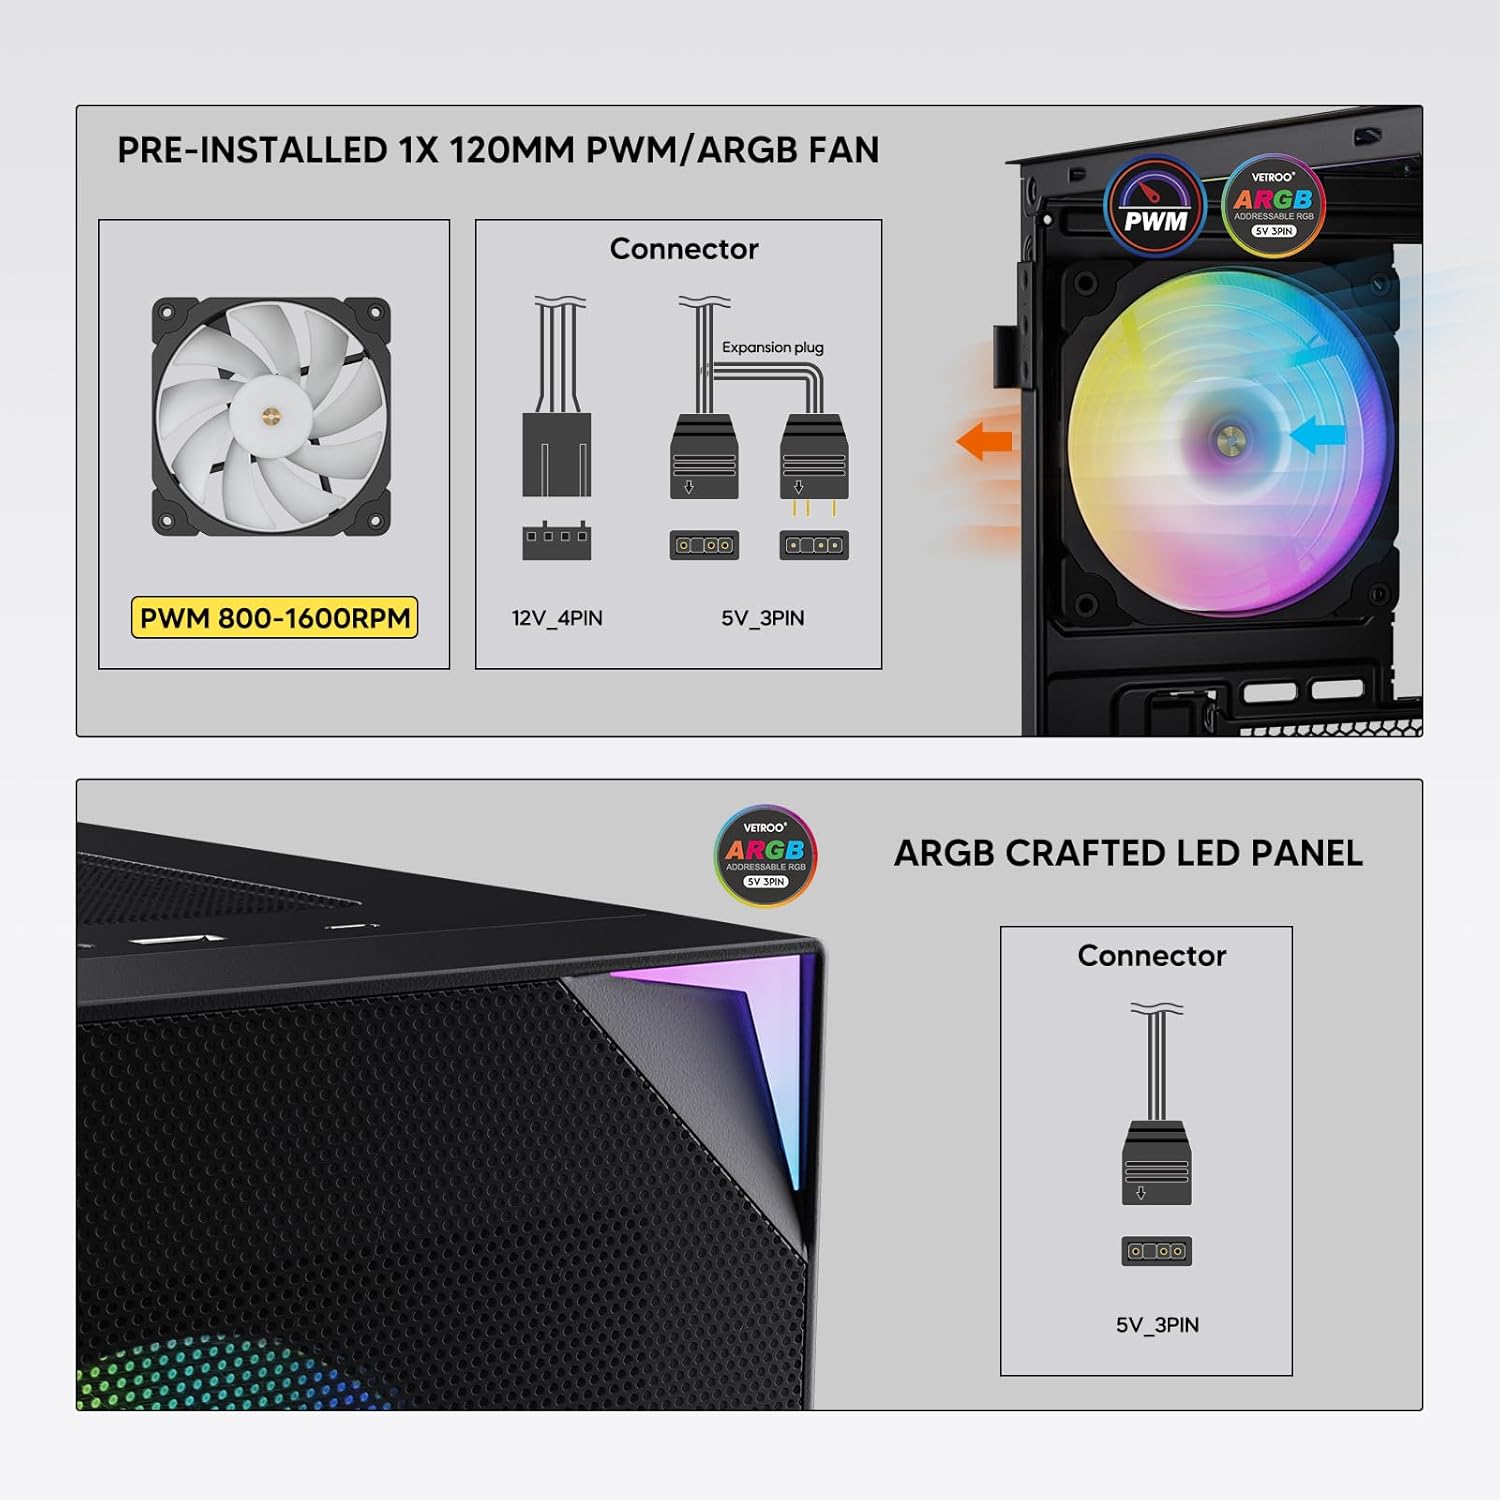
Figure 7: PWM and ARGB Connector Details
9. Upravljanje kablov
- Utilize the cable routing cutouts and tie-down points behind the motherboard tray to organize cables.
- The soft silicone grommets help protect cables and provide a clean look.
- Proper cable management improves airflow and aesthetics.
Delovanje
1. Začetni vklop
- After all components are securely installed and cables connected, close the tempered glass side panel.
- Connect your monitor, keyboard, mouse, and power cable to the PC.
- Flip the power switch on your PSU to the 'ON' position.
- Press the power button on the top I/O panel of the case to start your system.
2. Krmiljenje osvetlitve ARGB
- If connected to a compatible motherboard's 5V 3-pin ARGB header, the lighting of the pre-installed fan and LED strip can be controlled via your motherboard's RGB software (e.g., ASUS Aura Sync, MSI Mystic Light Sync, Gigabyte RGB Fusion, ASRock Polychrome Sync).
- Refer to your motherboard's manual for specific instructions on using its ARGB control software.
3. Upravljanje pretoka zraka
- The mesh front panel is designed for optimal air intake.
- Ensure that intake fans (typically front and bottom) and exhaust fans (typically rear and top) are configured to create positive or neutral air pressure for efficient cooling and dust prevention.

Figure 8: Airflow Diagram with Dust Filters
Vzdrževanje
1. Čiščenje filtra za prah
- The case is equipped with dust filters on the top and bottom panels.
- Regularly check and clean these filters to maintain optimal airflow and prevent dust buildup inside the system.
- Gently remove the magnetic dust filters and clean them with compressed air or by rinsing with water (ensure they are completely dry before re-installation).
2. Tempered Glass Panel Care
- Clean the tempered glass panel with a soft, lint-free cloth and a non-abrasive glass cleaner.
- Izogibajte se agresivnim kemikalijam ali abrazivnim materialom, ki bi lahko opraskali ali poškodovali steklo.
Odpravljanje težav
- Sistem se ne vklopi:
- Prepričajte se, da je napajalni kabel varno priključen tako na napajalnik kot na stensko vtičnico.
- Preverite, ali je stikalo napajalnika v položaju »VKLOP«.
- Preverite, ali je kabel gumba za vklop na sprednji plošči pravilno priključen na priključek matične plošče.
- Confirm all power cables (24-pin ATX, CPU, GPU) are properly seated in the motherboard and components.
- Ventilatorji se ne vrtijo / ARGB se ne prižge:
- Check that the fan's PWM connector is securely plugged into a motherboard fan header.
- Verify the ARGB 3-pin connector is correctly attached to a 5V 3-pin ARGB header on the motherboard (not 12V RGB).
- Prepričajte se, da je programska oprema ARGB vaše matične plošče pravilno nameščena in konfigurirana.
- Vrata USB ne delujejo:
- Confirm the USB 3.0 and USB Type-C front panel cables are correctly connected to their respective motherboard headers.
- Za pravilne lokacije glav preverite priročnik za matično ploščo.
- For other component-specific issues, refer to the instruction manuals for your motherboard, CPU, GPU, and other installed hardware.
Specifikacije
| Znamka | Vetroo |
| Ime modela | AL800 |
| Številka modela artikla | VT-CASE-AL800-BK (FBA) |
| Vrsta ohišja | Srednji stolp |
| Združljivost matične plošče | ATX, M-ATX, ITX |
| barva | Črna |
| Material | Kovina, kaljeno steklo |
| Teža predmeta | 12.37 funta (približno 5.61 kg) |
| Dimenzije izdelka (DxŠxV) | 18.4 x 8.6 x 17.9 palca (približno 46.7 x 21.8 x 45.5 cm) |
| Največja dolžina GPU | 340 mm |
| Največja višina hladilnika procesorja | 165 mm |
| Največja dolžina PSU | 200 mm |
| Sprednja V / I vrata | 1x USB 3.2 Type-C, 2x USB 3.0, HD Audio (Mic/Headphone), Power, Reset |
| Podpora oboževalcev | Front: 3x 120mm or 2x 140mm; Top: 2x 120mm or 2x 140mm; Rear: 1x 120mm; Bottom: 2x 120mm |
| Podpora za radiatorje | Front: 120/140/240/280/360mm; Top: 120/140/240mm; Rear: 120mm |
| Vnaprej nameščeni ventilatorji | 1x 120mm PWM/ARGB (Rear) |
Garancija in podpora
For warranty information, technical support, or to inquire about replacement parts, please visit the official Vetroo webspletno mesto ali se obrnite neposredno na njihovo službo za stranke. Shranite dokazilo o nakupu za uveljavljanje garancije.
Official Vetroo Store: Vetroo Amazon Store