
1. Izdelek je končanview
The suptek MD01A Gas Spring Monitor Arm is designed to enhance your workspace ergonomics and free up desk space. This monitor arm offers full flexibility, allowing you to adjust your monitor's height, tilt, swivel, and rotation for optimal viewudobje.
- Ergonomska oblika: Helps achieve a healthier working posture by allowing easy adjustment of monitor height up to 45 cm and horizontal extension up to 49.3 cm.
- Stabilna struktura: Features a gas spring mechanism for smooth, silent adjustments, made from high-strength steel and aluminum for durability and scratch resistance.
- Space Saving & Cable Management: Integrated cable management system keeps your workspace tidy and clutter-free.
- Univerzalna združljivost: Supports LED/LCD monitors from 13 to 32 inches, weighing between 2-9 kg, with VESA mounting patterns of 75x75 mm and 100x100 mm.

Image 1.1: Product dimensions showing load capacity (2-9kg), VESA patterns (75x75/100x100mm), screen size (13"-32"), and height/extension ranges.

Image 1.2: Illustration of the monitor arm's full adjustability, including tilt (±90°), swivel (±180°), and 360° rotation.
Video 1.3: Kratek uvodview demonstrating the general functionality and adjustability of the monitor arm.
2. Varnostne informacije
Please read and understand all instructions before installation and use. Failure to do so may result in personal injury or property damage.
- Ensure your monitor's weight and VESA pattern are within the specified limits (13-32 inches, 2-9 kg, VESA 75x75/100x100 mm).
- Do not overtighten screws during installation to avoid damaging the product or your desk.
- Otroke in hišne ljubljenčke držite stran od območja namestitve.
- Always adjust the gas spring tension carefully to match your monitor's weight.
- If you have any doubts about installation, consult a qualified professional.
3. Vsebina paketa
Preden nadaljujete z namestitvijo, preverite, ali so vse komponente prisotne in nepoškodovane. Paket običajno vključuje:
- Sklop ročice monitorja
- Pisalna miza Clamp Osnova
- Podstavek za pritrditev Grommet
- VESA plošča
- Komplet strojne opreme (vijaki, podložke, distančniki)
- Imbus ključi za nastavitev
- Navodila za uporabo
4. Nastavitev in namestitev
The suptek MD01A monitor arm offers two installation methods: C-clamp and Grommet Mount.

Image 4.1: Visual representation of the C-clamp and Grommet Mount options for desk attachment. Both support desk thickness from 10-70mm, with grommet hole diameter from 10-60mm.
4.1. Izberite način montaže
C-Clamp Namestitev:
- Pritrdite C-clamp base to the edge of your desk. Ensure the desk thickness is between 10-70mm.
- Zategnite clamp securely using the knob until the base is stable.
Montaža vtičnice:
- Insert the grommet base through an existing hole in your desk (diameter 10-60mm). Ensure the desk thickness is between 10-70mm.
- Podstavek pritrdite s spodnje strani mize s priloženo ploščo in matico.

Slika 4.2: Podrobno view of the C-clamp attachment method, suitable for desk thicknesses of 10-70mm.

Slika 4.3: Podrobno view of the Grommet mount attachment method, for desk thicknesses of 10-70mm and hole diameters of 10-60mm.
4.2. Attach VESA Plate to Monitor and Assemble Arm
- Monitor previdno položite z zaslonom navzdol na mehko, čisto površino.
- Align the VESA plate with the mounting holes on the back of your monitor (75x75mm or 100x100mm).
- Ploščo VESA pritrdite na monitor z ustreznimi vijaki in podložkami iz kompleta strojne opreme. Ne privijte premočno.
- Insert the lower arm into the desk mount base.
- Zgornjo roko pritrdite na spodnjo roko.
- Slide the monitor (with VESA plate attached) onto the end of the monitor arm. Ensure it clicks securely into place.

Image 4.4: A three-step visual guide illustrating the quick and easy installation process: fixing the clamp, assembling the arm, and connecting the monitor.
5. Navodila za uporabo in nastavitve
The suptek MD01A monitor arm offers various adjustments for optimal viewing.
5.1. Nastavitev napetosti plinske vzmeti
The gas spring tension must be adjusted to match your monitor's weight for proper function. Use the provided Allen key.
- If the arm falls down: Turn the inside screw counter-clockwise (towards the "+" direction) to increase gas spring tension until the arm can stay as intended.
- If the arm rises up or cannot be pressed down: Turn the inside screw clockwise (towards the "-" direction) to decrease gas spring tension until the arm can stay as intended.
Opomba: Ensure the arm is in a horizontal position during adjustment.
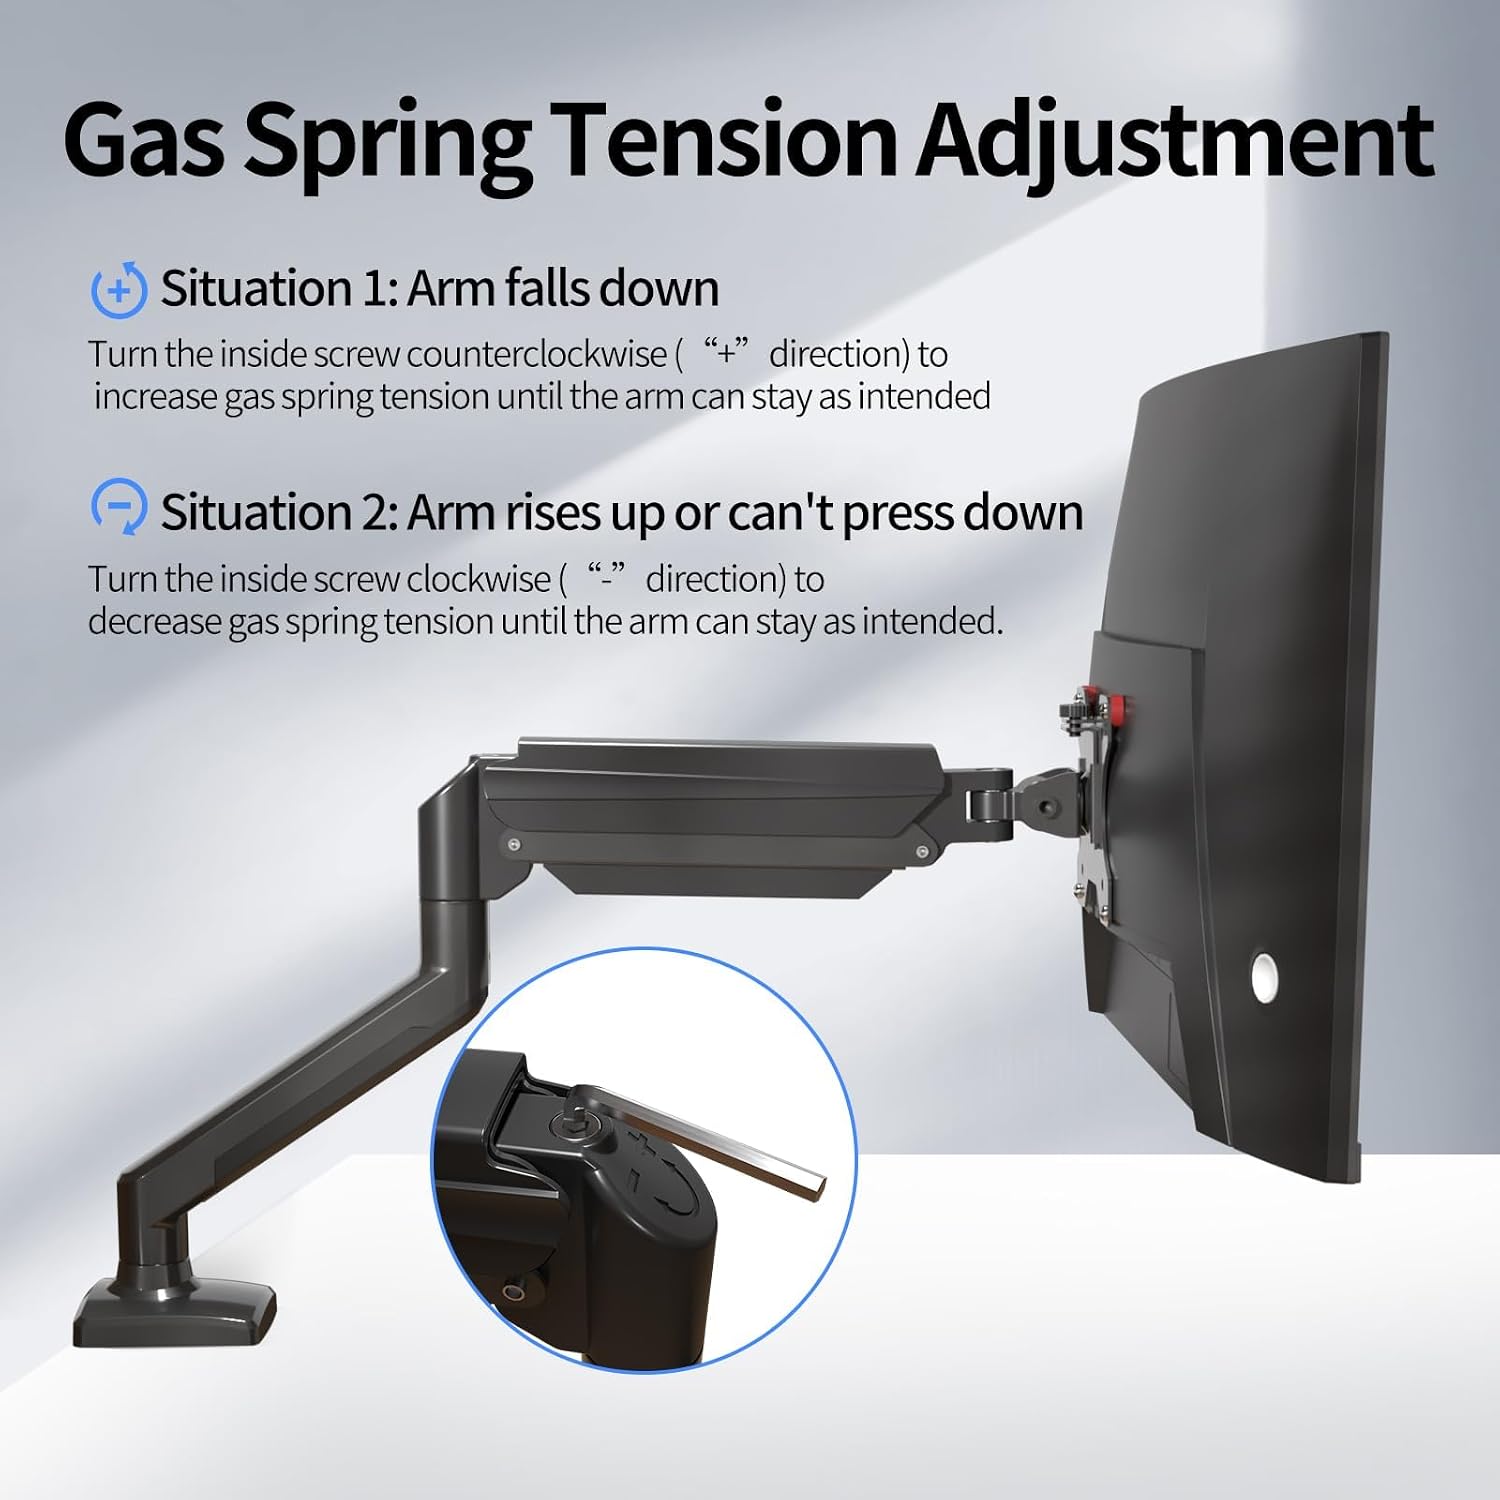
Image 5.1.1: Diagram showing how to adjust the gas spring tension using an Allen key to prevent the arm from falling or rising unintentionally.

Image 5.1.2: Detailed illustration of the gas spring adjustment mechanism, highlighting the plus and minus directions for increasing ali odlokasing napetost.
5.2. Tilt Angle, Swivel, and Rotation Adjustment
To adjust the tilt angle of your monitor:
- Loosen the tilting bolt on the VESA plate using an Allen key.
- Adjust the monitor to your desired tilt angle. It's easier to adjust if you grab the top and bottom of the screen.
- Retighten the tilting bolt to fix the intended angle. Do not let go of the screen before locking the screw to prevent rebound.
- Nastavitev višine: Gently push or pull the monitor up or down. The gas spring will assist in holding the position.
- Vrtljiva: Rotate the monitor arm horizontally at the joints to change the viewsmer.
- Vrtenje: Rotate the monitor 360 degrees from landscape to portrait orientation.

Image 5.2.1: Technical diagrams illustrating the monitor arm's tilt (±90°), swivel (±90°), and 360° rotation capabilities.
6. Vzdrževanje
Regular maintenance ensures the longevity and optimal performance of your monitor arm.
- Čiščenje: Wipe the arm with a soft, damp krpo. Izogibajte se abrazivnim čistilom ali topilom.
- Preverite povezave: Občasno preverite vse vijake in matico, da se prepričate, da so trdno priviti. Po potrebi jih ponovno privijte.
- Plinska vzmet: If the arm's movement becomes stiff or loose over time, re-adjust the gas spring tension as described in Section 5.1.
7. Odpravljanje težav
Tukaj so rešitve za pogoste težave, na katere lahko naletite:
| Težava | rešitev |
|---|---|
| Monitor arm falls down or cannot hold position. | The gas spring tension is too low. Turn the inside screw counter-clockwise (towards "+") to increase tension. Refer to Section 5.1. |
| Monitor arm rises up or cannot be pressed down. | The gas spring tension is too high. Turn the inside screw clockwise (towards "-") to decrease tension. Refer to Section 5.1. |
| Gap at the joint of the arm. | Tighten the nut at the joint using the provided Allen key until the gap is closed and the joint rotates smoothly. |
| Cannot insert the Allen key into the gas spring adjustment hole. | Press the upper arm down firmly until the tilting bolt is fully exposed, then insert the hex wrench. |
8. Specifikacije
| Funkcija | Podrobnost |
|---|---|
| Številka modela | MD01A |
| Znamka | suptek |
| Združljiva velikost zaslona | 13 - 32 palcev |
| Nosilnost | 2–9 kg |
| Združljivost VESA | 75x75 mm, 100x100 mm |
| Vrsta namestitve | Pisalna miza Clamp, Grommet Mount |
| Vrsta gibanja | Articulating (Tilt, Swivel, Rotation) |
| Kot nagiba | ±90° |
| Vrtenje | 360° |
| Material | Legirano jeklo |
| Pisalna miza Clamp Debelina | 10 - 70 mm |
| Premer odprtine za tesnilo | 10 - 60 mm |
9. Garancija in podpora
For warranty information, technical support, or to purchase replacement parts, please refer to the official suptek webspletno mesto ali se obrnite na prodajalca. Za uveljavljanje garancije shranite račun.