
BAOSHISHAN B0CF2D5BVD
BAOSHISHAN Electric Strapping Machine
Uporabniški priročnik
1. Uvod in konecview
This manual provides comprehensive instructions for the safe and efficient operation, maintenance, and troubleshooting of your BAOSHISHAN Electric Strapping Machine. This automatic strapping tool is designed for packaging various materials using PP/PET strapping, offering a 3-in-1 function of tensioning, welding, and cutting.
Please read this manual thoroughly before operating the machine to ensure proper usage and to maximize the lifespan of your device.

Figure 1.1: BAOSHISHAN Electric Strapping Machine and its packaging.
The image displays the BAOSHISHAN Electric Strapping Machine, a portable, handheld device, alongside its product packaging. The machine is dark blue and black, featuring a handle and a base for strapping. The box highlights key features like "Electric Strapping Machine," "2-5S Welding Time," and "600-2800N Tensioning Force."
2. Varnostne informacije
Vedno upoštevajte naslednje varnostne ukrepe, da preprečite poškodbe ali škodo na stroju:
- Pred uporabo preberite vsa navodila.
- Med delovanjem držite roke in ohlapna oblačila stran od gibljivih delov.
- Ensure the strapping material is correctly aligned before initiating the strapping process.
- Stroja ne uporabljajte v mokrem aliamp pogojev.
- Use only the specified PP/PET strapping material (1/2-5/8 inch width, 0.024-0.047 inch thickness).
- Pred kakršnim koli vzdrževanjem ali čiščenjem odklopite akumulator.
- Store the machine in a dry, secure place, out of reach of children.
- Do not attempt to repair the machine yourself. Contact qualified service personnel for repairs.
3. Vsebina paketa
Po odprtju paketa preverite, ali so priloženi vsi naslednji elementi:
- BAOSHISHAN Electric Strapping Machine
- 14.4V 4000mAh Lithium-Ion Battery (x2 included)
- Polnilec baterij
- Toolkit (includes wrench, screwdriver, and spare parts)
- Uporabniški priročnik (ta dokument)
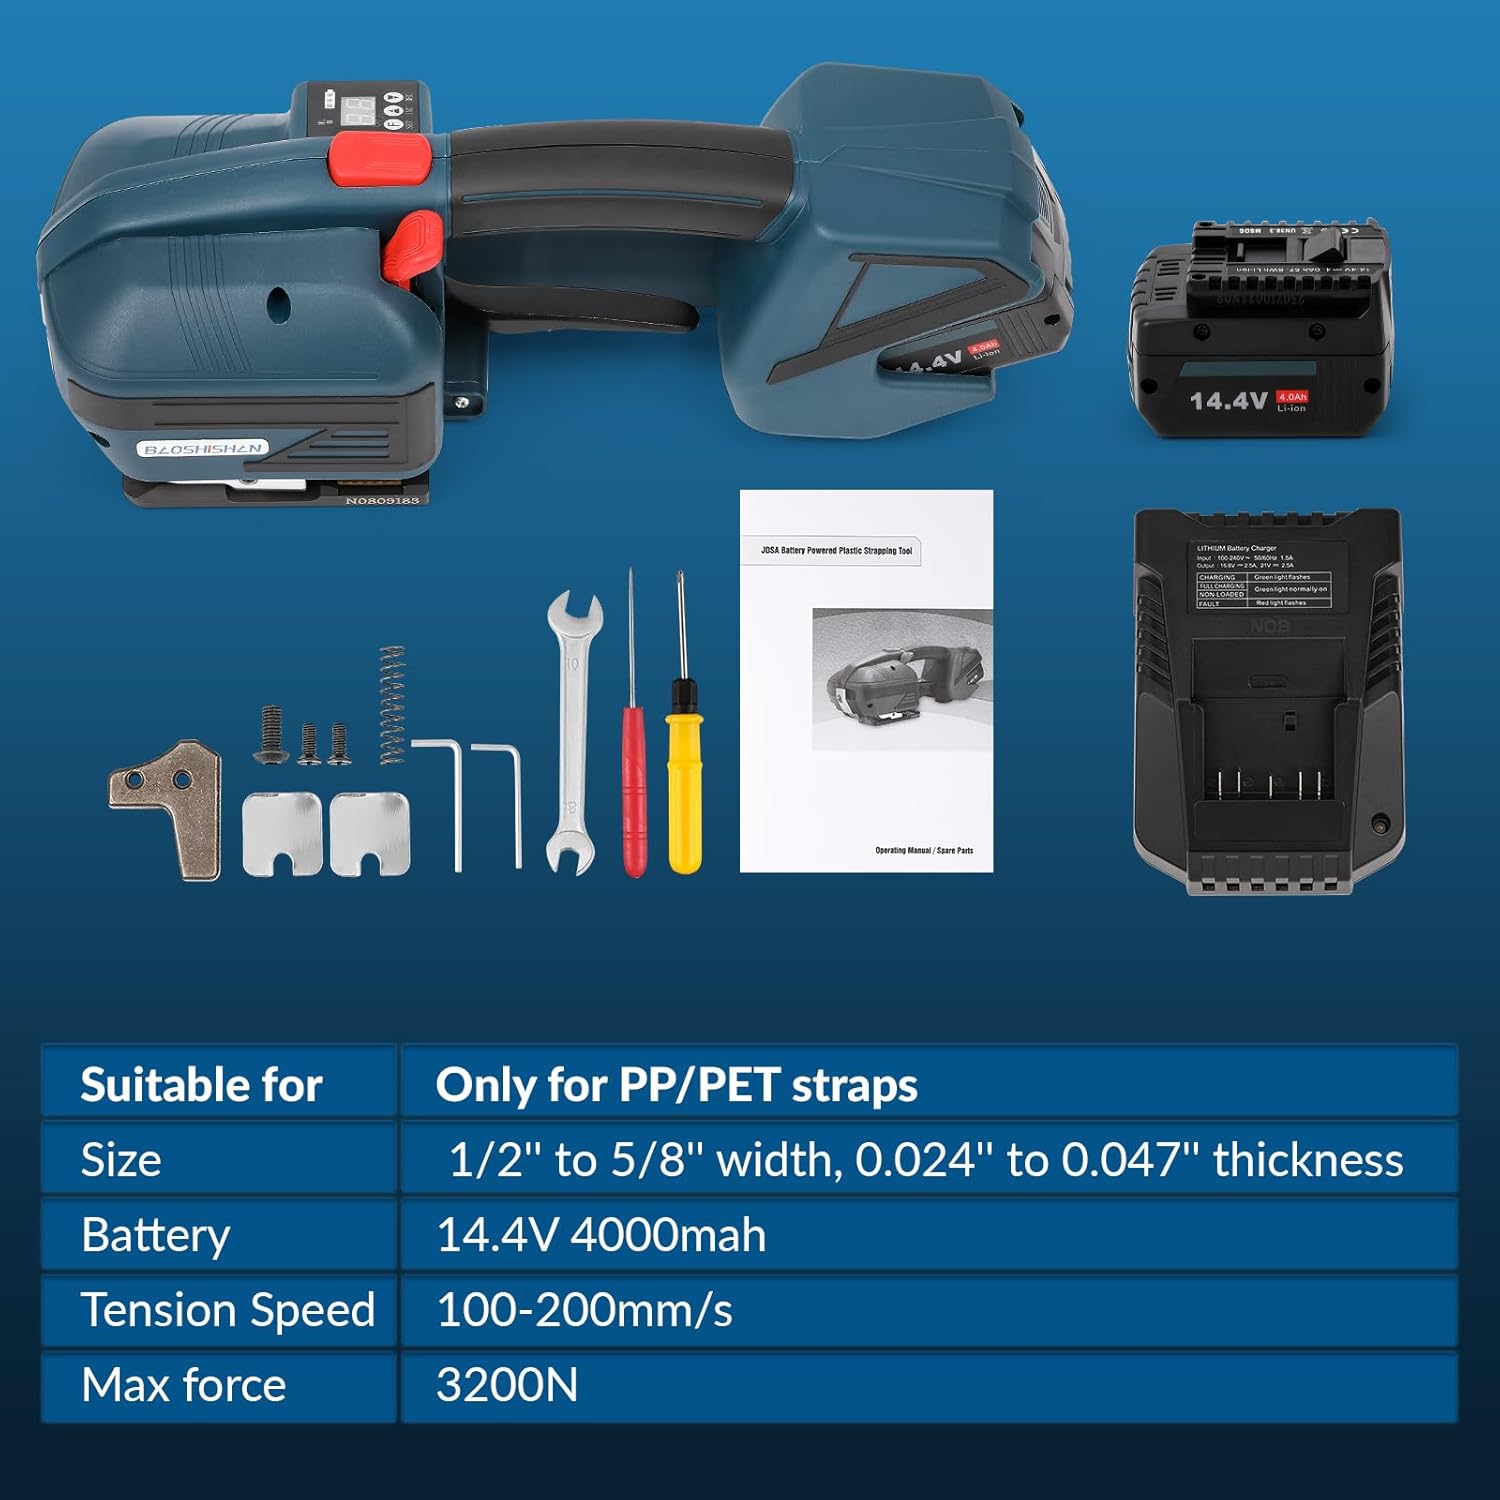
Slika 3.1: Priložene komponente in dodatki.
This image displays the main components included with the strapping machine: the electric strapping tool itself, two 14.4V 4.0Ah Li-ion batteries, a battery charger, a user manual, and a small toolkit containing a wrench, screwdriver, and various small spare parts.
4. Značilnosti izdelka
- Funkcionalnost 3 v 1: Combines tensioning, welding, and cutting into a single, efficient machine, eliminating the need for separate tools or metal buckles.
- LCD digitalni zaslon: Allows for precise adjustment of tensioning force and welding time, providing real-time feedback on settings and battery level.
- High Capacity 4000mAh Battery: Provides extended operation time, capable of completing over 350 strappings on a single 90-minute charge, ideal for outdoor or high-volume tasks.
- Buckle-Free Operation: Utilizes friction heat fusion to securely weld two straps together, achieving a bonding strength up to 75% of the strap's maximum load-bearing capacity, reducing consumable costs.
- Max 3200N Tensile Force: Enhanced pulling force suitable for a wide range of packaging applications, including cartons, wood, paper, and various industrial goods.
- Široka uporaba: Applicable across various industries for packaging cartons, light industrial goods, hardware tools, ceramic products, automotive parts, and sporting goods.

Figure 4.1: Digital Display Panel and Controls.
This image illustrates the digital display panel of the strapping machine. It shows the "HL" indicator (blue when complete), the power level indicator, "SET" button for F1 (tension) and F2 (welding time), and "INC" (increase) and "DEC" (decrease) buttons for adjusting parameters.

Figure 4.2: High-Capacity Battery.
The image highlights the 4000mAh 14.4V Li-ion battery, emphasizing its capacity for 5 hours of operation per battery, capable of over 350 strappings, with a charging time of 1.5 hours.
5. Nastavitev
5.1. Namestitev in polnjenje baterije
- Ensure the battery is fully charged before first use. Connect the battery to the charger and plug the charger into a power outlet. The indicator light on the charger will show charging status.
- To install the battery, align the battery with the slot on the machine's handle and slide it in until it clicks securely into place.
- Če želite odstraniti baterijo, pritisnite gumb za sprostitev (če je prisoten) in izvlecite baterijo.
5.2. Loading Strapping Material
This machine is designed exclusively for 1/2-5/8 inch wide, 0.024-0.047 inch thick PP (Polypropylene) or PET (Polyester) strapping.

Figure 5.1: Compatible Strapping Types.
This image clarifies that the machine is only compatible with 1/2-5/8 inch wide, 0.6-1.2mm thick PET (Polyester) and PP (Polypropylene) strapping. It explicitly shows that woven, nylon, polypropylene webbing, steel, and buckles are NOT compatible.
- Open the strapping guide lever on the machine.
- Insert the end of the strapping material into the feed slot, ensuring it passes through both the upper and lower guides.
- Pull the strapping through until it extends beyond the welding area.
- Close the strapping guide lever.
6. Navodila za uporabo
6.1. Adjusting Tension and Welding Time
Use the LCD display and control buttons to set the desired tensioning force and welding time:
- Press the "SET" button to toggle between tension (F1) and welding time (F2) settings.
- Use the "INC" (increase) and "DEC" (decrease) buttons to adjust the values. Refer to the product specifications for recommended ranges.
6.2. Strapping Process
- Pozicioniranje: Place the strapping machine on the object to be strapped, ensuring the strapping is flat and properly aligned under the machine's base.
- Napenjanje: Press and hold the tensioning button (usually the red lever on the handle) to apply tension to the strapping. Release the button once the desired tension is achieved. The machine will automatically stop tensioning when the set force is reached.
- Welding and Cutting: After tensioning, press the welding/cutting button (often a separate button or a continuation of the tensioning action) to initiate the heat fusion process and cut the strapping. Hold until the welding is complete and the strap is cut. The "HL" indicator on the display will turn blue when the process is complete.
- Remove Machine: Once the welding and cutting are complete, carefully lift the machine off the strapped object.

Figure 6.1: Positioning the machine and strapping.
This image shows a person placing the electric strapping machine onto a cardboard box, with the green strapping material already wrapped around the box and positioned under the machine's base, ready for tensioning.

Figure 6.2: Applying Tension.
The image depicts a hand pressing the red tensioning lever on the strapping machine, indicating the process of applying tension to the green strapping around a cardboard box.

Figure 6.3: Welding and Cutting.
This image shows a hand pressing the button to initiate the welding and cutting process on the strapping machine, securing the green strap around the box.

Figure 6.4: Completed Strapping.
The image displays a neatly strapped cardboard box with the electric strapping machine having completed its task and being lifted away, showing the secure, buckle-free seal on the strapping.
7. Vzdrževanje
- Čiščenje: Regularly clean the machine, especially the strapping guides and welding plate, to prevent accumulation of dust or strapping residue. Use a dry cloth or soft brush. Do not use abrasive cleaners or solvents.
- Vzdrževanje baterije: Store batteries in a cool, dry place. Do not expose them to extreme temperatures. Charge batteries fully before long-term storage and recharge every 3-6 months to maintain battery health.
- Pregled: Periodically inspect the machine for any signs of wear, damage, or loose components. Ensure all screws are tight.
- Zamenjava rezila: If the cutting performance degrades, the cutting blade may need replacement. Refer to the included toolkit for spare parts and consult the manufacturer's guidelines or a qualified technician.
8. Odpravljanje težav
| Težava | Možen vzrok | rešitev |
|---|---|---|
| Stroj se ne vklopi. | Baterija ni napolnjena ali ni pravilno nameščena. | Prepričajte se, da je baterija popolnoma napolnjena in varno vstavljena. |
| Strapping not tensioning properly. | Incorrect tension setting; strapping material is too thick/thin or wrong type; motor issue. | Adjust tension setting on LCD. Verify strapping type and dimensions. If problem persists, contact support. |
| Strapping not welding securely. | Incorrect welding time setting; dirty welding plate; wrong strapping material. | Adjust welding time. Clean the welding plate. Ensure correct PP/PET strapping is used. |
| Strapping not cutting. | Dull cutting blade; strapping not fully welded. | Replace the cutting blade. Ensure welding process completes before attempting to cut. |
| Baterija se hitro izprazni. | Battery old or damaged; operating in extreme temperatures. | Replace battery if necessary. Operate within recommended temperature ranges. |
9. Specifikacije
| Funkcija | Podrobnost |
|---|---|
| Model | B0CF2D5BVD |
| Znamka | BAOŠIŠAN |
| Baterija | 14.4V 4000mAh Lithium-Ion (2 included) |
| Čas polnjenja | Approx. 90 minutes (for 350+ strappings / 5 hours operation) |
| Strapping Material Compatibility | PP (Polypropylene) / PET (Polyester) |
| Strapping Width | 1/2 inch to 5/8 inch (12mm - 16mm) |
| Strapping Thickness | 0.024 inch to 0.047 inch (0.6mm - 1.2mm) |
| Max Tensile Force | 3200N |
| Čas varjenja | Adjustable (typically 2-5 seconds) |
| Tension Speed | 100-200 mm/s |
| Dimenzije izdelka | Približno 17.7 x 11.9 x 7.8 palca |
| Teža izdelka | Approx. 12.3 Pounds (with battery) |
10. Garancija in podpora
BAOSHISHAN is committed to providing high-quality products and excellent customer support. For any questions, technical assistance, or warranty claims, please contact BAOSHISHAN customer service through the retailer where the product was purchased or visit the official BAOSHISHAN store page on Amazon.
We offer continuous development and support to ensure your strapping machine operates efficiently and reliably.
Za več informacij obiščite: BAOSHISHAN Amazon Store
Ask a question about this manual
Ask about setup, troubleshooting, compatibility, parts, safety, or missing instructions. Manuals+ will review the question and use this page’s manual context to help answer it.