
Uvod
Thank you for choosing the Nuvance Professional Hair Clipper. This manual provides essential information for the safe and effective use, maintenance, and troubleshooting of your new hair clipper. Please read these instructions thoroughly before first use and keep them for future reference.
Pomembna varnostna navodila
Da bi zmanjšali tveganje električnega udara, poškodb ali požara, vedno upoštevajte te osnovne varnostne ukrepe:
- Naprave ne potapljajte v vodo ali druge tekočine.
- Keep the appliance away from water sources, especially when charging.
- Do not use the clipper if it has a damaged cord or plug, or if it is not working properly.
- Ta naprava ni namenjena uporabi osebam z zmanjšanimi telesnimi, senzoričnimi ali duševnimi sposobnostmi ali osebam brez izkušenj in znanja, razen če so pod nadzorom ali so jim dale navodila glede uporabe naprave s strani osebe, odgovorne za njihovo varnost.
- Otroke je treba nadzorovati, da se zagotovi, da se ne igrajo z napravo.
- Uporabljajte samo priključke, ki jih je dobavil proizvajalec.
- Unplug the clipper before cleaning or performing maintenance.
- Store the clipper in a dry place when not in use.
Vsebina paketa
Preverite, ali so v paketu prisotni vsi elementi:
- Nuvance Professional Hair Clipper
- 12 vodilnih glavnikov (različnih dolžin)
- USB polnilni kabel
- Krtača za čiščenje
- Rezilo olje
- Uporabniški priročnik
Konec izdelkaview
Familiarize yourself with the components of your Nuvance Hair Clipper.

Slika 1: Nuvance Hair Clipper components. This image shows the clipper from the side, highlighting the stainless steel blade, the blade adjustment lever, the power on/off switch, the battery indicator screen, and the USB charging port. The overall height of the clipper is indicated as 18.5 cm.
- Rezilo iz nerjavečega jekla: High-quality cutting blades for precise trimming.
- Blade Adjustment Lever: Allows fine-tuning of cutting length from 0.8mm to 2.0mm without a guide comb.
- Stikalo za vklop/izklop: Activates and deactivates the clipper.
- Digitalni zaslon: Prikazuje raven napolnjenosti baterije in stanje polnjenja.
- Vrata za polnjenje USB: Za priklop polnilnega kabla USB.
- Guide Comb Attachments: Various sizes for different hair lengths.
Nastavitev
Polnjenje Clipperja
Before first use, fully charge the clipper. A full charge typically takes approximately 3 hours and provides extended cordless operation.
- Prepričajte se, da je strižnik izklopljen.
- Insert the USB charging cable into the charging port at the bottom of the clipper.
- Connect the other end of the USB cable to a USB power adapter (not included) or a compatible USB port (e.g., computer, power bank).
- The digital display will show the charging progress. Once fully charged, the display will indicate 100%.

Slika 2: USB charging and digital display. The image illustrates the clipper being charged via a USB cable, with the digital screen showing the battery percentage. It also highlights the power switch for quick operation.
Pritrditev vodilnih glavnikov
The clipper comes with 12 guide combs to achieve various hair lengths from 0.8mm to 25mm.

Slika 3: Guide comb lengths. This image displays different guide comb attachments, indicating their respective trimming lengths: 1.5mm, 3mm, 4.5mm, 6mm, 10mm, 13mm, 19mm, and 25mm. It also mentions 4 reserve attachments for 1, 2, 3, and 4.
- Select the desired guide comb for your preferred hair length.
- Poravnajte vodilni glavnik z rezilom strižnika in ga trdno potisnite, da se zaskoči.
- Za odstranitev nežno potegnite glavnik stran od rezila.
Navodila za uporabo
Osnovno delovanje
- Ensure the clipper is charged and a guide comb is securely attached (if desired).
- Press the Power On/Off switch to turn on the clipper.
- Hold the clipper with the blade pointing downwards.
- Strižnik počasi premikajte v nasprotni smeri rasti dlak.
- After use, press the Power On/Off switch to turn off the clipper.
Adjusting Cutting Length (without guide comb)
The blade adjustment lever allows for precise cutting length adjustments from 0.8mm to 2.0mm without a guide comb.
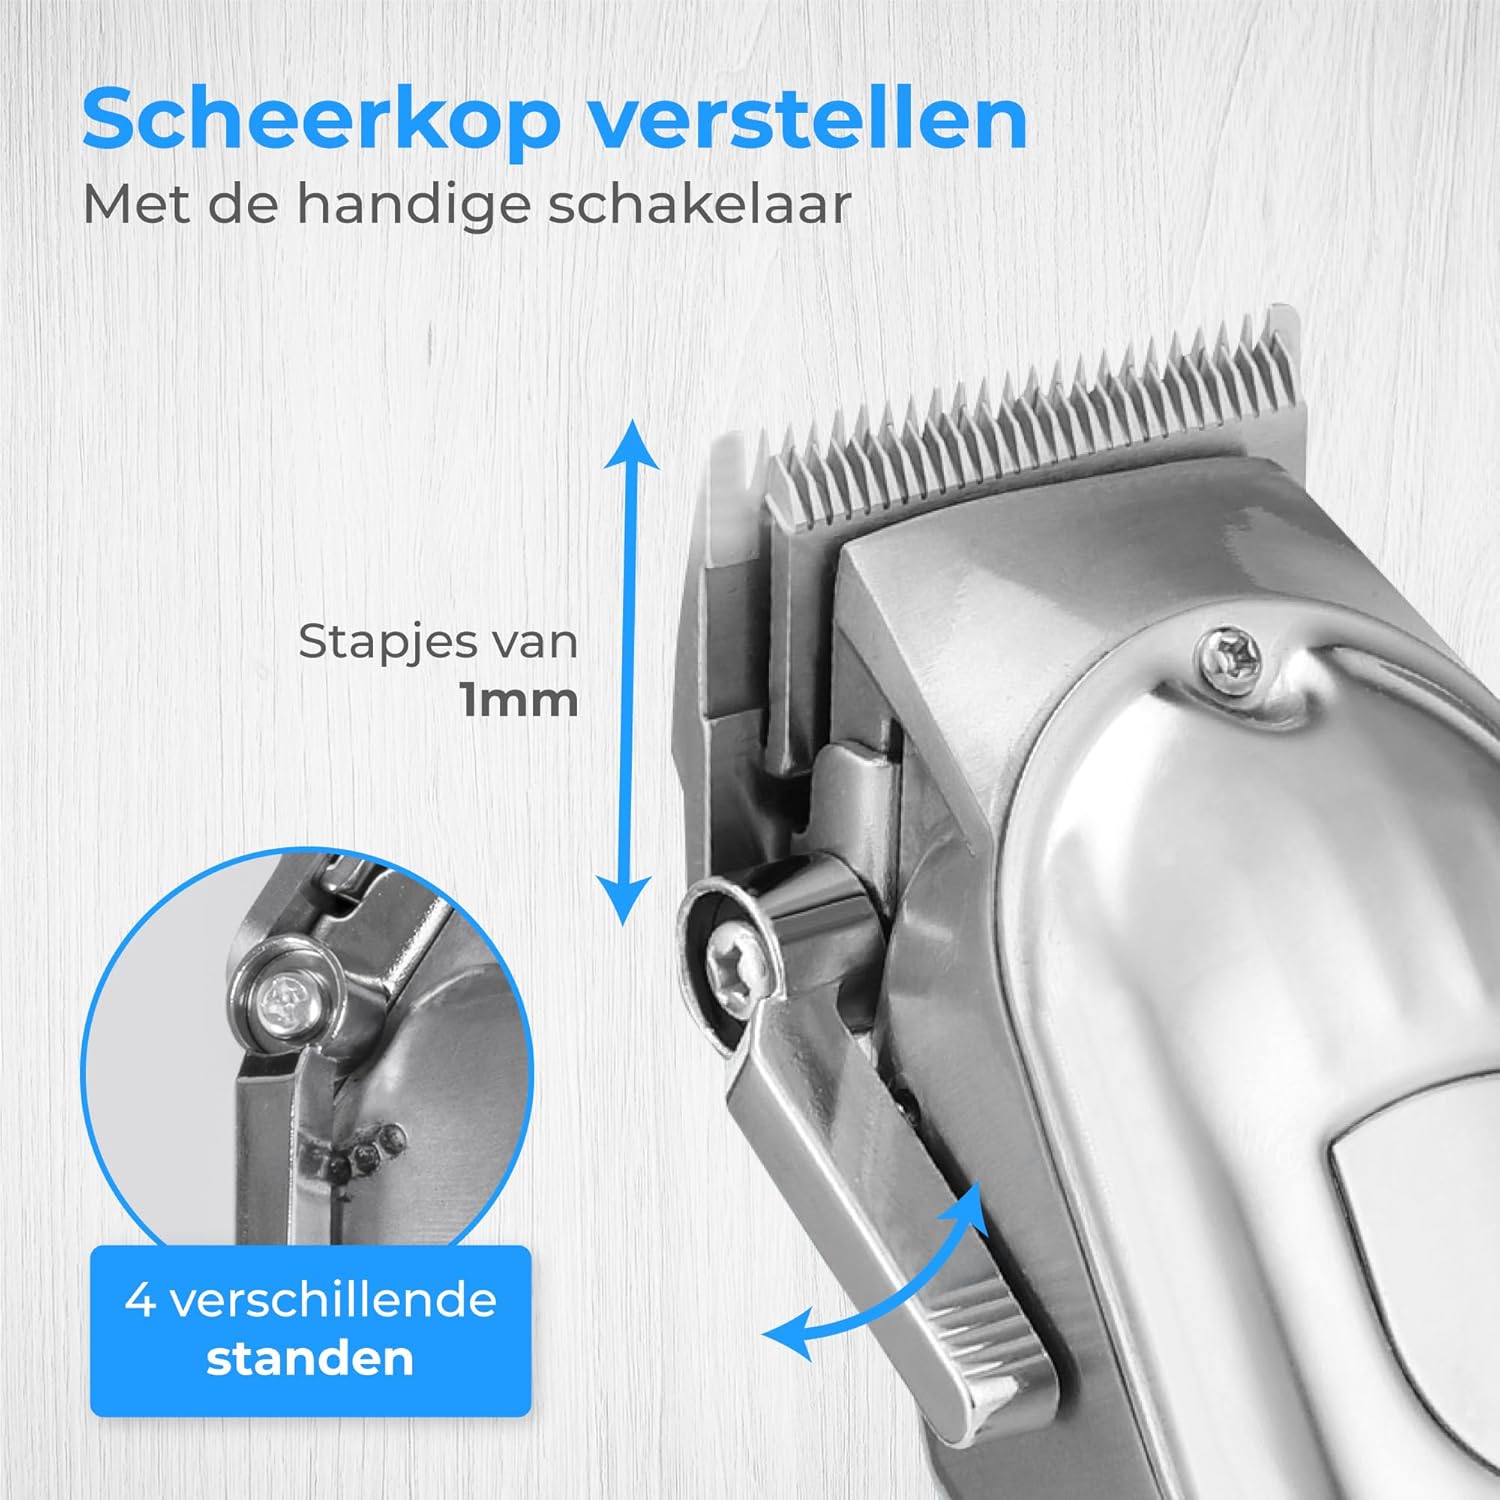
Slika 4: Blade adjustment lever. This image focuses on the side of the clipper, illustrating the lever that allows for fine adjustment of the blade's cutting length in 1mm increments, offering 4 different settings.
- Move the lever up for a shorter cut (closer to 0.8mm).
- Move the lever down for a longer cut (closer to 2.0mm).
Striženje las in brade
This clipper is suitable for various grooming needs, including head hair, beard, and body hair.

Slika 5: Multi-functional use. This image highlights the clipper's ability to trim hair on various body parts, including head hair, beard, chest, and stomach, indicating its versatile application.
- For head hair: Start with a longer guide comb and gradually reduce the length until the desired style is achieved.
- For beard trimming: Use a guide comb to maintain an even length. For detailing, remove the guide comb and use the blade adjustment lever.
- For body hair: Use appropriate guide combs for sensitive areas.
Vzdrževanje
Čiščenje rezil
Redno čiščenje zagotavlja optimalno delovanje in podaljšuje življenjsko dobo vašega strižnika.
- Izklopite in izključite strižnik iz električnega omrežja.
- Odstranite morebitne pritrjene vodilne glavnike.
- Za odstranitev odvečnih dlak z rezil uporabite priloženo čistilno krtačko.
- For a more thorough clean, the blades can be carefully detached (refer to specific instructions if provided in the physical manual for blade removal). Rinse detached blades under running water and ensure they are completely dry before reattaching. Do not rinse the clipper body.
Mazanje rezil
Apply a few drops of the supplied blade oil to the blades after every few uses to maintain sharpness and smooth operation.
- Apply 1-2 drops of oil to the top of the blades.
- Strižnik vklopite za nekaj sekund, da se olje enakomerno porazdeli.
- Odvečno olje obrišite z mehko krpo.
Odpravljanje težav
| Težava | Možen vzrok | rešitev |
|---|---|---|
| Strižnik se ne vklopi. | Baterija je prazna. | Strižnik popolnoma napolnite. |
| Strižnik puli dlake ali jih slabo reže. | Rezila so topa, umazana ali niso naoljena. | Očistite in naoljite rezila. Če težava ne preneha, je morda treba zamenjati rezila. |
| Clipper oddaja nenavaden zvok. | Rezila niso pravilno poravnana ali naoljena. | Ensure blades are clean and oiled. Check for proper blade attachment. |
| Digitalni zaslon ne deluje. | Unit is off or battery is completely dead. | Turn on the clipper or connect to charger. |
Specifikacije
- Model: HF-8933
- Znamka: Nuvance
- vir energije: USB za ponovno polnjenje
- Material rezila: Nerjaveče jeklo
- Rezalne dolžine: 0.8mm - 25mm (with 12 guide combs)
- Indikator baterije: Digitalni zaslon
Garancija in podpora
Nuvance products are manufactured to high-quality standards. For warranty information or technical support, please refer to the contact details provided with your purchase or visit the official Nuvance webmesto.
Prosimo, shranite dokazilo o nakupu za morebitne garancijske zahtevke.