
1. Uvod
This manual provides detailed instructions for the setup, operation, maintenance, and troubleshooting of your Volcora 80mm Thermal Receipt Printer. This printer is designed for Point-of-Sale (POS) applications, offering fast and efficient thermal printing with an auto-cutter. It supports USB and Ethernet connectivity and is compatible with Android, Windows, and Linux operating systems.
2. Varnostne informacije
- Prepričajte se, da je tiskalnik priključen na ozemljeno električno vtičnico.
- Tiskalnika ne izpostavljajte vodi ali prekomerni vlagi.
- Tiskalnika ne postavljajte na neposredno sončno svetlobo ali v bližino virov toplote.
- Uporabljajte samo napajalnik, ki je priložen tiskalniku.
- Tiskalnik hranite izven dosega otrok.
- Tiskalnika ne poskušajte razstavljati ali popravljati sami. Za pomoč se obrnite na podporo strankam.
3. Vsebina paketa
Preverite, ali so v paketu prisotni vsi elementi:
- Volcora 80mm Thermal Receipt Printer
- Napajalni kabel
- USB kabel
- Test Paper Roll
- Namestitveni CD

Figure 3.1: Package Contents. The image displays the Volcora Thermal Receipt Printer along with its accessories: a power cord, a USB cable, a roll of test paper, and an installation CD.
4. Izdelek je končanview
4.1. Vrata in gumbi
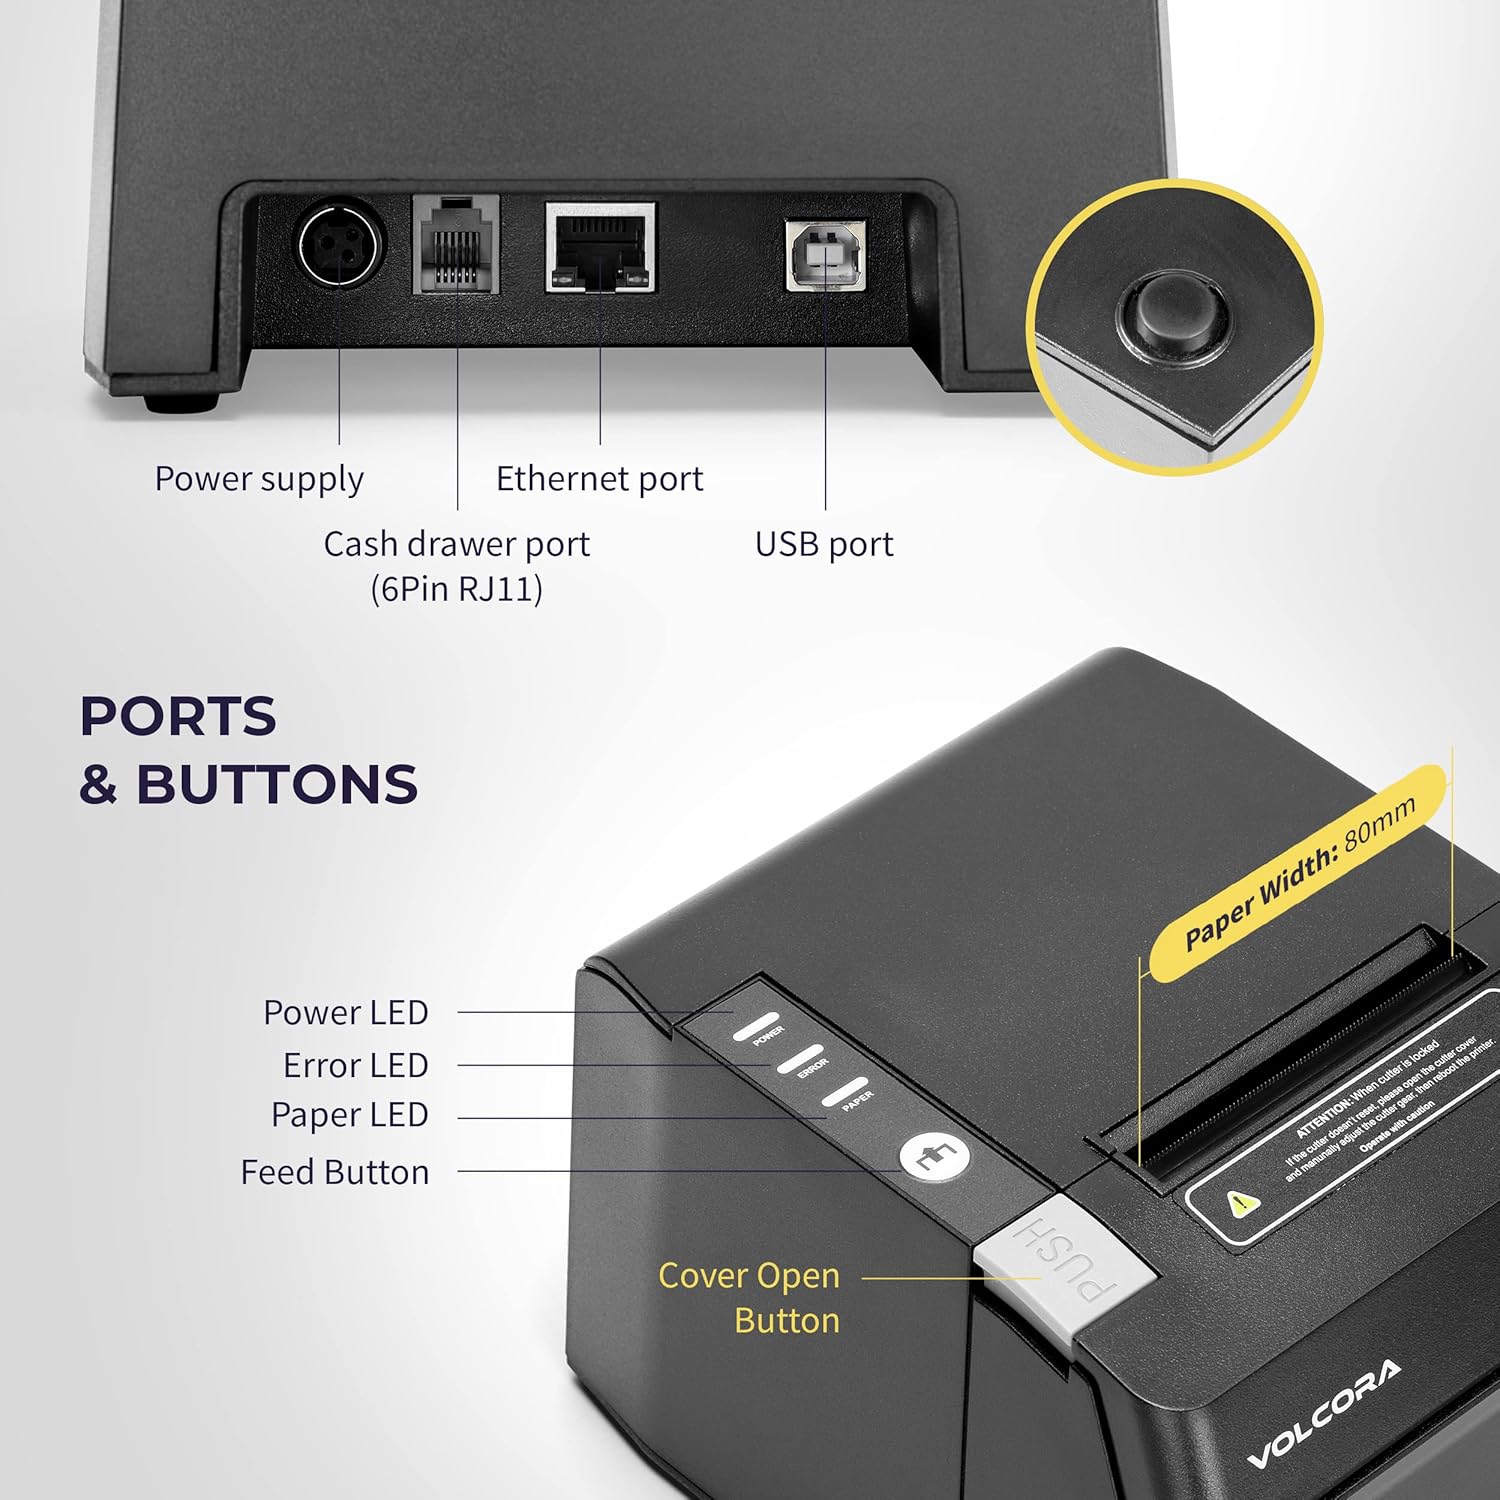
Figure 4.1: Printer Ports and Buttons. This image illustrates the rear ports including Power Supply, Ethernet Port, Cash Drawer Port (6Pin RJ11), and USB Port. It also shows the front panel with Power LED, Error LED, Paper LED, Feed Button, and Cover Open Button.
- Vrata za napajanje: Povezuje se z napajalnikom.
- Ethernet vrata: For network connectivity (LAN).
- Cash Drawer Port (6Pin RJ11): Connects to a cash drawer.
- Vrata USB: Za neposredno povezavo z računalnikom.
- LED za napajanje: Označuje stanje napajanja.
- LED za napako: Indicates printer errors.
- Papirna LED dioda: Indicates paper status (e.g., low paper).
- Gumb za dovajanje: Manually feeds paper.
- Gumb za odpiranje pokrova: Releases the printer cover to access the paper roll.

Slika 4.2: Večkratno views of the Volcora Thermal Receipt Printer, showing its compact design and various connection points.
5. Nastavitev
5.1. Unboxing and Connecting
- Razpakirajte tiskalnik in odstranite vse embalažne materiale.
- Priključite napajalnik na tiskalnik in nato v električno vtičnico.
- Connect the printer to your Windows PC using the provided USB cable.
Video 5.1: Getting Started with Volcora Thermal Receipt Printer. This video demonstrates the unboxing, connecting the printer to power and a Windows PC via USB, and performing a self-test.
5.2. Namestitev papirne role
- Press the Cover Open Button to open the printer cover.
- Vstavite zvitek termičnega papirja s stranjo za tiskanje navzgor.
- Izvlecite majhen kos papirja mimo rezalnika.
- Pokrov tiskalnika trdno zaprite, dokler se ne zaskoči.
5.3. Namestitev gonilnika (Windows)
- Download the latest driver for Windows from the Volcora support webspletno mesto: volcora.com/support.
- Razpakirajte preneseno file in zaženite namestitveni program gonilnika.
- Follow the on-screen prompts, agreeing to the license and selecting your printer model (e.g., 500108).
- Ensure the printer is connected via USB during installation.
- After successful installation, the printer should be recognized in your computer's "Printers & scanners" settings.

Figure 5.2: Easy Installation Steps. This diagram outlines the four main steps: Download drivers, Install drivers, Connect the printer, and Test print.
5.4. Network Configuration (Ethernet)
If you are using the Ethernet connection, you may need to configure the printer's IP address to match your network's subnet. This can be done using the Setting Tool software.
- First, identify your PC's IP address and subnet mask.
- Perform a printer self-test (see Section 6.2) to get the printer's current IP address.
- If the printer's IP is not in the same subnet as your PC, you will need to adjust either the PC's IP or the printer's IP.
- Open the Setting Tool software (available from volcora.com/support).
- Select the printer model and choose 'NET' for the port type.
- Enter the printer's current IP address and click 'Get Param' to retrieve its network settings.
- Modify the IP address, subnet mask, and gateway to align with your network configuration.
- Click 'Set' to apply the new settings to the printer.
- Perform another self-test to confirm the IP address has been updated.
Video 5.2: How to Modify LAN IP Address of Volcora Receipt Printer. This video guides you through identifying current IP addresses, changing PC host IP, and using the Setting Tool to configure the printer's IP address for Ethernet connectivity.
5.5. Možnosti umestitve

Figure 5.3: Multiple Use & Placement. The printer can be wall-mounted for kitchen use or placed on a counter for receipt printing.
6. Navodila za uporabo
6.1. Osnovno tiskanje
Once the printer is connected and drivers are installed, you can print receipts from your POS software or any application that supports printing. The printer features a 203 dpi resolution for clear prints and an auto-cutter for efficient receipt handling.

Figure 6.1: Efficient Printing. This image highlights the printer's fast print speed, low noise operation, and clear 203 dpi output, showing a receipt with a QR code and a barcode.
The printer supports various barcode types including UPC-A, UPC-E, EAN13, EAN8, CODE39, ITF25, CODABAR, CODE93, CODE128, QRCODE, PDF417, and Data matrix.
6.2. Printer Self-Test
A self-test prints the printer's configuration, including its IP address (if connected via Ethernet), and confirms basic functionality.
- Prepričajte se, da je tiskalnik izklopljen.
- Press and hold the "Feed" button.
- While holding the "Feed" button, power on the printer.
- Continue holding the "Feed" button for approximately 5 seconds until the self-test page begins to print.
6.3. Združljivost
The Volcora Thermal Receipt Printer is compatible with various POS systems and operating environments. It supports ESC/POS commands.

Figure 6.2: Printer Compatibility. This chart lists compatible POS systems such as Loyverse, SumUp, Gloria Food, FoodZaps, TabShop POS, POSAPP.vn POS, Olsera POS, and KaHero POS. It also lists systems that are not compatible, including Square, Toast, Ubereats, Grubhub, Doordash, Postmates, Clover, and Shopify.
Združljivi operacijski sistemi: Android, Windows, Linux. (Note: A software development kit (SDK) is required for custom application development on Ethernet-supported systems, including Windows, Linux, and MAC.)
Ni združljivo z: Delivery platforms or POS applications such as Ubereats, Grubhub, Doordash, Postmates, Square, Clover, or Shopify. Does not offer Bluetooth or WiFi printing options.

Figure 6.3: Detailed Compatibility Table. This table shows compatibility for USB and Serial connections across various operating systems (Windows, Mac OS, Linux, Android, iOS) and notes about SDK and ESC/POS commands.
7. Vzdrževanje
7.1. Čiščenje
- Regularly clean the printer's exterior with a soft, damp krpo.
- To clean the thermal print head, use an alcohol swab. Ensure the printer is off and cool before cleaning.
- Odstranite prah ali ostanke papirja s poti papirja.
8. Odpravljanje težav
8.1. Pogoste težave in rešitve
| Težava | Možen vzrok | rešitev |
|---|---|---|
| Tiskalnik se ne odziva | Power issue, loose cable, driver not installed. | Check power connection. Ensure USB/Ethernet cable is securely connected. Verify driver installation (Section 5.3). |
| Blank pages or faint print | Thermal paper loaded incorrectly, print head dirty. | Reload paper with the thermal side facing up. Clean the thermal print head (Section 7.1). |
| Zastoj papirja | Incorrect paper loading, foreign object. | Open the cover, remove jammed paper, and ensure proper loading. Remove any obstructions. |
| Težave z ethernetno povezavo | Incorrect IP address configuration. | Perform a self-test to check the printer's IP. Use the Setting Tool to configure the IP address to match your network (Section 5.4). |
| Printer not compatible with POS software | Programska oprema ni podprta. | Refer to the compatibility list (Section 6.3). Contact your POS software provider for compatibility information. |
For further assistance, refer to the Volcora support center or contact customer service.
9. Specifikacije
| Funkcija | Podrobnost |
|---|---|
| Znamka | Volcora |
| Številka modela | 500108 |
| Tehnologija tiskanja | Toplotna |
| Hitrost tiskanja | Do 220 mm/s |
| Ločljivost tiskanja | 203 dpi |
| Širina papirja | 80 mm (3 1/8") |
| Širina tiskanja | 72 mm |
| Vmesnik | USB, Ethernet (LAN), Cash Drawer (RJ11) |
| Auto Cutter Life | 1.5 milijonov kosov |
| Vhodna moč | AC 110V/240V, 50-60Hz |
| Izhodna moč | DC 24V/2A |
| Dimenzije izdelka | 7"D x 6"W x 4.5"H (approx. 16 x 4 x 16 inches as per some specs) |
| Teža predmeta | 3.76 funtov |
| Podprte črtne kode | UPC-A, UPC-E, EAN13, EAN8, CODE39, ITF25, CODABAR, CODE93, CODE128, QRCODE, PDF417, Data matrix |
| Ukaz tiskalnika | ESC/POS |
10. Garancija
This Volcora Thermal Receipt Printer comes with a Omejena garancija. Please refer to the warranty card included in your package or visit the Volcora support webspletno mesto za podrobna določila in pogoje.
11. Podpora strankam
For additional assistance, troubleshooting, or to download drivers and tools, please use the following resources:
- Volcora Help Portal: https://help.volcora.com
- Download Support Center: https://volcora.com/support
- E-pošta za podporo strankam: support@volcora.com
Our U.S. based customer support team is available to assist with any integration issues.