1. Uvod
This manual provides detailed instructions for the installation, operation, and maintenance of your Gravity Audio 1200W 12" Premium Car Subwoofer Kit. This comprehensive package includes a Gravity 12-inch subwoofer, an Audiobank 3000W Class D amplifier, an Audiotek single 12-inch vented subwoofer enclosure, and a complete amplifier installation kit. Please read this manual thoroughly before attempting installation or operation to ensure proper use and maximum performance.

Slika 1.1: Konecview of the Gravity Audio 1200W 12" Premium Car Subwoofer Kit components.
2. Varnostne informacije
Med namestitvijo in delovanjem vedno upoštevajte naslednje varnostne ukrepe:
- Priporočena profesionalna namestitev: Če ste glede katerega koli vidika namestitve negotovi, se posvetujte s usposobljenim tehnikom za avtomobilski avdio sistem.
- Odklopite baterijo: Always disconnect the vehicle's negative battery terminal before starting any electrical work to prevent short circuits and electrical shock.
- Pravilno ožičenje: Use appropriate gauge wiring as specified in this manual and ensure all connections are secure and insulated to prevent shorts.
- Prezračevanje: Zagotovite amplifier is mounted in a location with adequate airflow to prevent overheating.
- Izogibajte se oviram: Do not mount components in locations that obstruct airbags, driver visibility, or vehicle controls.
- Zaščita sluha: Dolgotrajna izpostavljenost visokim ravnem glasnosti lahko povzroči trajno poškodbo sluha. Pri prilagajanju glasnosti bodite previdni.
3. Vsebina paketa
Preverite, ali so v paketu vsi elementi:
- Gravity 12" 1200W Peak Power Subwoofer (GR-12PW)
- Audiobank 3000W Class D Monoblock Amplifier (P3001)
- Audiotek Single 12 Inch Vented Subwoofer Enclosure (CA-12SP)
- Popolna Amplifier Installation Kit (Power Cable, Ground Cable, Remote Turn-On Wire, RCA Interconnects, Speaker Wire, Fuse Holder, Fuse, Terminals, Zip Ties)

Figure 3.1: Contents of the amplifier installation kit, including various cables, fuse, and terminals.
4. Nastavitev in namestitev
Follow these steps for proper installation of your car audio system. Ensure the vehicle's battery is disconnected before proceeding.
4.1 Namestitev nizkotonca v ohišje
- Carefully place the Gravity 12" subwoofer into the opening of the Audiotek vented enclosure. Ensure the mounting holes align.
- Secure the subwoofer using appropriate screws (not included, typically self-tapping wood screws) through the mounting holes into the enclosure. Do not overtighten.
- Connect speaker wire from the subwoofer's terminals to the enclosure's internal terminals. Observe polarity: positive (+) to positive, negative (-) to negative.

Slika 4.1: Spredaj view of the Gravity 12-inch subwoofer, showing the cone and surround.

Slika 4.2: Spredaj view of the Audiotek single 12-inch vented subwoofer enclosure.
4.2 Amppritrditev dvižnika
Choose a secure, well-ventilated location for the Audiobank amplifier, such as the trunk or under a seat. Ensure it is away from moisture and direct sunlight.
- Mark the mounting holes on the chosen surface.
- Drill pilot holes if necessary, taking care not to damage any vehicle components.
- Zavarujte ampdvigalo z ustreznimi vijaki.

Slika 4.3: Zgornji del view of the Audiobank 3000W Class D Monoblock Amplifier.
4.3 Žične povezave
Glejte na amplifier's rear panel for terminal locations. Use the provided ampnamestitveni komplet lifier.
- Power Cable (+12V): Run the thick red power cable from the vehicle's positive battery terminal to the amplifier's +12V terminal. Install the fuse holder within 18 inches of the battery and insert the fuse.
- Ground Cable (GND): Connect the thick black ground cable from the ampOzemljitveni priključek napajalnika priključite na čisto, nepobarvano kovinsko površino na šasiji vozila. Zagotovite trdno povezavo z nizkim uporom.
- Žica za daljinski vklop (REM): Connect the blue remote wire from your head unit's remote output to the amplifier's REM terminal. This turns the amplifier on/off with your head unit.
- RCA Interconnects: Connect the RCA cables from your head unit's subwoofer or full-range pre-outs to the ampvhodne RCA priključke naprave Liferier.
- Izhod zvočnika: Connect the speaker wire from the enclosure's external terminals to the ampizhodne priključke zvočnikov naprave Liferier. Pazite na pravilno polarnost.

Figure 4.4: Rear panel of the Audiobank amplifier showing power, ground, remote, and speaker output terminals.

Figure 4.5: Speaker terminal on the Audiotek subwoofer enclosure for connecting to the amplifier.
5. Navodila za uporabo
Once all connections are made and verified, reconnect the vehicle's negative battery terminal.
5.1 Initial Power-Up and Basic Settings
- Vklopite kontakt vozila in glavno enoto. ampIndikator napajanja na izdelovalniku mora zasvetiti.
- Začnite z amplifier's GAIN control set to minimum (fully counter-clockwise).
- Set the head unit's volume to about 75% of its maximum.
- Počasi povečajte amplifier's GAIN control until you hear distortion, then back it off slightly. This sets the maximum clean output.
5.2 Ampkrmilniki za dvigalo
The Audiobank P3001 amplifier features several controls for fine-tuning your subwoofer's performance:
- DOBITE: Adjusts the input sensitivity to match the output of your head unit. (See 5.1)
- LPF (nizkoprepustni filter): This control sets the upper frequency limit for the subwoofer. Typically set between 80Hz and 120Hz. Frequencies above this setting will be filtered out.
- BASS BOOST: Provides an increase in bass output at a specific frequency. Use sparingly to avoid distortion and potential damage.
- FAZA: Allows you to adjust the phase of the subwoofer output (0 or 180 degrees) to ensure it blends seamlessly with your main speakers. Experiment with both settings to find the best sound.
6. Vzdrževanje
Your Gravity Audio Subwoofer Kit requires minimal maintenance to ensure long-term performance.
- Čiščenje: Občasno obrišite amplifier and subwoofer enclosure with a soft, dry cloth. Avoid using harsh chemicals or abrasive cleaners.
- Preverjanje povezave: Annually, inspect all wiring connections for tightness and corrosion. Re-tighten any loose connections.
- Prezračevanje: Zagotovite amplifier's cooling fins remain free of dust and debris to maintain proper heat dissipation.
7. Odpravljanje težav
If you experience issues with your subwoofer kit, consult the following table before seeking professional assistance:
| Težava | Možen vzrok | rešitev |
|---|---|---|
| Ni zvoka iz nizkotonca |
|
|
| Izkrivljen zvok |
|
|
| AmpPregrevanje gorilnika |
|
|
8. Specifikacije
Gravity 12" Subwoofer (GR-12PW)
- Vrsta zvočnika: Nizkotonec
- Premer globokotonca: 12 palcev
- Voice Coil Configuration: Dvojni 4 ohm
- Najvišja moč: Vsak po 1200 W
- RMS moč: Vsak po 600 W
- Frekvenčni odziv: 30 - 2.5 kHz
- Občutljivost: 90 dB
- Material stožca: Competition Grade Pressed Paper Cone
- Obkrožiti: Obroba iz pene High Roll
- Hladilni sistem: Advanced Air Flow Cooling System
Audiobank 3000W Class D Amplifier (P3001)
- Tip: Monoblok razreda D Amplifier
- Najvišja moč: 3000 Watts (Total Package)
- Kontrole: Gain, LPF, Bass Boost, Phase
Audiotek Single 12 Inch Vented Enclosure (CA-12SP)
- Oblikovanje: Vented (Ported)
- Material: High Quality Gray Carpet
- Dimenzije: Approximately 18"W x 16"D x 14"H (External)
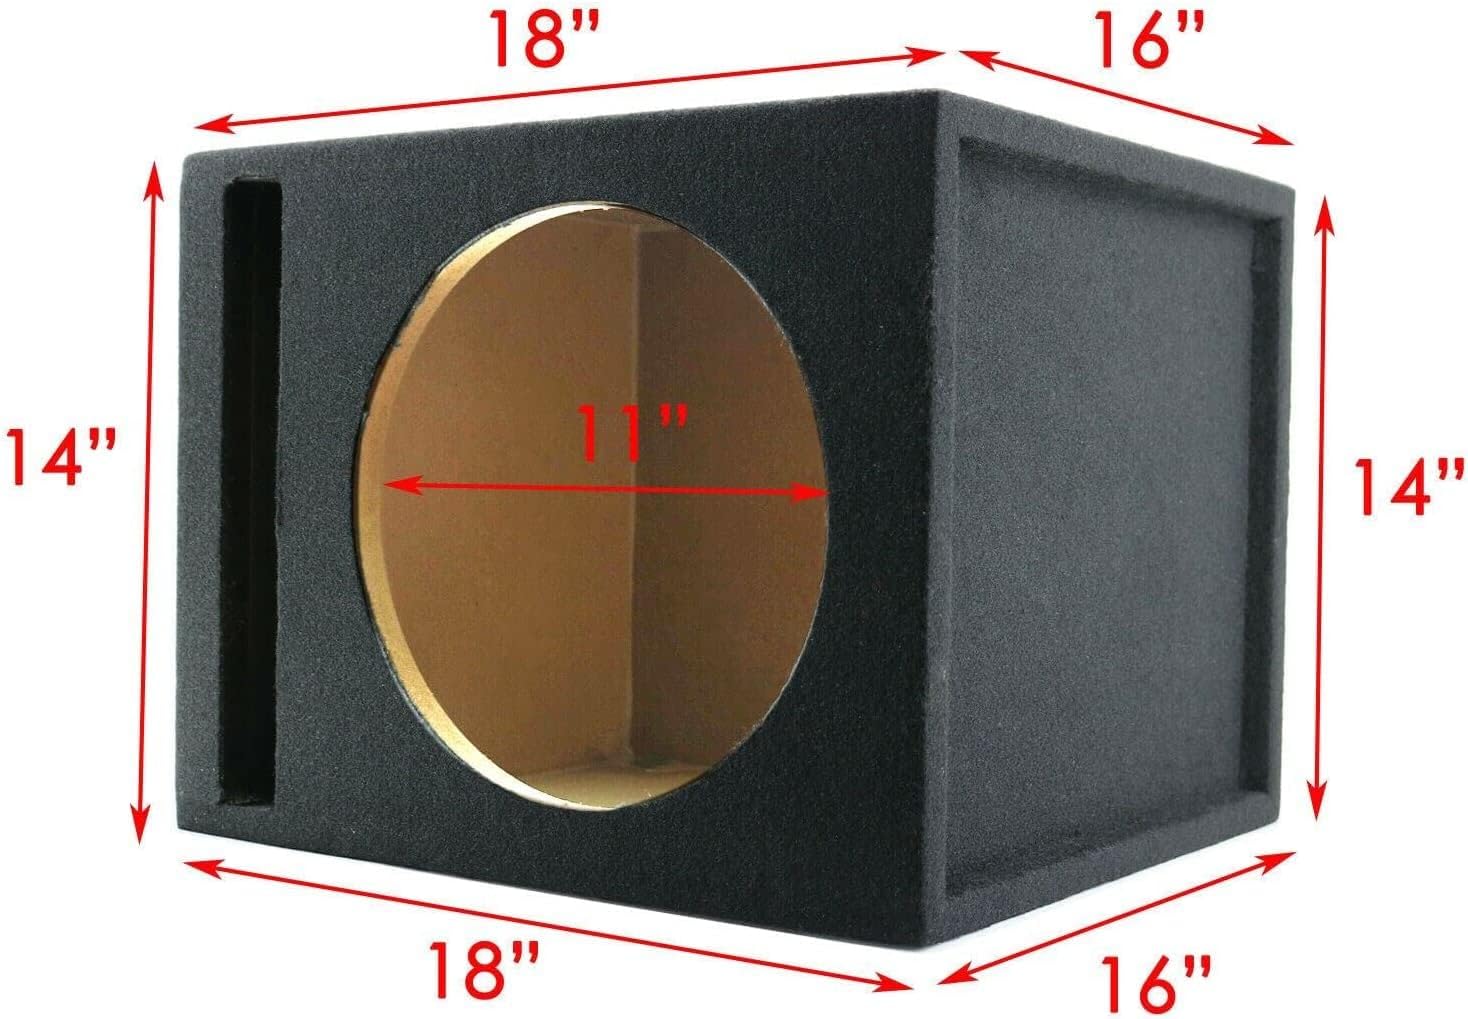
Figure 8.1: Dimensions of the Audiotek single 12-inch vented subwoofer enclosure.
9. Garancija in podpora
This product comes with a Limited Warranty. For specific details regarding warranty coverage, duration, and terms, please refer to the warranty card included with your purchase or contact Gravity Audio customer support directly.
Podpora uporabnikom
For technical assistance, troubleshooting not covered in this manual, or warranty claims, please contact your retailer or Gravity Audio customer service. Have your product model number (GR-12PW + P3001 + CA-12SP + Kit) and purchase date available when contacting support.