
Uvod
Thank you for choosing the WulaWindy Digital Alarm Clock. This device combines a large mirrored LED display with practical features such as dual USB charging ports, adjustable brightness, and a convenient snooze function. This manual provides detailed instructions to help you set up, operate, and maintain your new alarm clock.
For optimal performance, please read this manual thoroughly before use and retain it for future reference.
Lastnosti izdelka
- Enostavno upravljanje: Features only 3 buttons for straightforward setting of time, alarm, and brightness.
- Large Mirrored LED Display: A 6.5-inch screen with large numbers for easy readability, also functions as a mirror.
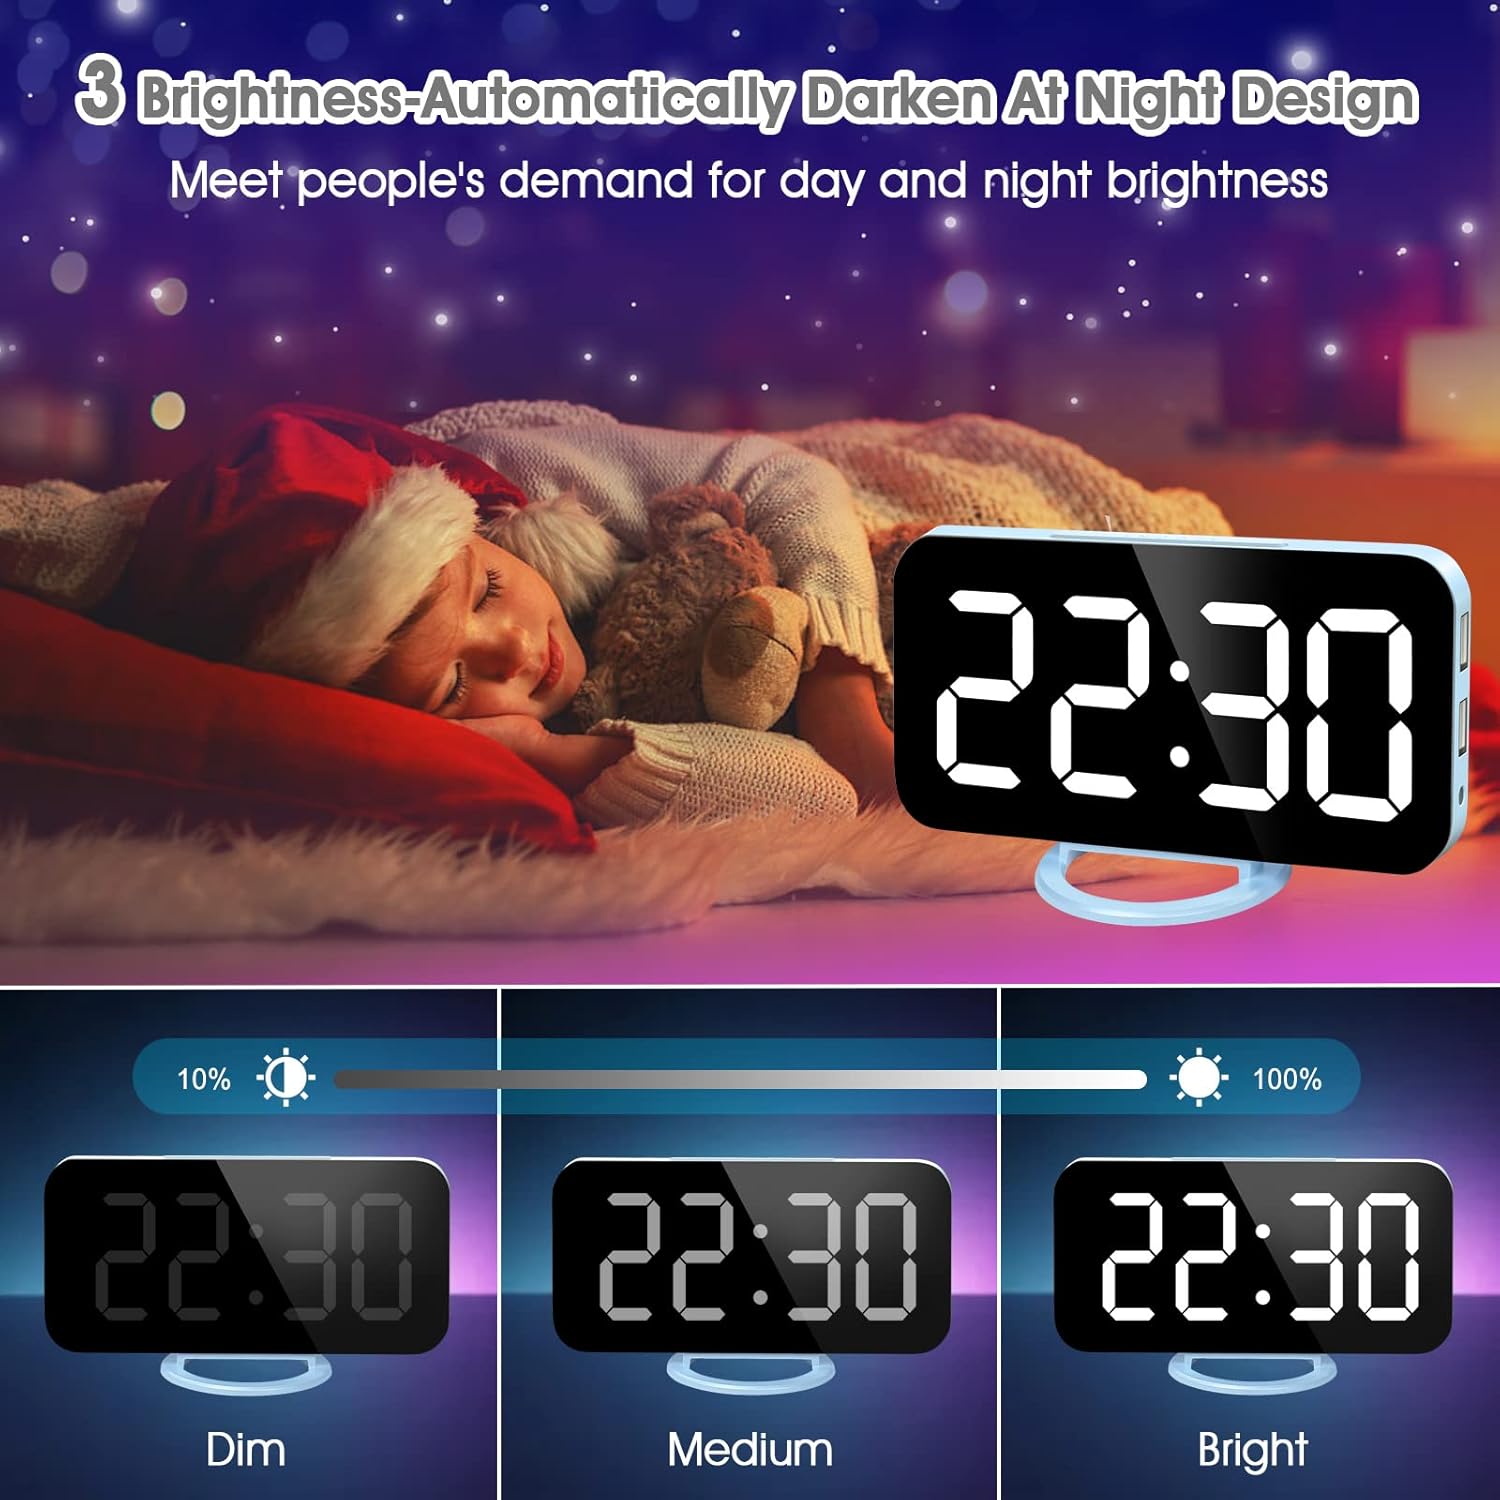
- Nastavljiva svetlost: Offers three manual brightness levels (Dim, Medium, Bright) and an automatic dimming mode for night.
- Dvojna vrata USB za polnjenje: Two USB ports allow simultaneous charging of two devices.
- Memory Battery Backup: Includes a backup battery (CR2016) to retain time settings during power outages. Note: The clock requires USB power to operate.
- Super Convenient Snooze Button: A large, easily accessible snooze button for 5-60 minute nap intervals.
Vsebina paketa
- WulaWindy Digital Alarm Clock
- USB napajalni kabel
- Snemljivo stojalo
- Rezervna baterija CR2016 (predhodno nameščena)
- Uporabniški priročnik
Nastavitev
- Razpakirajte uro: Budilko in vso dodatno opremo previdno vzemite iz embalaže.
- Odstranite zaščitne folije: Peel off any protective films from the mirrored display surface.
- Activate Backup Battery: Locate the battery compartment on the back of the clock. Remove the plastic insulator tab from the pre-installed CR2016 battery. This battery maintains time settings during power interruptions.
- Priključite napajanje: Plug the provided USB power cable into the input port on the side of the alarm clock. Connect the other end of the USB cable to a USB power adapter (not included) or a powered USB port. The clock display will illuminate.
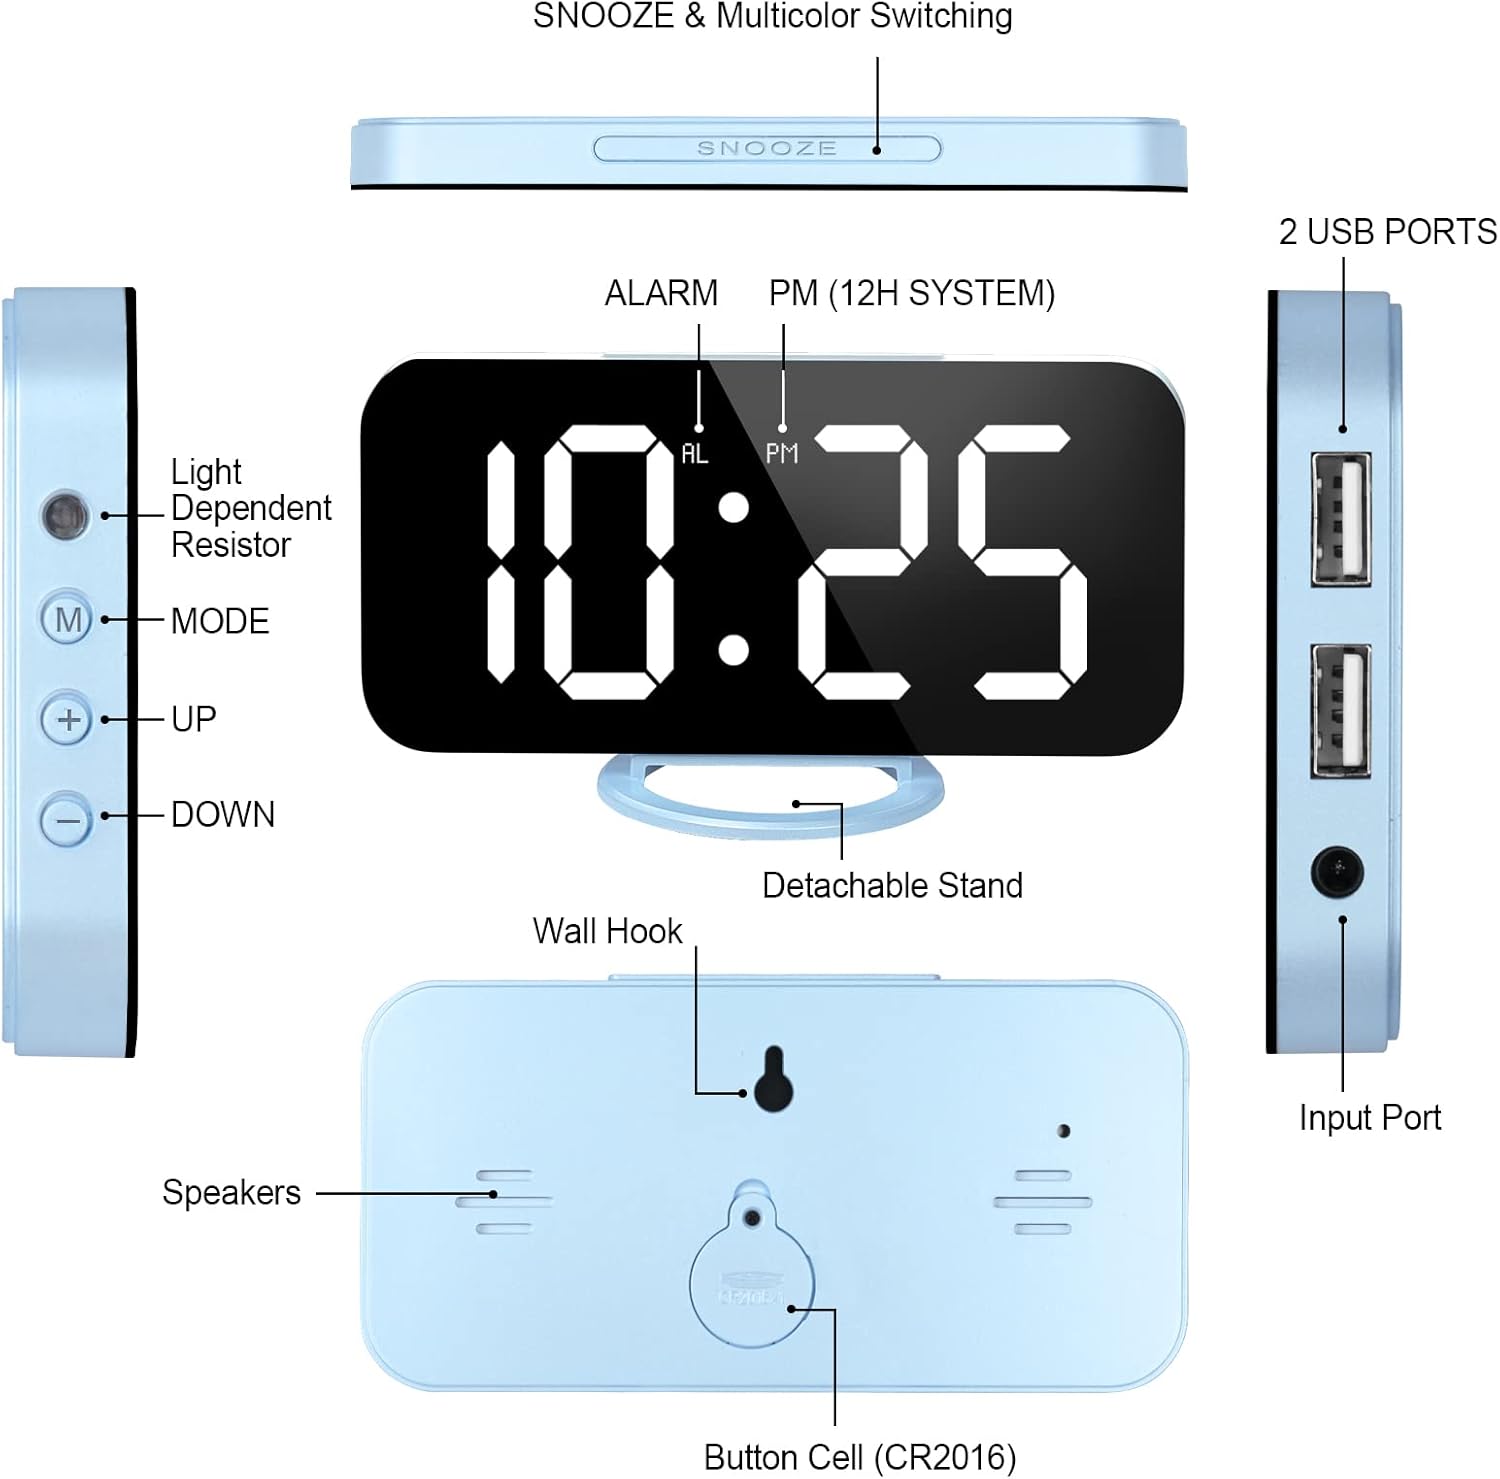
- Attach Stand (Optional): If using the clock on a desk or bedside table, attach the detachable stand to the bottom of the clock for stable positioning. The clock can also be wall-mounted using the keyhole slot on the back.
Navodila za uporabo
Gumb Konecview
The alarm clock features three main control buttons on the side and a large snooze button on top:
- Gumb MODE (M): Used to switch between time, alarm, and brightness settings.
- UP Button (+): Used to increase values or navigate options.
- DOWN Button (-): Used to decrease values or navigate options.
- Gumb DREMEČ: Located on top, used to activate snooze or adjust display color (if applicable).

Nastavitev časa
- Pritisnite NAČIN (M) enkrat pritisnite gumb za vstop v način nastavitve časa. Številke za ure bodo utripale.
- Uporabite GOR (+) or DOL (-) gumbi za nastavitev ure.
- Pritisnite NAČIN (M) button again to set the minutes. The minute digits will flash.
- Uporabite GOR (+) or DOL (-) gumbe za nastavitev minut.
- Pritisnite NAČIN (M) tretjič pritisnite gumb, da potrdite čas in zapustite način nastavitve časa.
- To switch between 12-hour and 24-hour format, press and hold the NAČIN (M) gumb v običajnem načinu prikaza časa.
Nastavitev alarma
- Pritisnite NAČIN (M) button twice to enter alarm setting mode. The alarm hour digits will flash, and an 'AL' indicator will appear.
- Uporabite GOR (+) or DOL (-) gumbe za nastavitev ure budilke.
- Pritisnite NAČIN (M) button again to set the alarm minutes. The alarm minute digits will flash.
- Uporabite GOR (+) or DOL (-) gumbe za nastavitev minut alarma.
- Pritisnite NAČIN (M) button a third time to confirm the alarm time.
- Za vklop ali izklop alarma pritisnite DOL (-) button while in normal time display mode. An alarm icon will appear on the display when the alarm is active.
Nastavitev svetlosti
The clock offers both manual and automatic brightness control:
- Ročna svetlost: V običajnem načinu prikaza časa pritisnite GOR (+) button to cycle through three brightness levels: Dim, Medium, and Bright.
- Samodejno zatemnitev: The clock can automatically adjust its brightness based on ambient light. To enable this, ensure the light sensor (located on the side) is unobstructed. The display will automatically dim at night.
Funkcija dremeža
Ko se oglasi alarm, pritisnite veliko DREMEŽ button on top of the clock to activate the snooze function. The alarm will pause and sound again after the set snooze interval (default is 5 minutes, adjustable up to 60 minutes). To turn off the alarm completely, press any other button on the side of the clock.

Vrata za polnjenje USB
The alarm clock is equipped with two USB charging ports on its side. These ports can be used to charge your mobile devices, smartwatches, or other USB-powered gadgets while the alarm clock is plugged into a power source.
Konec izdelkaview Video
Vzdrževanje
- Čiščenje: Wipe the display and body of the clock with a soft, dry cloth. Avoid using abrasive cleaners or solvents.
- Zamenjava baterije: The CR2016 backup battery should last for several years. If the clock loses time settings during a power outage, replace the battery. To replace, open the battery compartment on the back, remove the old battery, and insert a new CR2016 battery with the positive (+) side facing up.
- Shranjevanje: If storing the clock for an extended period, disconnect it from power and remove the backup battery.
Odpravljanje težav
| Težava | rešitev |
|---|---|
| Prikaz ure je izklopljen. | Ensure the USB power cable is securely connected to both the clock and a working power source. The clock requires continuous USB power to display time. |
| Time settings are lost after power outage. | The CR2016 backup battery may be depleted. Replace the battery as described in the Maintenance section. |
| Alarm se ne oglasi. | Prepričajte se, da je alarm aktiviran (ikona alarma je vidna na zaslonu). Preverite, ali je čas alarma pravilno nastavljen. |
| Zaslon je pretemno ali presvetlo. | Pritisnite GOR (+) button to cycle through manual brightness levels. If using auto-dimming, ensure the light sensor on the side is not obstructed. |
| Vrata za polnjenje USB ne delujejo. | Ensure the alarm clock is powered via its USB cable. The charging ports only function when the clock is receiving power. |
Specifikacije
| Funkcija | Podrobnost |
|---|---|
| Znamka | WulaWindy |
| Številka modela | yishang |
| Vrsta zaslona | Digital LED, Mirrored Surface |
| Dimenzije izdelka | 6.7 cm Š x 3.7 cm V |
| Vir napajanja | Corded Electric (USB), Battery Powered (for memory backup) |
| Rezervna baterija | 1 x CR2016 (priložen) |
| Posebne lastnosti | Alarm, Snooze, Dual USB Charging, Adjustable Brightness, Auto-Dimming |
| Vrsta namestitve | Desk Clock, Wall Mount |
| Material | Akrilonitril butadien stiren |
| Teža predmeta | 6.7 unč |
Garancija in podpora
WulaWindy products are designed for quality and reliability. For any questions, technical support, or warranty claims, please refer to the contact information provided with your purchase or visit the official WulaWindy store on Amazon.
We are committed to ensuring 100% user satisfaction.