1. Uvod
This manual provides essential information for the safe and efficient operation of your Admark K420 Class D Professional Power Amplifier. Please read this manual thoroughly before installation and use to ensure optimal performance and to prevent damage to the unit or other equipment. The Admark K420 is a high-performance, four-channel Class D amplifier designed for professional audio applications, delivering 2000 Watts per channel at 8 Ohms.
2. Varnostna navodila
Vedno upoštevajte te osnovne varnostne ukrepe, da zmanjšate tveganje požara, električnega udara in poškodb:
- vir energije: Connect the unit only to a power supply of the type described in this manual and marked on the unit.
- Ozemljitev: Za preprečitev električnega udara se prepričajte, da je enota pravilno ozemljena.
- Prezračevanje: Ne blokirajte prezračevalnih odprtin. Namestite v skladu z navodili proizvajalca. Okoli enote naj bo dovolj prostora za pravilen pretok zraka.
- Voda in vlaga: Naprave ne izpostavljajte dežju ali vlagi. Ne uporabljajte je v bližini vode.
- Toplota: Ne nameščajte v bližini virov toplote, kot so radiatorji, grelniki, peči ali druge naprave (vključno z amplifiers), ki proizvajajo toploto.
- Servisiranje: Tega izdelka ne poskušajte servisirati sami. Vsa servisna dela prepustite usposobljenemu servisnemu osebju.
- Kabli: Zaščitite napajalni kabel, da se po njem ne pohodi ali stisne, zlasti pri vtičih, vtičnicah in na mestu, kjer izstopa iz naprave.
3. Vsebina paketa
Upon opening the package, please verify that all components are present and in good condition. If any items are missing or damaged, contact your dealer immediately.
- Admark K420 Professional Power Amplifier
- AC napajalni kabel
- Uporabniški priročnik (ta dokument)
5. Nastavitev
5.1 Montaža v stojalo
The Admark K420 is designed for standard 19-inch rack mounting and occupies 1U of rack space. Ensure the rack is stable and has adequate ventilation. Secure the amplifier using appropriate rack screws.
5.2 Priključki na zadnji plošči
The rear panel provides all input and output connections. Refer to the image below for a visual guide.

Image: Rear panel of the Admark K420 amplifier, displaying four XLR input connectors, four SpeakON output connectors, and the power inlet.
5.2.1 Napajalni priključek
Connect the supplied AC power cord to the power inlet on the rear panel and then to a suitable grounded AC power outlet. Ensure the amplifier's power switch is in the OFF position before connecting power.
5.2.2 Vhodne povezave
Use balanced XLR cables to connect your audio source (e.g., mixer, audio processor) to the XLR input connectors (CH A, CH B, CH C, CH D) on the rear panel. Ensure correct polarity.
5.2.3 Izhodne povezave
Connect your loudspeakers to the SpeakON output connectors (OUTPUT CH A, OUTPUT CH B, OUTPUT CH C, OUTPUT CH D) using appropriate SpeakON cables. Ensure the impedance of your loudspeakers matches the amplifier's specifications (minimum 8 Ohms per channel for full power output). Observe correct wiring for stereo or bridged modes if applicable (refer to specific wiring diagrams on the unit or in advanced documentation).
6. Navodila za uporabo
The front panel of the Admark K420 provides controls and indicators for monitoring and adjusting the amplifier's operation.
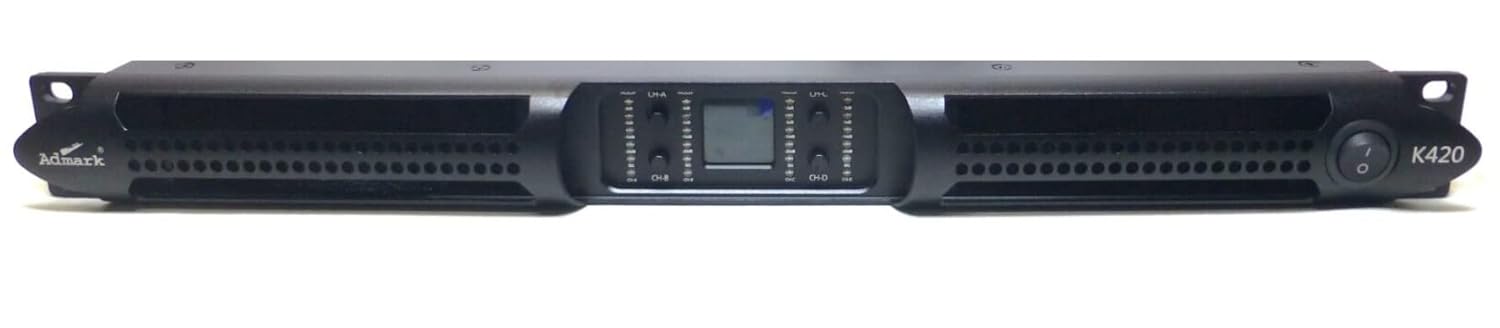
Image: Front panel of the Admark K420 amplifier, featuring the power switch, individual channel level controls, and LED indicators for signal, clip, and protection status.
6.1 Vklop/izklop
- Vklop: Ensure all connections are secure and input levels are turned down. Press the power switch on the front panel. The power indicator LED should illuminate.
- Ugasniti: Turn down all input levels, then press the power switch to turn off the amplifier.
6.2 Kontrole in indikatorji na sprednji plošči
- Stikalo za vklop: Preklopi ampvklop ali izklop dvižnika.
- Kontrole nivoja kanalov: Individual rotary controls for adjusting the output level of each channel (CH A, CH B, CH C, CH D). Start with these controls fully counter-clockwise (minimum) and gradually increase to the desired level.
- Signalna LED: Zasveti, ko je na ustreznem kanalu prisoten zvočni signal.
- Sponka LED: Illuminates when the output signal is clipping (distorting). Reduce the input level or channel level control immediately to prevent damage to speakers and the amplifier.
- Zaščita LED: Zasveti, ko je amplifier's protection circuitry is activated due to fault conditions (e.g., overheating, short circuit). The ampNaprava bo utišala svoj izhod. Izklopite enoto, odpravite težavo in jo nato ponovno vklopite.
6.3 Osnovna operacija
- Ensure all audio sources and speakers are connected correctly.
- Turn down all channel level controls on the amplifier.
- Power on your audio source equipment first, then the Admark K420 amplifier.
- Postopoma povečujte nivo kanalov na amplifier to achieve the desired volume. Monitor the Signal and Clip LEDs.
- When finished, turn down the amplifier's channel level controls, then power off the amplifier, followed by your audio source equipment.
