
1. Uvod
This manual provides detailed instructions for the setup, operation, and maintenance of your XTUGA U-260 Dual Channel UHF Wireless Microphone System. Please read this manual thoroughly before using the product to ensure proper functionality and to maximize its lifespan. Retain this manual for future reference.
2. Izdelek je končanview
The XTUGA U-260 is a professional-grade dual UHF wireless microphone system designed for various applications including church events, karaoke, weddings, and other live events. It features a robust design, adjustable frequencies, and convenient auto-scan and IR pairing functions.
2.1. Vključene komponente
- U-260 UHF Wireless Receiver (1 unit)
- UHF Wireless Handheld Microphones (2 units)
- Antennas (2 units)
- Napajalnik (1 enota)
- Uporabniški priročnik (1 enota)
- Zvočni kabel (1 enota)
- Anti-skid Rings (2 units)
- Power Plugs (2 units)
- Napajalni kabli (2 kosa)

Figure 2.1: All components included with the XTUGA U-260 Wireless Microphone System, including the receiver, two microphones, antennas, power adapter, cables, and anti-skid rings.
2.2. Ključne značilnosti
- Dual UHF Channels: Two independent channels with 100 selectable frequencies each (Channel 1: 540.1 - 564.85 MHz; Channel 2: 568.1 - 592.85 MHz).
- Auto Scan Function: Automatically searches for the least interference channel.
- IR Synchronization: Seamlessly pairs the receiver and microphones.
- Zaklepanje frekvence: Prevents accidental frequency changes.
- Long Range Operation: Up to 492ft (150 meters) operating distance.
- Vzdržljiva konstrukcija: Microphones feature sturdy metal construction.
- Vrhunska kakovost zvoka: High-quality dynamic cartridge designed to limit feedback and interference.
- Rechargeable Microphones: Built-in lithium batteries provide up to 8 hours of use on a 3-hour charge via USB-C.
- Dashboard-Inspired Display: Receiver features a unique display for AF and RF signal indication.

Figure 2.2: The receiver's display screen, featuring a dashboard-inspired design for clear signal indication.
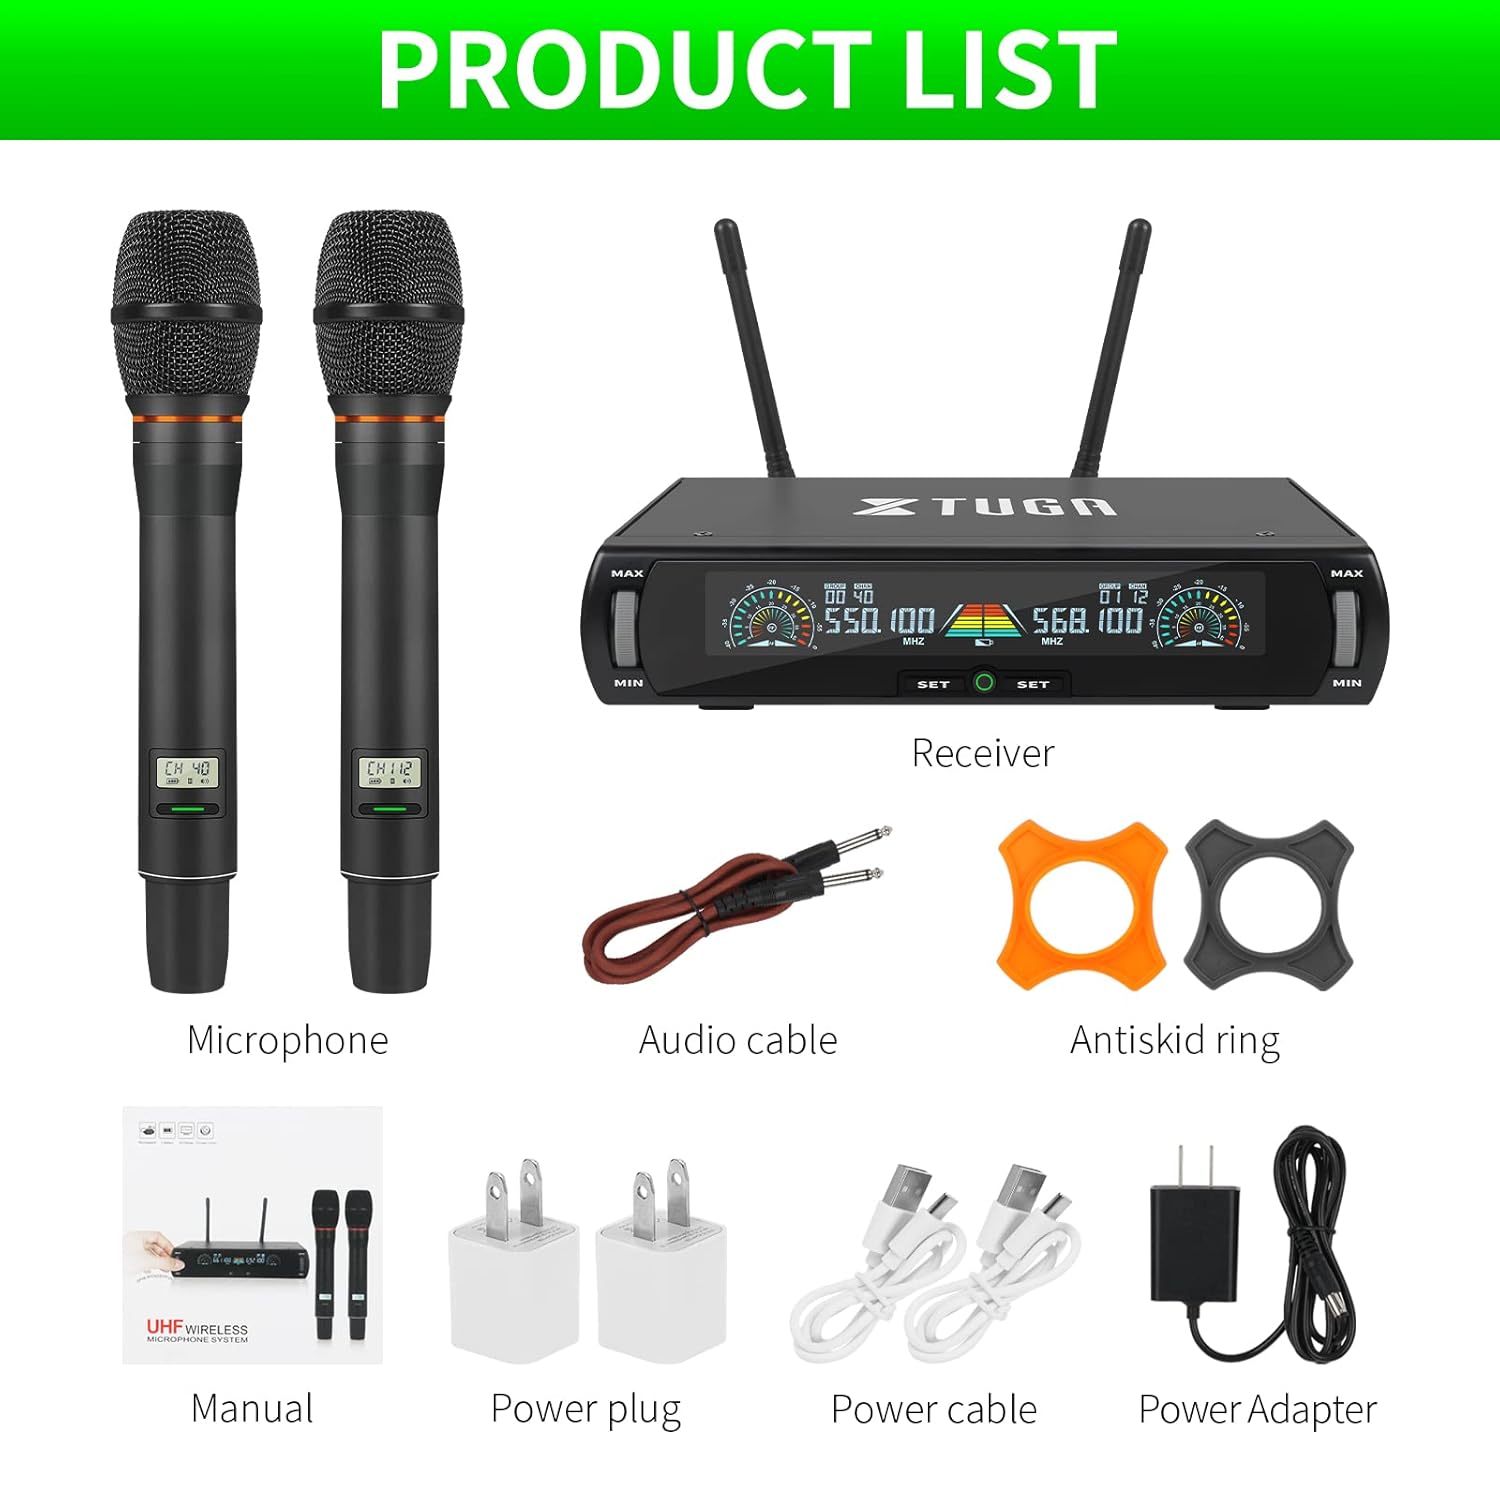
Figure 2.3: Illustration of the microphone's cardioid pickup pattern, designed to reduce noise and capture sound realistically.
2.3. Identifikacija sestavnih delov

Slika 2.4: Podrobno view of the receiver and microphone components.
- Nadzor glasnosti
- Function settings button
- Switch (Power/Mode)
- Zaslon
- Power socket (DC 12V)
- Antenska vtičnica
- XLR izhod
- Audio output (6.35mm/1/4 inch)
- Steel meshed head (Microphone)
- Display screen (Microphone)
- Switch (Microphone Power)
- Type-C charging port (Microphone)
3. Navodila za nastavitev
- Razpakirajte komponente: Previdno vzemite vse predmete iz embalaže.
- Povežite antene: Screw the two antennas into the antenna jacks on the rear of the receiver. Ensure they are securely tightened.
- Napajalni priključek: Connect the power adapter to the receiver's power socket (DC 12V) and plug it into a suitable power outlet.
- Avdio izhod:
- For balanced output, connect XLR cables from the receiver's XLR outputs to your mixer or amplifier.
- For unbalanced output, use the provided 6.35mm (1/4 inch) audio cable to connect the receiver's audio output to your mixer or amplifier.
- Sprejemnik ob vklopu: Press the power switch on the receiver. The display screen should illuminate.
- Polnilni mikrofoni: Before first use, ensure both microphones are fully charged using the provided USB-C cables and power plugs. The microphone display will show charging status.
- Vklopni mikrofoni: Press and hold the power switch on each microphone until its display illuminates.

Figure 3.1: The XTUGA U-260 system ready for operation, showing the receiver with antennas and two handheld microphones.
4. Navodila za uporabo
4.1. Frequency Selection and IR Pairing
The system features an auto-scan function to find clear frequencies and IR synchronization for easy pairing.

Figure 4.1: Diagram illustrating the IR pairing process between the microphone and receiver.
- Initiate Auto Scan: On the receiver, press the "SET" button three times quickly for the desired microphone channel (left or right). The receiver will scan for the clearest available frequency.
- Select Frequency (Optional): If you wish to manually select a frequency after the scan, rotate the volume knob corresponding to the microphone channel you are adjusting.
- IR Pairing: Once a frequency is displayed on the receiver, hold the front of the microphone (where its display is located) close to the IR sensor on the receiver. The IR sensor is located on the bottom left side of the receiver's screen.
- Potrdite seznanjanje: While holding the microphone near the IR sensor, press the "SET" button on the receiver once for the corresponding microphone channel. A small indicator light on the receiver should flash, and the microphone's display will update to show the new frequency, confirming successful pairing. This process may require a couple of attempts to ensure proper alignment and timing.
4.2. Frequency Lock Function
To prevent accidental changes to the selected frequency, use the frequency lock function.

Figure 4.2: Visual representation of the frequency lock function, showing a padlock icon.
- Zakleniti: Press and hold the "SET" button on the receiver for the desired microphone channel until a lock icon appears on the display.
- Za odklepanje: Press and hold the "SET" button again until the lock icon disappears.
4.3. Nadzor glasnosti
Each microphone channel has an independent volume control knob on the receiver. Rotate the "MIN/MAX" knobs to adjust the output volume for each microphone.
4.4. Microphone Charging
The handheld microphones are equipped with built-in rechargeable lithium batteries.

Figure 4.3: Illustration of microphone battery life (8 hours work) and charging time (3 hours) via USB-C.
- Connect a USB-C cable to the charging port at the bottom of the microphone.
- Connect the other end of the USB-C cable to a power adapter or a USB power source.
- A dim red light on the microphone's display bar indicates charging. The light will turn off or change color when fully charged.
- A full charge typically takes approximately 3 hours and provides up to 8 hours of continuous use.
5. Vzdrževanje
- Čiščenje: Use a soft, dry cloth to clean the receiver and microphones. Do not use liquid cleaners or solvents.
- Shranjevanje: Sistem shranjujte na hladnem in suhem mestu, stran od neposredne sončne svetlobe in ekstremnih temperatur, ko ga ne uporabljate.
- Vzdrževanje baterije: For optimal battery life, avoid fully discharging the microphones frequently. Recharge them regularly, especially if storing for extended periods.
- Upravljanje kablov: Ensure all cables are connected securely and are not strained or kinked.
6. Odpravljanje težav
| Težava | Možen vzrok | rešitev |
|---|---|---|
| Ni zvoka. |
|
|
| Motnje ali statični šum. |
|
|
| Mikrofon se ne seznanja. |
|
|
| Microphone battery drains quickly. |
|
|
7. Specifikacije
| Funkcija | Podrobnost |
|---|---|
| Model | U-260 |
| Znamka | XTUGA |
| Faktor oblike mikrofona | Mikrofonski sistem (ročni) |
| Tehnologija povezljivosti | UHF Wireless, XLR |
| Število kanalov | 2 (2x100 selectable frequencies) |
| Frequency Range (Channel 1) | 540.1 - 564.85 MHz |
| Frequency Range (Channel 2) | 568.1 - 592.85 MHz |
| Območje delovanja | Do 492 ft (150 metrov) |
| Polarni vzorec | Unidirectional (Cardioid Pickup) |
| Impedanca | 600 Ohm |
| Razmerje med signalom in hrupom | 120 dB |
| Vir napajanja mikrofona | Vgrajena litijeva baterija za ponovno polnjenje |
| Življenjska doba baterije mikrofona | Do 8 ur |
| Čas polnjenja mikrofona | Approximately 3 hours (via USB-C) |
| Vir napajanja sprejemnika | DC 12V Napajalnik |
| Material | Metal (Microphones) |
| Vključene komponente | Receiver, 2 Handheld Microphones, 2 Antennas, Power Adapter, User Manual, Audio Cable, Anti-skid Rings, Power Plugs, Power Cables |
| Teža predmeta | 2 kg |
8. Garancija in podpora
XTUGA provides a one-year free warranty period for products with authentic brand logos. For any questions, technical assistance, or warranty claims, please contact XTUGA customer support through your purchase platform or the official XTUGA webmesto.
Prosimo, shranite dokazilo o nakupu za potrditev garancije.