
1. Uvod
Thank you for choosing the Karlsson LED Mirror Alarm Clock. This digital alarm clock features a modern design with a clear LED display integrated into a silver mirror surface, showing time and temperature. This manual provides essential information for the safe and efficient use of your device.
Kaj je v škatli:
- Karlsson LED Mirror Alarm Clock
- USB napajalni kabel

Slika 1: Spredaj view of the Karlsson LED Mirror Alarm Clock, showing the time (15:08) and temperature (19°C) on its reflective display.
2. Varnostne informacije
- Naprave ne izpostavljajte vodi ali prekomerni vlagi.
- Izogibajte se ekstremnim temperaturam, neposredni sončni svetlobi ali prašnemu okolju.
- Hraniti izven dosega otrok.
- Use only the provided USB cable or a compatible power adapter.
- When inserting batteries, ensure correct polarity (+/-).
- Ne mešajte starih in novih baterij ali različnih vrst baterij.
- Odstranite baterije, če naprave ne boste uporabljali dlje časa.
3. Izdelek je končanview
Familiarize yourself with the components and controls of your alarm clock.
Sprednji zaslon:
- Prikaz časa: Prikazuje trenutni čas v 12-urnem ali 24-urnem formatu.
- Prikaz temperature: Prikazuje temperaturo okolice v stopinjah Celzija ali Fahrenheita.
Zadnji krmilniki:
- Gumb SET: Used to enter setting modes (time, alarm).
- Gumb GOR: Uporablja se za povečanje vrednosti ali navigacijo po menijih.
- Gumb DOL: Uporablja se za zmanjševanje vrednosti ali navigacijo po menijih.
- MODE/V Button: Used to switch display modes or activate voice control (if available).
- Gumb RESET: Ponastavi napravo na tovarniške nastavitve.
- DC 5V vhod: For connecting the USB power cable.
- Predal za baterije: Holds 3 x AAA batteries for backup power.
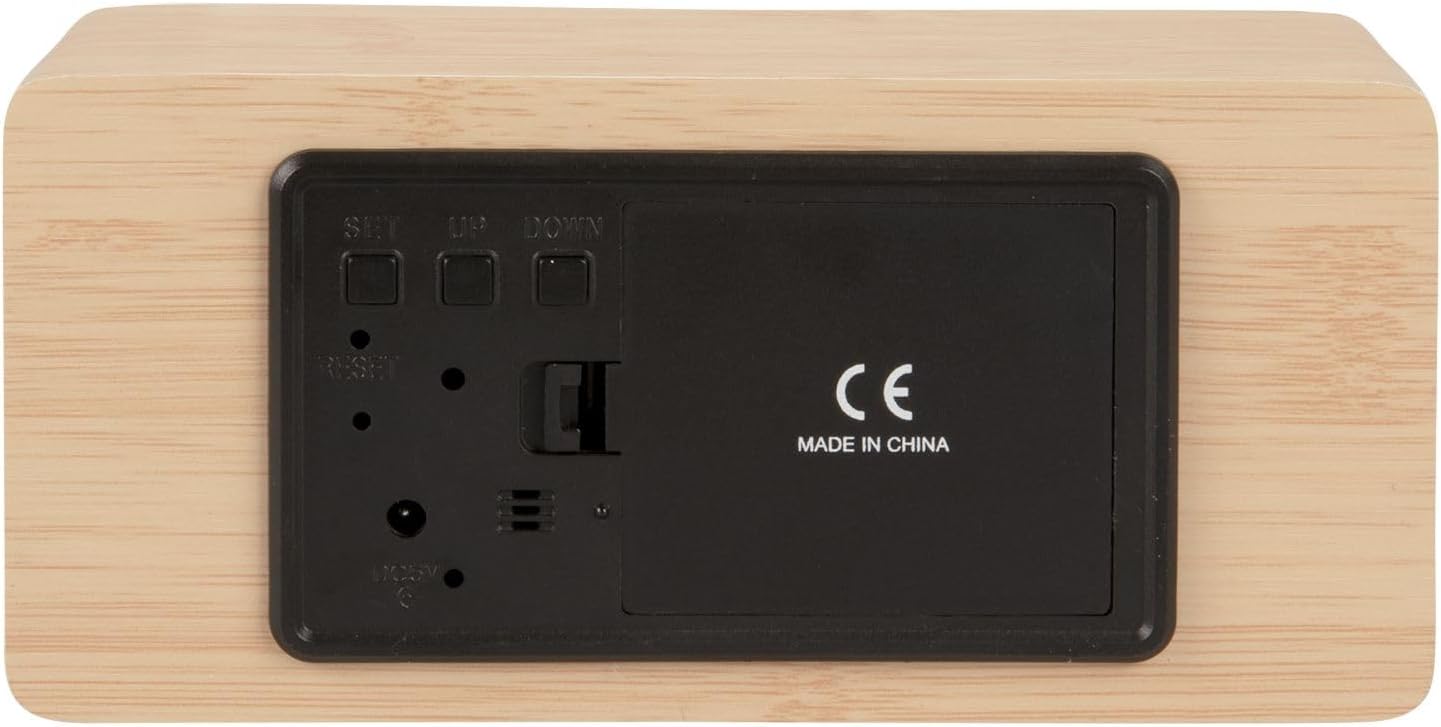
Slika 2: Zadaj view of the alarm clock, highlighting the SET, UP, DOWN buttons, power input, and battery compartment.
4. Nastavitev
Napajanje naprave:
The alarm clock can be powered via the included USB cable or by 3 x AAA batteries (not included) for backup.
- Napajanje USB: Connect the small end of the USB cable to the DC 5V input port on the back of the alarm clock. Connect the other end to a USB power adapter (not included) or a powered USB port.
- Varnostno kopiranje baterije: Open the battery compartment cover on the back of the clock. Insert 3 x AAA batteries, ensuring correct polarity. Close the cover securely. Batteries are primarily for backup and may not power the display continuously.

Slika 3: The USB power cable provided for connecting the alarm clock to a power source.
5. Navodila za uporabo
Nastavitev časa:
- Pritisnite in držite NASTAVI gumb, dokler ne začnejo utripati številke za uro.
- Uporabite UP or DOL gumbi za nastavitev ure.
- Pritisnite NASTAVI ponovno za potrditev ure in premik na nastavitev minut.
- Uporabite UP or DOL gumbe za nastavitev minut.
- Pritisnite NASTAVI to confirm the minutes and exit time setting mode.
Nastavitev alarma:
- Pritisnite NASTAVI button once (do not hold) to cycle through display modes until 'AL' or an alarm icon appears.
- Pritisnite in držite NASTAVI button again until the alarm hour digits flash.
- Uporabite UP or DOL gumbe za nastavitev želene ure budilke.
- Pritisnite NASTAVI to confirm the alarm hour and move to alarm minute setting.
- Uporabite UP or DOL gumbe za nastavitev želenih minut alarma.
- Pritisnite NASTAVI za potrditev in izhod iz načina nastavitve alarma.
- Za vklop/izklop alarma pritisnite UP button while in normal time display mode. An alarm icon will appear/disappear on the display.
Switching Display Modes (12/24 Hour, Temperature Unit):
- V običajnem načinu prikaza časa pritisnite UP gumb za preklapljanje med 12-urnim in 24-urnim formatom časa.
- Pritisnite DOL gumb za preklapljanje med temperaturnimi enotami Celzija (°C) in Fahrenheita (°F).
6. Vzdrževanje
- Clean the alarm clock with a soft, dry cloth.
- Do not use abrasive cleaners, solvents, or harsh chemicals, as these may damage the mirror surface or casing.
- Ensure the device is unplugged and batteries are removed before cleaning.
7. Odpravljanje težav
- Zaslon je prazen: Check if the USB cable is securely connected to a power source. If using batteries, ensure they are inserted correctly and are not depleted.
- Alarm se ne oglasi: Verify that the alarm is set and activated (alarm icon visible on display). Check the alarm volume if adjustable (this model may not have adjustable volume).
- Incorrect time/settings: Pritisnite PONASTAVI button on the back of the unit using a thin object (e.g., a paperclip) to restore factory settings, then re-set the time and alarm.
- Odčitek temperature se zdi netočen: Ensure the clock is placed in a location away from direct heat sources or drafts that could affect ambient temperature readings.
8. Specifikacije
| Številka modela | PTG-KA5879WD |
| Material | Leseni furnir |
| Dimenzije (D x Š x V) | 15 cm x 7 cm x 4.5 cm (približno 5.9 x 2.76 x 1.77 palca) |
| Teža | 245 g (približno 0.54 funta) |
| barva | Light wood casing, silver mirror display |
| Vrsta zaslona | Digitalna LED |
| Posebna funkcija | Alarm |
| Vir napajanja | USB powered (cable included), 3 x AAA batteries (not included) for backup |
9. Garancija in podpora
This product is manufactured by Karlsson. For any support inquiries, warranty information, or service requests, please refer to the retailer where the product was purchased or visit the official Karlsson webZa kontaktne podatke obiščite spletno mesto. Za uveljavljanje garancije shranite dokazilo o nakupu.