
1. Uvod
This manual provides essential information for the proper installation, operation, and maintenance of your SUNMI T2s Lite 15.6-inch Android Point of Sale (POS) system. Please read this manual thoroughly before using the device to ensure optimal performance and safety. Keep this manual for future reference.
2. Varnostne informacije
- Naprave ne izpostavljajte ekstremnim temperaturam, vlagi ali neposredni sončni svetlobi.
- Izogibajte se padcem ali izpostavljanju naprave močnim udarcem.
- Uporabljajte samo napajalnik, ki je priložen napravi. Uporaba napačnega napajalnika lahko povzroči poškodbe ali požar.
- Naprave ne poskušajte razstavljati ali popravljati sami. Obrnite se na usposobljeno servisno osebje.
- Napravo hranite ločeno od vode ali drugih tekočin.
- Med delovanjem zagotovite ustrezno prezračevanje okoli naprave.
3. Vsebina paketa
Preverite, ali so v paketu prisotni vsi elementi:
- SUNMI T2s Lite POS Terminal
- Napajalni adapter
- Napajalni kabel
- Vodnik za hitri začetek (če je primerno)
- Garancijska kartica (če obstaja)
Če kateri koli predmet manjka ali je poškodovan, se nemudoma obrnite na prodajalca.
4. Izdelek je končanview
The SUNMI T2s Lite is an integrated Android-based POS system designed for retail environments. It features a 15.6-inch capacitive touchscreen display and various connectivity options.
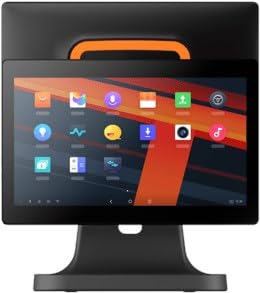
Slika 4.1: Spredaj view of the SUNMI T2s Lite POS system. This image displays the main 15.6-inch touchscreen, which is the primary interface for operating the device. The design is compact and suitable for various retail settings.
4.1 ključni komponenti
- 15.6-palčni zaslon na dotik: High-resolution (1920x1080) capacitive touch interface.
- Gumb za vklop: Located typically on the side or rear for turning the device on/off.
- Vrata USB: For connecting peripherals such as barcode scanners, external printers, or cash drawers.
- Ethernet vrata: Za žično omrežno povezljivost.
- Vhodna moč: Za priključitev napajalnika.
- Sprednja kamera: For specific applications requiring image capture.
5. Nastavitev
5.1 Razpakiranje in namestitev
- Previdno vzemite napravo in vso dodatno opremo iz embalaže.
- Place the POS terminal on a stable, flat surface in a well-ventilated area.
- Ensure there is sufficient space around the device for cable connections and heat dissipation.
5.2 Priključitev napajanja
- Priključite napajalni kabel na napajalnik.
- Plug the power adapter into the power input port on the back of the SUNMI T2s Lite.
- Drugi konec napajalnega kabla priključite v ozemljeno električno vtičnico.
5.3 Initial Boot and Network Connection
- Press and hold the power button until the screen lights up. The device will boot into the Android operating system.
- Za začetno nastavitev sledite navodilom na zaslonu, vključno z izbiro jezika in časovnega pasu.
- Povezava Wi-Fi: Pojdi na Nastavitve > Omrežje in internet > Wi-Fi, izberite svoje omrežje in vnesite geslo.
- Ethernet povezava: Connect an Ethernet cable from your router/switch to the Ethernet port on the device. The device should automatically connect to the wired network.
5.4 Priključitev zunanjih naprav
- Naprave USB: Plug USB peripherals (e.g., barcode scanner, external printer, cash drawer) into the available USB ports. The system will typically recognize them automatically.
- Naprave Bluetooth: Pojdi na Nastavitve > Povezane naprave > Bluetooth, enable Bluetooth, and pair with your desired device.
6. Navodila za uporabo
6.1 Vklop/izklop
- Za vklop: Pritisnite in držite gumb za vklop, dokler se zaslon ne zasveti.
- Za izklop: Press and hold the power button until a power menu appears. Select "Power off" and confirm. Alternatively, a short press of the power button will put the device to sleep.
6.2 Uporaba zaslona na dotik
- Tapnite: Za izbiro elementa ali aktiviranje gumba.
- Tapnite in zadržite: To open context menus or drag items.
- Povlecite: To scroll through lists or navigate between screens.
- Povečava s ščipanjem in ščipanjem prstov: Za povečavo ali pomanjšavo slik oz. web strani.
6.3 Navigacija v operacijskem sistemu Android
- Domači zaslon: The central hub for your applications and widgets.
- Predal za aplikacije: Dostop do vseh nameščenih aplikacij.
- Obvestilna plošča: Povlecite navzdol z vrha zaslona do view obvestila in hitre nastavitve.
- nastavitve: Configure Wi-Fi, Bluetooth, display, sound, and other system options.
6.4 Basic POS Functions
The specific POS functions will depend on the software application installed on your device. Refer to the documentation provided with your POS software for detailed instructions. Generally, you will:
- Launch your POS application from the home screen or app drawer.
- Prijavite se s svojimi uporabniškimi poverilnicami.
- Process transactions using the touchscreen and connected peripherals (e.g., scanning items, accepting payments).
- Print receipts if an external or integrated printer is configured.
7. Vzdrževanje
7.1 Čiščenje naprave
- Always power off and unplug the device before cleaning.
- Uporabite mehko krpo, ki ne pušča vlaken, dampened with water or a mild, non-abrasive cleaner to wipe the screen and exterior surfaces.
- Ne pršite tekočin neposredno na napravo.
- Izogibajte se uporabi agresivnih kemikalij, topil ali abrazivnih materialov.
7.2 Posodobitve programske opreme
Regularly check for and install system and application updates to ensure optimal performance, security, and access to new features. You can usually find system updates in Nastavitve > Sistem > Posodobitev sistema.
7.3 Shranjevanje
When not in use for extended periods, store the device in a cool, dry place, away from direct sunlight and extreme temperatures. If storing for a long time, ensure the battery is charged to about 50% to prolong its lifespan.
8. Odpravljanje težav
Ta razdelek obravnava pogoste težave, na katere lahko naletite. Za bolj zapletene težave se obrnite na podporo strankam.
- Naprava se ne vklopi:
- Prepričajte se, da je napajalnik varno priključen na napravo in delujočo električno vtičnico.
- Preverite, ali vtičnica deluje.
- Try holding the power button for 10-15 seconds to force a restart.
- Zaslon na dotik se ne odziva:
- Ponovno zaženite napravo.
- Prepričajte se, da je zaslon čist in brez umazanije ali tekočin.
- Network connection issues (Wi-Fi/Ethernet):
- Check if the Wi-Fi is enabled and you are connected to the correct network with the right password.
- For Ethernet, ensure the cable is properly connected and your router/switch is working.
- Znova zaženite usmerjevalnik/modem.
- Peripherals (e.g., printer, scanner) not working:
- Prepričajte se, da je periferna naprava pravilno priključena na pravilna vrata.
- Check if the peripheral has its own power supply and is turned on.
- Verify that the necessary drivers or software for the peripheral are installed and configured within your POS application.
9. Specifikacije
The following are key technical specifications for the SUNMI T2s Lite:
| Funkcija | Specifikacija |
|---|---|
| Znamka | SUNMI |
| Proizvajalec | Sunmi |
| Izvorna ločljivost zaslona | 1920 x 1080 slikovnih pik |
| Tehnologija povezljivosti | Bluetooth, Ethernet, USB, WLAN |
| Opis kamere | Frontalni |
| ASIN | B0B53FLFT8 |
10. Garancija in podpora
The SUNMI T2s Lite POS system comes with a standard manufacturer's warranty. Please refer to the warranty card included in your package for specific terms and conditions, including warranty period and coverage details.
For technical support, service, or warranty claims, please contact your authorized SUNMI dealer or the customer support channel specified in your purchase documentation. Ensure you have your product model number (T2s Lite) and ASIN (B0B53FLFT8) ready when contacting support.