
Intellitronix DP1805
Intellitronix LED Digital Gauge Panel User Manual
Model: DP1805G
1. Uvod
This manual provides comprehensive instructions for the installation, operation, and maintenance of your Intellitronix LED Digital Gauge Panel, model DP1805G, designed for 1970-1976 Dodge Duster/Dart vehicles. This digital gauge panel offers a modern, high-tech display for essential vehicle information, enhancing both functionality and interior aesthetics.
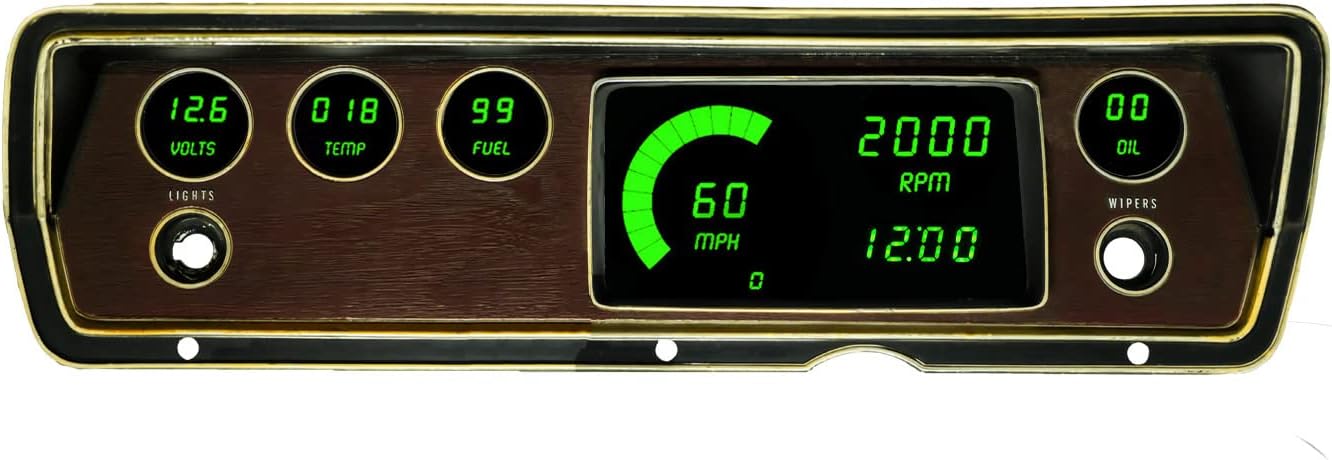
Figure 1: Intellitronix LED Digital Gauge Panel (DP1805G) installed view.
The Intellitronix LED Digital Gauge Panel provides clear, vibrant green digital readouts for critical vehicle parameters, integrated seamlessly into the dashboard.
2. Ključne značilnosti
- Merilnik hitrosti: Displays speeds up to 255 MPH. Includes odometer, trip meter, one-button calibration (tire size, gear ratio, transmission independent), 0-60 time, 1/4 mile elapse time, and high-speed recall. Compatible with electronic cruise control senders or the included Intellitronix S9013 universal speedometer sending unit.
- Tahometer: Displays 0-9999 RPM. Supports 1-2-4-6-8-10-12 cylinder engines. Features high-speed recall.
- Water Temperature Gauge: Displays 18-275°F range. Includes sending unit S8023.
- Oil Pressure Gauge: Reads 0-100 PSI range. Oil pressure sender is included.
- Voltmeter: Displays 7.0 to 18.0 volt range. No sending unit required.
- Fuel Level Gauge: Reads 0-99% range in 1% increments. Works with existing Chrysler 73-10 ohms fuel level sending unit.
- Integrated turn signals and high beam indicator.
- Direct fit printed circuit boards and custom fit "smoked" plexiglass faceplate.
3. Združljivost vozil
This Intellitronix LED Digital Gauge Panel is specifically designed for the following vehicles:
- 1970-1976 Dodge Duster
- 1969-1976 Dodge Dart
- 1968-1977 Plymouth Scamp
- 1968-1977 Plymouth Valiant
- 1973-1976 Dodge Dart Sport
- 1972 Plymouth Demon
Note: The original bezel is NOT included with this product and must be retained from your vehicle for installation.
4. Vsebina paketa
Po odprtju paketa preverite, ali so prisotne vse naslednje komponente:
- Direct fit printed circuit boards
- Custom fit "smoked" plexiglass faceplate
- Universal temperature sending unit (S8023)
- Oil pressure sending unit
- Speedometer sending unit (Intellitronix S9013)
- Necessary senders and sensors for vehicles without electronic transmission or cruise control
- Navodila za namestitev

Figure 2: Included components of the gauge panel kit.
The kit includes the main circuit board, a smoked plexiglass cover, and all necessary sensors and wiring for a complete installation.
5. Nastavitev in namestitev
Installation of the Intellitronix LED Digital Gauge Panel requires automotive electrical and mechanical knowledge. It is highly recommended that installation be performed by a qualified professional to ensure proper function and avoid damage to the product or vehicle.
5.1. Preverjanja pred namestitvijo
- Preden začnete z električnimi deli, odklopite akumulator vozila.
- Prepričajte se, da so vse komponente, navedene v poglavju 4, prisotne in nepoškodovane.
- Familiarize yourself with your vehicle's wiring diagrams, especially for the existing gauge cluster.
- Confirm the correct bushing size for the water temperature sender (1/2 inch is standard, 3/8 inch available upon request at purchase).
5.2. General Installation Steps (Overview)
- Carefully remove the existing gauge cluster from your vehicle's dashboard.
- Transfer the original bezel to the new Intellitronix digital gauge panel.
- Connect the new sending units (temperature, oil pressure, speedometer) to their respective locations on the engine/transmission.
- Wire the gauge panel according to the detailed instructions provided in the product packaging. This typically involves connecting power, ground, illumination, and signal wires from the sending units.
- Mount the new digital gauge panel into the dashboard opening.
- Ponovno priklopite akumulator vozila.
- Perform initial calibration and testing as described in the operating instructions.
Refer to the specific installation instructions included with your product for detailed wiring diagrams and step-by-step procedures.
6. Navodila za uporabo
Once installed, your Intellitronix LED Digital Gauge Panel is designed for intuitive operation. Most functions are automatic, with specific calibration and recall features accessible via a single button.
6.1. Speedometer Functions
- Prikaz hitrosti: Shows current vehicle speed in MPH.
- Števec kilometrov: Spremlja skupno prevoženo razdaljo.
- Merilnik poti: Tracks distance for a single trip. Reset by pressing and holding the calibration button.
- One-Button Calibration: Allows for easy calibration regardless of tire size, gear ratio, or transmission type. Follow the specific calibration steps in the included manual.
- 0-60 Time: Measures acceleration time from 0 to 60 MPH.
- 1/4 Mile Elapse Time: Measures time to complete a quarter-mile.
- High Speed Recall: Recalls the maximum speed achieved.
6.2. Tachometer Functions
- Prikaz vrtljajev: Shows current engine revolutions per minute.
- Cylinder Selection: Automatically or manually configurable for 1, 2, 4, 6, 8, 10, or 12 cylinder engines.
- High Speed Recall: Recalls the maximum RPM achieved.
6.3. Other Gauge Displays
- Temperatura vode: Displays engine coolant temperature.
- Tlak olja: Displays engine oil pressure.
- Voltmeter: Displays vehicle system voltage.
- Raven goriva: Displays fuel tank level as a percentage.
7. Vzdrževanje
The Intellitronix LED Digital Gauge Panel is designed for long-lasting performance with minimal maintenance.
- Čiščenje: To clean the plexiglass faceplate, use a soft, lint-free cloth and a mild, non-abrasive cleaner specifically designed for plastics or automotive interiors. Avoid harsh chemicals or abrasive materials that could scratch the surface.
- Električne povezave: Občasno preverite vse električne povezave, da se prepričate, da so varne in brez korozije.
- Celovitost senzorja: Ensure all sending units (temperature, oil pressure, speedometer) are securely mounted and their wiring is intact.
8. Odpravljanje težav
If you encounter issues with your digital gauge panel, refer to the following common troubleshooting steps. For more complex problems, consult a professional automotive technician or contact Intellitronix customer support.
| Težava | Možen vzrok | rešitev |
|---|---|---|
| Gauge not illuminating or no display. | No power, blown fuse, loose ground connection. | Check vehicle fuses. Verify power and ground connections to the gauge panel. Ensure battery is charged. |
| Inaccurate speedometer reading. | Incorrect calibration, faulty speedometer sender. | Perform speedometer calibration as per the included instructions. Check the speedometer sender and its wiring. |
| Inaccurate temperature/oil pressure/fuel reading. | Faulty sending unit, incorrect wiring to sender. | Verify the correct sending unit is installed and properly wired. Check for shorts or open circuits in the sender wiring. |
| Tachometer not reading or reading incorrectly. | Incorrect cylinder setting, faulty signal wire connection. | Ensure the tachometer is set to the correct number of cylinders. Check the tachometer signal wire connection to the ignition system. |
9. Specifikacije
| Parameter | Vrednost |
|---|---|
| Znamka | Intellitronix |
| Številka modela | DP1805 |
| Barva zaslona | Zelena LED |
| Območje merilnika hitrosti | 0-255 MPH |
| Območje tahometra | 0-9999 RPM |
| Območje temperature vode | 18-275 °F |
| Območje tlaka olja | 0-100 PSI |
| Območje voltmetra | 7.0-18.0 voltov |
| Območje nivoja goriva | 0-99% (Chrysler 73-10 ohms sender compatible) |
| Material | Copper, Fiberglass, Acrylic |
| Mere izdelka (D x Š x V) | 10 x 8 x 4 palcev |
| Teža predmeta | 3 funtov |
10. Garancija in podpora
For information regarding product warranty, technical support, or replacement parts, please contact Intellitronix directly.
Lahko obiščete njihovega uradnika website or use the contact information provided in the original product packaging.
Visit the Intellitronix Store on Amazon za več informacij o izdelku in vire podpore.
Ask a question about this manual
Ask about setup, troubleshooting, compatibility, parts, safety, or missing instructions. Manuals+ will review the question and use this page’s manual context to help answer it.