
1. Uvod
This manual provides detailed instructions for the safe and efficient operation of your InFocus P120 INL412 Multimedia Projector (Model INL4128). Please read this manual thoroughly before using the projector and keep it for future reference. This projector is designed for high-quality image projection, suitable for various applications including presentations, home entertainment, and gaming.
2. Varnostne informacije
Za preprečitev poškodb projektorja in zagotovitev varnosti uporabnika upoštevajte naslednje varnostne ukrepe:
- Prezračevanje: Zagotovite zadostno prezračevanje okoli projektorja. Ne blokirajte prezračevalnih odprtin. Vzdržujte minimalno razdaljo 30 cm (12 palce) od sten ali drugih predmetov.
- vir energije: Uporabljajte samo navedeni napajalnik in glasnosttage. Varno priključite napajalni kabel.
- Toplota: The projector generates heat during operation. Do not touch the projector's vents or exhaust areas directly after use.
- Svetlobna moč: Ne glejte neposredno v lečo projektorja, ko jeamp je vklopljena, saj lahko močna svetloba povzroči poškodbe oči.
- Umestitev: Projektor postavite na stabilno, ravno površino. Izogibajte se postavljanju na neposredno sončno svetlobo, v bližino virov toplote ali na mesta z visoko vlažnostjo ali prahom.
- Čiščenje: Pred čiščenjem izključite napajalni kabel. Uporabite mehko, suho krpo. Ne uporabljajte tekočih ali aerosolnih čistil.
- Servisiranje: Projektorja ne poskušajte servisirati sami. Vsa servisna dela prepustite usposobljenemu serviserju.
3. Izdelek je končanview
3.1 Top Panel and Lens Area
The top panel features the control buttons for basic operation and the lens area with focus and zoom adjustments.

Slika 3.1: Zgornji del view of the InFocus P120 INL412 projector, highlighting the control panel on the right and the lens adjustment area on the left. The InFocus logo is visible on the top surface.
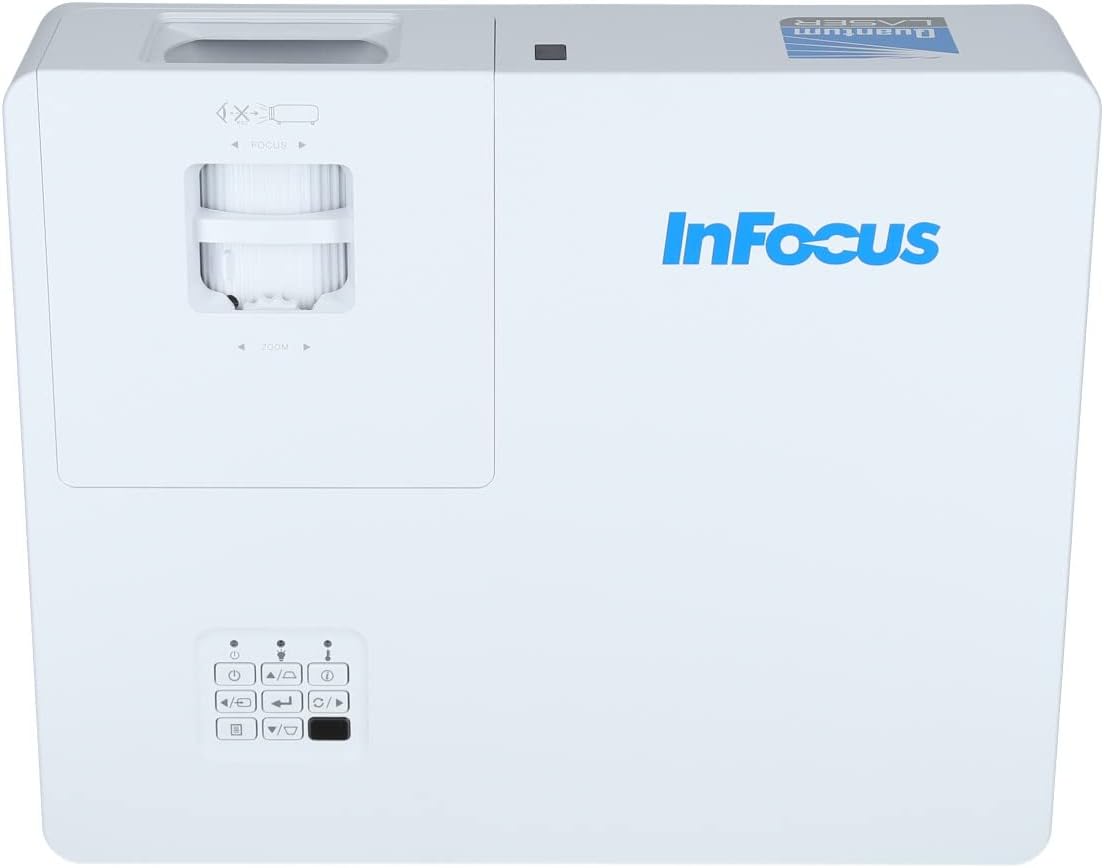
Slika 3.2: Zapiralo view of the projector's top panel, showing the focus and zoom rings near the lens opening and the array of control buttons for power, menu, source selection, and navigation.
3.2 Priključki na zadnji plošči
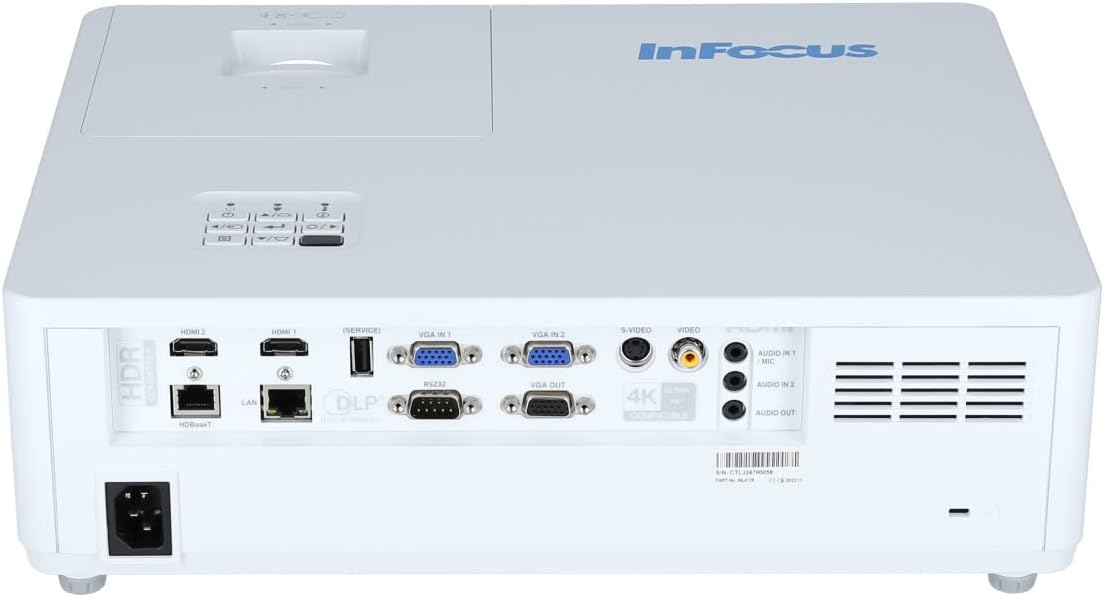
The rear panel provides various input and output ports for connecting external devices.

Figure 3.3: Rear panel of the InFocus P120 INL412 projector, displaying a comprehensive array of connectivity options including HDMI (x2), USB, S-Video, Ethernet (LAN), VGA In (x2), VGA Out, RS232, and Audio In/Out ports. The power input is located on the bottom left.
Key ports include:
- HDMI 1 in 2: For connecting high-definition digital video and audio sources.
- USB: For connecting USB devices, potentially for media playback or firmware updates.
- S-Video: For connecting older video sources.
- VGA IN 1 & 2: For connecting computers or other devices with VGA output.
- VGA IZHOD: Za priklop na zunanji monitor.
- Ethernet (LAN): Za omrežno povezljivost in nadzor.
- Audio IN 1 & 2 / Audio OUT: Za analogne avdio povezave.
- RS232: Za serijski nadzor.
- Vhodna moč: Za priključitev napajalnega kabla.
3.3 Front and Side Panels
The front panel houses the projection lens and front ventilation, while the side panels feature additional ventilation grilles.

Slika 3.4: Spredaj view of the InFocus P120 INL412 projector, displaying the main projection lens on the right and the extensive front ventilation grille on the left, crucial for heat dissipation.
Slika 3.5: stran view of the InFocus P120 INL412 projector, illustrating the side ventilation grilles that contribute to maintaining optimal operating temperature.
4. Nastavitev
4.1 Postavitev projektorja
Position the projector on a stable, flat surface or mount it securely. Ensure the projector is within the optimal projection distance for your screen size. Maintain clear space around the projector for proper ventilation.
4.2 Povezovanje naprav
Before connecting any cables, ensure the projector and all source devices are powered off.
- HDMI povezava: Connect an HDMI cable from your source device (e.g., laptop, Blu-ray player, gaming console) to either the HDMI 1 or HDMI 2 port on the projector.
- VGA povezava: Connect a VGA cable from your computer to either VGA IN 1 or VGA IN 2. For audio, connect a separate audio cable from your computer's audio output to the corresponding Audio IN port on the projector.
- USB povezava: Insert a USB drive into the USB port for media playback (if supported by firmware) or service functions.
- Ethernetna (LAN) povezava: Connect an Ethernet cable to the LAN port for network control or updates.
- Avdio izhod: If using external speakers, connect an audio cable from the Audio OUT port on the projector to your audio system.
4.3 Napajalni priključek
Connect the power cord to the projector's power input and then plug the other end into a grounded electrical outlet.
5. Navodila za uporabo
5.1 Vklop/izklop
- Vklop: Pritisnite Moč button on the projector's control panel or the remote control. The power indicator light will change.
- Ugasniti: Pritisnite Moč button again. A confirmation message may appear. Press the button a second time to confirm shutdown. Allow the projector to cool down before unplugging it.
5.2 Prilagajanje ostrenja in povečave
Obrnite obroč za ostrenje okoli objektiva, dokler slika ni ostra in jasna. Z obročem za zoom prilagodite velikost slike tako, da se prilega zaslonu.
5.3 Izbira vhodnega vira
Pritisnite Vir button on the control panel or remote control to cycle through available input sources (HDMI 1, HDMI 2, VGA 1, VGA 2, S-Video, USB). Select the input corresponding to your connected device.
5.4 Navigacija po meniju
Uporabite meni button to access the on-screen display (OSD) menu. Use the arrow buttons to navigate through menu options and the Vnesite button to select. Press meni spet za izhod.
6. Vzdrževanje
6.1 Čiščenje leče
Lečo nežno obrišite z mehko krpo, ki ne pušča vlaken in je posebej zasnovana za optične površine. Ne uporabljajte abrazivnih čistil ali prekomerne sile, saj lahko lečo opraskate.
6.2 Cleaning the Projector Exterior
Use a soft, dry cloth to clean the projector's casing. For stubborn dirt, dampen the cloth slightly with water, then wipe dry immediately. Avoid getting liquids into the projector's openings.
6.3 Nega prezračevanja
Regularly check the projector's ventilation grilles for dust accumulation. Use a soft brush or a vacuum cleaner with a brush attachment to gently remove dust from the vents to ensure proper airflow and prevent overheating.
7. Odpravljanje težav
7.1 Slika ni prikazana
- Prepričajte se, da je projektor vklopljen in da lučka indikatorja napajanja sveti neprekinjeno.
- Verify that the video cable (HDMI, VGA, etc.) is securely connected to both the projector and the source device.
- Preverite, ali je na projektorju izbran pravilen vhodni vir.
- Confirm that the source device (laptop, player) is powered on and outputting a signal.
7.2 Slika je zamegljena ali neizostrena
- Prilagodite obroč za ostrenje na objektivu projektorja, dokler slika ni ostra.
- Prepričajte se, da je projektor na pravilni razdalji od platna.
- Očistite lečo projektorja, če je videti umazana.
7.3 Ni zvoka
- If using HDMI, ensure the source device's audio output is set to HDMI.
- If using VGA, ensure a separate audio cable is connected from the source to the projector's Audio IN port.
- Preverite nastavitve glasnosti na projektorju in izvorni napravi.
- If using external speakers, ensure they are properly connected to the Audio OUT port and powered on.
8. Specifikacije
| Funkcija | Podrobnost |
|---|---|
| Znamka | InFocus |
| Proizvajalec | V fokusu |
| Ime modela | P120 INL412 |
| Številka modela | INL4128 |
| leto | 2023 |
| Strojni vmesnik | Ethernet, HDMI, S-Video, USB |
| Število elementov | 1 |
| Razmerje stranic | 16:9 |
| Wattage | 341 vatov |
| Baterije priložene | št |
| Potrebne baterije | št |
| Faktor oblike | Namizje |
| Vrsta namestitve | Namizni nosilec |
| Priložen daljinski upravljalnik | ja |
| Dimenzije izdelka | 56.13 x 46.48 x 25.15 cm |
| Teža predmeta | 5.5 kg |
| Največja velikost slike | 308.28 palcev |
| Najmanjša velikost slike | 910.63 milimetrov |
| Prvi razpoložljivi datum | 5. januar 2022 |
9. Garancija in podpora
For warranty information and technical support, please refer to the documentation included with your purchase or visit the official InFocus webspletnega mesta. Shranite dokazilo o nakupu za uveljavljanje garancije.