
1. Izdelek je končanview
The iTOMA CKS209 is a versatile alarm clock radio designed to enhance your bedside experience. It features dual wireless charging capabilities for your smartphone and earbuds, along with two additional USB ports for other devices. Enjoy your favorite music via Bluetooth 5.1 technology or tune into digital FM radio. The clock includes dual alarms with customizable wake-up modes, a large 1.4-inch orange LED display with auto and manual dimmer control, and a 2-level orange night light.
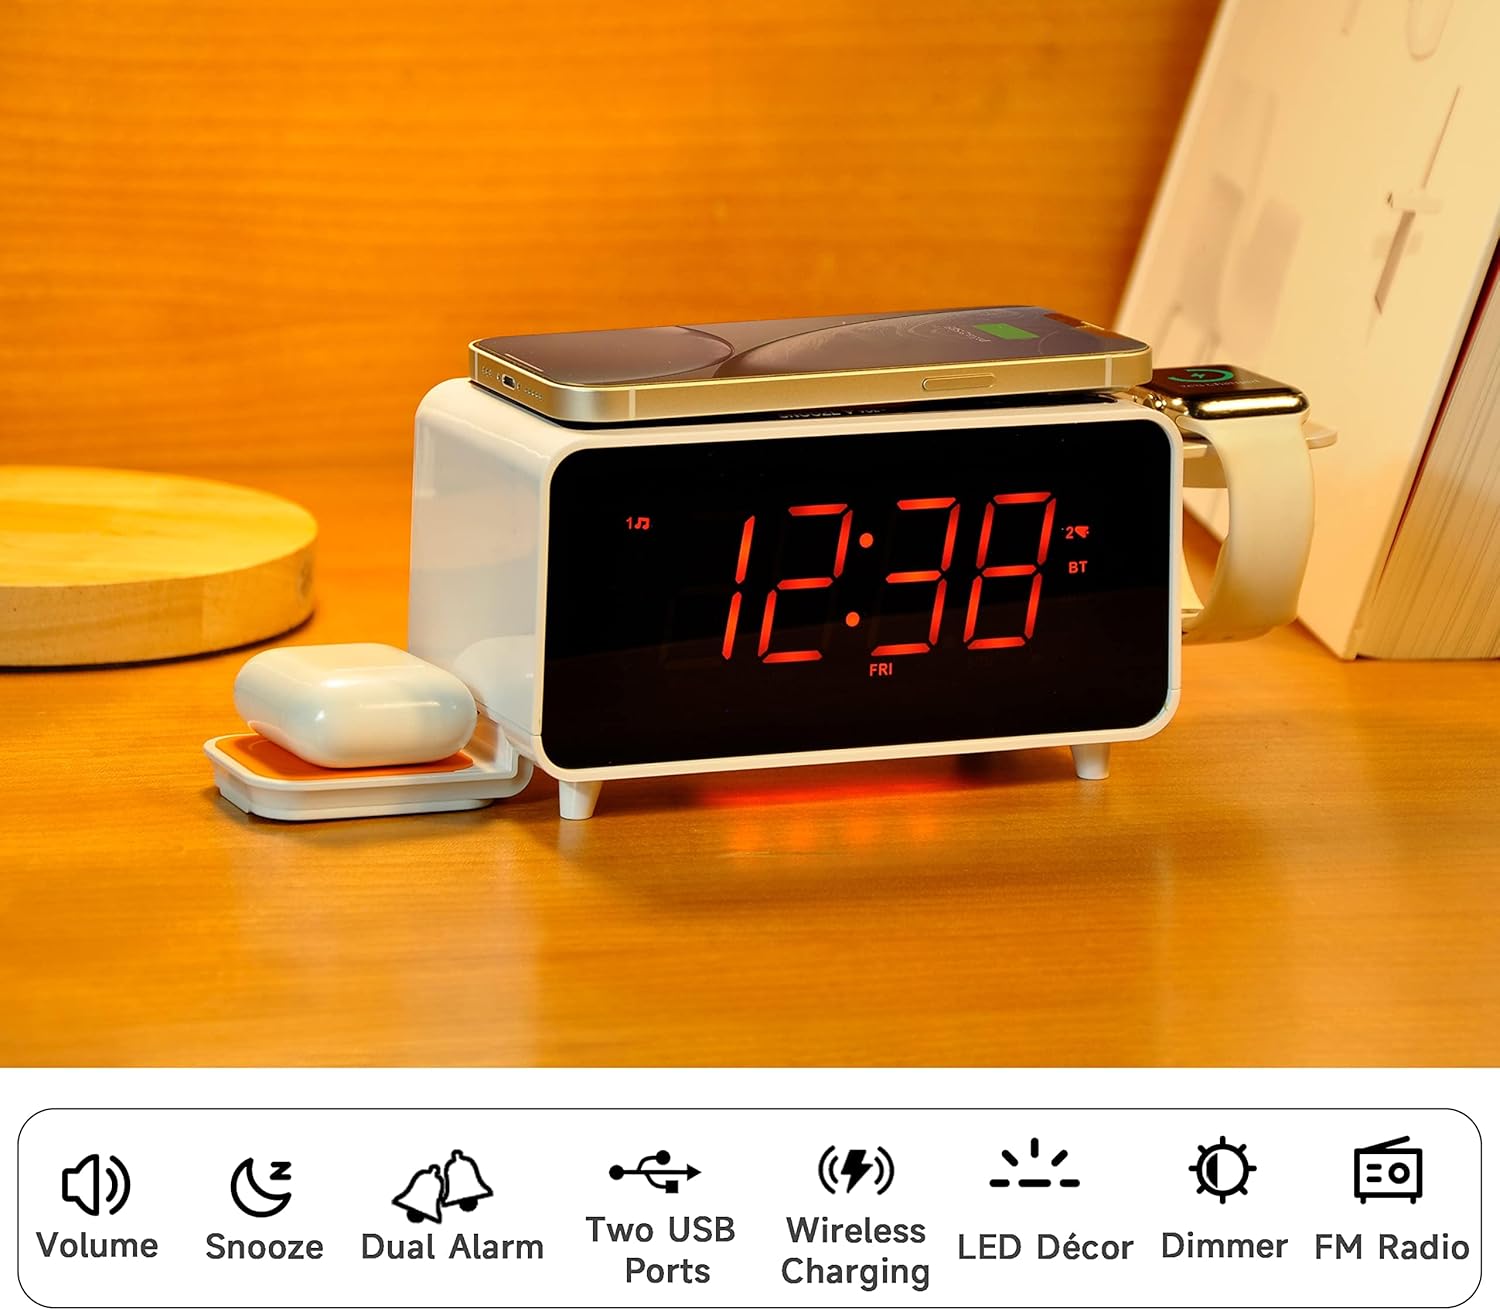
Image: The iTOMA CKS209 alarm clock radio displaying the time, with a smartphone wirelessly charging on top, earbuds on a side wireless charging pad, and a smartwatch on its holder.
Ključne značilnosti:
- Brezžično polnjenje: 15W ultra-fast wireless charger for smartphones and 3W foldable earphone wireless charger. Includes a watch wireless charging support holder (charging cable not included).
- Bluetooth 5.1: Seamless audio streaming from your Bluetooth-enabled devices.
- Dvojna vrata USB: One USB-A and one USB-C port (5V 2.1A) for additional device charging.
- Smart Dual Alarm: Set two independent alarms with options to wake to radio or buzzer. Features snooze, crescendo wake-up, 15-level volume control, and 4 alarm week modes (Every day, single day, weekdays, weekends).
- 1.4" Orange LED Display: Clear 12/24-hour format display with 3-level dimmer brightness and auto-dimmer function.
- Nočna luč: 2-level orange night light for ambient illumination.
- Digital FM Radio: 20 programmable preset stations with external wire antenna for enhanced reception.
- Rezervna baterija: Maintains time and alarm settings during power interruptions.
2. Nastavitev
2.1 Napajalni priključek
- Unpack the iTOMA CKS209 unit and all accessories.
- Connect the provided AC adapter to the DC IN jack on the back of the unit.
- Plug the AC adapter into a standard wall outlet. The display will light up, and the clock will automatically set the time.
2.2 Initial Time Setting (Manual)
While the clock features auto-time setting, you can manually adjust the time, date, and year if needed.
- Pritisnite in držite URA SET button located on the top panel until the year flashes on the display.
- Uporabite TUNE +/- buttons (or rotate the SNOOZE/VOL dial) to adjust the year.
- Pritisnite URA SET again to confirm and move to the month setting. Repeat the process for month, day, hour, and minute.
- Pritisnite URA SET one last time to save your settings.
2.3 Time Zone and Daylight Saving Time (DST)
- Pritisnite in držite SPANJE/ČASOVNI PAS button to enter time zone setting.
- Uporabite TUNE +/- buttons (or rotate the SNOOZE/VOL dial) to select your desired time zone.
- Pritisnite SPANJE/ČASOVNI PAS again to toggle DST ON or OFF.
- Pritisnite SPANJE/ČASOVNI PAS one last time to confirm and exit.
Video: This video demonstrates the time setting and Bluetooth operation for a similar iTOMA CKS207 model, which shares similar functionalities with the CKS209.
3. Navodila za uporabo
3.1 Brezžično polnjenje
The iTOMA CKS209 features multiple wireless charging options:
- Smartphone Wireless Charging: Place your Qi-compatible smartphone on the top charging pad. The charging indicator on the display will illuminate to confirm charging.
- Earbud Wireless Charging: Place your Qi-compatible earbuds on the foldable 3W wireless charging pad located on the side.
- Smartwatch Holder: Utilize the integrated holder for your smartwatch. Note: A separate smartwatch charging cable (not included) is required and connects to one of the USB ports.
Image: A smartphone is placed on the top surface of the iTOMA CKS209, indicating wireless charging in progress.
Image: A close-up of the side of the iTOMA CKS209 showing the integrated holder designed for a smartwatch.
3.2 vrata za polnjenje USB
In addition to wireless charging, the unit provides two USB ports (one Type-A and one Type-C) on the back for wired charging of other devices.
- Connect your device's USB charging cable to either the USB-A or USB-C port on the back of the alarm clock.
- Ensure your device is properly connected and charging.
Image: A smartphone is connected via a USB cable to one of the charging ports on the back of the iTOMA CKS209.
3.3 Bluetooth zvočnik
Brezžično pretakajte zvok iz naprav, ki podpirajo Bluetooth.
- Pritisnite VKLOP/IZKLOP gumb za vklop enote.
- Pritisnite NAČIN button repeatedly until 'BT' appears on the display and starts flashing, indicating pairing mode.
- On your mobile device, enable Bluetooth and search for 'iTOMA CKS209' (or similar model name).
- Select the device to pair. Once connected, 'BT' will stop flashing and remain solid.
- You can now play audio from your device through the alarm clock speaker. Adjust volume using the GLASNOST +/- buttons or your mobile device.

Image: A smartphone displaying music playback is positioned near the iTOMA CKS209, indicating a Bluetooth connection.
3.4 FM radio
Poslušajte svoje najljubše FM radijske postaje.
- Pritisnite VKLOP/IZKLOP gumb za vklop enote.
- Pritisnite NAČIN button repeatedly until the FM frequency appears on the display.
- For automatic station search, press and hold the TUNE +/- buttons. The radio will scan and save available stations.
- For manual tuning, short press the TUNE +/- buttons to adjust the frequency step by step.
- Glasnost prilagodite s tipko GLASNOST +/- gumbi.
3.5 Dvojna budilka
Set up to two independent alarms.
- Pritisnite AL1 or AL2 button to select the desired alarm. The alarm time will flash on the display.
- Uporabite TUNE +/- buttons (or rotate the SNOOZE/VOL dial) to set the desired alarm hour and minute.
- Pritisnite AL1 or AL2 again to select the wake-up source (Buzzer or FM Radio).
- Pritisnite AL1 or AL2 again to select the alarm week mode (Every day, single day, weekdays, or weekends).
- Pritisnite AL1 or AL2 one last time to confirm and activate the alarm. The alarm indicator will appear on the display.
- Za izklop alarma pritisnite ustrezno tipko AL1 or AL2 gumb, dokler indikator alarma ne izgine z zaslona.
- Funkcija dremeža: Ko se oglasi alarm, pritisnite tipko DREMEŽ gumb za začasno utišanje alarma za 9 minut.

Image: The iTOMA CKS209 alarm clock radio displaying the time on a bedside table, ready for use.
3.6 Display & Dimmer Control
Adjust the brightness of the 1.4-inch orange LED display.
- Kratek pritisk na DIMMER button to cycle through 3 brightness levels (High, Medium, Low).
- The unit also features an auto-dimmer function that adjusts display brightness based on ambient light conditions.
Image: A visual representation of the iTOMA CKS209 display at different brightness levels, from bright to invisible, and the auto-dimmer setting.
3.7 Nočna lučka
Activate the ambient orange night light.
- Pritisnite LED button to turn the night light ON.
- Pritisnite LED button again to cycle through 2 brightness levels.
- Pritisnite LED button a third time to turn the night light OFF.
4. Vzdrževanje
To ensure the longevity and optimal performance of your iTOMA CKS209, follow these maintenance guidelines:
- Čiščenje: Use a soft, dry cloth to clean the exterior of the unit. Do not use liquid cleaners or abrasive materials, as they may damage the finish.
- Prezračevanje: Za preprečitev pregrevanja enote poskrbite, da bo nameščena v dobro prezračevanem prostoru. Ne blokirajte prezračevalnih odprtin.
- Napajalni kabel: Redno pregledujte napajalni kabel glede morebitnih poškodb. Če je poškodovan, prenehajte z uporabo in se obrnite na podporo strankam.
- Shranjevanje: Če enoto shranjujete dalj časa, jo izključite iz električne vtičnice in jo shranite na hladnem in suhem mestu.
5. Odpravljanje težav
If you encounter any issues with your iTOMA CKS209, please refer to the following common troubleshooting steps:
- Brez napajanja/izklop zaslona:
- Ensure the AC adapter is securely plugged into both the unit and a working wall outlet.
- Preverite, ali vtičnica deluje, tako da vanjo priključite drugo napravo.
- Brezžično polnjenje ne deluje:
- Preverite, ali je vaša naprava združljiva s standardom Qi.
- Prepričajte se, da je vaša naprava pravilno centrirana na polnilni plošči.
- Odstranite vse debele ovitke za telefon ali kovinske predmete, ki bi lahko motili polnjenje.
- Potrdite, da je enota vklopljena.
- Težave s povezovanjem Bluetooth:
- Ensure the alarm clock is in Bluetooth pairing mode ('BT' flashing).
- Preverite, ali je Bluetooth omogočen v vaši mobilni napravi.
- Move your mobile device closer to the alarm clock.
- Če je bila naprava že seznanjena, poskusite prekiniti seznanitev in jo znova seznaniti.
- FM Radio Static/Poor Reception:
- Extend the external wire antenna fully for better reception.
- Reposition the antenna or the unit to find a location with better signal strength.
- Alarm se ne oglasi:
- Ensure the alarm (AL1 or AL2) is activated and its indicator is visible on the display.
- Preverite nastavitev glasnosti alarma.
- Verify the alarm time and day settings are correct.
6. Specifikacije
| Funkcija | Podrobnost |
|---|---|
| Znamka | iTOMA |
| Številka modela | CKS209-CA |
| barva | Orange Led Display |
| Dimenzije izdelka | 16.8 x 3.81 x 9.1 cm |
| Teža predmeta | 820 g |
| Material | Plastika |
| Vrsta zaslona | LED |
| Posebne lastnosti | Auto Dimmable, Charging Port, Charging Station, Foldable, Multiple Time Zone |
| Brezžično polnjenje | 15W (Phone), 3W (Earbuds) |
| USB polnjenje | USB-A, USB-C (5V 2.1A) |
| Različica Bluetooth | 5.1 |
| FM frekvenca | 87.5-108 MHz |
7. Garancija in podpora
For warranty information, technical support, or any inquiries regarding your iTOMA CKS209, please refer to the documentation included in your product packaging or visit the official iTOMA webspletno mesto. Za pomoč se lahko obrnete tudi neposredno na prodajalca.