
1. Izdelek je končanview
Thank you for choosing the Arlux Lighting Onyx R2 Round Recessed LED Spot Light. This product is designed for indoor use, providing efficient and modern illumination. This manual provides essential information for the safe installation, operation, and maintenance of your new LED spot light.
Varnostne informacije
- Pred namestitvijo in uporabo natančno preberite vsa navodila.
- Namestitev mora opraviti usposobljen električar v skladu z lokalnimi električnimi predpisi in predpisi.
- Ensure the power supply is disconnected at the main circuit breaker before installation, maintenance, or cleaning.
- Izdelka ne spreminjajte na noben način. Nepooblaščene spremembe lahko razveljavijo garancijo in predstavljajo varnostno tveganje.
- Ta izdelek je namenjen samo za uporabo v zaprtih prostorih. Ne izpostavljajte ga vlagi ali ekstremnim temperaturam.
- Ne glejte neposredno v LED-žarnico, ko je prižgana, saj lahko to povzroči preobremenitev ali poškodbo oči.
- Embalažni material hranite izven dosega otrok.
2. Vsebina paketa
Preden nadaljujete z namestitvijo, preverite, ali so vse komponente prisotne in nepoškodovane.
- 1 x Arlux Lighting Onyx R2 Round Recessed LED Spot Light
- 1 x LED Driver (Power Supply)
- Montažna oprema

Image 2.1: The Arlux Lighting Onyx R2 Recessed LED Spot Light shown with its separate LED driver (power supply) and connecting cable.
3. Specifikacije
| Znamka | Arlux Lighting |
| Model | Onyx R2 |
| Vrsta | Recessed LED Spot Light |
| oblika | Okrogla |
| Poraba energije | 18 vatov |
| Svetlobni tok | 1550 lumnov |
| Barvna temperatura | 4000 Kelvinov (nevtralno bela) |
| Material | Aluminij |
| barva | Bela |
| Teža predmeta | 390 gramov |
| Vrsta namestitve | Stropna montaža (vgradna) |
| Vir napajanja | Električni na kabel |
| Posebne uporabe | Ceiling illumination for indoor spaces |
4. Nastavitev in namestitev
4.1 Kontrolni seznam pred namestitvijo
- Potrebna orodja: Drill, hole saw (appropriate diameter for recess), wire strippers, screwdriver, voltage tester.
- Napajanje: Ensure the electrical circuit is compatible with the spot light's power requirements (18W).
- Ceiling Space: Verify sufficient clearance above the ceiling for the fixture and driver.
- Varnost na prvem mestu: Preden začnete z električnimi deli, vedno izklopite glavno napajanje na odklopniku.
4.2 koraki namestitve
- Pripravite strop: Using an appropriate hole saw, cut a circular opening in the ceiling at the desired installation location. Refer to the product specifications for the exact cutout diameter (typically around Ø200-210mm for a Ø225mm fixture).
- Connect the Driver: Connect the AC input wires from your household electrical supply to the input terminals of the LED driver. Ensure correct polarity (Live, Neutral, Earth) as indicated on the driver. Secure connections firmly.
- Connect the Spot Light: Plug the DC output cable from the LED driver into the corresponding input port on the back of the Onyx R2 spot light. This connection is typically a simple plug-and-play connector.
- Insert the Spot Light: Gently push the spring clips on the sides of the spot light upwards and insert the fixture into the prepared ceiling opening. The spring clips will hold the light securely in place.
- Končno preverjanje: Ensure the spot light is flush with the ceiling surface and securely mounted.
- Obnovi moč: Ponovno vklopite glavno napajanje na odklopniku.
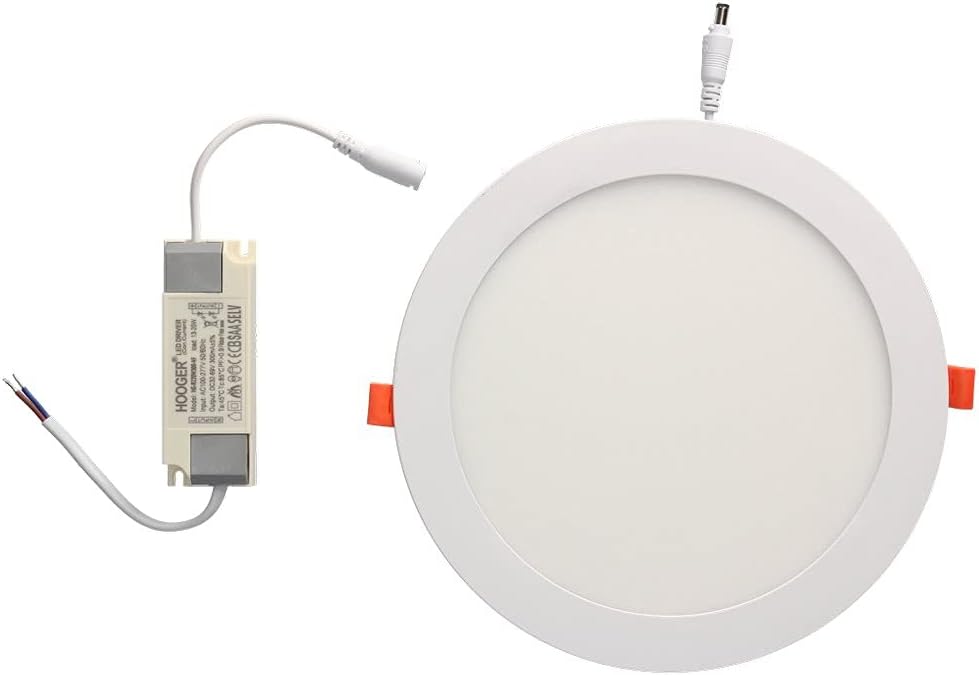
Image 4.1: The Arlux Lighting Onyx R2 Recessed LED Spot Light shown installed flush within a ceiling, providing ambient lighting.
5. Navodila za uporabo
The Arlux Lighting Onyx R2 Recessed LED Spot Light operates immediately upon receiving power. It is typically controlled by a standard wall switch connected to the electrical circuit.
- Vklop/izklop: Use the wall switch connected to the light fixture to turn the light on or off.
- Zatemnitev: This model is not specified as dimmable. Attempting to use it with a non-compatible dimmer switch may cause damage or malfunction.
6. Vzdrževanje
The Arlux Lighting Onyx R2 LED Spot Light requires minimal maintenance.
- Čiščenje: Ensure the power is off before cleaning. Wipe the surface of the light with a soft, dry, or slightly damp krpo. Ne uporabljajte abrazivnih čistil, topil ali agresivnih kemikalij, saj lahko poškodujejo površino ali električne komponente.
- Življenjska doba LED diode: LED lights have a long lifespan and do not require bulb replacement. If the light stops functioning, refer to the troubleshooting section.
7. Odpravljanje težav
If you encounter issues with your Arlux Lighting Onyx R2 LED Spot Light, please consult the following table before contacting support.
| Težava | Možen vzrok | rešitev |
|---|---|---|
| Lučka se ne prižge | Brez napajanja Ohlapna žična povezava Napačen gonilnik LED Faulty light fixture | Preverite odklopnik in stensko stikalo. Preverite, ali so vse žične povezave varne (najprej izklopite napajanje). Test the driver if possible, or replace it. If driver is functional, the fixture may be faulty; contact support. |
| Svetloba utripa | Nestabilno napajanje Ohlapno ožičenje Incompatible dimmer switch (if used) | Ensure stable power. Check for loose connections. Remove dimmer switch if not compatible, or replace with a compatible LED dimmer. |
| Svetloba je šibka | Napačno napajanje voltage padec | Ensure the correct LED driver is used. Consult an electrician to check for voltage issues in your electrical system. |
8. Garancija in podpora
Information regarding specific warranty terms for the Arlux Lighting Onyx R2 Round Recessed LED Spot Light is not available in the provided product details. For warranty inquiries or technical support, please contact your retailer or the manufacturer directly.
Spare parts availability information is also not available. Please contact your point of purchase for assistance with replacement components.