1. Uvod
This manual provides essential instructions for the installation, operation, and maintenance of your new HURI Carburetor. This replacement carburetor is designed to restore optimal fuel delivery to your snowblower engine, ensuring efficient and reliable performance. Please read this manual thoroughly before attempting any installation or operation.
Varnostne informacije
- Always disconnect the spark plug wire before performing any maintenance or installation to prevent accidental engine startup.
- Ensure the engine is cool before working on the carburetor.
- Work in a well-ventilated area. Gasoline fumes are flammable.
- Nosite ustrezno osebno zaščitno opremo, kot so rokavice in zaščita za oči.
- Če ste glede katerega koli koraka negotovi, se posvetujte s kvalificiranim tehnikom.
2. Vsebina paketa
Preverite, ali so v vašem paketu prisotne vse spodaj navedene komponente:
- 1x Carburetor
- 1x Gasket
- 1x Fuel Line
- 2x Primer Bulbs
- 1x filter za gorivo

Image 2.1: All components included in the HURI Carburetor replacement kit. This includes the main carburetor unit, a black fuel line, two red primer bulbs, a black gasket, and a red fuel filter.
3. Združljivost
This HURI Carburetor is designed as a replacement part for various snowblower models. Please confirm your model number against the list below:
- Craftsman Snowblower Models: 536887994, 536.886260, 536.887992, 536.797480, 536.772300, 536.885213, 536.887995, 536.88110, 536.887993, 536.884900, 536.886190, 143-029003 (for 8hp, 9hp, 10hp, 11hp Tecumseh engines, 26" and 28" snow throwers)
- Yard Machines MTD Snow Thrower Models: 317E640F000, 31AE665E118
- Also compatible with 826 Snow Blower Thrower.
4. Nastavitev in namestitev
The following steps outline the general procedure for replacing a snowblower carburetor. Specific steps may vary slightly depending on your snowblower model. Refer to your snowblower's original service manual for detailed instructions specific to your equipment.
Potrebno orodje (običajno):
- Komplet ključev
- Izvijači (ploski in križni)
- Klešče
- Cev za gorivo klamps
- Odtočna posoda za gorivo
Koraki namestitve:
- Prepare the Snowblower: Ensure the engine is off and cool. Disconnect the spark plug wire. Turn off the fuel supply valve (if equipped) and drain any fuel from the tank into an approved container.
- Dostop do uplinjača: Remove any engine covers, air filter housing, or other components that obstruct access to the carburetor. Note the routing of all hoses and linkages.
- Odklopite komponente: Carefully disconnect the fuel line, throttle linkage, and choke linkage from the old carburetor. Use fuel line clamps to prevent fuel leakage.
- Odstranite stari uplinjač: Unbolt the old carburetor from the engine. Remove the old gasket.
- Namestitev novega tesnila: Place the new gasket (included in the HURI kit) onto the engine mounting studs. Ensure it is correctly oriented.
- Montaža novega uplinjača: Position the new HURI Carburetor onto the mounting studs, aligning it with the gasket. Secure it with the original nuts, tightening them evenly.
- Povežite komponente: Reconnect the fuel line, throttle linkage, and choke linkage to the new carburetor. Ensure all connections are secure and linkages move freely without binding. Replace primer bulbs and fuel filter if necessary using the provided parts.
- Ponovno sestavite: Reinstall any covers or air filter housing removed earlier.

Slika 4.1: Stran view of the HURI Carburetor, illustrating the throttle and choke linkage points. This view helps in identifying where control cables connect during installation.

Slika 4.2: Spredaj view of the HURI Carburetor, showing the air intake opening and the two mounting holes for attachment to the engine. This perspective is crucial for proper alignment.

Slika 4.3: Zadaj view of the HURI Carburetor, highlighting the fuel inlet barb and the float bowl at the bottom. This is where the fuel line connects.
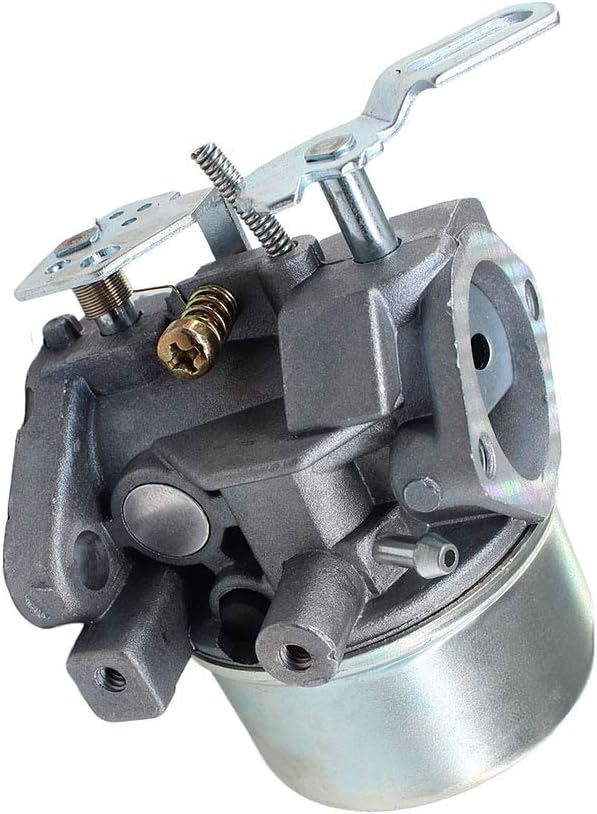
Slika 4.4: Pod kotom view of the HURI Carburetor, providing a comprehensive look at its various ports, screws, and overall construction. This view can assist in identifying specific components during installation.
5. Operating Instructions (After Carburetor Replacement)
After successful installation, follow these steps to start your snowblower:
- Ponovno priklopite svečko: Ponovno priključite žico svečke.
- Refill Fuel Tank: Fill the fuel tank with fresh, appropriate fuel for your snowblower.
- Odprite ventil za gorivo: Open the fuel supply valve (if applicable).
- Napolnite uplinjač: Press the primer bulb 1 to 2 times. Pozor: Over-priming can flood the carburetor and make starting difficult. If fuel begins to pour out, you have over-primed.
- Set Choke and Throttle: Set the choke to the "FULL" or "START" position and the throttle to the "FAST" position.
- Zagon motorja: Pull the starter cord firmly or engage the electric starter.
- Prilagodi dušilko: Once the engine starts and runs smoothly, gradually move the choke to the "OFF" or "RUN" position.
6. Vzdrževanje
Regular maintenance helps ensure the longevity and performance of your carburetor:
- Kakovost goriva: Always use fresh, clean gasoline. Stale fuel can cause deposits and clog carburetor passages. Consider using a fuel stabilizer, especially during storage.
- Filter goriva: Regularly inspect and replace the fuel filter (a new one is included in your kit) to prevent contaminants from reaching the carburetor.
- Shranjevanje: Before long-term storage, run the engine until it runs out of fuel, or drain the fuel system completely to prevent gumming and varnish buildup in the carburetor.
- Čiščenje: If performance issues arise, the carburetor may need cleaning. This typically involves disassembling the carburetor, cleaning passages with carburetor cleaner, and replacing gaskets. This is an advanced procedure and may require professional assistance.
7. Odpravljanje težav
If your snowblower experiences issues after carburetor replacement, consider the following common problems and solutions:
| Težava | Možen vzrok | rešitev |
|---|---|---|
| Motor se ne zažene | No fuel, flooded engine, spark plug issue, incorrect choke setting. | Check fuel level. If flooded, wait 5-10 minutes, then try starting without choke. Check spark plug for fouling or damage. Ensure choke is set correctly. |
| Motor teče neenakomerno ali se ustavi | Clogged fuel filter, old fuel, air leak, carburetor adjustment needed. | Replace fuel filter. Use fresh fuel. Check all carburetor mounting bolts and gaskets for air leaks. Carburetor adjustments are typically factory set; if needed, consult a professional. |
| Puščanje goriva iz uplinjača | Improperly seated gasket, loose bolts, damaged float needle. | Check carburetor mounting bolts for tightness. Ensure gasket is correctly installed and not damaged. If problem persists, the float needle or seat inside the carburetor may be faulty. |
| Primer bulb not working | Cracked bulb, clogged fuel line to primer. | Replace the primer bulb (two are included in the kit). Check fuel lines for obstructions. |
For issues not listed or if solutions do not resolve the problem, professional service may be required.
8. Specifikacije
- Znamka: HURI
- Vrsta izdelka: Nadomestni uplinjač
- Compatible Engine Types: 8hp, 9hp, 10hp, 11hp Tecumseh engines (as found in compatible snowblowers)
- Vrsta goriva: Bencin
- Teža artikla: Približno 10.2 unč
- Dimenzije paketa: Približno 4.41 x 3.62 x 3.15 palca
9. Garancija in podpora
HURI products are manufactured to high standards. For specific warranty information regarding this carburetor, please refer to the documentation provided with your purchase or contact HURI customer support directly. Keep your proof of purchase for warranty claims.
For technical assistance or further inquiries, please visit the HURI official website or contact their customer service department. Contact details are typically available on the product packaging or the seller's information page.