1. Uvod
This manual provides detailed instructions for the proper installation, operation, and maintenance of your Gravity G3-12D4 12-inch car audio subwoofer and Gravity WZ3000.1D Class D amplifier, along with the included 4-gauge amplifier installation kit. Please read this manual thoroughly before beginning installation to ensure correct setup and optimal performance.
2. Varnostne informacije
Med namestitvijo in delovanjem vedno upoštevajte naslednje varnostne ukrepe:
- Disconnect the vehicle's negative battery terminal before any wiring to prevent electrical shorts.
- Prepričajte se, da so vse žice pravilno napeljane in pritrjene, da preprečite poškodbe zaradi ostrih robov ali premičnih delov.
- Use appropriate gauge wiring as specified in this manual to handle current loads and prevent overheating.
- Install fuses at the battery and near the amplifier as instructed to protect against power surges.
- Izogibajte se nameščanju komponent na mestih, ki ovirajo delovanje vozila ali varnostne funkcije.
- Komponent ne izpostavljajte prekomerni vlagi ali ekstremnim temperaturam.
- Če niste prepričani o katerem koli koraku namestitve, poiščite strokovno pomoč.
3. Vsebina paketa
Preverite, ali so v paketu vsi elementi:
- Gravity G3-12D4 12-inch Car Audio Subwoofer
- Gravity WZ3000.1D Class D Amplifier
- 4 Gauge AmpKomplet za namestitev rešovalnika, vključno z:
- 17 ft. 4 Gauge Power Cable
- 3 ft. 4 Gauge Ground Cable
- Inline AGU Fuse Holder with 80A + 100A Fuses
- 17 ft. Double Shielded RCA Cable
- 17 ft. 18 Gauge Turn-On Cable
- 20 ft. 16 Gauge Speaker Wire
- All necessary accessories and terminals
- Daljinski gumb za upravljanje nizkih tonov
4. Značilnosti izdelka
Gravity G3-12D4 Subwoofer
- Dual 4 Ohm Voice Coil Configuration
- Competition Grade Pressed Paper Cone
- Obroba iz pene High Roll
- Advanced Air Flow Cooling System
Gravity WZ3000.1D Amplifier
- Class D MOSFET Power Amplifier
- Stable at 1 Ohm, 2 Ohm, and 4 Ohm loads
- High and Low Level Inputs
- Variable Low Pass Crossover (LPF)
- Spremenljivo ojačanje nizkih tonov
- Podzvočni filter
4 Gauge Ampnamestitveni komplet lifier
- High Quality Thick 4 Gauge Power and Ground Cables
- Inline AGU Fuse Holder with multiple fuses for protection
- True Sound Double Shielded RCA Cable for clear signal transmission
- Complete set of accessories and terminals for a professional installation
5. Nastavitev in namestitev
Proper installation is crucial for performance and safety. If you are not confident in your ability to install this system, please consult a professional installer.
5.1. Namestitev nizkotonca
The G3-12D4 subwoofer requires a suitable enclosure (not included) for optimal performance. Ensure the enclosure is properly sealed and sized according to subwoofer specifications. Mount the subwoofer securely to the enclosure using appropriate screws, ensuring a tight seal around the mounting flange.

Slika: spredaj view of the Gravity G3-12D4 12-inch subwoofer, showing the black cone with a red Gravity logo and red stitching on the foam surround.

Slika: Zadaj view of the Gravity G3-12D4 12-inch subwoofer, displaying the magnet structure and speaker terminals.
5.2. Montaža Amplifier
Select a mounting location for the WZ3000.1D amplifier that is dry, well-ventilated, and protected from physical damage. Common locations include under a seat, in the trunk, or mounted to a custom amplifier rack. Ensure there is sufficient airflow around the amplifier for cooling. Secure the amplifier firmly using screws.

Slika: Stran view of the Gravity WZ3000.1D amplifier, showing the heat sink fins for cooling.
5.3. Ožičenje sistema
Follow these steps carefully for wiring the amplifier and subwoofer:
- Power Cable (Red 4 Gauge): Run the 17 ft. 4 gauge power cable from the vehicle's positive battery terminal to the amplifier location. Install the inline AGU fuse holder within 18 inches (45 cm) of the battery. Do not insert the fuse until all wiring is complete.
- Ground Cable (Black 4 Gauge): Connect the 3 ft. 4 gauge ground cable from the amplifier's ground terminal to a clean, unpainted metal surface on the vehicle chassis. Ensure a solid, low-resistance connection. The ground point should be as short as possible.
- Remote Turn-On Cable (Blue 18 Gauge): Connect the 17 ft. 18 gauge turn-on cable from the amplifier's REM terminal to the remote turn-on output of your head unit. This cable signals the ampvklop in izklop naprave za vklop in izklop z glavno enoto.
- RCA Signal Cables: Connect the 17 ft. double shielded RCA cable from the RCA outputs of your head unit to the RCA INPUTs on the WZ3000.1D amplifier.
- Speaker Wiring (16 Gauge): Connect the 20 ft. 16 gauge speaker wire from the amplifier's speaker output terminals to the G3-12D4 subwoofer. Ensure correct polarity (+ to + and - to -). For a single G3-12D4 (dual 4-ohm voice coils), you can wire the voice coils in parallel for a 2-ohm load or in series for an 8-ohm load. The WZ3000.1D amplifier is stable down to 1 ohm, so a 2-ohm parallel configuration is recommended for maximum power output.
- Daljinski upravljalnik nizkih tonov: Connect the remote bass control knob to the dedicated REMOTE port on the amplifier. Mount the knob in an accessible location for easy adjustment.
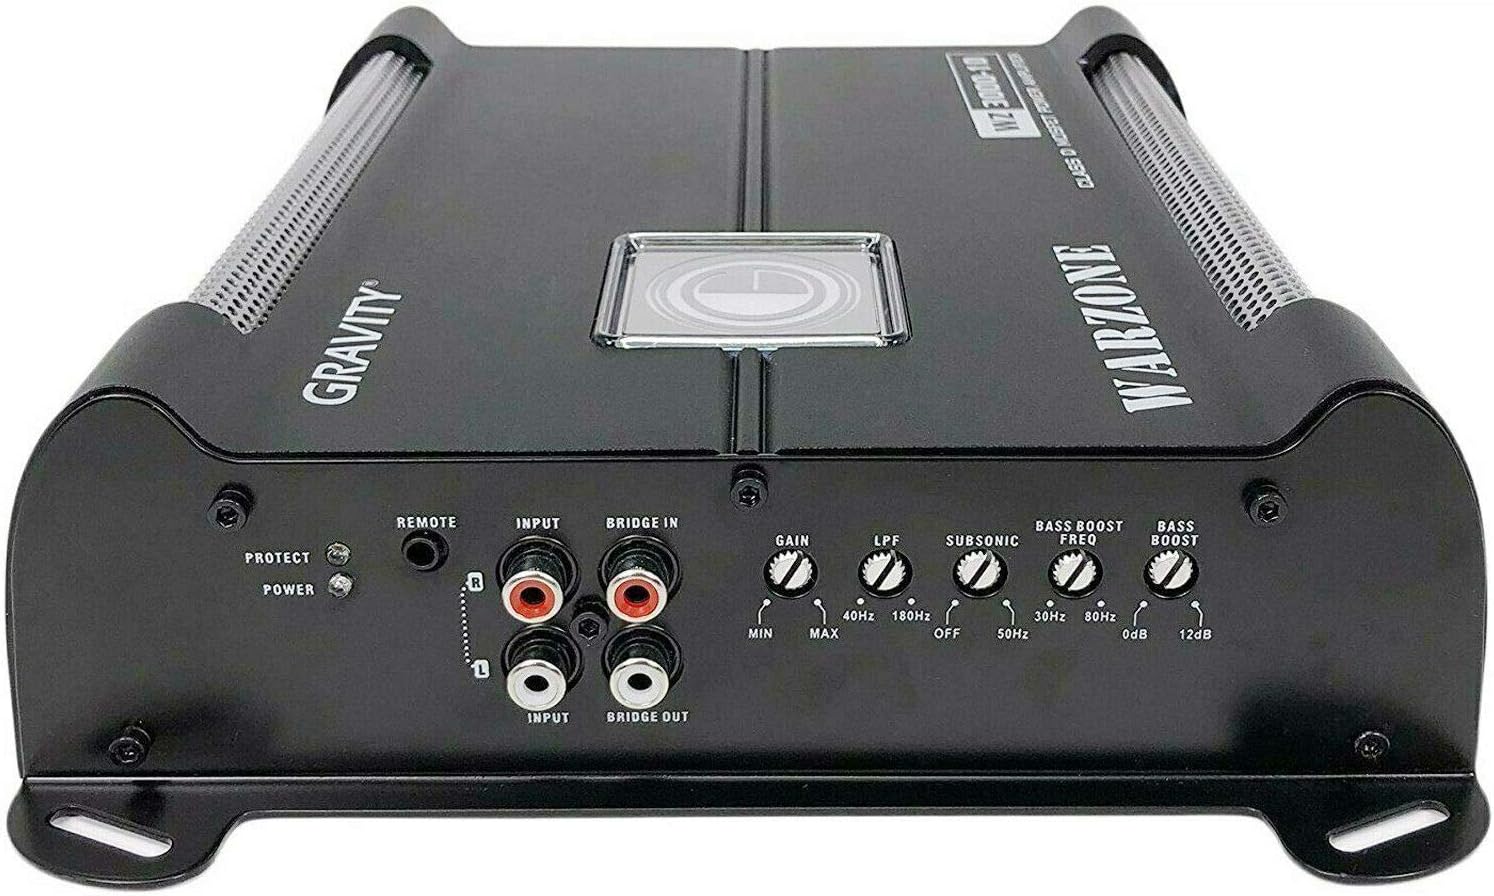
Image: Front panel of the Gravity WZ3000.1D amplifier, displaying RCA inputs, remote control port, and various adjustment knobs.

Image: Rear panel of the Gravity WZ3000.1D amplifier, showing the power input terminals (+12V, GND, REM) and speaker output terminals.

Image: The remote bass control knob, used for adjusting subwoofer output level from the driver's seat.
5.4. Final Connection
Once all wiring is securely connected and checked for shorts, insert the appropriate fuse (80A or 100A, depending on your system's power draw) into the inline AGU fuse holder near the battery. Reconnect the vehicle's negative battery terminal.
6. Navodila za uporabo
After installation, power on your head unit. The amplifier should turn on automatically (indicated by a power LED). Adjust the amplifier settings as follows:
- GAIN (vhodna raven): Start with the GAIN control at minimum. Play a familiar track with strong bass at about 75% of your head unit's maximum volume. Slowly increase the GAIN until you hear distortion, then back off slightly. This sets the ampvhodno občutljivost ojačevalnika prilagodite izhodu vaše glavne enote.
- LPF (nizkoprepustni filter): This control filters out high frequencies, allowing only low frequencies to pass to the subwoofer. Set the LPF between 40 Hz and 180 Hz. A common starting point is 80 Hz, but adjust to blend smoothly with your main speakers.
- SUBSONIC Filter: This filter removes extremely low frequencies below the audible range that can cause damage to the subwoofer. Set it between 0 Hz and 50 Hz. A setting around 25-30 Hz is often suitable for ported enclosures, while sealed enclosures may not require it as much.
- BASS BOOST FREQ: This selects the frequency at which the bass boost will be applied. Adjust this to enhance a specific bass frequency range.
- BASS BOOST: This control increases the output level at the selected bass boost frequency (0-12 dB). Use sparingly to avoid distortion and potential speaker damage.
- Daljinski upravljalnik nizkih tonov: This knob allows you to adjust the subwoofer's output level conveniently from your listening position without affecting other ampnastavitve lifierja.
7. Vzdrževanje
To ensure longevity and optimal performance of your car audio system:
- Redno preverjajte vse ožičene povezave glede tesnosti in korozije.
- Obdrži amplifier and subwoofer free from dust and debris. Use a soft, dry cloth for cleaning.
- Zagotovite ampHladilna rebra gorilnika niso ovirana, da se prepreči pregrevanje.
- Avoid exposing the subwoofer cone to direct sunlight for extended periods, as UV rays can degrade materials.
8. Odpravljanje težav
Če naletite na težave, si oglejte naslednje pogoste težave in rešitve:
| Težava | Možen vzrok | rešitev |
|---|---|---|
| Brez napajanja / Amplifier se ne vklopi | Pregorela varovalka Slaba napajalna ali ozemljitvena povezava Brez signala za daljinski vklop | Check and replace fuse in fuse holder Preverite, ali so vse napajalne in ozemljitvene povezave varne Check remote wire connection to head unit and amplifier |
| Ni zvoka iz nizkotonca | RCA kabli odklopljeni ali okvarjeni Žice zvočnikov odklopljene ali v kratkem stiku Ampprenizek dobiček liferatorja Glasnost glavne enote je prenizka | Preverite povezave RCA Preverite povezave zvočniških žic in morebitne kratke stike Prilagodi amplifier dobiček Increase head unit volume |
| Izkrivljen zvok | Ojačanje je nastavljeno previsoko Poškodovan zvočnik ali amplifier Incorrect LPF or Bass Boost settings | Zmanjšaj amplifier dobiček Inspect speaker and amplifier for damage Adjust LPF and Bass Boost settings |
| AmpPregrevanje gorilnika | Nezadostno prezračevanje Nepravilna impedančna obremenitev Ojačanje je nastavljeno previsoko | Zagotovite ustrezno pretok zraka okoli amplifier Preverite ujemanje impedance zvočnikov amplifier's stable load Zmanjšaj amplifier dobiček |
9. Specifikacije
Gravity G3-12D4 Subwoofer
- Speaker Size: 12 Inches
- Voice Coil Configuration: Dual 4 Ohm
- Peak Power: 2000 Watts (each)
- RMS Power: 1000 Watts (each)
- Frequency Response: 30 - 500 Hz
- Občutljivost: 87 dB
Gravity WZ3000.1D Amplifier
- Max Power: 3000W @ 1 Ohm
- Razred: D
- Stable Impedance: 1 Ohm, 2 Ohm, 4 Ohm
- Signal-to-Noise Ratio (S/N): 70 dB
- Frekvenčni odziv: 8 Hz ~ 180 Hz
- Skupno harmonično popačenje (THD): 0.2 %
- Bass Boost Level: 0 ~ 12 dB
- Low Pass Filter (LPF): 40 Hz ~ 180 Hz
- Subsonic Filter: 0 ~ 50 Hz
- Dimensions (L×W×H): 223.5mm (8.8 in) × 211mm (8.3 in) × 64.5 mm (2.5 in)
4 Gauge Ampnamestitveni komplet lifier
- Power Cable: 17 ft. 4 Gauge
- Ground Cable: 3 ft. 4 Gauge
- Fuse Holder: Inline AGU with 80A + 100A Fuses
- RCA Cable: 17 ft. Double Shielded
- Turn-On Cable: 17 ft. 18 Gauge
- Speaker Wire: 20 ft. 16 Gauge
10. Garancija in podpora
Gravity products are designed for reliability and performance. For specific warranty terms and conditions, please refer to the warranty card included with your product or contact Gravity customer support. Keep your purchase receipt as proof of purchase for any warranty claims.
For technical support or inquiries, please visit the official Gravity webali se obrnite na njihov oddelek za pomoč uporabnikom.