
1. Uvod
Hvala za nakupasing the XTUGA ES602 Professional DJ Mixer. This manual provides essential information for the safe and efficient operation of your mixer. Please read it thoroughly before use and retain it for future reference.
The XTUGA ES602 is a versatile 7-channel mixing console designed for stage audio, DJ applications, and music production. It features XLR and LINE inputs, +48V phantom power, a built-in digital effect processor, USB/MP3 playback, and Bluetooth connectivity.
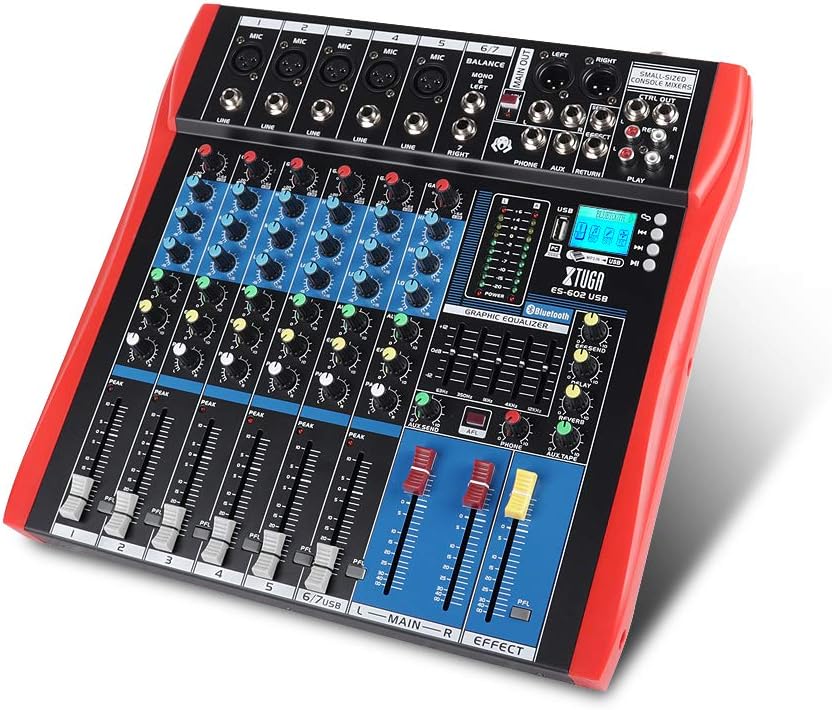
Figure 1: XTUGA ES602 Professional DJ Mixer overview. This image displays the top panel of the mixer, showing all input channels, control knobs, faders, and the master section with the USB/MP3/Bluetooth module.
2. Varnostna navodila
- Napajanje: Uporabljajte samo navedeni napajalnik. Prepričajte se, da je glasnosttage ustreza vašemu lokalnemu napajalniku.
- Voda in vlaga: Naprave ne izpostavljajte dežju ali vlagi. Na napravo ne postavljajte predmetov, napolnjenih s tekočino.
- Prezračevanje: Zagotovite zadostno prezračevanje. Ne blokirajte prezračevalnih odprtin.
- Viri toplote: Napravo hranite stran od virov toplote, kot so radiatorji, grelniki, štedilniki ali druge naprave, ki proizvajajo toploto.
- Čiščenje: Clean only with a dry cloth. Avoid liquid cleaners.
- Servisiranje: Ne poskušajte servisirati te enote sami. Vsa servisna dela prepustite usposobljenemu serviserju.
- Fantomska moč: When using condenser microphones, ensure +48V phantom power is activated only after connecting the microphone and before connecting to other devices to prevent damage.
3. Lastnosti
The XTUGA ES602 mixer offers a range of features for professional audio mixing:
- 7-kanalna mešalna miza: Equipped with XLR and LINE inputs for versatile connectivity.
- +48V fantomsko napajanje: Na voljo za kondenzatorske mikrofone.
- Kontrole posameznih kanalov: Each channel features GAIN, 3-band EQ (HIGH, MID, LOW), AUX, EFFECT, PAN control knobs, and a volume fader.
- PFL (Pre-Fader Listen) Switch: Allows monitoring of individual channels via headphones.
- Built-in Digital Effect Processor: Includes REPEAT, EFF SEND, DELAY, SEND, and RETURN controls for integrated effects.
- USB/MP3 Playback and Recording: Direct USB input for MP3 playback from U-disk and recording capabilities.
- Bluetooth povezljivost: Seamlessly connect mobile phones, tablets, and other Bluetooth-enabled devices for audio playback.
- Glavni izhodi: XLR (L/R) and 1/4" (L/R) stereo output jacks.
- REC izhod: Dedicated REC (L/R) output for external recording devices.
- Vmesnik slušalk: Za spremljanje zvoka.
- LED indikatorji: Power and output level indicator lights for easy monitoring.
- Trajna zasnova: Ultra-thin, all-metal chassis for high density dust resistance and durability.
4. Kontrole in funkcije
This section details the various controls and connections on your XTUGA ES602 mixer.
4.1 Input Channels (Channels 1-7)
- Vhod za mikrofon (XLR): Connects balanced microphones.
- LINE Input (1/4" Jack): Connects line-level instruments or devices.
- +48V PHANTOM Power Switch: Activates phantom power for condenser microphones on XLR inputs.
- Gumb GAIN: Prilagodi vhodno občutljivost za vsak kanal.
- HIGH, MID, LOW EQ Knobs: 3-band equalizer for adjusting the treble, midrange, and bass frequencies of each channel.
- AUX gumb: Controls the send level to the auxiliary output.
- Gumb EFFECT: Controls the send level to the internal effect processor.
- Gumb PAN: Adjusts the stereo position (left/right) of the channel.
- PFL Switch: Engages Pre-Fader Listen for monitoring the channel's signal before the fader.
- PEAK LED: Zasveti, ko je vhodni signal previsok, kar kaže na morebitno prekinitev signala.
- Fader kanala: Adjusts the output volume of the individual channel.
4.2 Glavni del
- MAIN OUT (XLR & 1/4" Jacks): Balanced stereo main outputs for connecting to ampdvigalniki ali zvočniki z napajanjem.
- REC OUT (RCA Jacks): Stereo output for connecting to recording devices.
- PHONES Jack (1/4"): Stereo headphone output for monitoring.
- AUX SEND/RETURN Jacks: For connecting external effects processors or monitoring systems.
- GLAVNI drsniki (L/R): Nadzira skupno izhodno glasnost mešalnika.
- EFFECT Level Knob: Prilagodi splošno raven notranjih učinkov.
- REPEAT, DELAY Knobs: Controls parameters of the digital effect processor.
- LEVEL Meter: LED display showing the main output level.

Slika 2: Podrobno view of the XTUGA ES602 mixer's channel controls and LED level meters. This image highlights the individual channel knobs for GAIN, EQ, AUX, EFFECT, PAN, and the main output level indicators.
4.3 USB/MP3/Bluetooth Module
- Vrata USB: For connecting a USB flash drive for MP3 playback or connecting to a computer for recording/playback.
- LCD zaslon: Shows current mode, track information, and Bluetooth status.
- Gumbi za upravljanje: Play/Pause, Stop, Previous/Next Track, Mode selection (USB/Bluetooth/PC).
- Indikator Bluetooth: Prikazuje stanje povezave Bluetooth.

Figure 3: Close-up of the Bluetooth and MP3 connection section on the XTUGA ES602 mixer. This image shows the USB port, LCD display, and control buttons for media playback and Bluetooth pairing.
5. Nastavitev
Follow these steps to set up your XTUGA ES602 mixer.
5.1 Napajalni priključek
- Prepričajte se, da je stikalo za vklop mešalnika v položaju IZKLOP.
- Priloženi napajalnik priključite na vhod za napajanje mešalnika.
- Priključite napajalnik v ustrezno vtičnico za izmenični tok.
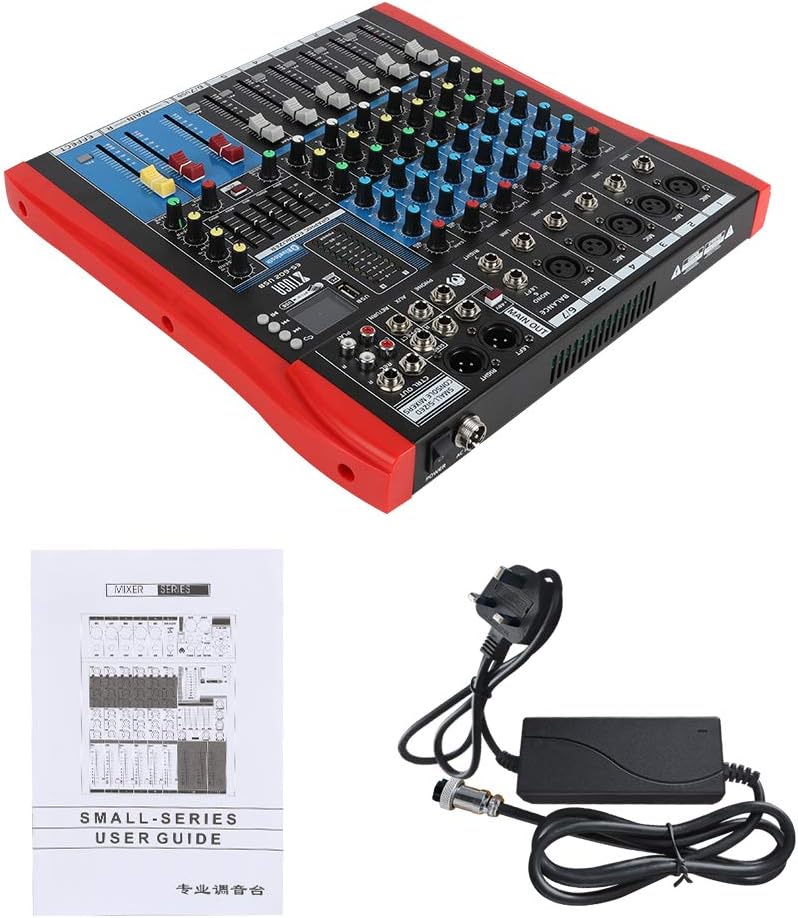
Figure 4: XTUGA ES602 mixer shown with its power adapter and user guide. This illustrates the components included for initial setup.
5.2 Priklop mikrofonov in instrumentov
- For microphones, connect XLR cables to the Vhod za MIC jacks. If using condenser microphones, activate the +48V PHANTOM Power Switch for the respective channel.
- For line-level instruments (keyboards, guitars with preamps, etc.), connect 1/4" TS/TRS cables to the LINE vhod vtičnice.
- Ensure all channel GAIN knobs are set to their minimum position before connecting.
5.3 Priklop izhodnih naprav
- Priključite glavne zvočnike ali ampdvigalo za MAIN OUT (XLR or 1/4") vtičnice.
- For recording, connect an external recording device to the REC OUT (RCA) vtičnice.
- Priključite slušalke v TELEFONI jack for monitoring.
5.4 Connecting to a Computer for Recording
- Connect a USB cable from the mixer's vrata USB na vaš računalnik.
- The mixer should be recognized as an audio device by your operating system.
- Select the mixer as the input device in your digital audio workstation (DAW) or recording software.
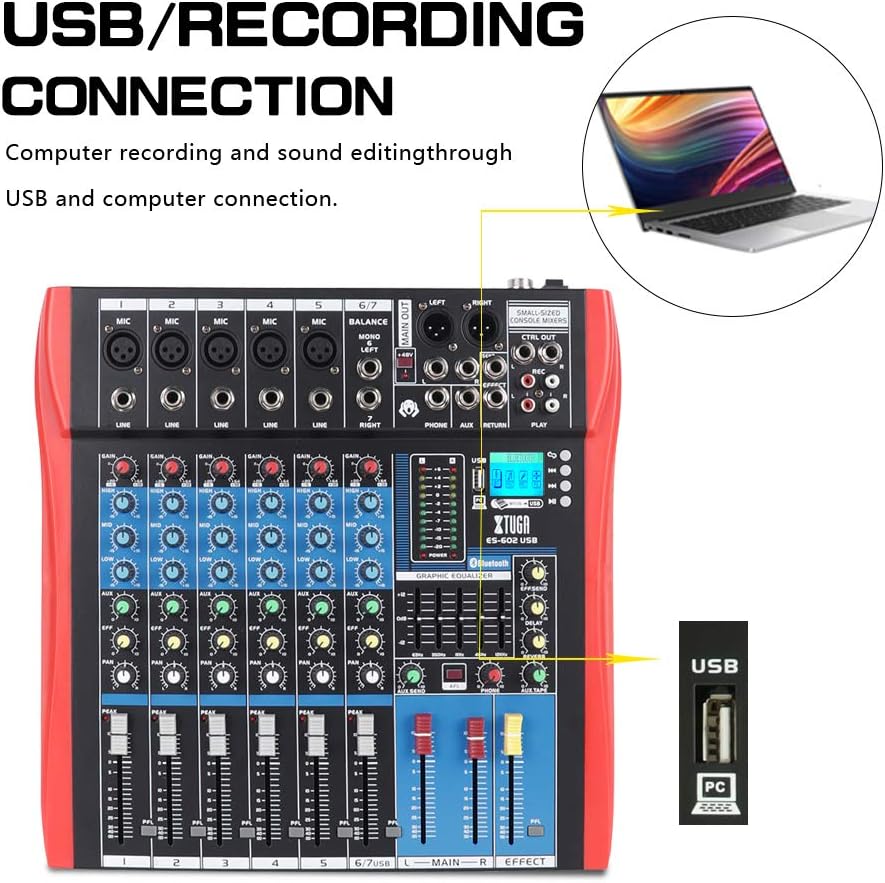
Figure 5: Illustration of the XTUGA ES602 mixer connected to a laptop via USB for recording and sound editing. This highlights the USB input port and its function.
6. Delovanje
This section covers the basic operation of your XTUGA ES602 mixer.
6.1 Powering On and Initial Level Setting
- After all connections are made, turn on your mixer's power switch.
- Počasi dvignite MAIN Faders na udoben nivo poslušanja.
- For each active input channel, gradually increase the gumb GAIN do PEAK LED flashes only occasionally during the loudest parts of the signal.
- Adjust individual Faderji kanalov to balance the mix.
6.2 Uporaba Bluetooth
- Pritisnite gumb MODE on the USB/MP3/Bluetooth module until "Bluetooth" appears on the LCD display. The Bluetooth indicator will flash.
- On your mobile device, search for Bluetooth devices and select "XTUGA MIXER" (or similar).
- Once paired, the Bluetooth indicator will become solid. You can now play audio from your device through the mixer.
- Use the module's control buttons for Play/Pause, Next/Previous track.
6.3 Predvajanje prek USB-ja/MP3-ja
- Vstavite USB-ključ z zvočno datoteko MP3 files v vrata USB.
- The mixer should automatically switch to USB mode and begin playback. If not, press the gumb MODE da izberete USB.
- Use the control buttons to navigate tracks and control playback.
6.4 Snemanje
- Na USB-pogon: In USB/MP3 mode, press the gumb REC on the module to start recording the main mix to the connected USB drive. Press again to stop.
- V računalnik: Ensure the mixer is connected to your computer via USB. Open your recording software and select the mixer as the input device. Start recording within your software.
6.5 Uporaba učinkov
- Prilagodite EFFECT knob on individual channels to send a portion of that channel's signal to the internal effect processor.
- Uporabite EFFECT Level knob in the master section to control the overall volume of the applied effect.
- Prilagodite PONOVI in ZAMUDA knobs to fine-tune the characteristics of the digital effect.
7. Vzdrževanje
Pravilno vzdrževanje zagotavlja dolgo življenjsko dobo in optimalno delovanje vašega mešalnika.
- Čiščenje: Use a soft, dry cloth to clean the exterior of the mixer. Do not use abrasive cleaners, solvents, or waxes.
- Zaščita pred prahom: When not in use, cover the mixer to protect it from dust and debris.
- Shranjevanje: Mešalnik shranjujte na hladnem in suhem mestu, stran od neposredne sončne svetlobe in ekstremnih temperatur.
- Upravljanje kablov: Izogibajte se pretiranemu upogibanju ali stiskanju kablov. Kable odklopite tako, da povlečete vtič, ne za sam kabel.
8. Odpravljanje težav
If you encounter issues with your mixer, refer to the following common problems and solutions.
- Ni zvoka:
- Preverite, ali je mešalnik vklopljen.
- Zagotovite vse MAIN Faders in posameznik Faderji kanalov are raised.
- Verify that output cables are securely connected to your amplifier/zvočniki.
- Preverite glasnost na vašem amplifier/zvočniki.
- Brez vhodnega signala:
- Ensure microphones/instruments are properly connected to the correct input jacks.
- Preverite, ali je gumb GAIN for the respective channel is sufficiently turned up.
- If using a condenser microphone, ensure +48V FANTOMSKO napajanje je aktiviran.
- Test input sources (microphones, instruments) with another device to confirm they are working.
- Popačen zvok:
- Zmanjšajte gumb GAIN for the offending channel if the PEAK LED stalno sveti.
- Znižajte MAIN Faders if the output level meter is consistently in the red.
- Preverite, ali so kabli poškodovani.
- Težave s povezavo Bluetooth:
- Ensure the mixer is in Bluetooth mode (LCD shows "Bluetooth").
- Prepričajte se, da je Bluetooth vaše mobilne naprave omogočen in v dosegu.
- Poskusite prekiniti seznanitev in ponovno seznaniti napravo.
- Predvajanje z USB-ja ne deluje:
- Ensure the USB drive is properly inserted and contains compatible MP3 files.
- Pritisnite gumb MODE to ensure the mixer is in USB mode.
- Poskusite z drugim pogonom USB.
9. Specifikacije
| Funkcija | Specifikacija |
|---|---|
| Številka modela | ES602 (also ES802/1202 series) |
| Število kanalov | 7 |
| Tehnologija povezljivosti | Pomožni, Bluetooth, USB |
| Avdio vhod | Auxiliary, USB, XLR |
| Vrsta izhodnega priključka | Pomožni, XLR |
| Vir napajanja | Električni na kabel |
| Teža predmeta | 3.59 kg |
| Dimenzije izdelka | 46 x 46 x 14 cm |
| Proizvajalec | XTUGA |
| UPC | 784124158754 |
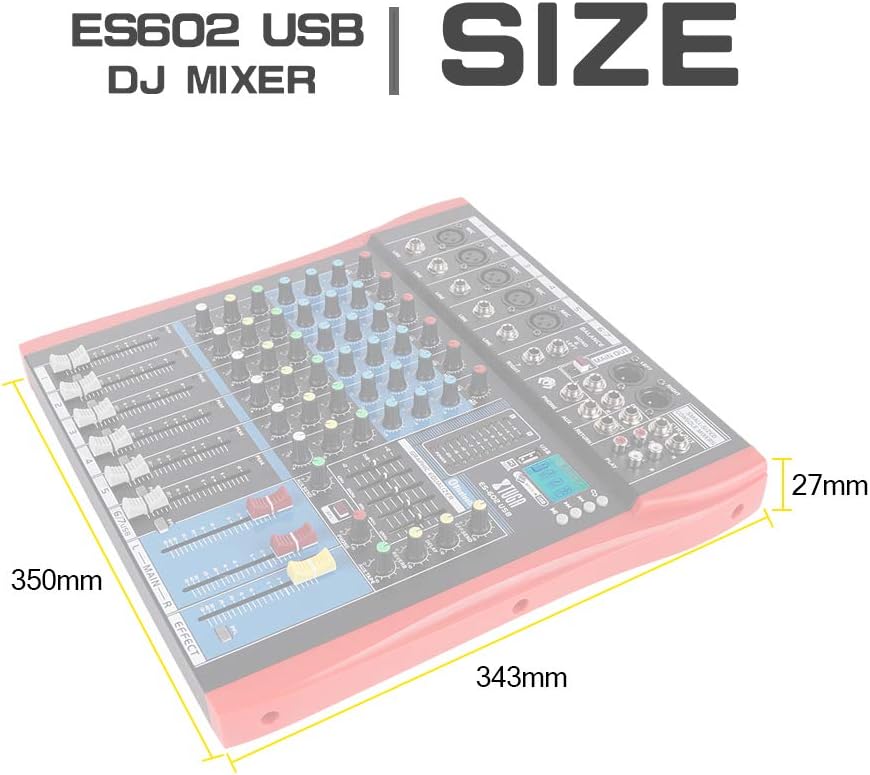
Figure 6: Dimensions of the XTUGA ES602 USB DJ Mixer, showing measurements of 350mm length, 343mm width, and 27mm height.
10. Garancija in podpora
XTUGA products are designed for reliability and performance. For warranty information and technical support, please refer to the warranty card included with your product or visit the official XTUGA webspletnega mesta. Račun shranite kot dokazilo o nakupu za morebitne garancijske zahtevke.