1. Uvod
Thank you for choosing the Homcloud Wi-Fi LED Strip Controller, Model AS-SL1. This device allows you to control 12-24V RGB + White LED strips via Wi-Fi, offering smart lighting solutions for your home. This manual provides essential information for safe installation, operation, and maintenance of your controller. Please read it thoroughly before use and retain it for future reference.
2. Varnostne informacije
- Pred namestitvijo ali vzdrževanjem se prepričajte, da je napajanje izklopljeno, da preprečite električni udar.
- This device is designed for indoor use only. Do not expose it to moisture or extreme temperatures.
- Use only with 12-24V DC power supplies and compatible RGB + White LED strips. Exceeding the specified voltage ali wattage (192 Watts max) can damage the device and LED strips.
- Do not attempt to open or modify the controller. This will void the warranty and may cause damage or injury.
- Hraniti izven dosega otrok.
- Ensure all wiring connections are secure and correctly polarized (positive to positive, negative to negative).
3. Vsebina paketa
Prosimo, preverite paket za naslednje artikle:
- Homcloud Wi-Fi LED Controller (AS-SL1)
- Uporabniški priročnik (ta dokument)
4. Izdelek je končanview
The Homcloud AS-SL1 is a compact Wi-Fi controller designed to manage RGB + White LED strips. It features terminal blocks for secure wiring connections and an integrated Wi-Fi module for smart control via a mobile application or voice commands.
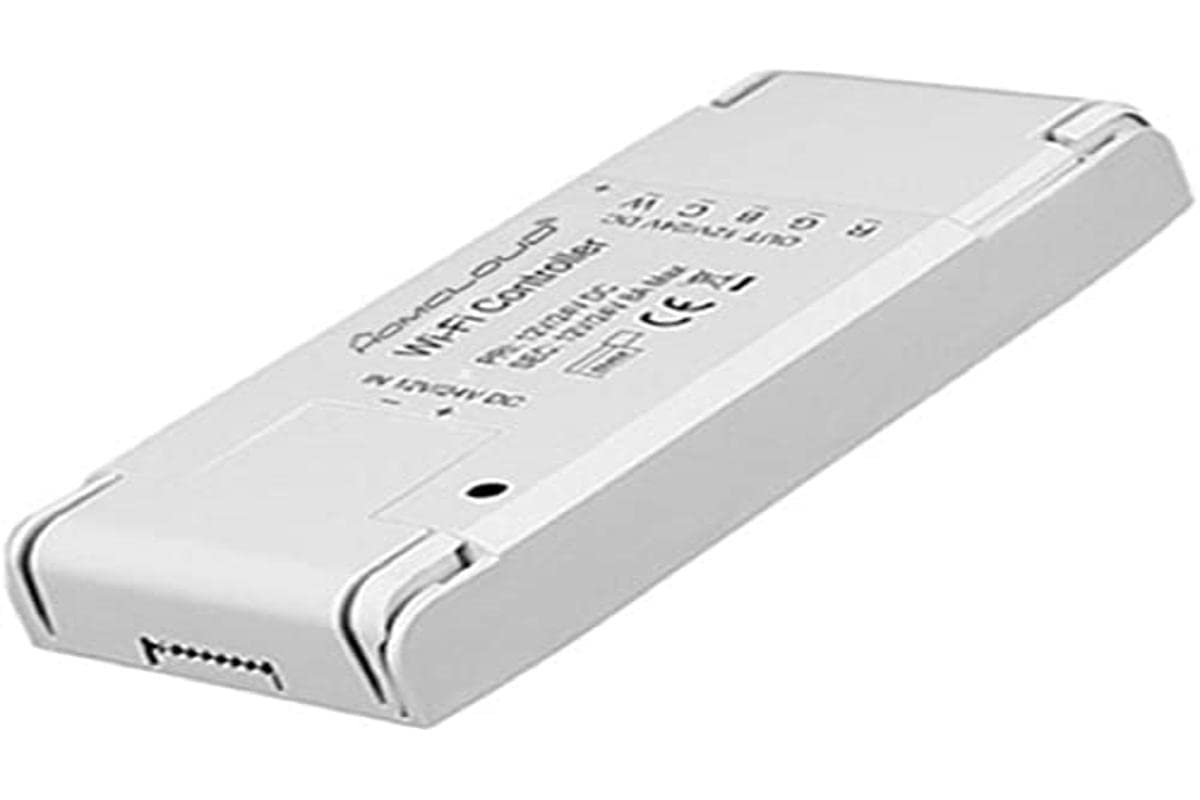
Slika 1: Homcloud Wi-Fi LED Strip Controller (AS-SL1). This image shows the compact design of the controller with its input and output terminals.
Ključne značilnosti:
- Wi-Fi Connectivity (2.4GHz)
- Compatible with 12-24V RGB + White LED Strips
- App Control (via Homcloud app or compatible smart home platforms)
- Voice Control (compatible with smart assistants)
- Programmable Schedules and Timers
- Oddaljeni dostop
5. Nastavitev
5.1 Namestitev ožičenja
- Pripravite komponente: Ensure you have your Homcloud Wi-Fi LED Controller, a compatible 12-24V DC power supply, and an RGB + White LED strip.
- Odklop napajanja: Before making any connections, ensure the power supply is unplugged from the mains.
- Connect Power Supply to Controller: Locate the input terminals on the controller (usually marked DC IN, V+, V- or similar). Connect the positive (+) output of your 12-24V DC power supply to the V+ terminal and the negative (-) output to the V- terminal. Ensure connections are secure.
- Connect LED Strip to Controller: Locate the output terminals on the controller (usually marked V+, R, G, B, W or similar). Connect the corresponding wires from your RGB + White LED strip to these terminals.
- LED Strip V+ to Controller V+
- LED Strip R to Controller R
- LED Strip G to Controller G
- LED Strip B to Controller B
- LED Strip W to Controller W
- Preverite povezave: Double-check all wiring for correct polarity and secure connections. Loose connections can cause malfunctions or damage.
Note: A detailed wiring diagram is typically provided in the physical product packaging. Ensure you follow the specific wiring instructions for your LED strip and power supply.
5.2 Seznanjavanje aplikacij
- Prenesite aplikacijo: Download the "Homcloud" app from your smartphone's app store (iOS or Android).
- Registracija/Prijava: Odprite aplikacijo in registrirajte nov račun ali se prijavite z obstoječim.
- Krmilnik za vklop: Plug in the power supply to the mains. The LED strip should light up briefly or flash, indicating it's in pairing mode. If not, refer to the app's instructions for resetting the device to pairing mode (often involves cycling power multiple times).
- Dodaj napravo: In the Homcloud app, tap the "+" icon (usually in the top right corner) to add a new device. Select "Lighting" or "LED Controller" from the device list.
- Povežite se z Wi-Fi: Follow the on-screen instructions to connect the controller to your 2.4GHz Wi-Fi network. Ensure your phone is also connected to the same 2.4GHz network during pairing.
- Popolno seznanjanje: Once the device is successfully added, you can rename it and begin controlling your LED strip through the app.
6. Navodila za uporabo
6.1 Nadzor aplikacij
Once paired, the Homcloud app provides full control over your LED strip:
- Vklop/izklop: Toggle the power button to turn the LED strip on or off.
- Izbira barve: Use the color wheel or predefined color palettes to choose any desired color for RGB LEDs.
- Prilagoditev bele svetlobe: Adjust the brightness and color temperature (if supported by your LED strip) of the dedicated white LEDs.
- Nadzor svetlosti: Slide the brightness bar to adjust the intensity of the light.
- Scenski načini: Select from various pre-programmed scene modes (e.g., Party, Relax, Reading) or create custom scenes.
- Sinhronizacija glasbe: Some apps offer music synchronization features, allowing the lights to react to sound.
- Časovniki in urniki: Set schedules for the LED strip to turn on/off at specific times or activate certain scenes.
6.2 Glasovni nadzor
The Homcloud AS-SL1 controller supports voice control through compatible smart assistants (e.g., Amazon Alexa, Google Assistant). To enable voice control:
- Poveži račun: In your smart assistant's app (e.g., Alexa app, Google Home app), search for the "Homcloud" skill or service.
- Dovoli: Link your Homcloud account with your smart assistant account.
- Odkrijte naprave: Ask your smart assistant to discover new devices. Your LED strip controller should appear.
- Glasovni ukazi: Zdaj lahko uporabljate glasovne ukaze, kot so:
- "Alexa, turn on [LED strip name]"
- "Hey Google, set [LED strip name] to blue"
- "Alexa, dim [LED strip name] to 50%"
7. Vzdrževanje
- Čiščenje: Disconnect power before cleaning. Use a soft, dry cloth to wipe the controller. Do not use liquid cleaners or solvents.
- Okolje: Ensure the controller is kept in a dry, indoor environment, away from direct sunlight, high temperatures, and corrosive substances.
- Povezave: Občasno preverjajte ožičene povezave, da se prepričate, da so varne.
8. Odpravljanje težav
| Težava | Možen vzrok | rešitev |
|---|---|---|
| LED trak ne sveti. | No power; incorrect wiring; faulty LED strip or power supply. | Check power connection. Verify all wiring connections (V+, V-, R, G, B, W). Test LED strip and power supply separately if possible. |
| Controller cannot connect to Wi-Fi. | Incorrect Wi-Fi password; 5GHz Wi-Fi network; controller not in pairing mode; weak Wi-Fi signal. | Ensure correct 2.4GHz Wi-Fi password. Confirm your router supports 2.4GHz. Reset controller to pairing mode (refer to app instructions). Move controller closer to router. |
| Nadzor aplikacije se ne odziva. | Poor Wi-Fi connection; app glitch; controller offline. | Check your home Wi-Fi network. Restart the Homcloud app. Power cycle the controller. |
| Glasovno upravljanje ne deluje. | Smart assistant not linked to Homcloud account; device not discovered; incorrect voice command. | Ensure Homcloud skill/service is enabled and linked in your smart assistant app. Ask the assistant to discover devices. Use correct voice commands as listed in section 6.2. |
9. Specifikacije
| Funkcija | Podrobnost |
|---|---|
| Številka modela | AS-SL1 |
| Znamka | Homcloud |
| Vhodna voltage | 12-24 V DC |
| Največja izhodna moč | 192 vatov |
| Brezžična tehnologija | Wi-Fi (2.4 GHz) |
| Nadzorna metoda | Nadzor aplikacij, glasovni nadzor |
| Posebne lastnosti | Voice control, remote access, programmable, timer functions |
| Uporabno okolje | Samo za notranjo uporabo |
| Dimenzije (D x Š x V) | 0.01 x 0.01 x 0.01 cm (approx. 0.004 x 0.004 x 0.004 inches) - Note: These dimensions seem unusually small and might be placeholder data. |
| Teža | 10 Grams (approx. 0.35 oz) |
| UPC | 700443260688 |
10. Garancija in podpora
Specific warranty information for the Homcloud AS-SL1 controller is not provided in the product details. For warranty claims or technical support, please contact your retailer or visit the official Homcloud website. Please have your model number (AS-SL1) and proof of purchase ready when contacting support.