
1. Uvod
This manual provides detailed instructions for the installation, operation, and maintenance of your KICKER car audio system. This system includes a KICKER 48DCWR122-RS Dual 12" CompR Series Subwoofer Enclosure, a KICKER 46CXA8001 Mono Amplifier, and a Harmony Audio HA-AK8 Amplifier Installation Kit. Please read this manual thoroughly before attempting installation or operation to ensure proper function and safety.
Varnostni ukrepi:
- Pred začetkom kakršnih koli električnih del vedno odklopite negativni pol akumulatorja vozila.
- Prepričajte se, da so vse napeljave pravilno napeljane in zavarovane, da preprečite poškodbe ali kratke stike.
- Med namestitvijo uporabljajte ustrezno osebno zaščitno opremo.
- Če ste glede katerega koli dela postopka namestitve negotovi, se posvetujte s profesionalnim monterjem avtomobilskih avdio sistemov.
2. Vsebina paketa
Preverite, ali so v paketu vsi elementi:
- 1 x KICKER 48DCWR122-RS Dual 12" CompR Series Subwoofer Enclosure
- 1 x KICKER 46CXA8001 Car Audio Class D Mono Amplifier
- 1 x Harmony Audio HA-AK8 Car Stereo Complete 8 Gauge Ampnamestitveni komplet lifier

Slika 2.1: Spredaj view of the KICKER Dual 12 inch CompR Subwoofer Enclosure. This image shows the two 12-inch subwoofers mounted in a black carpeted enclosure with the KICKER logo.

Slika 2.2: Zgornji del view of the KICKER 46CXA8001 Mono Amplifier. The amplifier is a compact black unit with the KICKER logo and model number CXA800.1 visible.

Figure 2.3: Harmony Audio HA-AK8 8 Gauge Amplifier Installation Kit components. This image displays various cables, a fuse holder, terminals, and zip ties included in the installation kit.
3. Nastavitev in namestitev
Proper installation is crucial for optimal performance and safety. It is recommended to have this system installed by a qualified professional.
3.1 Subwoofer Enclosure Placement
The KICKER 48DCWR122-RS enclosure is designed for freestanding placement. Choose a secure location in your vehicle, typically the trunk or cargo area, where it will not shift during driving. Ensure adequate ventilation around the enclosure.

Slika 3.1: Zadaj view of the KICKER Dual 12 inch CompR Subwoofer Enclosure. This view shows the rear panel, typically where the speaker terminals are located for connection to an amplifier.
3.2 Amplifier Installation (KICKER 46CXA8001)
Namestite amplifier in a location that provides good air circulation and is protected from moisture and excessive heat. Common locations include under a seat, in the trunk, or attached to the subwoofer enclosure.
3.2.1 Power Wiring (HA-AK8 Kit)
- Power Cable (+12V): Connect the 8-gauge power cable from the HA-AK8 kit to the vehicle's positive battery terminal. Install the fuse holder (included in HA-AK8 kit) as close to the battery as possible (within 18 inches) to protect the vehicle's electrical system. Route the power cable to the amp+12V priključek napajalnika.
- Ground Cable (GND): Connect the 8-gauge ground cable from the HA-AK8 kit to a clean, unpainted metal surface on the vehicle's chassis. Ensure a solid, low-resistance connection. Connect the other end to the amplifier's GND terminal. The ground cable should be as short as possible, ideally less than 3 feet.
- Remote Turn-On Cable (REM): Connect a thin gauge wire (typically blue) from your head unit's remote output to the ampREM priključek napajalnika. Ta žica obrne ampvklop in izklop sistema za odpravljanje težav z glavno enoto.
3.2.2 Signalni vhod
The 46CXA8001 amplifier supports both high-level (speaker level) and low-level (RCA) inputs. Use the appropriate input type based on your head unit's outputs.
- Vnos nizke ravni: If your head unit has RCA outputs, connect them to the ampvhodne RCA priključke naprave Liferier.
- Vhod na visoki ravni: If your head unit does not have RCA outputs, use the speaker-level inputs. Refer to the amplifier's specific wiring diagram for connecting speaker wires directly to the amplifier.
3.2.3 Izhod za zvočnike
Connect the subwoofer enclosure's speaker terminals to the amplifier's SPEAKER output terminals. Ensure correct polarity (+ to + and - to -) for optimal sound. The 48DCWR122-RS enclosure is wired for a 2 Ohm load.
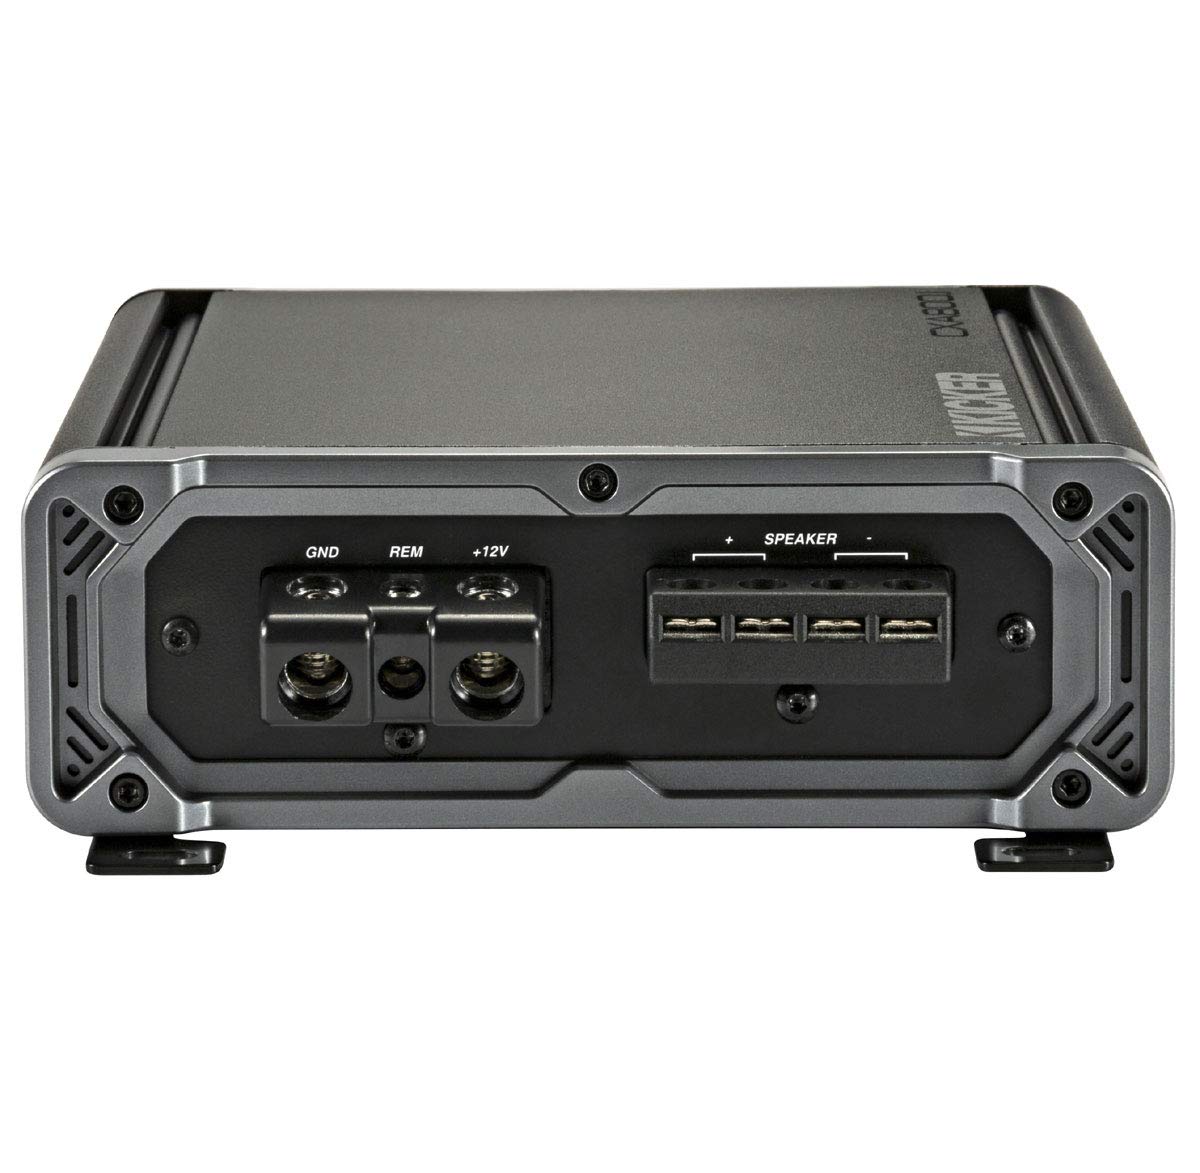
Figure 3.2: Connection side of the KICKER 46CXA8001 Mono Amplifier. This image shows the power (GND, REM, +12V) and speaker output terminals on one side of the amplifier.
4. Navodila za uporabo
Once the system is installed, follow these steps for initial setup and operation:
4.1 Začetni vklop
- Še enkrat preverite vse ožične povezave.
- Ponovno priključite negativni pol akumulatorja vozila.
- Vklopite glavno enoto. ampIzklopnik se mora vklopiti (kar prikazuje LED dioda).
4.2 Amplifier Settings (KICKER 46CXA8001)
The 46CXA8001 amplifier features several adjustable controls:
- Gain Control: Adjust the gain to match the output voltagvaše glavne enote. Začnite z minimalnim ojačanjem in ga počasi povečujte, dokler ne zaslišite popačenja, nato pa ga nekoliko zmanjšajte. To ni regulator glasnosti.
- Nizkoprepustni križanec (LPF): Variable from 50-200Hz. Set this to filter out frequencies above your desired subwoofer range. A common starting point is 80-100Hz.
- Podzvočni filter: Fixed at 25Hz. This filters out extremely low frequencies that the subwoofer cannot reproduce efficiently, protecting it from damage.
- KICKER EQ Boost: Variable to +12dB, centered at 40Hz. Use this to fine-tune the bass response to your preference. Use sparingly to avoid distortion.
5. Vzdrževanje
Regular maintenance ensures the longevity and performance of your KICKER system.
- Čiščenje: Obdrži amplifier and subwoofer enclosure clean and free of dust and debris. Use a soft, dry cloth. Do not use liquid cleaners directly on components.
- Povezave: Občasno preverite vse povezave napajanja, ozemljitve, daljinskega upravljalnika in zvočnikov, da se prepričate, da so varne in brez korozije.
- Prezračevanje: Zagotovite amplifier's heatsink fins are not obstructed to allow for proper cooling.
6. Odpravljanje težav
If you experience issues with your system, refer to the following common problems and solutions:
6.1 No Power / AmpŽivljenjski slog se ne vklopi
- Preverite varovalko: Verify the fuse in the HA-AK8 kit's fuse holder is intact. Replace if blown.
- Napajalni priključek: Ensure the +12V power cable is securely connected to the battery and amplifier.
- Ozemljitvena povezava: Confirm the ground cable has a solid connection to the chassis and amplifier.
- Daljinski vklop: Check that the remote wire is connected to both the head unit and amplifier, and that the head unit is powered on.
6.2 Ni zvoka iz nizkotonca
- Priključki zvočnikov: Verify speaker wires are correctly connected to both the amplifier and subwoofer enclosure, with correct polarity.
- Vhod signala: Ensure RCA or high-level input cables are securely connected to both the head unit and amplifier.
- Ampdobiček lifierja: Povečajte amplifier's gain control slightly.
- Head Unit Settings: Check head unit's subwoofer output settings and volume.
6.3 Popačen zvok
- Nastavitev ojačanja: Zmanjšajte amplifier's gain control. It may be set too high.
- Vhodna raven: Ensure the head unit's volume is not excessively high, causing the input signal to clip.
- Nastavitev križanja: Adjust the LPF setting on the amplifier.
6.4 AmpPregrevanje gorilnika
- Prezračevanje: Zagotovite amplifier has adequate airflow and is not covered.
- Impedanca: Preverite, ali impedanca nizkotonca ustreza amplifier's capabilities (the 48DCWR122-RS is 2 Ohm, which the 46CXA8001 supports).
- Nastavitev ojačanja: Zmanjšajte ampdobiček rešitelja.
7. Specifikacije
7.1 KICKER 48DCWR122-RS Dual 12" CompR Series Subwoofer Enclosure
- Upravljanje moči: 1000 W RMS / 2000 W Peak
- Recommended Power Range: 500 - 1000 Watts RMS
- Nazivna impedanca: 2 Ohm
- Frekvenčni odziv: 25 - 500 HHz
- Občutljivost: 98 dB
- Material stožca: polipropilen
- Prostorski material: Ribbed Santoprene
- Konstrukcija ohišja: MDF (Medium Density Fiberboard) with extensive internal bracing
- Vrsta ohišja: Ported, Front-facing port
- Dimenzije (približne):
- Box Top Depth: 14"
- Box Bottom Depth: 17 1/4"
- Box Height: 16"
- Box Width: 32 3/8"
7.2 KICKER 46CXA8001 Car Audio Class D Mono Amplifier
- RMS izhodna moč:
- 600 W x 1 @ 2 Ohm
- 800 W x 1 @ 1 Ohm
- Najvišja izhodna moč:
- 1200 W x 1 @ 2 Ohm
- 1600 W x 1 @ 1 Ohm
- Frekvenčni odziv: 25Hz - 200Hz
- Razmerje med signalom in šumom: 95 dB
- Vhodna občutljivost:
- High level: 250mV-10V
- Low level: 125mV-5V
- Aktivni križanec: 12dB/octave, variable 50-200Hz, low pass only
- Podzvočni filter: 24dB/octave high-pass fixed @ 25Hz
- KICKER EQ Boost: Variable to +12dB, centered @ 40Hz
- Dimenzije (približne): 8-1/8" Length x 2-3/8" Height x 7-3/16" Width
8. Garancija in podpora
KICKER products are engineered for performance and reliability. For specific warranty information regarding your KICKER 48DCWR122-RS subwoofer enclosure and 46CXA8001 amplifier, please refer to the warranty card included with your product or visit the official KICKER website. For support with the Harmony Audio HA-AK8 installation kit, please refer to Harmony Audio's documentation.
If you require technical assistance or have questions not covered in this manual, please contact KICKER customer support or your authorized KICKER dealer.