
1. Uvod
The MASTECH MS8260E is a versatile 2000-count digital multimeter designed for a wide range of electrical and electronic measurements. It features a large LCD display, non-contact voltage (NCV) detection, and capabilities for measuring AC/DC voltage, AC/DC current, resistance, capacitance, and inductance. This manual provides essential information for the safe and effective operation, maintenance, and troubleshooting of your device.
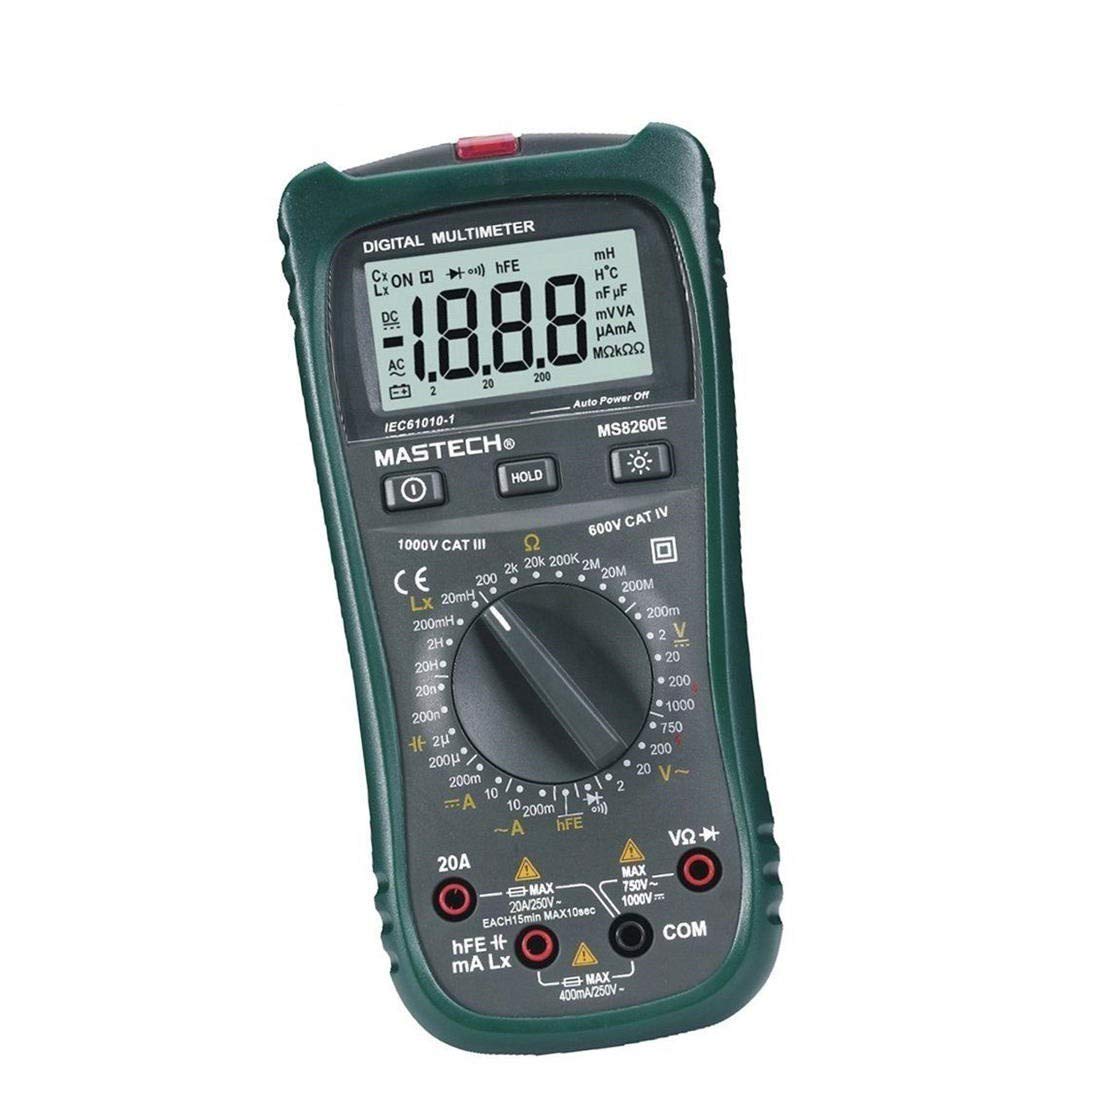
Slika 1: Spredaj view of the MASTECH MS8260E Digital Multimeter, showing the LCD display, function rotary switch, and input jacks.
2. Varnostne informacije
Za varno delovanje in servisiranje merilnika upoštevajte naslednja varnostna navodila:
- Read and understand all instructions in this manual before using the meter.
- Vedno upoštevajte lokalne in nacionalne varnostne predpise.
- Merilnika ne uporabljajte, če je videti poškodovan ali če je izolacija merilnih vodnikov poškodovana.
- Observe the input limits for each measurement range to prevent electrical shock or damage to the meter. This meter is rated for CAT.IV 600V.
- Bodite previdni pri delu z voltagnad 30 V AC RMS, 42 V vrhom ali 60 V DC. Te vol.tagpredstavljajo nevarnost električnega udara.
- Vedno izključite napajanje tokokroga in izpraznite vse visokonapetostnetage capacitors before making resistance, continuity, diode, or capacitance measurements.
- Baterijo takoj zamenjajte, ko se prikaže indikator nizke napolnjenosti baterije, da zagotovite natančne odčitke.
- Merilnika ne uporabljajte v okolju z eksplozivnimi plini, hlapi ali prahom.
3. Izdelek je končanview
The MS8260E multimeter is equipped with several features to facilitate accurate and convenient measurements:
- Large 2000 Counts LCD Display: Zagotavlja jasne digitalne odčitke.
- Vgrajen brezkontaktni voltage (NCV) Detector: Zazna AC voltage greater than 110V without physical contact, indicated by a flash warning.
- Funkcija zadrževanja podatkov: Zamrzne prikazano vrednost za lažje snemanje.
- Osvetlitev zaslona: Improves visibility in dimly lit conditions.
- Samodejni izklop: Conserves battery life by automatically turning off the meter after a period of inactivity.
- Indikacija prazne baterije: Alerts the user when the battery needs replacement.
- Indikacija polarnosti: Automatically displays negative polarity.
- 30-Range Rotary Switch: Selects various measurement functions including AC/DC voltage, AC/DC current, resistance, capacitance, inductance, diode check, continuity test, and transistor (hFE) check.
4. Nastavitev
4.1 Namestitev baterije
The MS8260E requires one 9V battery (NEDA 1604/6F22). To install or replace the battery:
- Ensure the meter is turned off and disconnect all test leads from the input terminals.
- Poiščite pokrov predalčka za baterije na zadnji strani merilnika.
- Odvijte pritrdilni vijak (vijake) in odstranite pokrov.
- Insert the 9V battery, observing the correct polarity.
- Namestite pokrov predalčka za baterije in ga pritrdite z vijakom(-i).
4.2 Priključitev merilnih vodnikov
Always connect the black test lead to the "COM" (common) input jack. Connect the red test lead to the appropriate input jack based on the desired measurement:
- Za Voltage, Resistance, Capacitance, Inductance, Diode, Continuity, and hFE measurements: Connect the red lead to the "VΩCAPHz" jack.
- For Current measurements up to 200mA: Connect the red lead to the "mA" jack.
- For Current measurements up to 10A: Connect the red lead to the "10A" jack.
Ensure test leads are fully inserted into the jacks before taking measurements.
5. Navodila za uporabo
Turn the rotary switch to the desired function. The meter will display "OL" (Overload) if no input is present or if the input exceeds the range.
5.1 DC zvtage Merjenje (DCV)
- Set the rotary switch to the desired DCV range (200mV, 2V, 20V, 200V, 1000V).
- Connect the black test lead to the "COM" jack and the red test lead to the "VΩCAPHz" jack.
- Merilne kable priključite na komponento ali vezje, ki ga želite izmeriti, pri čemer upoštevajte polarnost.
- Preberite zvtage vrednost na LCD zaslonu.
5.2 AC Voltage Merjenje (ACV)
- Set the rotary switch to the desired ACV range (2V, 20V, 200V, 750V).
- Connect the black test lead to the "COM" jack and the red test lead to the "VΩCAPHz" jack.
- Priključite merilne kable na izmenični tok (AC volt)tage vir.
- Preberite zvtage vrednost na LCD zaslonu.
5.3 DC Current Measurement (DCA)
- Set the rotary switch to the desired DCA range (200mA, 10A).
- For measurements up to 200mA, connect the red lead to the "mA" jack. For measurements up to 10A, connect the red lead to the "10A" jack. The black lead connects to "COM".
- Odprite tokokrog, kjer želite izmeriti tok, in merilnik priključite zaporedno na breme.
- Odčitajte trenutno vrednost na LCD zaslonu.
5.4 AC Current Measurement (ACA)
- Set the rotary switch to the desired ACA range (200mA, 10A).
- For measurements up to 200mA, connect the red lead to the "mA" jack. For measurements up to 10A, connect the red lead to the "10A" jack. The black lead connects to "COM".
- Odprite tokokrog, kjer želite izmeriti tok, in merilnik priključite zaporedno na breme.
- Odčitajte trenutno vrednost na LCD zaslonu.
5.5 Merjenje upornosti (Ω)
- Set the rotary switch to the desired Ω range (200Ω, 2kΩ, 20kΩ, 200kΩ, 2MΩ, 20MΩ, 200MΩ).
- Connect the black test lead to "COM" and the red test lead to "VΩCAPHz".
- Prepričajte se, da je tokokrog izklopljen in da so vsi kondenzatorji izpraznjeni.
- Merilne kable priključite na upor ali komponento.
- Odčitajte vrednost upora na LCD-zaslonu.
5.6 Capacitance Measurement (CAP)
- Set the rotary switch to the desired CAP range (20nF, 200nF, 2uF, 200uF).
- Connect the black test lead to "COM" and the red test lead to "VΩCAPHz".
- Preden priključite merilne kable, se prepričajte, da je kondenzator popolnoma izpraznjen.
- Priključite merilne kable na kondenzator.
- Odčitajte vrednost kapacitivnosti na LCD zaslonu.
5.7 Merjenje induktivnosti (L)
- Set the rotary switch to the desired Inductance range (20mH, 200mH, 2H, 20H).
- Connect the black test lead to "COM" and the red test lead to "VΩCAPHz".
- Connect the test leads across the inductor.
- Vrednost induktivnosti odčitajte na LCD-zaslonu.
5.8 Preskus diode
- Set the rotary switch to the Diode symbol.
- Connect the black test lead to "COM" and the red test lead to "VΩCAPHz".
- Rdeči kabel priključite na anodo, črni pa na katodo diode. Premični toktagPrikazan bo padec napetosti (običajno od 0.5 V do 0.8 V za silicijeve diode).
- Reverse the leads. The display should show "OL" for a good diode.
5.9 Preizkus kontinuitete
- Set the rotary switch to the Continuity symbol.
- Connect the black test lead to "COM" and the red test lead to "VΩCAPHz".
- Priključite merilne kable na vezje ali komponento.
- Če je upornost manjša od približno 30 Ω, se bo oglasil zvočni signal, ki označuje neprekinjenost žice.
5.10 Transistor (hFE) Test
- Vrtljivo stikalo nastavite v položaj hFE.
- Identify the type (NPN or PNP) and pinout (Emitter, Base, Collector) of the transistor.
- Insert the transistor leads into the corresponding sockets in the hFE test socket on the meter.
- Read the hFE (DC current gain) value on the LCD display.
5.11 brezkontaktna zvtage (NCV) zaznavanje
- Vrtljivo stikalo nastavite v položaj NCV.
- Hold the top front part of the meter near the AC voltage source (e.g., an electrical outlet or insulated wire).
- Če je voltage greater than 110V is detected, the NCV indicator light will flash, and the buzzer may sound.
6. Vzdrževanje
6.1 Čiščenje
Obrišite števec z oglasomamp krpo in blagim detergentom. Ne uporabljajte abrazivnih sredstev ali topil. Pred uporabo se prepričajte, da je merilnik suh.
6.2 Zamenjava baterije
When the "BAT" symbol appears on the display, the battery needs to be replaced. Refer to Section 4.1 for battery installation instructions.
6.3 Zamenjava varovalke
If the current measurement function fails, the fuse may need replacement. This operation should only be performed by qualified personnel. Refer to the service manual or contact customer support for fuse specifications and replacement procedures.
6.4 Shranjevanje
If the meter is not to be used for an extended period, remove the battery to prevent leakage and damage to the meter. Store the meter in a cool, dry place away from direct sunlight.
7. Odpravljanje težav
| Težava | Možen vzrok | rešitev |
|---|---|---|
| Ni prikaza ali pa je prikaz bled | Low battery; Meter off | Replace battery; Turn on meter |
| "OL" displayed | Input exceeds range; Open circuit (for resistance/continuity) | Select higher range; Check circuit connection |
| Nepravilni odčitki | Low battery; Incorrect range selected; Poor test lead contact | Replace battery; Select appropriate range; Ensure good contact |
| Merjenje toka ne deluje | Pregorela varovalka | Replace fuse (by qualified personnel) |
8. Specifikacije
| Merilna funkcija | Razpon | Natančnost |
|---|---|---|
| DC Voltage (DCV) | 200mV, 2V, 20V, 200V, 1000V | ±0.5% (200mV-200V), ±0.8% (1000V) |
| AC Voltage (ACV) | 2 V, 20 V, 200 V, 750 V | ±0.8% (2V-200V), ±1.2% (750V) |
| enosmerni tok (DCA) | 200 mA, 10 A | ±1.5% (200mA), ±2.0% (10A) |
| AC tok (ACA) | 200 mA, 10 A | ±1.8% (200mA), ±3.0% (10A) |
| Upor (Ω) | 200Ω, 2kΩ, 20kΩ, 200kΩ, 2MΩ, 20MΩ, 200MΩ | ±0.8% (200Ω-2MΩ), ±1.0% (20MΩ), ±5.0% (200MΩ) |
| Kapaciteta (CAP) | 20nF, 200nF, 2uF, 200uF | ±4.0% (20nF-2uF), ±5.0% (200uF) |
| Induktivnost (L) | 20mH, 200mH, 2H, 20H | ±3.0 % |
| Zvočna kontinuiteta | Buzzer sounds at <30Ω | N/A |
| Diodni test | 1mA, 2.8V | N/A |
| Transistor (hFE) | 0 - 1,000 | N/A |
Splošne specifikacije:
- Zaslon: LCD s 2000 števci
- Ocena varnosti: CAT.IV 600V
- moč: 9V battery (NEDA 1604/6F22)
- Teža: Approximately 1 kg (including battery)
9. Garancija in podpora
For warranty information, technical support, or service inquiries, please refer to the warranty card included with your product or visit the official Mastech website. Do not attempt to repair the meter yourself, as this may void the warranty and pose safety risks.