
1. Uvod
This manual provides detailed instructions for the installation, operation, and maintenance of your ASRock B365 PRO4 ATX Motherboard. Please read this manual thoroughly before proceeding with installation to ensure correct setup and to prevent damage to the components.
The ASRock B365 PRO4 motherboard supports 9th and 8th Generation Intel Core Processors, offering a robust platform for personal computing. It features a Digi Power Design with an 8 Power Phase Design, ensuring stable power delivery to the CPU.
2. Varnostne informacije
- Pred nameščanjem ali odstranjevanjem kakršnih koli komponent vedno izklopite napajanje.
- Nosite antistatično zapestnico, da preprečite poškodbe občutljivih komponent zaradi elektrostatične razelektritve (ESD).
- Matično ploščo prijemajte za robove, da se izognete dotikanju občutljivih komponent.
- Zagotovite ustrezno prezračevanje v ohišju računalnika, da preprečite pregrevanje.
- Matično ploščo hranite stran od vlage in ekstremnih temperatur.
3. Nastavitev in namestitev
3.1 Vsebina paketa
Preverite, ali so v paketu prisotni vsi elementi:
- ASRock B365 PRO4 Motherboard
- Navodila za hitro namestitev
- Podporni CD
- I / O Shield
- 2 x SATA podatkovni kabli
- 3 x vijaki za vtičnice M.2
- 1 x Standoff for M.2 Socket

Image: ASRock B365 PRO4 Motherboard and its included accessories, including the quick installation guide, support CD, I/O shield, SATA cables, and M.2 screws/standoff.
3.2 Postavitev matične plošče
Seznanite se s ključnimi komponentami in priključki na matični plošči.

Slika: Od zgoraj navzdol view of the ASRock B365 PRO4 Motherboard, highlighting the CPU socket, RAM slots, PCIe slots, and M.2 slots.

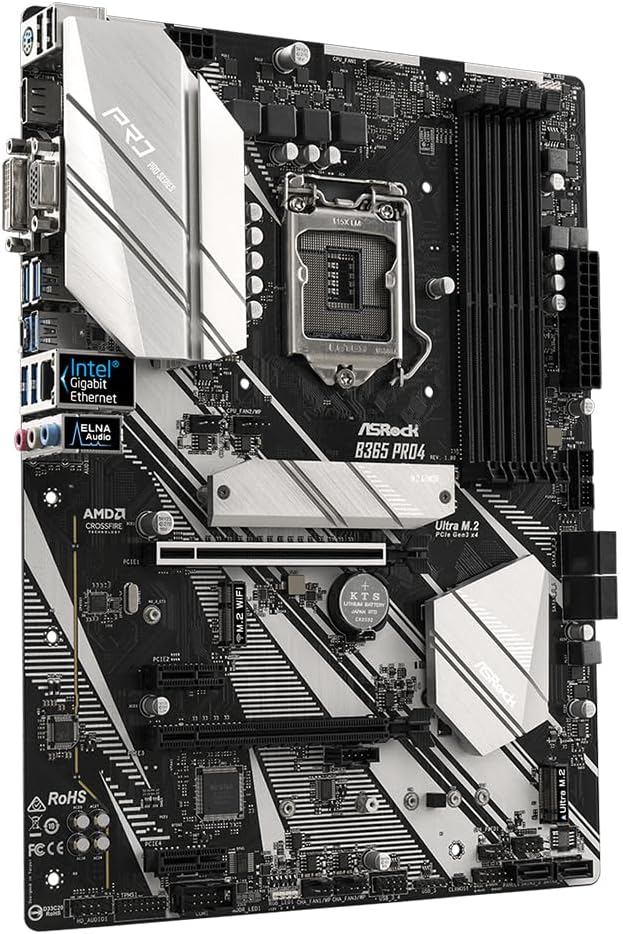
Slika: Pod kotom view of the ASRock B365 PRO4 Motherboard, showing the heatsinks and various connectors.
3.3 CPU Installation (LGA1151)
- Odprite ročico podnožja procesorja in dvignite nosilno ploščo.
- Previdno poravnajte procesor z vtičnico in se prepričajte, da se zlati trikotnik na procesorju ujema s trikotnikom na vtičnici.
- Procesor previdno namestite v podnožje, ne da bi ga silili.
- Zaprite nakladalno ploščo in jo pritrdite z ročico.
3.4 Namestitev pomnilnika (RAM)
The motherboard features 4 DDR4 DIMM slots, supporting dual-channel memory up to 64GB.
- Odprite sponke na obeh koncih reže DIMM.
- Poravnajte zarezo na modulu RAM s ključem v reži DIMM.
- Insert the RAM module firmly until the clips snap into place.
3.5 Namestitev pomnilniške naprave
The motherboard supports 6 SATA3 ports and 2 Ultra M.2 ports.
- SATA pogoni: Connect SATA data cables to the SATA ports on the motherboard and to your storage devices (HDDs/SSDs). Connect power cables from your power supply to the devices.
- M.2 SSD-ji: Locate the M.2 slots. Insert the M.2 SSD into the slot at an angle, then gently push it down and secure it with the provided screw and standoff.
3.6 Namestitev razširitvene kartice (PCIe)
The motherboard has 2 PCI-Express 3.0 x16 slots and 2 PCI-Express 3.0 x1 slots.
- Select an appropriate PCIe slot for your expansion card (e.g., graphics card).
- Odstranite ustrezni kovinski nosilec iz ohišja računalnika.
- Align the card with the slot and press firmly until it is seated correctly.
- Kartico pritrdite z vijakom na ohišje računalnika.
3.7 Connecting Peripherals to the I/O Panel
Zadnja V/I plošča ponuja različna vrata za priključitev zunanjih naprav.
Slika: Bližnji posnetek view of the ASRock B365 PRO4 Motherboard's rear I/O panel, showing ports for PS/2, USB 2.0, USB 3.1 Gen 1, VGA, DVI-D, HDMI, LAN, and audio jacks.
- Vrata USB: Connect USB devices (keyboard, mouse, external drives) to the available USB 2.0 (5 ports) and USB 3.1 Gen 1 (8 ports, including 1 Type-C rear) ports.
- Video izhodi: Connect your monitor to the VGA, DVI-D, or HDMI port.
- Vrata LAN: Priključite ethernetni kabel za dostop do omrežja.
- Avdio priključki: Connect speakers, headphones, or microphones to the audio jacks.
- Vrata PS/2: Connect a PS/2 keyboard or mouse.
4. Navodila za uporabo
4.1 Prvi zagon in nastavitev BIOS-a
- After assembling all components, connect the power supply and monitor.
- Power on your system. Press Del or F2 during startup to enter the BIOS/UEFI setup utility.
- Konfigurirajte vrstni red zagona, sistemski čas in druge potrebne nastavitve. Shranite spremembe in zaprite.
- Install your operating system from a bootable USB drive or optical media.
4.2 Namestitev gonilnika
After installing the operating system, install the necessary drivers from the provided Support CD or download the latest versions from the ASRock webspletno mesto. Ključni dejavniki vključujejo:
- Gonilniki čipov
- Gonilniki za zvok (Realtek ALC892)
- LAN Drivers (Intel I219V Gigabit Ethernet)
- Gonilniki grafičnih kartic (za integrirano grafično kartico ali ločeno grafično kartico)
5. Vzdrževanje
- Odstranjevanje prahu: Redno čistite prah z matične plošče in ventilatorjev ohišja s stisnjenim zrakom. Pred čiščenjem se prepričajte, da je sistem izklopljen in izklopljen iz električnega omrežja.
- Posodobitve BIOS-a: Preverite ASRock website periodically for BIOS updates. Updates can improve system stability and compatibility. Follow the instructions carefully when updating the BIOS.
- Upravljanje kablov: Zagotovite, da so kabli lepo napeljani, da izboljšate pretok zraka in preprečite motnje.
6. Odpravljanje težav
- Brez napajanja:
- Check all power connections, including the 24-pin ATX and 8-pin 12V CPU power connectors.
- Prepričajte se, da je stikalo za napajanje v položaju VKLOP.
- Brez zaslona:
- Verify that the monitor is connected to the correct video output (either integrated graphics or discrete GPU).
- Ponovno namestite grafično kartico in module RAM-a.
- Nestabilnost/zrušitve sistema:
- Preverite, ali so moduli RAM pravilno nameščeni.
- Prepričajte se, da je hladilnik procesorja pravilno nameščen in da ima dober stik.
- Posodobite gonilnike in BIOS na najnovejše različice.
- Pogon M.2 SSD ni bil zaznan:
- Ensure the M.2 SSD is correctly seated and secured.
- Check BIOS settings to ensure M.2 slots are enabled and configured correctly (SATA vs. PCIe mode).
7. Specifikacije
| Funkcija | Podrobnost |
|---|---|
| CPU vtičnica | LGA 1151 |
| Združljivi procesorji | 9th/8th Generation Intel Core Processors (up to 95W) |
| Čipset | Intel B365 |
| Spomin | 4 x DDR4 DIMM slots, Dual Channel, Non-ECC, Buffered, Max 64GB (2666/2400/2133 MHz) |
| Razširitvene reže | 2 x PCIe 3.0 x16, 2 x PCIe 3.0 x1 |
| Multi-Graphics Support | AMD Quad CrossFireX and CrossFire Technology |
| Shranjevanje | 6 x SATA3 ports (RAID 0, 1, 5, 10), 2 x Ultra M.2 ports (PCIe Gen3 x4 & SATA3) |
| Avdio | Realtek ALC892 7.1-Channel HD Audio |
| LAN | Intel I219V Gigabit Ethernet |
| Vrata USB | 8 x USB 3.1 Gen1 (1 Type-C rear, 5 rear, 2 via header), 5 x USB 2.0 (2 rear, 3 via header) |
| Video izhodi | 1 x VGA, 1 x DVI-D, 1 x HDMI |
| Faktor oblike | ATX (12.0 x 9.0 inch / 30.5 x 22.9 cm) |
8. Garancija in podpora
8.1 Informacije o garanciji
The ASRock B365 PRO4 Motherboard comes with a 1-letna omejena garancija. This warranty covers defects in materials and workmanship under normal use. For specific terms and conditions, please refer to the warranty card included with your product or visit the official ASRock webmesto.
Note: Damage caused by improper installation, misuse, unauthorized modifications, or natural disasters is not covered under warranty.
8.2 Tehnična podpora
For technical assistance, driver downloads, BIOS updates, or further troubleshooting, please visit the official ASRock support webspletno mesto:
You may also contact ASRock customer service directly through their webspletno mesto za prilagojeno podporo.