1. Uvod
This user manual provides comprehensive instructions for the setup, operation, and maintenance of your Reloop RP-1000 MK2 Professional Belt Drive Turntable System. Please read this manual thoroughly before using the product to ensure proper function and to prevent damage.
The Reloop RP-1000 MK2 is designed for both aspiring DJs and HiFi enthusiasts, offering high-quality audio reproduction through its belt-driven mechanism. This design effectively isolates the platter from motor vibrations, ensuring clear, distortion-free sound. The MK2 version features an enhanced top panel construction, improved metallic buttons, and a pre-fitted Ortofon OM Black pick-up system for immediate playback.
2. Varnostna navodila
To ensure safe operation and prolong the life of your turntable, please observe the following safety guidelines:
- Napajanje: Connect the unit only to an AC outlet with the correct voltage as indicated on the product. Ensure the power cord is not pinched or walked on.
- Vlaga: Enote ne izpostavljajte dežju, vlagi ali prekomerni vlažnosti. Na enoto ne postavljajte predmetov, napolnjenih s tekočinami, kot so vaze.
- Prezračevanje: Zagotovite zadostno prezračevanje okoli enote. Ne blokirajte prezračevalnih odprtin.
- Viri toplote: Napravo hranite stran od virov toplote, kot so radiatorji, grelniki, štedilniki ali druge naprave (vključno z amplifiers), ki proizvajajo toploto.
- Čiščenje: Čistite samo s suho krpo. Izogibajte se uporabi tekočih čistil ali aerosolov.
- Servisiranje: Do not attempt to service the unit yourself. Refer all servicing to qualified service personnel. Servicing is required when the apparatus has been damaged in any way, such as power-supply cord or plug is damaged, liquid has been spilled or objects have fallen into the apparatus, the apparatus has been exposed to rain or moisture, does not operate normally, or has been dropped.
- Umestitev: Place the turntable on a stable, level surface to prevent vibrations and ensure proper tracking.
3. Vsebina paketa
Prosimo, preverite, ali so v vašem paketu priloženi vsi spodaj navedeni artikli:
- Gramofonska plošča
- OM Black pick-up system (by Ortofon)
- Naglavna lupina
- Slipmat
- Protiutež
- Napajalni kabel
- Operating Instruction Manual (this document)
If any items are missing or damaged, please contact your retailer or Reloop customer support immediately.
4. Izdelek je končanview
Familiarize yourself with the main components of your Reloop RP-1000 MK2 turntable.

Slika 4.1: Pod kotom view of the Reloop RP-1000 MK2 turntable, showcasing the platter, tonearm, and control panel.
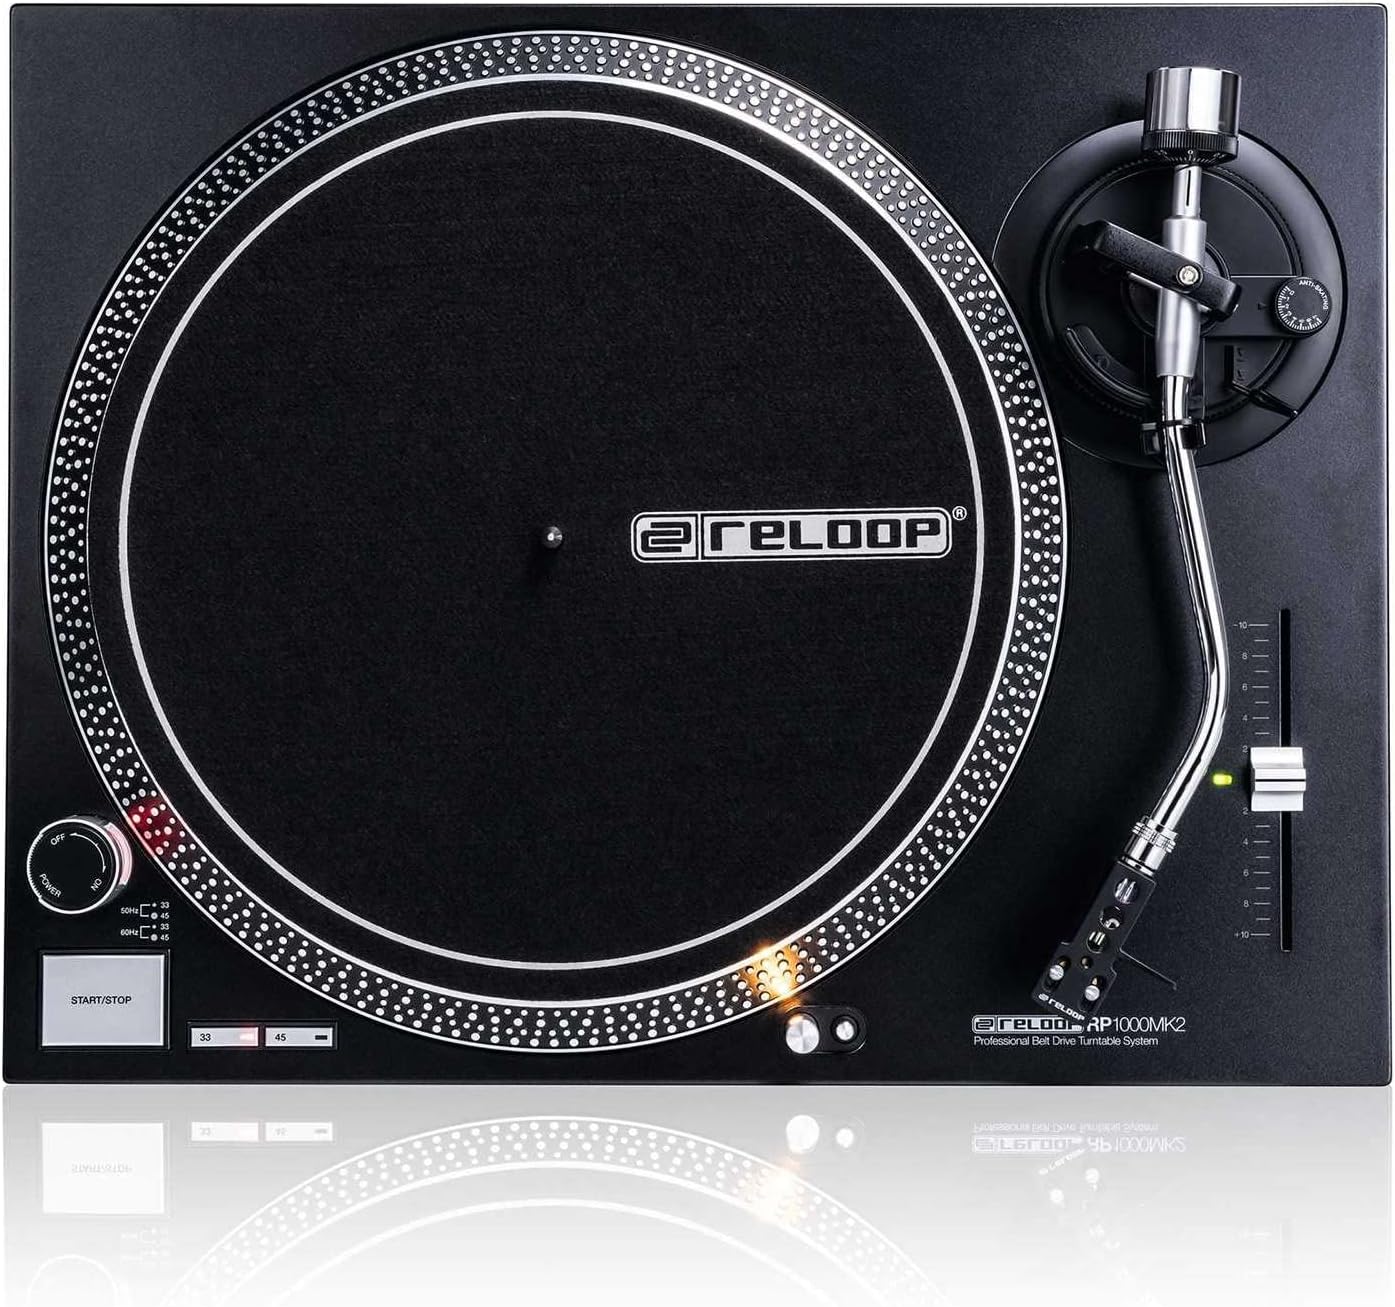
Slika 4.2: Od zgoraj navzdol view highlighting the platter, slipmat with Reloop logo, S-shaped tonearm, and pitch control slider.

Slika 4.3: Podrobno view of the S-shaped tonearm, headshell, and the pre-fitted Ortofon OM Black pick-up system.

Figure 4.4: Close-up of the power knob, start/stop button, and speed selection buttons (33/45 RPM).
Ključne komponente:
- Krožnik: Precision-engineered, die-cast aluminum platter for stable rotation.
- Tonar: Statically balanced S-shaped tonearm with hydraulic lift and anti-skating mechanism.
- Kartuša: High-quality OM Black pick-up system by Ortofon, pre-fitted to a headshell.
- Nadzor višine: Adjustable slider with a range of +/-10% for fine speed adjustments.
- Speed Select Buttons: Buttons for selecting 33 1/3 RPM and 45 RPM playback speeds.
- Gumb Start/Stop: Controls the rotation of the platter.
- Target Light: Extendable aluminum target light to illuminate the needle position in dark environments.
- Shock-absorbing Feet: Improve isolation from unwanted vibrations.
5. Nastavitev
5.1 Razpakiranje in namestitev
- Previdno odstranite vse komponente iz embalaže. Embalažo shranite za kasnejši transport ali shranjevanje.
- Place the turntable on a flat, stable, and level surface, away from direct sunlight, heat sources, and strong magnetic fields.
- Ensure there is sufficient space around the unit for ventilation.
5.2 Namestitev plošče in traku
- Pladenj namestite na sredinsko vreteno. Prepričajte se, da je varno pritrjen.
- Locate the drive belt. Carefully stretch the belt around the inner rim of the platter and hook it onto the motor pulley, which is visible through one of the platter's openings.
- Na pladenj položite filcano podlogo.
5.3 Tonearm Setup
The OM Black pick-up system is pre-fitted to the headshell. Follow these steps to balance the tonearm:
- Attach the headshell with the pre-fitted cartridge to the front end of the tonearm. Secure it by turning the locking ring clockwise.
- Place the counterweight onto the rear of the tonearm and rotate it until it is approximately centered.
- Sprostite ročico clamp and lower the tonearm lift.
- Carefully adjust the counterweight by rotating it forwards or backwards until the tonearm is perfectly balanced and floats horizontally.
- Once balanced, hold the counterweight steady and rotate only the numbered ring on the front of the counterweight to '0' (zero).
- Rotate the entire counterweight (including the numbered ring) counter-clockwise to set the recommended tracking force for the Ortofon OM Black cartridge, typically between 1.5 to 2.0 grams. Refer to the cartridge manufacturer's specifications for the precise recommended tracking force.
- Set the anti-skating dial to the same value as your tracking force.
- Return the tonearm to its rest and secure it with the clamp.
5.4 Avdio in napajalni priključki
- Priključite avdio kable RCA iz izhoda gramofona na vhod PHONO na vašem amplifier or mixer. Ensure correct left (white) and right (red) channel connections.
- Ozemljitveno žico iz gramofona priključite na ozemljitveni priključek na vašem amplifier or mixer to minimize hum.
- Plug the power cord into the turntable's power input and then into a suitable AC power outlet.
6. Navodila za uporabo
6.1 Osnovna operacija
- Vklop: Turn the power knob clockwise to the "ON" position. The platter will not start spinning until the START/STOP button is pressed.
- Izberite hitrost: Press the "33" or "45" button to select the desired playback speed according to the record you are playing. The corresponding LED will illuminate.
- Krajevni zapis: Carefully place a vinyl record onto the platter.
- Začetni krožnik: Press the START/STOP button. The platter will begin to rotate.
- Položaj ročice tona: Sprostite ročico clamp. Use the tonearm lift lever to raise the tonearm. Carefully move the tonearm over the desired track on the record.
- Spodnja ročica: Gently lower the tonearm lift lever to allow the stylus to descend onto the record groove.
- Predvajanje: The audio will now play through your connected audio system.
- Ustavi predvajanje: At the end of the record, or when you wish to stop, use the tonearm lift lever to raise the tonearm, return it to its rest, and secure it with the clamp. Press the START/STOP button to stop the platter rotation.
- Ugasniti: Turn the power knob counter-clockwise to the "OFF" position when not in use.
6.2 Using Pitch Control
The pitch control slider allows you to finely adjust the playback speed by +/-10%. Move the slider up or down to increase or decrease the speed. The center detent indicates 0% pitch adjustment (nominal speed).
6.3 Target Light
Press the aluminum target light button to extend the light, illuminating the needle position. This is particularly useful in low-light environments. Press it again to retract the light.
7. Vzdrževanje
7.1 Čiščenje enote
- Pred čiščenjem vedno odklopite napajalni kabel.
- Use a soft, dry, lint-free cloth to wipe the surface of the turntable.
- Za trdovratne madeže rahlo damp Uporabite lahko krpo, nato pa takoj nato suho krpo. Izogibajte se abrazivnim čistilom ali topilom.
7.2 Nega pisala
- The stylus (needle) is a delicate component. Handle it with extreme care.
- Redno čistite pisalo z mehko krtačko, namenjeno čiščenju pisala, in ga nežno čistite od zadaj naprej.
- A worn or dirty stylus can damage your records and degrade sound quality. Replace the stylus when signs of wear are apparent (e.g., distorted sound, skipping).
7.3 Zamenjava jermena
The belt is a wear-and-tear part. If you notice inconsistent speed or the platter not spinning, the belt may need replacement. Contact Reloop support or an authorized service center for replacement belts and instructions.
7.4 Dust Cover Care (if applicable)
If your turntable includes a dust cover, clean it with a soft, damp cloth. Avoid using dry cloths as they can scratch the acrylic surface. Do not use harsh chemicals.
8. Odpravljanje težav
Preden se obrnete na podporo, si oglejte naslednje pogoste težave in njihove rešitve:
| Težava | Možen vzrok | rešitev |
|---|---|---|
| No power / Platter not spinning | Power cord not connected; Power switch off; Belt not installed or broken. | Ensure power cord is securely plugged in. Turn power switch ON. Check if the drive belt is correctly installed around the platter and motor pulley. Replace belt if broken. |
| Ni zvoka ali zelo tih zvok | RCA kabli niso pravilno priključeni; Amplifier/mixer input incorrect; Stylus damaged or dirty; Cartridge not properly seated. | Check RCA connections to amplifier/mixer (PHONO input). Ensure ground wire is connected. Clean stylus. Re-seat cartridge in headshell. |
| Distorted sound / Skipping | Stylus dirty or worn; Tracking force incorrect; Anti-skating incorrect; Turntable not level; Record dirty or damaged. | Clean or replace stylus. Re-adjust tracking force and anti-skating. Ensure turntable is on a level surface. Clean record. |
| Neskladna hitrost | Worn or stretched belt; Motor issue. | Inspect the drive belt for wear and replace if necessary. If the issue persists, contact service. |
9. Specifikacije
| Funkcija | Opis |
|---|---|
| Ime modela | RP-1000 MK2 Professional Belt Drive Turntable System |
| Vrsta pogona | Pogon na jermen |
| Motorni sistem | Powerful belt-drive motor system absorbs unwanted vibration and noise |
| Plošča | Precision-engineered, die-cast aluminum platter with stable rotation |
| Hitrosti | 2 selectable speeds (33 1/3 & 45 RPM) |
| Nadzor tona | Adjustable range of +/-10% |
| Tonar | Statically balanced S-shaped tonearm with hydraulic lift and anti-skate |
| Gradnja | Redesigned metal top panel, tactile buttons, reinforced housing construction, optimized damping features, shock-absorbing feet |
| Dimenzije (Š x G x V) | 17.72 x 13.86 x 5.67 palca (približno 45 x 35.2 x 14.4 cm) |
| Teža | 16.06 funta (približno 7.3 kg) |
| Povezljivost | Analog RCA output, Ground terminal |
| Vir napajanja | Corded Electric, 220 Volts (check local voltage zahteve) |
10. Garancija in podpora
10.1 Informacije o garanciji
Reloop products are manufactured to the highest quality standards. This product comes with a manufacturer's warranty. Please refer to the warranty card included in your package or visit the official Reloop webZa podrobne garancijske pogoje, ki veljajo za vašo regijo, obiščite spletno mesto.
Shranite dokazilo o nakupu (račun ali potrdilo o nakupu), saj ga boste potrebovali pri morebitnih garancijskih zahtevkih.
10.2 Podpora strankam
Should you encounter any issues not covered in the troubleshooting section, or require further assistance, please contact Reloop customer support or your authorized dealer. Contact information can typically be found on the official Reloop webspletnem mestu ali na embalaži vašega izdelka.
For the latest information, FAQs, and support resources, please visit the official Reloop webspletno mesto: www.reloop.com