
Uvod
Thank you for choosing the Peakeep S8 Digital Alarm Clock. This manual provides detailed instructions for setting up, operating, and maintaining your new alarm clock. Please read this manual thoroughly before use to ensure proper function and to maximize your product experience.
Lastnosti izdelka
- Velik LCD zaslon: Features a clear, boldface number display for easy readability.
- Pametni senzor svetlobe: Built-in sensor automatically activates a soft backlight in dark environments, ensuring visibility without disturbing sleep.
- Gradually Strengthening Alarm: The alarm sound increases in volume gradually to gently wake you up.
- Funkcija dremeža: Provides an additional 5 minutes of sleep after the alarm sounds.
- Adjustable Time and Date Format: Customize time display (12/24 hour) and date format.
- Nadzor temperature: Prikazuje temperaturo okolice v stopinjah Celzija ali Fahrenheita.
- Baterija: Operates on 3 x AAA batteries (not included).
Vsebina paketa
- 1 x Peakeep S8 Digital Alarm Clock
- 1 x uporabniški priročnik
Kontrolniki in zaslon
Sprednji zaslon
The large LCD screen displays time, date, day of the week, alarm status, and temperature. The backlight activates automatically in low light conditions when the sensor is enabled.
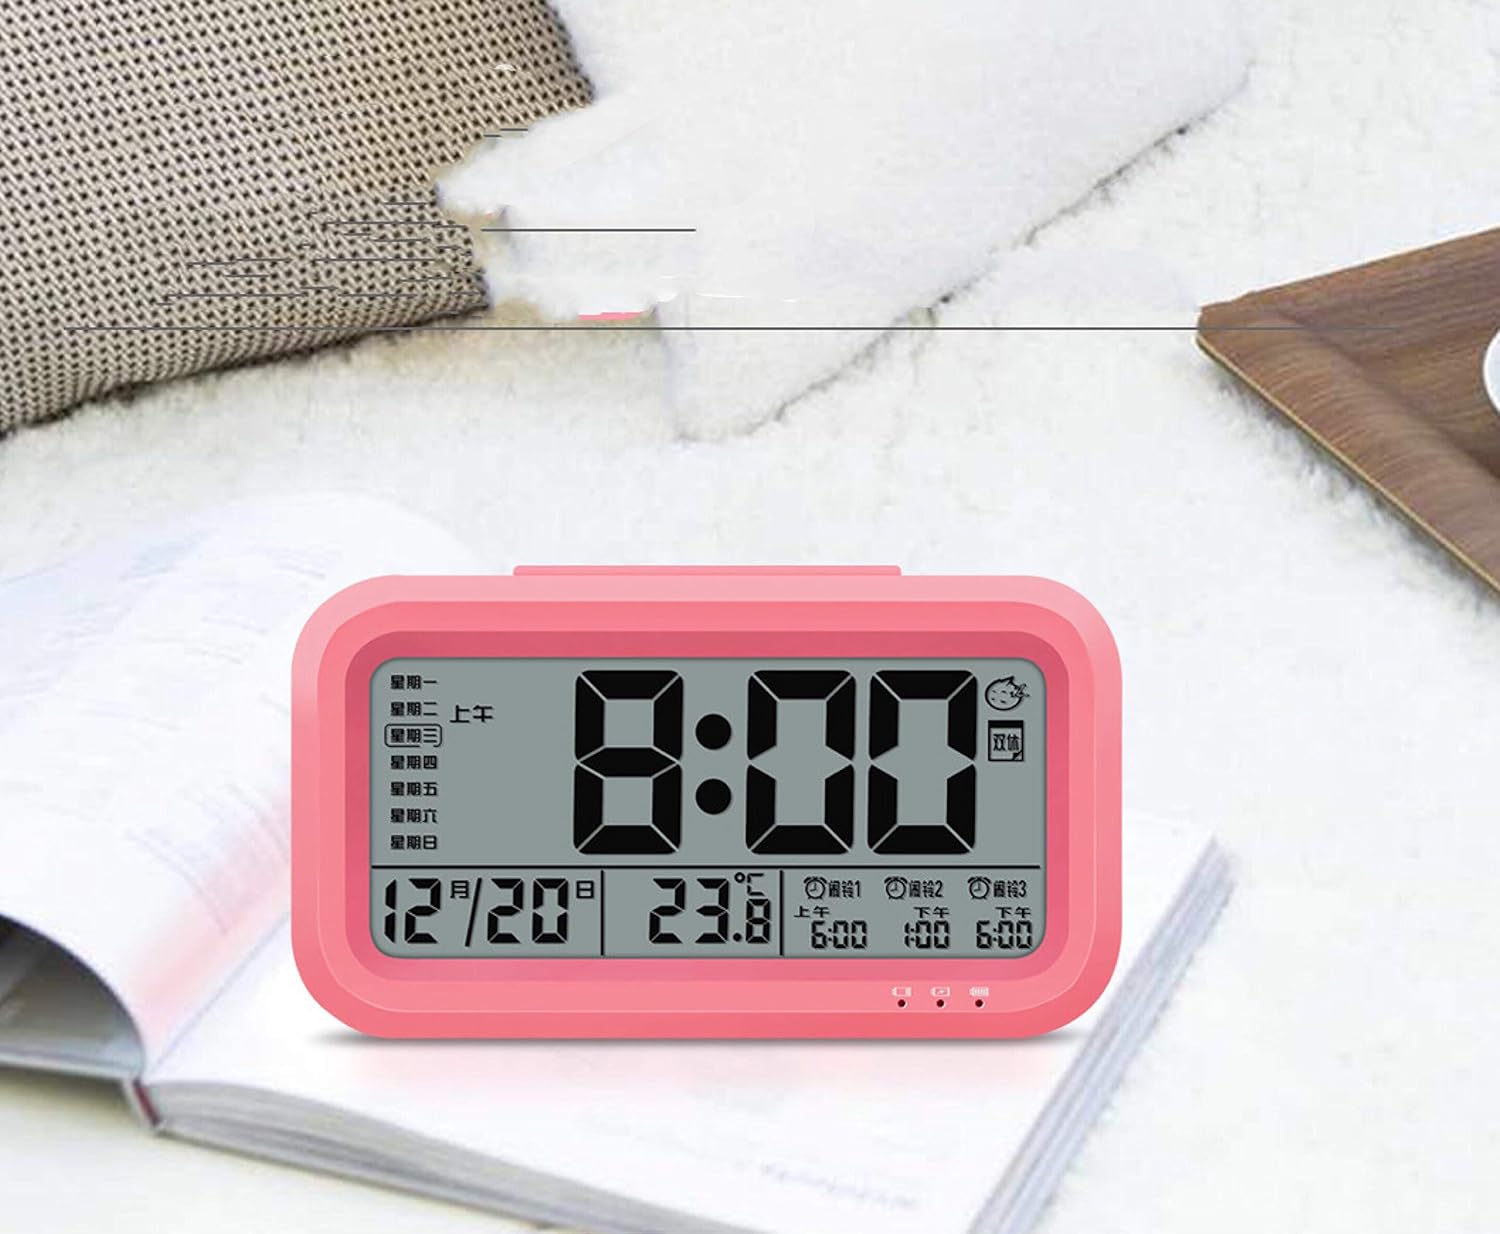
Slika: spredaj view of the Peakeep S8 Digital Alarm Clock. This image shows the large digital display with the time (8:00), date (12/20), and temperature (23.8°C). It also indicates alarm settings and day of the week.
Krmiljenje zadaj
The back of the clock features several buttons and switches for setting time, date, alarm, and other functions.
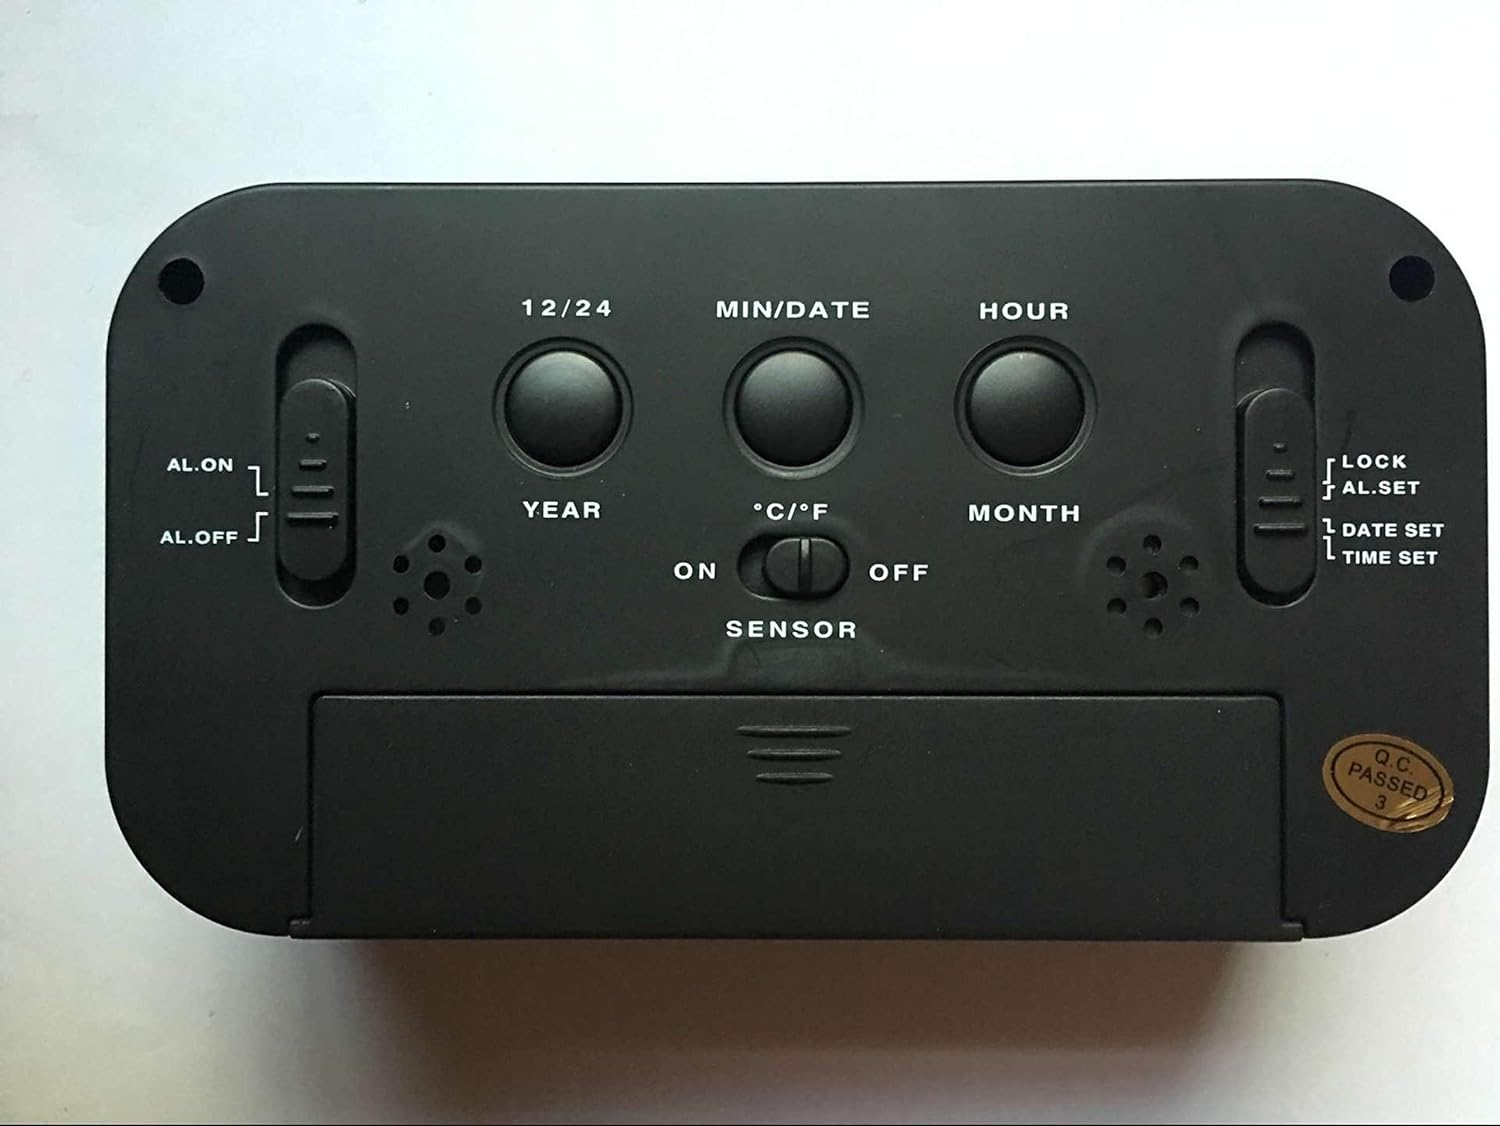
Slika: Zadaj view of the Peakeep S8 Digital Alarm Clock. This image highlights the control panel on the back, including buttons for 12/24 hour format, MIN/DATE, HOUR, YEAR, MONTH, °C/°F, and switches for AL.ON/AL.OFF, LOCK/AL.SET/DATE SET/TIME SET, and SENSOR ON/OFF.
- Gumb 12/24: Preklaplja med 12-urnim in 24-urnim prikazom časa.
- MIN/DATE Button: Used to adjust minutes during time/alarm setting, and to view datum.
- Gumb URA: Used to adjust hours during time/alarm setting.
- YEAR Button: Used to set the year.
- MONTH Button: Used to set the month.
- Gumb °C/°F: Switches temperature display between Celsius and Fahrenheit.
- AL.ON/AL.OFF Switch: Turns the alarm function on or off.
- MODE Switch (LOCK/AL.SET/DATE SET/TIME SET):
- KLJUČAVNICA: Locks current settings to prevent accidental changes.
- AL.SET: Vstopi v način nastavitve alarma.
- DATE SET: Enters date setting mode.
- ČAS NASTAVLJEN: Vstopi v način nastavitve časa.
- SENSOR ON/OFF Switch: Activates or deactivates the smart light sensor for automatic backlight.
- SNOOZE/LIGHT Button (Top): Activates snooze when alarm sounds, or temporarily illuminates the display.
Nastavitev
1. Namestitev baterije
- Odprite pokrov predalčka za baterije na zadnji strani ure.
- Insert 3 new 1.5V AAA batteries, ensuring correct polarity (+ and -).
- Trdno zaprite pokrov prostora za baterije.
- Opomba: Baterije niso vključene.
2. Začetna nastavitev časa
- Slide the MODE switch to ČAS NAST.
- Pritisnite URA gumb za nastavitev ure.
- Pritisnite MIN/DATUM gumb za prilagoditev minut.
- Once the correct time is set, slide the MODE switch back to KLJUČAVNICA.
3. Initial Date Setting
- Slide the MODE switch to DATUM NASTAVLJEN.
- Pritisnite LETO gumb za nastavitev leta.
- Pritisnite MESEC gumb za nastavitev meseca.
- Pritisnite MIN/DATUM gumb za nastavitev dneva.
- Once the correct date is set, slide the MODE switch back to KLJUČAVNICA.
Navodila za uporabo
Nastavitev alarma
- Slide the MODE switch to AL.NASTAV.
- Pritisnite URA gumb za nastavitev budilke.
- Pritisnite MIN/DATUM gumb za nastavitev minut alarma.
- Once the desired alarm time is set, slide the MODE switch back to KLJUČAVNICA.
- Za vklop alarma potisnite AL.ON/AL.OFF preklopi na AL.ON. An alarm icon will appear on the display.
Uporaba funkcije dremeža
Ko se oglasi alarm, pritisnite veliko SNOOZE / LUČ button on top of the clock. The alarm will pause for approximately 5 minutes and then sound again. This can be repeated.
Izklop alarma
Če želite alarm popolnoma izklopiti, potisnite AL.ON/AL.OFF preklopi na AL.OFF. The alarm icon will disappear from the display.
Activating the Smart Light Sensor
To enable the automatic backlight feature, slide the SENZOR preklopi na ON. The display will automatically illuminate with a soft glow in dark environments. Slide the switch to IZKLOP da onemogočite to funkcijo.
Spreminjanje temperaturne enote
Pritisnite ° C / ° F button on the back of the clock to switch the temperature display between Celsius and Fahrenheit.
Changing Time Format (12/24 Hour)
Pritisnite 12/24 button on the back of the clock to toggle between 12-hour (with AM/PM indicator) and 24-hour time formats.
Vzdrževanje
Čiščenje
Uro obrišite z mehko, suho krpo. Ne uporabljajte abrazivnih čistil ali topil, saj lahko poškodujejo površino.
Zamenjava baterije
When the display becomes dim or the clock functions erratically, it is time to replace the batteries. Follow the battery installation steps in the "Setup" section. Always replace all three AAA batteries at the same time with new ones.
Odpravljanje težav
| Težava | Možen vzrok/rešitev |
|---|---|
| Zaslon je prazen ali temen. |
|
| Alarm se ne oglasi. |
|
| Clock is losing or gaining time. |
|
| Gumbi se ne odzivajo. |
|
Specifikacije
- Znamka: Peakeep
- Številka modela: S8 (Item Model Number: Crazy Curry-030)
- Vrsta zaslona: Digitalni LCD
- Material: Plastika
- barva: Black (Black-a)
- vir energije: 3 x 1.5 V AAA bateriji (nista priloženi)
- Posebne lastnosti: Alarm, Snooze, Smart Light Sensor, Temperature Display (°C/°F), 12/24 Hour Format
- Dimenzije: (Approximate, based on typical alarm clock size and weight)
- Teža artikla: 178 g
- Teža pošiljke: 0.18 kilogramov
- UPC: 734602860235
Garancija in podpora
This product is designed for reliability and ease of use. For specific warranty information, please refer to the documentation provided at the time of purchase or contact your retailer.
If you encounter any issues not covered in this manual, please contact the retailer or manufacturer for assistance. Keep your purchase receipt as proof of purchase for any warranty claims.