
1. Uvod
Thank you for choosing the Technoline WT 538 Wireless Projection Alarm Clock. This modern device features a touch sensor for projection and illumination, designed to integrate seamlessly into your digital lifestyle. It offers a radio-controlled clock with manual setting options, date and weekday display in 7 languages, 12/24 hour format, time zone adjustment, and indoor temperature display in Celsius or Fahrenheit. The alarm includes a customizable snooze function, and the time can be projected onto a wall or ceiling. This manual provides detailed instructions for setup, operation, and maintenance to ensure optimal performance of your alarm clock.

Slika 1.1: Spredaj view of the Technoline WT 538 Wireless Projection Alarm Clock in use, showing its display and projection feature.
2. Varnostne informacije
- Pred uporabo naprave natančno preberite vsa navodila.
- Napravo hranite ločeno od vode, vlage in ekstremnih temperatur.
- Use only the specified power adapter (4.5V) and battery type (2 x 1.5V AAA).
- Naprave ne poskušajte razstavljati ali popravljati sami. Vsa servisna dela prepustite usposobljenemu osebju.
- Izrabljene baterije zavrzite odgovorno v skladu z lokalnimi predpisi.
3. Vsebina paketa
Prosimo, preverite, ali so vsi predmeti prisotni in v dobrem stanju:
- Technoline WT 538 Wireless Projection Alarm Clock
- 4.5V napajalnik
- 2 x 1.5 V AAA baterije
- Uporabniški priročnik (ta dokument)
4. Izdelek je končanview
Familiarize yourself with the main components and controls of your WT 538 alarm clock.
4.1 Front Display and Projection
The front of the device features a clear digital display showing time, date, weekday, and indoor temperature. The projection lens is located on the side, allowing time to be projected onto a surface.

Slika 4.1: Podrobno view of the alarm clock's digital display.
4.2 Rear Controls and Connections
The back of the alarm clock houses the control buttons, battery compartment, and power adapter input.

Slika 4.2: Zadaj view showing buttons (SET, ALARM, +, -, WAVE), projection ON/OFF switch, alarm ON/OFF switch, battery compartment, and DC 4.5V power input.
5. Nastavitev
5.1 Namestitev baterije
- Odprite pokrov prostora za baterije na zadnji strani naprave.
- Insert 2 x 1.5V AAA batteries, ensuring correct polarity (+ and -).
- Trdno zaprite pokrov prostora za baterije.
5.2 Priključitev napajalnika
For continuous operation and permanent projection, connect the included 4.5V power adapter.
- Plug the small end of the power adapter into the DC 4.5V input jack on the back of the alarm clock.
- Drugi konec napajalnika priključite v standardno stensko vtičnico.
5.3 Začetna nastavitev
Upon first power-on (either with batteries or power adapter), the clock will attempt to synchronize with the radio-controlled time signal. This process may take a few minutes. If the signal is not received, you can set the time manually.
6. Navodila za uporabo
6.1 Time Setting (Radio-Controlled and Manual)
- Radijsko voden čas: The clock automatically attempts to receive the DCF-77 radio signal for accurate time. A signal icon on the display indicates reception status.
- Ročna nastavitev časa: If radio reception is poor, press and hold the 'SET' button to enter manual time setting mode. Use the '+' and '-' buttons to adjust hours, minutes, and other settings. Press 'SET' again to confirm each step.
- 12/24-urni format: During manual time setting, you can switch between 12-hour (with AM/PM indicator) and 24-hour formats.
- Nastavitev časovnega pasu: Adjust the time zone offset if needed, typically during manual setup.
6.2 Date and Weekday Display
The display shows the current date and weekday. The weekday can be displayed in 7 different languages. Refer to the manual setting section to cycle through language options.
6.3 Indoor Temperature Display
The alarm clock continuously displays the indoor temperature. Press the '°C/°F' button to switch between Celsius and Fahrenheit units.
6.4 Funkcija alarma
- Press the 'ALARM' button once to view trenutni čas alarma.
- Press and hold the 'ALARM' button to enter alarm setting mode. Use '+' and '-' to adjust the alarm hour and minute. Press 'ALARM' to confirm.
- Use the 'ALARM ON/OFF' switch on the back to activate or deactivate the alarm. An alarm icon will appear on the display when active.
6.5 Funkcija dremeža
When the alarm sounds, gently touch the top of the alarm clock (touch sensor area) to activate the snooze function. The alarm will pause for a preset duration (adjustable during alarm setup) and sound again later.
6.6 Aktivacija osvetlitve ozadja
The display backlight can be activated by gently touching the top of the alarm clock (touch sensor area). This provides temporary illumination for easy viewv slabih svetlobnih pogojih.
6.7 Funkcija projekcije
The WT 538 can project the time onto a wall or ceiling.
- Temporary Projection: Gently touch the top of the alarm clock (touch sensor area) to activate the projection temporarily.
- Permanent Projection: Permanent projection is only possible when the alarm clock is powered by the included 4.5V power adapter. Use the 'Projection ON/OFF' switch on the back of the device to enable continuous projection.
- Adjust the angle of the projection lens to achieve the desired position and focus.
7. Vzdrževanje
7.1 Čiščenje
Napravo obrišite z mehko, suho krpo. Ne uporabljajte abrazivnih čistil ali topil, saj lahko poškodujejo površino.
7.2 Zamenjava baterije
When the display dims or the device functions become unreliable, it is time to replace the batteries. Follow the battery installation steps in Section 5.1.
8. Odpravljanje težav
- Ni zaslona/naprave, ki se ne vklopi: Check battery polarity, ensure batteries are fresh, or verify the power adapter is correctly connected and plugged into a working outlet.
- Poor Radio Signal Reception: Move the alarm clock to a location away from electronic devices that may cause interference. Try different orientations.
- Projection Unclear/Out of Focus: Adjust the projection lens to focus the image. Ensure the projection surface is within the optimal range.
- Projection Not Permanent: Ensure the alarm clock is connected to the power adapter and the 'Projection ON' switch is activated. Permanent projection is not available when running on batteries alone.
- Alarm se ne oglasi: Check if the alarm is set correctly and the 'ALARM ON' switch is activated.
9. Specifikacije
| Funkcija | Specifikacija |
|---|---|
| Znamka | Tehnolinija |
| Model | Wt538 |
| Vrsta zaslona | Digitalno |
| Posebne lastnosti | Alarm, Calendar Display, Multiple Time Zones, Snooze, Silent Clock, Illuminated, Projection |
| Dimenzije izdelka (D x V x G) | 15 cm x 9 cm x 1.5 cm (with battery compartment: 4 cm) |
| Teža (vključno z baterijami) | 0.202 kg |
| Vir napajanja | 4.5V Power Adapter (included) or 2 x 1.5V AAA Batteries (included) |
| Vrsta namestitve | Namizna |
| Material okvirja | Akrilonitril butadien stiren |
| Območje merjenja temperature | -9.9 °C do 50 °C |
| Temperaturna ločljivost | 0.1 °F |
| Natančnost temperature | 0 °C to 40 °C: ± 1 °C; -9.9 °C to -0.1 °C: ± 2 °C; 40 °C to 50 °C: ± 2 °C |
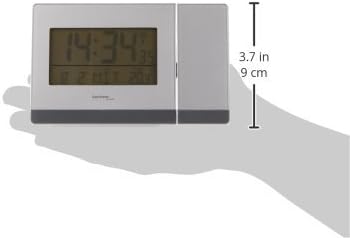
Slika 9.1: Stran view illustrating the dimensions of the alarm clock.
10. Garancija in podpora
Za informacije o garanciji ali tehnično podporo glejte dokumentacijo, ki je bila priložena nakupu, ali se obrnite na prodajalca. Shranite dokazilo o nakupu za morebitne garancijske zahtevke.