AirTies AIR-4920
Uporabniški priročnik za pametni ojačevalnik Wi-Fi AT&T Air 4920 Airties
Model: AIR-4920 | Brand: AirTies
1. Uvod in konecview
The AT&T Air 4920 Airties Smart Wi-Fi Extender is designed to expand the coverage and improve the signal strength of your existing Wi-Fi network. It creates a seamless mesh network, allowing your devices to automatically connect to the strongest Wi-Fi signal as you move around your home or office. This manual provides detailed instructions for setting up, operating, maintaining, and troubleshooting your Wi-Fi extender.

Slika 1: Spredaj view of the AT&T Air 4920 Airties Smart Wi-Fi Extender.
2. Vsebina paketa
Prosimo, preverite, ali so v vašem paketu vsi elementi:
- AT&T Air 4920 Airties Smart Wi-Fi Extender Unit
- Napajalni adapter
- Vodnik za hiter začetek (ta priročnik služi kot celovit vodnik)
3. Značilnosti in komponente izdelka
Familiarize yourself with the various ports, buttons, and indicator lights on your Wi-Fi Extender.

Slika 2: Spredaj in zadaj view of the Wi-Fi Extender with labeled components.
- 5 GHz Wi-Fi Indicator: Prikazuje stanje 5 GHz Wi-Fi pasu.
- 2.4 GHz Wi-Fi Indicator: Prikazuje stanje 2.4 GHz Wi-Fi pasu.
- Power Indicator / On/Off Button: Indicates power status. Can also be used to turn the device on/off.
- Gumb WPS: Used for Wi-Fi Protected Setup to quickly connect to your router.
- Gigabit Ethernet Ports (1 & 2): For wired connections to devices like computers, gaming consoles, or smart TVs.
- Stikalo za vklop/izklop: A physical switch to turn the device completely off or on.
- DC Power Input (12V): Priloženi napajalnik priključite tukaj.
- Gumb za ponastavitev: Used to restore the device to factory default settings. (Requires a paperclip or similar pointed object).
4. Navodila za namestitev
Follow these steps to set up your AT&T Air 4920 Wi-Fi Extender:
4.1 Začetna namestitev
For initial setup, place the Wi-Fi Extender near your AT&T gateway (router). Once paired, you can move it to a more central location in your home where Wi-Fi signal is weak.
4.2 Napajalni priključek
- Connect the provided power adapter to the DC Power Input (7) on the back of the extender.
- Priključite napajalnik v stensko vtičnico.
- Ensure the Power On/Off Switch (6) is in the 'On' position. The Power Indicator (3) should light up.
4.3 Pairing with Your AT&T Gateway (Router)
There are two primary methods for pairing:
Method A: Using WPS (Wi-Fi Protected Setup) - Recommended
- Pritisnite in držite WPS Button (4) on the front of the Wi-Fi Extender for 2-3 seconds until the indicator lights start blinking.
- V dveh minutah pritisnite Gumb WPS on your AT&T gateway (router). Refer to your gateway's manual for the exact location of its WPS button.
- Wait for the indicator lights on the extender (1, 2, and 3) to turn solid green, indicating a successful connection. This may take a few minutes as the extender updates its firmware and synchronizes with your gateway.
Method B: Using an Ethernet Cable (If WPS fails or is not preferred)
- Connect one end of an Ethernet cable (not included) to one of the Gigabit Ethernet Ports (5) on the back of the extender.
- Connect the other end of the Ethernet cable to an available LAN port on your AT&T gateway (router).
- The extender will automatically detect the connection and begin pairing. Wait for the indicator lights (1, 2, and 3) to turn solid green.
- Once paired, you can disconnect the Ethernet cable if you wish to use the extender wirelessly.
4.4 Optimalna postavitev
After successful pairing, unplug the extender and move it to a location roughly halfway between your AT&T gateway and the area where you need improved Wi-Fi coverage. Ensure the extender is placed in an open area, away from large metal objects, concrete walls, or other electronic devices that might cause interference. Plug it back into a power outlet. The indicator lights should turn solid green again, confirming a good connection.

Figure 3: The Wi-Fi Extender connected to its power adapter.
5. Operating Your Wi-Fi Extender
Once set up, the AT&T Air 4920 operates automatically to extend your Wi-Fi network. Your devices will seamlessly connect to the strongest signal, whether from your gateway or the extender, using your existing Wi-Fi network name (SSID) and password.
Stanje lučke indikatorja:
- Svetlo zeleno: Excellent connection and operation.
- Trdna jantarna/oranžna: Fair connection. Consider repositioning the extender closer to your gateway.
- Trdno rdeče: No connection or poor signal. Reposition the extender or check connections.
- Utripa: During WPS pairing or firmware update.
- Izklop: Naprava je izklopljena ali ne prejema napajanja.
Žične povezave:
You can connect wired devices (e.g., desktop computers, smart TVs, gaming consoles) to the Gigabit Ethernet Ports (5) on the back of the extender for a stable, high-speed connection.
6. Vzdrževanje
To ensure optimal performance and longevity of your Wi-Fi Extender:
- Čiščenje: Zunanjost nežno obrišite z mehko, suho krpo. Ne uporabljajte tekočih čistil ali aerosolov.
- Prezračevanje: Prepričajte se, da prezračevalne reže niso blokirane, da preprečite pregrevanje.
- Posodobitve vdelane programske opreme: The extender typically receives automatic firmware updates from AT&T. Ensure it remains connected to power and your network for these updates to occur.
- Cikel moči: If you experience minor issues, try unplugging the extender from the power outlet for 10 seconds and then plugging it back in.
7. Odpravljanje težav
If you encounter issues with your Wi-Fi Extender, refer to the following common problems and solutions:
| Težava | Možen vzrok | rešitev |
|---|---|---|
| Extender lights are off. | Brez moči. | Ensure the power adapter is securely connected and plugged into a working outlet. Check the Power On/Off Switch (6). |
| Indicator lights are red or amber. | Poor or no connection to the gateway. |
|
| Wi-Fi signal is still weak in extended areas. | Suboptimal placement. | Move the extender to a more central location between your gateway and the weak signal area. Avoid placing it in corners or behind furniture. |
| Devices not connecting to the extender. | Extender not properly paired or network issues. |
|
| Need to reset to factory settings. | Configuration issues or preparing for new setup. | With the extender powered on, use a paperclip or similar pointed object to press and hold the Gumb za ponastavitev (8) for about 10 seconds until the lights flash. The extender will restart with factory defaults. |
8. Specifikacije
| Funkcija | Podrobnost |
|---|---|
| Številka modela | AIR-4920 |
| Mere izdelka (V x Š x G) | 3.94 x 4.27 x 1.63 palcev (približno) |
| Teža predmeta | 15 unč |
| Standard brezžične komunikacije | 802.11ac |
| Hitrost prenosa podatkov | Do 1000 megabitov na sekundo |
| Vrsta priključka | RJ45 (Ethernet) |
| barva | Bela |
| Proizvajalec | AirTies |
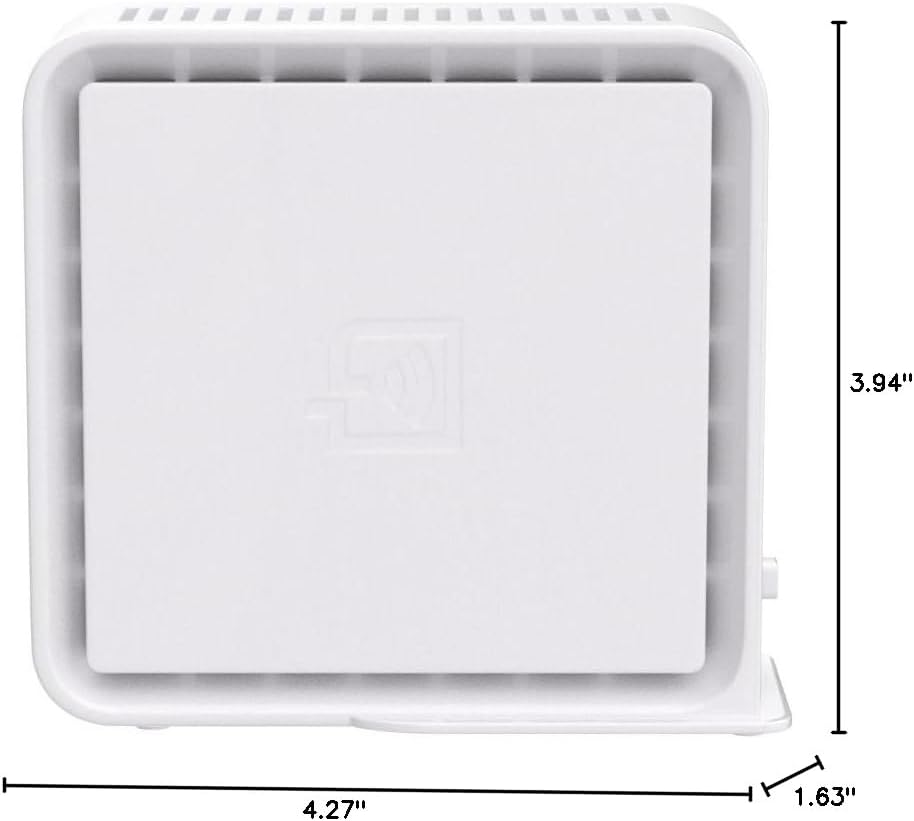
Figure 4: Approximate dimensions of the Wi-Fi Extender.
Ask a question about this manual
Ask about setup, troubleshooting, compatibility, parts, safety, or missing instructions. Manuals+ will review the question and use this page’s manual context to help answer it.