
1. Uvod
This manual provides detailed instructions for the installation, operation, and maintenance of your ASRock AB350M-HDV MicroATX Motherboard. The ASRock AB350M-HDV is designed to support AMD Socket AM4 A-Series APUs (Bristol Ridge) and Ryzen Series CPUs (Summit Ridge), featuring a Digi Power design and 7 Power Phase design for stable performance. It supports DDR4 memory and offers various connectivity options including SATA3, USB 3.0, and an Ultra M.2 slot.
2. Izdelek je končanview
The ASRock AB350M-HDV motherboard is a MicroATX form factor board, ideal for compact PC builds. It features essential components for a modern computing system.

Slika 2.1: Pod kotom view of the ASRock AB350M-HDV Motherboard, showcasing its compact MicroATX design and various components.
Ključne značilnosti:
- Supports AMD Socket AM4 A-Series APUs (Bristol Ridge) and Ryzen Series CPUs (Summit Ridge).
- DDR4 memory support up to 3200+ (OC) for Ryzen CPUs and 2400 for A-series APUs.
- 1 PCIe 3.0 x16 slot and 1 PCIe 2.0 x1 slot for expansion cards.
- 4 SATA3 ports and 1 Ultra M.2 (PCIe Gen3 x4 & SATA3) slot for storage.
- 6 USB 3.0 ports (2 front, 4 rear) and 2 USB 2.0 ports for peripheral connectivity.
- Integrated Gigabit Ethernet for network connectivity.
- Video outputs: VGA, DVI, HDMI.

Slika 2.2: Od zgoraj navzdol view of the ASRock AB350M-HDV Motherboard, highlighting the CPU socket, RAM slots, M.2 slot, and PCIe slots.
3. Nastavitev in namestitev
Follow these steps carefully to install your ASRock AB350M-HDV motherboard and its components.
3.1 Namestitev procesorja
- Na matični plošči poiščite vtičnico za procesor AM4.
- Dvignite ročico za obremenitev na strani vtičnice.
- Poravnajte trikotno oznako na procesorju z ustrezno oznako na podnožju. Previdno namestite procesor v podnožje, ne da bi ga silili.
- Spustite ročico za nalaganje, da pritrdite procesor.
- Namestite hladilnik procesorja v skladu z navodili proizvajalca.
3.2 RAM (Memory) Installation
- Locate the DDR4 DIMM slots. This motherboard has 4 slots.
- Odprite sponke na obeh koncih reže DIMM.
- Poravnajte zarezo na modulu RAM s ključem v reži DIMM.
- Insert the RAM module firmly into the slot until the clips snap into place. Ensure both clips are closed.
3.3 Namestitev pomnilniške naprave (SATA in M.2)
SATA pogoni:
- En konec podatkovnega kabla SATA priključite na vrata SATA3 na matični plošči.
- Drugi konec podatkovnega kabla SATA priključite na trdi disk ali SSD.
- Priključite napajalni kabel SATA iz napajalnika (PSU) na napravo za shranjevanje.
M.2 SSD:
- Locate the Ultra M.2 slot on the motherboard.
- Odstranite vijak M.2 in distančnik iz reže.
- Vstavite pogon M.2 SSD v režo pod kotom 30 stopinj.
- Push the M.2 SSD down and secure it with the screw and standoff.
3.4 Napajalni priključki
- 24-pinski ATX napajalni priključek iz napajalnika priključite na 24-pinski napajalni priključek na matični plošči.
- Connect the 8-pin (or 4-pin) ATX 12V power connector from your PSU to the corresponding socket near the CPU.
3.5 Priključki sprednje plošče
Connect the cables from your PC case (Power Button, Reset Button, HDD LED, Power LED, USB, Audio) to the corresponding headers on the motherboard. Refer to the motherboard layout diagram in your physical manual for exact header locations.
3.6 Namestitev grafične kartice
- Poiščite režo PCIe 3.0 x16.
- Odstranite ustrezni pokrov razširitvene reže z ohišja računalnika.
- Align the graphics card with the PCIe slot and press it down firmly until it clicks into place.
- Grafično kartico pritrdite na ohišje z vijakom.
- Connect any required PCIe power cables from your PSU to the graphics card.
4. Navodila za uporabo
4.1 Prvi zagon in nastavitev BIOS-a/UEFI-ja
- Ko sestavite vse komponente, priključite monitor, tipkovnico in miško.
- Vklopite sistem.
- Med zagonom večkrat pritisnite DEL or F2 tipko za vstop v orodje za nastavitev BIOS/UEFI.
- In the BIOS, you can configure boot order, system time, and other advanced settings. Save changes and exit to boot into your operating system installation media.
4.2 Namestitev gonilnika
After installing your operating system, install the necessary drivers for the motherboard components. These typically include chipset drivers, audio drivers, LAN drivers, and any specific utility drivers. Drivers can be found on the ASRock official webspletno mesto za vaš specifični model matične plošče.
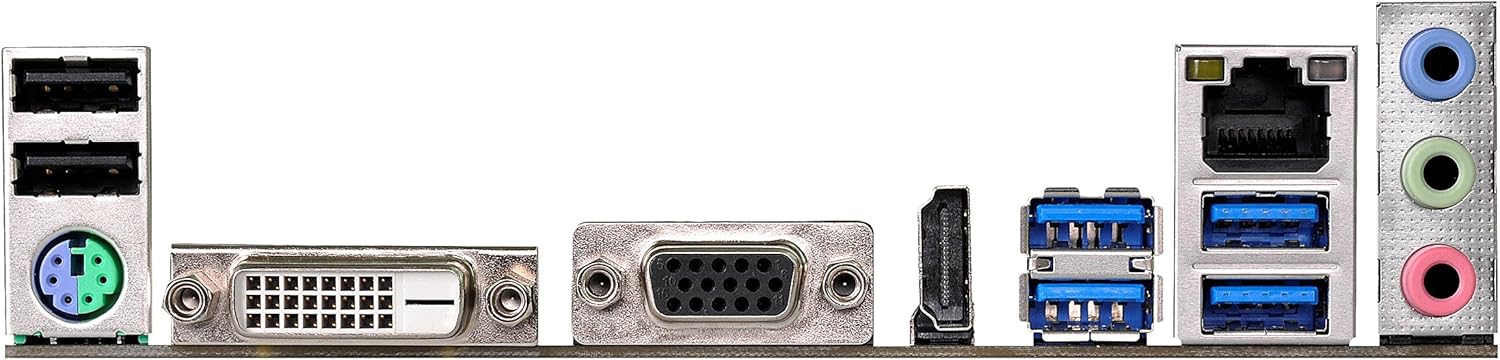
Figure 4.1: Rear I/O panel of the ASRock AB350M-HDV Motherboard, showing USB ports, video outputs (VGA, DVI, HDMI), LAN port, and audio jacks.
5. Vzdrževanje
Pravilno vzdrževanje zagotavlja dolgo življenjsko dobo in optimalno delovanje vaše matične plošče.
5.1 Čiščenje
- S stisnjenim zrakom redno čistite prah z matične plošče in komponent.
- Pred čiščenjem se prepričajte, da je sistem izklopljen in izklopljen iz električnega omrežja.
- Izogibajte se uporabi tekočih čistil neposredno na komponentah.
5.2 Posodobitve BIOS-a/UEFI-ja
Občasno preverite ASRock website for BIOS/UEFI updates. Updates can improve compatibility, stability, and performance. Follow the instructions provided by ASRock carefully when performing a BIOS update to avoid system damage.
6. Odpravljanje težav
V tem razdelku so rešitve za pogoste težave, na katere lahko naletite.
6.1 Ni napajanja / Ni POST-a (samodejni preizkus ob vklopu)
- Preverite napajalne povezave: Ensure the 24-pin and 8-pin (or 4-pin) CPU power connectors are securely seated.
- Preverite napajalnik: Test your power supply unit (PSU) to ensure it is functional and providing adequate power.
- Ponovno namestite komponente: Remove and re-install the CPU, RAM, and graphics card to ensure they are properly seated.
- Počisti CMOS: Refer to your physical manual for instructions on how to clear the CMOS (Complementary Metal-Oxide-Semiconductor) settings, which can resolve boot issues.
6.2 Ni izhoda za prikaz
- Povezava monitorja: Ensure your monitor is correctly connected to the graphics card or motherboard (if using an APU with integrated graphics).
- Grafična kartica: If using a dedicated graphics card, ensure it is properly installed and has sufficient power. Test with another graphics card if possible.
- APU Compatibility: If using an AMD A-Series APU, ensure your monitor is connected to the motherboard's video outputs (VGA, DVI, HDMI). Ryzen CPUs without integrated graphics require a dedicated graphics card.
6.3 Operacijski sistem se ne zažene
- Vrstni red zagona: Check the BIOS/UEFI settings to ensure the correct boot device (e.g., SSD/HDD with OS) is prioritized.
- Naprava za shranjevanje: Verify that your storage device is detected in the BIOS.
- OS Installation: If the OS is newly installed, ensure the installation process completed successfully.
7. Specifikacije
| Znamka | ASRock |
| Ime modela | AB350M-HDV |
| CPU vtičnica | Vtičnica AM4 |
| Vrsta čipseta | AMD Promontory B350 |
| Združljivi procesorji | AMD A-Series APUs (Bristol Ridge), Ryzen Series CPUs (Summit Ridge) |
| Tehnologija pomnilnika RAM | DDR4 |
| Hitrost ure pomnilnika | 2133 MHz (Base), up to 3200+ (OC) for Ryzen CPU |
| Na voljo pomnilniške reže | 4 |
| Vmesnik grafične kartice | PCI Express (1x PCIe 3.0 x16, 1x PCIe 2.0 x1) |
| Total SATA Ports | 4 (SATA3) |
| M.2 reža | 1 (Ultra M.2, PCIe Gen3 x4 & SATA3) |
| Skupno število vrat USB | 8 (6x USB 3.0, 2x USB 2.0) |
| Video izhodi | VGA, DVI, HDMI |
| Tip glavnega napajalnega priključka | 24-pinski ATX |
| Faktor oblike | MicroATX |
| Teža predmeta | 1.3 funta |
8. Informacije o garanciji
The ASRock AB350M-HDV Motherboard comes with a 1 leta garancije. For specific terms and conditions, please refer to the warranty card included with your product or visit the official ASRock webmesto.
9. Podpora
For further assistance, technical support, or driver downloads, please visit the official ASRock webspletno mesto:
You can also find contact information for customer service and support resources on their webmesto.