
1. Uvod
This manual provides essential information for the safe and efficient operation of your KitchenAid 5KMT223GER 2-Slot Automatic Toaster. Please read all instructions carefully before first use and retain for future reference.

Slika 1.1: Spredaj view of the KitchenAid 5KMT223GER 2-Slot Automatic Toaster.
2. Pomembna varnostna navodila
Pri uporabi električnih naprav je treba vedno upoštevati osnovne varnostne ukrepe, vključno z naslednjimi:
- Preberite vsa navodila.
- Ne dotikajte se vročih površin. Uporabite ročaje ali gumbe.
- Za zaščito pred električnim udarom ne potapljajte kabla, vtičev ali opekača kruha v vodo ali drugo tekočino.
- Potreben je natančen nadzor, kadar katero koli napravo uporabljajo otroci ali v njeni bližini.
- Izvlecite vtič iz vtičnice, ko ga ne uporabljate in pred čiščenjem. Pustite, da se ohladi, preden nadenete ali snamete dele.
- Ne uporabljajte naprave s poškodovanim kablom ali vtičem, ali če naprava ne deluje pravilno, je padla ali je kakor koli poškodovana. Napravo vrnite v najbližji pooblaščeni servisni center na pregled, popravilo ali nastavitev.
- Uporaba dodatkov, ki jih proizvajalec aparata ne priporoča, lahko povzroči poškodbe.
- Ne uporabljajte na prostem.
- Kabel ne sme viseti čez rob mize ali pulta ali se dotikati vročih površin.
- Ne postavljajte na ali blizu vročega plinskega ali električnega gorilnika ali v segreto pečico.
- Za izklop izklopite kateri koli gumb in nato izvlecite vtič iz stenske vtičnice.
- Naprave ne uporabljajte za namene, ki niso predvideni.
- V opekač ne smete vstavljati prevelikih živil, embalaže iz kovinske folije ali pripomočkov, ker lahko povzročijo požar ali električni udar.
- Če so opekači med delovanjem pokriti ali se dotikajo vnetljivega materiala, vključno z zavesami, draperijami, stenami in podobnim, lahko pride do požara.
- Ne poskušajte odstraniti hrane, ko je opekač kruha priključen.
- Ne upravljajte brez nadzora.
- Always remove the crumb tray for cleaning. Do not operate the toaster without the crumb tray in place.
3. Deli in funkcije
Familiarize yourself with the components of your KitchenAid 2-Slot Automatic Toaster:
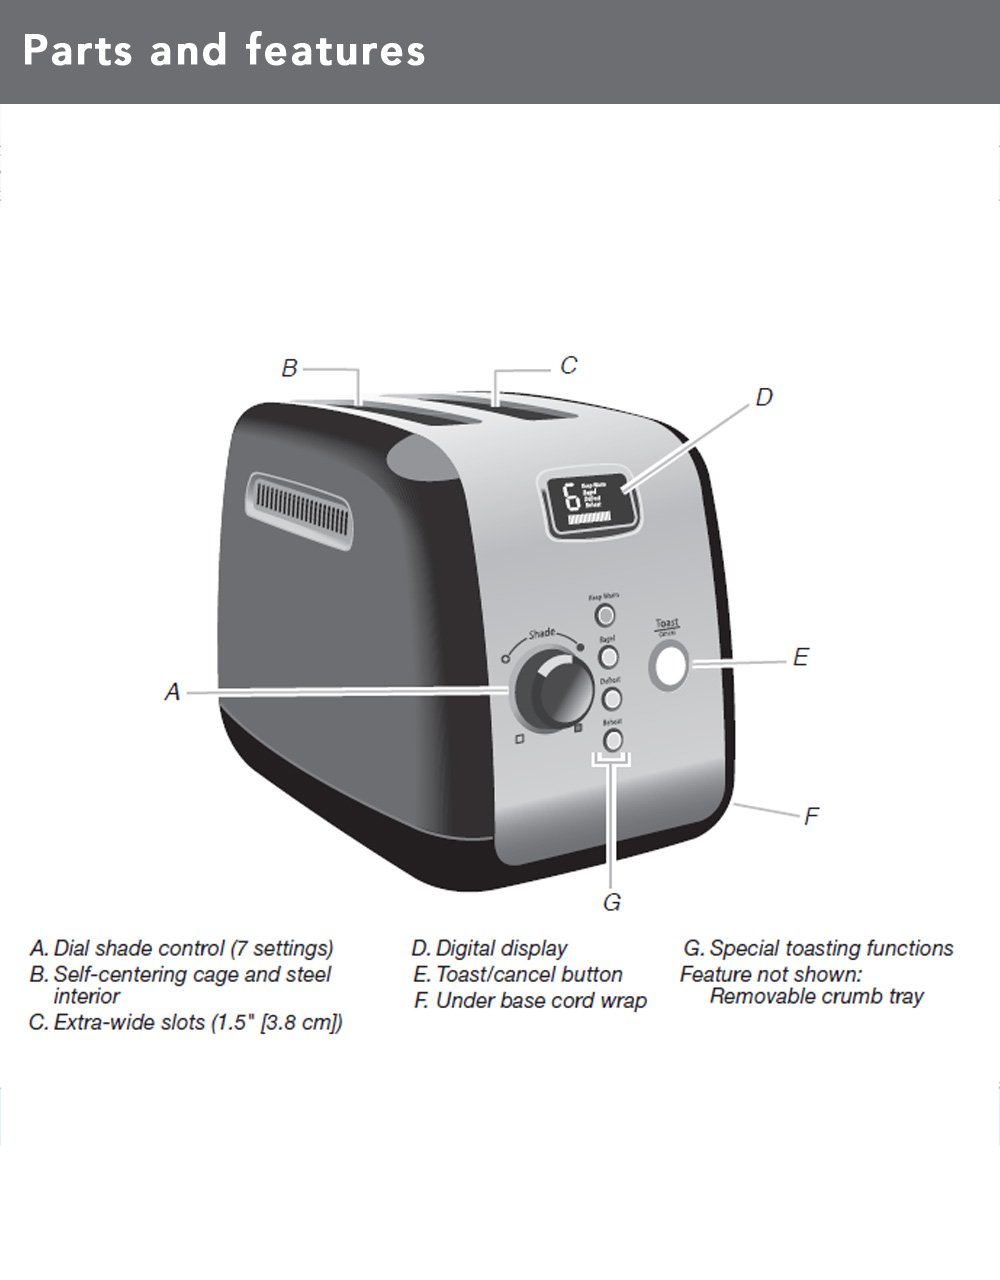
Image 3.1: Diagram illustrating the main parts and features of the toaster.
- Shade Control Dial (A): Adjusts the browning level with 7 settings.
- Self-Centering Bread Racks (B): Automatically centers bread for even toasting.
- Extra-Wide Slots (C): 3.8 cm (1.5 inches) wide slots accommodate various bread types.
- Digital Display (D): Shows selected shade setting and a countdown timer for toasting progress.
- Toast/Cancel Button (E): Initiates or cancels the toasting cycle. Features motorized lift.
- Under Base Cord Wrap (F): Za priročno shranjevanje kabla.
- Special Toasting Functions (G): Includes Keep Warm, Bagel, Defrost, and Reheat buttons.
- Odstranljiv pladenj za drobtine: Located at the back for easy cleaning (not shown in diagram).
4. Nastavitev
Before using your toaster for the first time:
- Razpakirajte toaster in odstranite vso embalažo.
- Obrišite zunanjost toasterja z oglasomamp krpo. Preden priključite v vtičnico, se prepričajte, da je popolnoma suha.
- Place the toaster on a stable, flat, heat-resistant surface, away from flammable materials.
- Ensure the crumb tray is properly inserted at the back of the toaster.
- Pred prvo uporabo opekač kruha vklopite brez kruha na najvišji stopnji sence (7), da sežgejo morebitni ostanki izdelave. Prisoten je lahko rahel vonj ali dim; to je normalno. Pustite, da se opekač popolnoma ohladi.
5. Navodila za uporabo
Follow these steps to toast bread and use the special functions:

Image 5.1: Bread slices inserted into the toaster's extra-wide slots.
5.1 Osnovno praženje
- Plug the toaster into a grounded electrical outlet.
- Place bread slices into the toasting slots. The self-centering racks will automatically adjust.
- Obrnite Gumb za nadzor senčil to select your desired browning level (1 for lightest, 7 for darkest). The digital display will show the selected shade.
- Pritisnite Toast/Cancel Button. The motorized lift will lower the bread into the slots, and the toasting cycle will begin. The digital display will show a countdown.
- Once the cycle is complete, the toaster will automatically raise the toasted bread.
- Če želite kadar koli prekiniti cikel opekanja, pritisnite Toast/Cancel Button. The bread will be raised.
5.2 Posebne funkcije
Your toaster includes dedicated buttons for specialized toasting needs:
- OHRANI NA TOPLO: Press this button after a toasting cycle to keep toasted food warm for up to one minute. The toaster will gently lower and raise the bread after the warming period.
- BAGEL: This function toasts the cut-side of a bagel while gently warming the outer surfaces. Insert bagels with the cut side facing inwards. Select your desired shade, then press the BAGEL gumb, ki mu sledi Toast/Cancel Button.
- ODMRZEVANJE: Use this function to defrost and toast frozen food. Select your desired shade, then press the ODMRZEVANJE gumb, ki mu sledi Toast/Cancel Button. The toaster will automatically adjust the toasting time.
- OGREVANJE: This function quickly reheats previously toasted food without further browning. Press the OGREVANJE gumb, ki mu sledi Toast/Cancel Button.
6. Čiščenje in vzdrževanje
Redno čiščenje zagotavlja optimalno delovanje in podaljšuje življenjsko dobo vašega opekača kruha.
6.1 Pladenj za drobtine

Image 6.1: The removable crumb tray for easy cleaning.
- Pred čiščenjem vedno izključite opekač kruha iz električnega omrežja in ga pustite, da se popolnoma ohladi.
- Pull out the removable crumb tray located at the back of the toaster.
- Discard crumbs. The crumb tray can be washed in the top rack of a dishwasher or by hand with warm, soapy water. Rinse thoroughly and dry completely before reinserting.
- Never operate the toaster without the crumb tray properly inserted.
6.2 Zunanjost
- Obrišite zunanjost toasterja z oglasomamp krpo in temeljito posušite.
- Ne uporabljajte abrazivnih čistil ali grobih gobic, saj lahko opraskajo površino.
- Opekača kruha nikoli ne potapljajte v vodo ali katero koli drugo tekočino.
7. Odpravljanje težav
If you experience issues with your toaster, refer to the following table for common problems and solutions:
| Težava | Možen vzrok | rešitev |
|---|---|---|
| Opekač kruha se ne vklopi. | Ni priključeno; napajanje izklopljenotage; odklopnik se je sprožil. | Prepričajte se, da je opekač kruha varno priključen v delujočo vtičnico. Preverite gospodinjsko varovalko. |
| Bread does not lower or raise. | Toaster not powered; Toast/Cancel button not pressed; food jammed. | Ensure power is on. Press Toast/Cancel button. Unplug toaster and carefully remove any jammed food. |
| Neenakomerno opekanje. | Neenakomerna debelina kruha; nabiranje drobtin. | Ensure bread slices are of similar thickness. Clean crumb tray regularly. |
| Vonj po dimu ali zažganem. | Food jammed; crumb buildup; high shade setting. | Immediately press Cancel. Unplug and allow to cool. Remove jammed food or clean crumb tray. Reduce shade setting for next use. |
If the problem persists after attempting these solutions, please contact KitchenAid customer support.
8. Specifikacije
| Funkcija | Podrobnost |
|---|---|
| Številka modela | 5KMT223GER |
| Wattage | 1100 vatov |
| voltage | 220 volta |
| Slot Count | 2 |
| Nastavitve senc | 7 |
| Posebne funkcije | Keep Warm, Bagel, Defrost, Reheat, Cancel |
| Material | Kovina |
| Mere izdelka (D x Š x V) | 25 G x 34 Š x 25.5 V centimetrov |
| Teža predmeta | 2200 gramov |
| Vključene komponente | Pop-up Toaster, Removable Crumb Tray |
9. Garancija in podpora
Your KitchenAid 5KMT223GER 2-Slot Automatic Toaster is covered by a 2-letna omejena garancija od datuma nakupa. Ta garancija krije napake v materialu in izdelavi pri običajni gospodinjski uporabi.
For warranty service, technical support, or to order replacement parts, please contact KitchenAid customer service. Keep your purchase receipt as proof of purchase for warranty claims.